background image

52

File Erasing

This section explains how to erase recorded files. You may erase one file at a time, or you
may erase all files at one time.

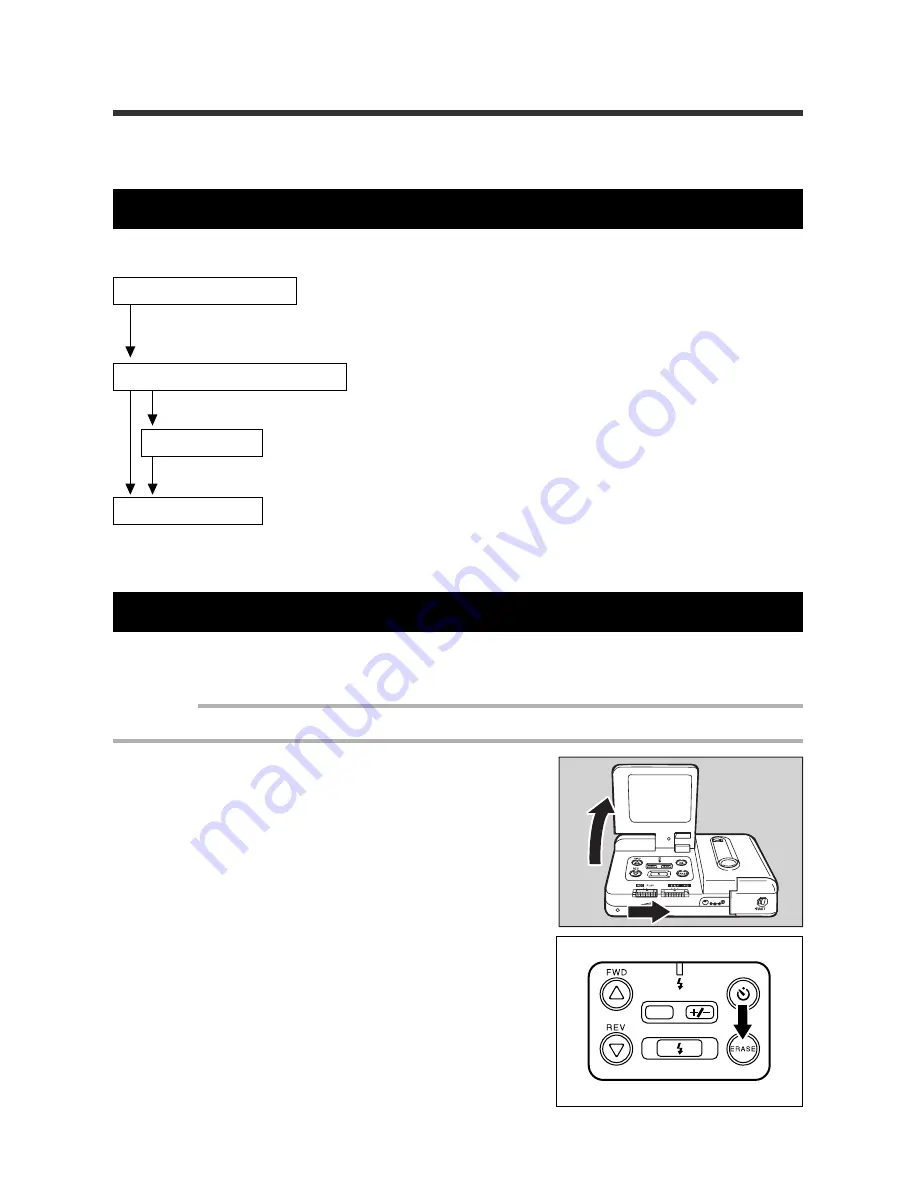
Operation Flow

The following is the basic explanation of how to erase a file.

Turn the power on.

Open the LCD monitor and set the REC(ord)/PLAY switch to PLAY. Press the
ERASE.

Select the erase method.

Choose to erase either a single file or all files.

Select a file.

Select a file to be erased, or erase all files

Erase the file.

See pages 52 - 53 for information on erasing one file.
See page 54 for information on erasing all files.

Erasing One File

The following steps explain how to erase a specific file.

Important
• An erased file cannot be restored. Carefully confirm the contents of a file before erasing it.

q

Open the LCD monitor, then set the
REC(ord)/PLAY switch to PLAY.

w

Press the ERASE button.

DATE

Содержание ESP 2

Страница 1: ... Batteries 17 Inserting a Lithium Battery 19 Using AC Power 21 Before You Begin Recording 22 Adjusting the Date and Time 22 Adjusting the LCD 24 Holding the Camera 24 Chapter 2 Recording Basics Taking Pictures 28 Picture taking Sequence 28 Turning on the Power 28 Selecting the Image Quality 29 Taking Pictures 30 Exposure Compensation 32 Chapter 3 Picture Taking Applications Flash Mode 36 Selecting...

Страница 2: ...g 52 Operation Flow 52 Erasing One File 52 Erasing All Files 54 Chapter 5 Additional Information Changing a Camera Setting 56 Setting the Auto Power Off mode 56 Setting the Power Saving Mode 57 Saving Your Settings 58 Returning the settings to the Original Position 59 System Configuration Figure 60 Accessories for ESP2 62 Computer and DC Connections 63 Handling Precautions 66 Caring for Your Digit...

Страница 3: ...ervice in other coun tries Radio frequency interference Using the digital camera near electric devices could inhibit the performance of both the camera and nearby devices Interference is likely to occur when the camera is placed near a radio or television If this condition occurs perform the following procedures Relocate the camera as far as possible from the interference source Change the orienta...

Страница 4: ...e feature to place the subject in natural color regardless of the lighting conditions Close up shooting You may approach a subject as close as a distance of 1 cm This is called Macro Shoot ing and is appropriate for pictures of flowers insects or other detailed subjects Monitoring on a TV A recorded file may be viewed on a TV by connecting the video cable Dubbing to a video cassette tape and print...

Страница 5: ...mes Camera main unit Top Lens Self timer light Release button Macro dial Wrist strap eyelet LCD monitor Flash sensor reception window Flash Remote control reception Bottom Clock Battery compartment Tripod screw hole ...

Страница 6: ...erminal DC IN 5 V Operation panel LCD monitor Terminal cover RS232C AUX terminal Reset button VIDEO OUT terminal Operation panel DATE DATE button Flash LED Self Timer button Erase button Flash button exposure com pensation button FWD button REV button Connection cable AC adaptor not supplied AY3140 100V to 240V Power cord ...

Страница 7: ...nd time display The date and time that the image was shot appears here Playback data display The number of the current file and the number of available file are displayed Note All data is displayed in this figure However only the necessary data is displayed When the LCD monitor is opened if no camera operations button or switch operations are performed for more than approximately five minutes the ...

Страница 8: ...s are depleted Re place or recharge the batteries The clock battery is depleted or the clock battery is not set Replace or insert a new batteries The file is lost or damaged Record the image again the data that was recorded at this time may not be played back correctly If the error message is still displayed turn on the power again or press the Reset button The erase operation was not performed co...

Страница 9: ...on for more than two seconds e Press the FWD U button or the REV T button to change the information Each time the DATE button is pressed the next position starts flashing Press the DATE button repeatedly to set in order the year month date hour and minute When the selected date or time area is flash ing press the U button or the T button to set the correct numbers r Start the clock When the inform...

Страница 10: ...d slide the REC ord PLAY switch to the REC position w Press the Flash button and select Flash Off Forced Flash or Auto Flash no sym bol e While viewing the LCD monitor position the camera to frame the subject then press the Release button to take the picture Changing the Flash Mode Pages 36 39 q Open the LCD monitor and set the REC ord PLAY switch to REC w Press the Self Timer button The Self Time...

Страница 11: ... 52 54 e To erase one file press the U U U U U and T T T T T buttons to select ERASE then press the Release button Press the U U U U U and T T T T T buttons to select the file to be erased Press the Release but ton be consistent Repeat as desired e To erase all the files press the U U U U U and T T T T T but tons to select ERASE ALL then Press the RELEASE button to erase all files Or press the Era...

Страница 12: ...rning Turn off the power immediately if a fire odor or other abnormal condition is observed Remove the batteries carefully being care ful to avoid electrical shock or burning When the power is supplied by an electrical outlet always remove the electrical plug from the wall outlet to avoid fire or shock Contact your nearest service rep resentative Do not use this equipment when it is damaged or is ...

Страница 13: ... and do not attempt to disassemble heat or recharge the batteries Only Nickel Cadmium or nickel metal hydride NiMH batteries can be recharged Doing so may damage the batteries and cause a fire injury or environmental contamination Do not use batteries incorrectly do not use batteries of a different type or name do not use batteries of a different manufacturer and do not mix old and new batteries B...

Страница 14: ...his may cause fire or electrical shock Do not use the unit near flammable gas gasoline benzene thin ner etc This may cause an explosion fire or burns Do not use the camera in an airplane or other location where us age is restricted Using the camera in these locations may result in an accident When dust accumulates on the electrical plug wipe it off thoroughly The dust may cause a fire When using a...

Страница 15: ...ged securely into the wall Do not get the camera wet Do not touch the camera with wet hands This may cause an electrical shock Do not point the flash unit at the driver of a car bicycle or train This may cause an accident To prevent fire and shock do not use metal objects such as a twee zers to grasp the batteries This may cause a short circuit Special Products When using products that are optiona...

Страница 16: ...14 ...

Страница 17: ...g the Package Contents 16 Attaching the Wrist Strap 16 Supplying Power to the Camera 17 Inserting Batteries 17 Inserting a Lithium Battery 19 Using AC Power 21 Before You Begin Recording 22 Adjusting the Date and Time 22 Adjusting the LCD 24 Holding the Camera 24 ...

Страница 18: ...e Four AA Alkaline Batteries Lithium battery CR2025 Wrist Strap Instructions for use Warranty Card Attaching the Wrist Strap For security always use the wrist strap when carrying the camera q To attach the wrist strap pull the leading end of the strap through the wrist strap eyelet on the camera then pull then re mainder of the strap through the looped end of the strap as shown Important Avoid swi...

Страница 19: ...teries in a fire do not short circuit the ter minals and do not attempt to disassemble heat or recharge the batteries Only Nickel Cadmium or nickel metal hydride NiMH bat teries can be recharged Doing so may damage the batteries and cause a fire injury or environmental contamination Do not use batteries incorrectly do not use batteries of a different type or name do not use batteries of a differen...

Страница 20: ...Important Use only specified AA type batteries Never use manganese batteries or any other type of battery that is not specifically recommended Use of such batteries may damage the camera or LCD monitor Some batteries may become hot after a long period of use Remove the batteries after they have cooled q Close the LCD monitor then press slide the lever to open the battery compartment Note See Turni...

Страница 21: ...ydride batteries the time between light ing of the battery symbol and complete depletion of the batteries is shorter than when alka line batteries are used The batteries run out quickly after the symbol lights Safety Precautions Do not use damaged batteries or batteries that are almost depleted Do not subject the batteries to strong impact Inserting a Lithium Battery The lithium battery CR2025 mai...

Страница 22: ...poles and negative poles when inserting the batteries r Close the battery tray Note The battery symbol appears in the LCD monitor to indicate that the lithium battery is worn out or is not inserted Replace or insert the battery Safety Precautions The lithium battery CR2025 maintains the date and time Battery life is approximately one year To prevent imperfect contact wipe off the battery with a dr...

Страница 23: ...daptor to the DC IN 5 V jack of the camera e Insert the plug into an electrical outlet Note When the AC adaptor is used with the camera it becomes the active power source even when the batteries are installed in the camera Important Plug the power cord firmly into the power source and into the camera If the power plug or con necting cable loosens during recording data could be lost or damaged When...

Страница 24: ...lowing order year month day The camera uses a 24 hour clock where 00 00 indicates midnight and 12 00 indicates noon q Open the LCD monitor Note The REC ord PLAY switch can be set to either REC or PLAY w Press and hold the DATE button for more than two seconds e Press the U U U U U button or the T T T T T button to change the flashing number the year for example To increase the number Press the U b...

Страница 25: ...s press the DATE button again The clock starts and the display reappears on the LCD monitor Note The current date and time will be displayed only when in the RECORD mode Press the DATE button repeatedly to display the date and time on the LCD monitor When the REC ord PLAY switch is set to REC The current date and time will appear on the LCD monitor When the REC ord PLAY switch is set to PLAY the d...

Страница 26: ...e left w Adjust the LCD monitor toward you or away from you to obtain the optimal angle The LCD monitor can be adjusted between 60 and 140 Holding the Camera Moving the camera during picture taking will result in blurred pictures For best results hold the camera steady when pressing the Release button q Securely hold the camera with both hands hold your elbows lightly against your side Point the c...

Страница 27: ...m the Release button then press the button too fast the camera may shake and a blurred picture may result Note Hold the camera vertically for a more vertical image The image will appear vertically on the LCD monitor Be sure to keep your fingers and the wrist strap away from the camera lens and the flash window ...

Страница 28: ...26 ...

Страница 29: ...Chapter 2 Recording Basics Taking Pictures 28 Picture taking Sequence 28 Turning on the Power 28 Selecting the Image Quality 29 Taking Pictures 30 Exposure Compensation 32 ...

Страница 30: ...y of either E N or F Economy Normal or Fine See page 29 Take the picture Press the Release button to record the image See page 30 Turning on the Power The power is turned on by opening the LCD monitor approximately 60 q Open the LCD monitor then set the REC ord PLAY switch to REC The lens cover opens and the power is turns on Note When the power is turned on the Recording Data Display and the Flas...

Страница 31: ... are saved See Saving Your Settings on page 58 for further details Selecting the Image Quality This digital camera uses compression and decompression schemes to record a large amount of information N Normal mode is standard F Fine mode improves picture quality and E Economy mode allows you to record and store more images You may change the image quality for each image The number of pixels is set t...

Страница 32: ... needed to record images Note See Holding the Camera on page 24 q Look at the LCD monitor and position the camera to compose the image Use the macro mode to take pictures of subjects at distances from 1 to 60 cm Note See Macro Shooting on page 45 w Press the Release button lightly so that it is halfway down The Release button has two steps Messages are displayed if the button is pressed halfway do...

Страница 33: ...ime Tip If no operation is performed for five minutes or longer while the power is on the Auto Power Off function dims the LCD monitor to save power Turn off the Auto Power Off function if a certain amount of time is required until a picture can be taken Prepare a spare set of batteries the batteries may be worn out if they are used for a long time Connect an optional AC adaptor to use the camera ...

Страница 34: ...er of the shooting range the camera cannot determine the backlit conditions Shooting images that are too light When shooting an image that is too light the entire image is underexposed The image is recorded too dark light colored subjects are recorded in a grayish tone In this case increase the value positive compensation to adjust the exposure Shooting images that are too dark When shooting an im...

Страница 35: ...ss the button again Important About the exposure compensation qTo confirm the effect of the exposure compensation on the recorded image watch the image on the LCD monitor after the picture is taken or play back the image wThe exposure compensation value is retained in memory even when the exposure compensation setting is released However the exposure compensation setting only affects the images re...

Страница 36: ...34 ...

Страница 37: ...ode 36 Flash Off Mode 37 Forced Flash Mode 38 Auto Flash Mode 39 Setting the White Balance Mode 40 Selecting a White Balance Mode 40 Daylight Mode 41 Fluorescent Mode 42 Tungsten Light Mode 43 Special Functions 44 Using the Self Timer 44 Macro Shooting Close up Shooting 45 ...

Страница 38: ...pt when the White Balance Mode is set to AUTO mode Perform the operations after changing the White Balance Mode to AUTO See Setting the White Balance Mode on page 40 When performing Macro Shooting the Flash Off mode is set The flash mode cannot be changed The light from the flash appears red in the picture if the flash discharges on the subject at a distance less than the minimum distance approxim...

Страница 39: ...taking a picture q Press the FLASH button until the sym bol appears on the LCD monitor w Press the Release button The camera will take a picture without the flash discharging Important In dim light the camera s shutter speed is automatically reduced The message SLOW SHUT TER CHECK FLASH MODE will appear To prevent a blurred picture steadily hold the camera or stabilize the camera with a tripod Can...

Страница 40: ... FLASH LED will light when the Release but ton is pressed lightly Note The flash LED flashes while the flash is charging a picture cannot be taken at this time w Press the RELEASE button The camera will take a picture with the flash Canceling the Mode Press the FLASH button repeatedly to select another mode Flash Distance The recommended shooting range is approximately 0 6 m to 3 0 m if the flash ...

Страница 41: ...h will operate Note The flash LED flashes while the flash is recharging A photo cannot be taken at this time w Press the Release button The flash will discharge automatically in dark lo cations or in backlighting Canceling the Mode Press the FLASH button repeatedly to select another mode Flash Distance The recommended shooting range is approximately 0 6 m to 3 0 m if the flash is used If the flash...

Страница 42: ...ht mode then take the picture Selecting a White Balance Mode DATE Subjects that the Auto White Balance may not work properly Monotone subjects Subjects with multiple light sources Subjects with a deep background especially when a flash is used Note If the white area of subject is insufficient move the camera to increase the white portion of the subject then shoot the picture To adjust the White Ba...

Страница 43: ... U U U U or T T T T T button repeatedly until the symbol ap pears on the LCD monitor The will re main on the LCD monitor for about three seconds Important The Flash Off mode is set when the Daylight mode is set At this time the flash mode cannot be switched even if the FLASH button is pressed The color tone of the same subject may vary depending on weather conditions Canceling the Mode Press the F...

Страница 44: ...r T T T T T button to display the symbol on the LCD monitor The will remain on the LCD monitor for about three seconds Important The Flash Off mode is set when the Fluorescent mode is set At this time the Flash mode cannot be switched even if the FLASH button is pressed The color tone for the same subject may vary depending on the type of the fluorescent light Canceling the Mode Press the FLASH bu...

Страница 45: ...ds press the U U U U U or T T T T T button to display the symbol on the LCD monitor The will remain on the LCD monitor for about three seconds Important The Flash Off mode is set when the Tungsten Light mode is set At this time the Flash mode cannot be switched even if the FLASH button is pressed The color tone for the same subject may vary depending on the type of incandescent light Canceling the...

Страница 46: ...e LCD moni tor w Frame the subject and make sure that the camera is positioned securely Press the Release button Within 10 seconds position yourself in front of the camera The Self Timer light on the front of the camera glows The Self Timer light will flash for nearly two seconds just before the picture is taken The Self Timer is disabled after one picture is taken Note The Self Timer cannot be ac...

Страница 47: ...is focused press the Release button to take the picture Important When the camera is repositioned the subject may go out of focus the accurate focus range for macro shooting is quite narrow Position the camera on a stable surface or tripod before taking a close up picture Important The Flash Off mode is set when the Macro mode is set The Flash mode cannot be switched at this time even if the FLASH...

Страница 48: ...46 ...

Страница 49: ...re Playback Erasure Before Playback 48 Displaying Information 48 Connecting to a TV 49 File Playback 50 File Playback 50 Automatic Playback 50 File Erasing 52 Operation Flow 52 Erasing One File 52 Erasing All Files 54 ...

Страница 50: ...following figure File number of this image Total number of files Date Time Time Date Standard playback display Tips The monitor displays information about the recorded images including the date and time of recording Press the DATE button repeatedly to change the display in the following sequence The date and time setting mode is set if the DATE button is pressed and held for more than two seconds ...

Страница 51: ...ect the Video cable to the VIDEO OUT terminal e Connect the opposite end of the Video cable to the VIDEO IN terminal of the TV r Set your TV to Line Input or Auxiliary mode For details refer to your TV owner s manual Note When the Video cable is connected to the camera no image is displayed on the LCD monitor Extended Playback For extended playback use the optional AC adaptor See Using AC Power on...

Страница 52: ...ed file w Press the U U U U U or T T T T T button to move through the available files Automatic Playback The files may be played back in sequence using the optional remote control This is called the automatic playback function The playback interval length of time each image is displayed may be set between 0 5 to 30 seconds q Press the PROGRAM button of the remote control RELEASE ERASE FWD PROGRAM ...

Страница 53: ...e next page Use the U or T button to select the previous page or the next page then press the ENTER button on the remote control unit To cancel the settings Use the U or T button to select EXIT then press the ENTER button e Press the ENTER button of the remote control The recorded files will be played back in se quence To stop the playback Press the ENTER button or the PROGRAM but ton on the remot...

Страница 54: ...ct the erase method Choose to erase either a single file or all files Select a file Select a file to be erased or erase all files Erase the file See pages 52 53 for information on erasing one file See page 54 for information on erasing all files Erasing One File The following steps explain how to erase a specific file Important An erased file cannot be restored Carefully confirm the contents of a ...

Страница 55: ...o referred to as the ENTER button in the LCD monitor r Press the U U U U U or T T T T T button to select the file to be erased t Press the RELEASE button The selected file is erased Repeat steps r and t to erase another file When you finish press the ERASE button Note When a file is erased the file numbers of the suc ceeding files decrease by one Canceling the Mode Press the ERASE button again E R...

Страница 56: ...PLAY w Press the ERASE button e Press the U U U U U or T T T T T button to select ERASE ALL with the arrow Then press the RE LEASE button An ERASE ALL message will appear Note The Release button is referred to as the ENTER but ton in the LCD monitor r Press the RELEASE button The ERASING message appears and all files are erased After erasing is finished the NO IMAGE RECORDED message appears Note T...

Страница 57: ...aving Mode 57 Saving Your Settings 58 Returning the Settings to the Original Position 59 System Configuration Figure 60 Accessories for ESP2 62 Computer and DC Connections 63 Handling Precautions 66 Caring for Your Digital Camera 67 Troubleshooting 68 Using Your Digital Camera in Other Countries 71 Specifications 72 ...

Страница 58: ...he SELFTIMER button while press ing the U U U U U button The REC ord PLAY switch can be set to either REC or PLAY Auto Power Off is enabled w Within three seconds press the U U U U U or T T T T T button to turn off the function Within three seconds the Auto Power Off will be disabled Note When the Auto Power Off feature turns off the LCD monitor you may turn on the LCD monitor by these methods clo...

Страница 59: ...or becomes dark If the Re lease button is pressed lightly the LCD monitor becomes slightly dark When the Release button is pressed and re leased the picture is taken and the LCD monitor turns dark again after a few seconds Playback mode Regular operation The LCD monitor is slightly dark This condition remains un til the setting is changed This setting can be oper ated however the power saving func...

Страница 60: ...nction saves your settings when the power is turned off If the power is turned off when the Power Off Memory is set the Flash mode see page 36 White Balance mode see page 40 Auto Power Off see page 56 and Automatic Play back see page 51 settings are saved They will be available when the power is turned on next All other camera settings will return to the original positions q Press the SELF TIMER b...

Страница 61: ...Off Memory settings the original positions q Remove the terminal cover on the side of the camera Depress the RESET button with the tip of a sharp pencil or similar object The settings also are reset when the batteries or the clock batteries are installed The recorded im ages are not erased even after a reset is per formed Important Do not use a sharp object or an object that breaks easily ...

Страница 62: ... Remote control Remote control AY3740 When using this unit with the camera the screen dis play button and the moni tor button do not function RELEASE ERASE FWD PROGRAM EV REV ENTER REMOTE CONTROL AY3740 Power supply AC adaptor AY3140 100 V to 240 V Image transmission to a per sonal computer You can transmit your file to a personal computer using the utility software for the ESP2 The file can be tr...

Страница 63: ...ble that is in cluded Output Color printer Color copier Accessories for ESP2 on page 62 for information on products mentioned above Once data is sent to your per sonal computer you can print it with a color printer or color copier A video printer can be con nected to the camera for printing still pictures ...

Страница 64: ...r operating on AC power See page 21 Using AC Power For recording or playback by remote control The Auto matic Playback feature enables you to program the se quence of pictures to be played back This function is avail able only with this Remote Control Model AY3140 AY3740 ...

Страница 65: ...AT compatible unit RS232C D sub 9 pin Macintosh Connection cable RS232C AUX Macintosh adaptor 1 Open the terminal cover on the side of the camera 2 Connect the cable to the RS232C AUX ter minal 3 Connect the other end of the cable to the serial port of the computer ...

Страница 66: ...the Apple menu When the computer and the camera are connected correctly the following dialog box is displayed y Select the image to be imported To specify one image at a time Press the button or the button to select the image then click the Select check button Repeat the operation and specify the images to be imported in image sequence To specify all images Click the Select All button All images t...

Страница 67: ...elect whether a file is to be added to the album or to be developed on the desktop e Select the format in which the file should be saved r Click OK to start the file transfer Note It is recommended to use an AC adapter when images are uploaded or downloaded The file transfer operations will be interrupted if the power is cut off during the operation Refer to the on line help menu in the software f...

Страница 68: ...is occurs place the camera into a bag or plastic bag temporarily to moderate any drastic change of temperature Keep it in the bag until the temperature difference is minimized If the LCD monitor is exposed to sunlight or other bright light it may appear white and may become difficult to observe Sometimes a pixel that always lights or never lights is present in the LCD monitor The brightness may ha...

Страница 69: ...ce representative The camera is equipped with a hazardous high voltage circuit Never attempt to repair the camera by yourself Keep the camera away from volatile liquids such as thinner benzene and insecticide These chemicals may peel off the paint or damage the surface Do not scrub the surface of the LCD monitor with a hard object the LCD monitor is scratched or damaged easily Wipe off the surface...

Страница 70: ...ower The batteries go dead quickly Shooting and Playback Problems Cause The batteries are not inserted properly incorrect polarity or are dead The power is off or the REC ord PLAY switch is set to PLAY The shutter release button is not fully pressed down Button was pressed only halfway down The internal memory is full The Self Timer mode is selected The flash is recharging Flash Off mode is select...

Страница 71: ...lled a smear Remedy Reduce the distance to the sub ject Select the Flash Off mode Compensate the exposure with the button Turn the brightness adjustment dial to the right or to the left to ad just the brightness Press the FLASH button to change the setting Compensate the exposure with the button Turn the brightness adjustment dial to the right or to the left to ad just the brightness Include a whi...

Страница 72: ...et the REC ord PLAY switch to either REC or PLAY If the camera still fails to function properly try the following 1 Remove and reinstall all batter ies in the camera 2 Reset the REC ord PLAY switch to either REC or PLAY Reset the time and date correctly Replace the batteries with fresh batteries and reset the date Slide the REC ord PLAY switch to PLAY Select the mode again Select the mode again Co...

Страница 73: ... from a travel agent or electric store Viewing the Image on a TV Check if the TV operates in the NTSC format with an image input terminal The optional video connection cable is required The NTSC format is used in the following countries Dominican Republic El Salvador Ecuador Guam Guatemala Haiti Honduras Japan Mexico Micronesia Myanmar Nicaragua Panama Peru Philippines Puerto Rico Surinam Taiwan T...

Страница 74: ...ive system TFT active matrix system Picture elements 61 380 dots 279 H 220 V Brightness adjustment Brightness adjustment dial is attached Color temperature Standard setting 4200 50K Automatic adjustment range 2800K to 8000K Fixed adjustment range Fluorescent light 4000K Outdoor 5100K Incandescent light 3200K Exposure adjustment AE range EV6 3 to EV17 Light measuring system Centerweighted EV memory...

Страница 75: ...ase line method Number of recording files Economy mode Approx 100 files Normal mode Approx 50 files Fine mode Approx 25 files Input Output Power input 5V AC adaptor Video output 1 0 Vp p 75Ω RS232C AUX Special Body Hole for tripod 1 4 20 UNC 5 7 mm max bolt length Power Supply Batteries of main unit Battery types AA alkaline batteries AA Nickel metal hydride batteries AA Nickel Cadmium batteries V...

Страница 76: ... antenna Increase the separation between the equipment and receiver Connect the equipment to an outlet on a circuit different from that to which the receiver is connected Consult the dealer or an experienced radio TV technician for help FCC 15 105B Changes or modifications not expressly approved by the party responsible for compli ance could void the user s authority to operate the equipment FCC 1...

Отзывы: