background image

English

20

Step 2: Optional Connections

 (continued)

R

L

Y

PB

PR

VIDEO (CVBS)

COMPONENT

VIDEO

EXT 2

S-VIDEO (Y/C)

VIDEO (CVBS)

S-VIDEO (Y/C)

AUDIO

COAXIAL

R

L

R

L

(DIGITAL AUDIO)

INPUT

OUTPUT

EXT 1

AUDIO

TV-OUT

ANTENNA-IN

AU D IO
O U T

S-V ID E O

IN

V ID E O   IN

TV


CABLE

SATELLITE

ANTENNA


VIDEO 

IN 

OUT

IN

AUDIO

L

AUDIO

R


VIDEO 

OUT

AUDIO

L

AUDIO

R

VHF/UHF

RF IN

VHF/UHF

RF OUT

A

B

C

Rear of a VCR 
(Example only)

D

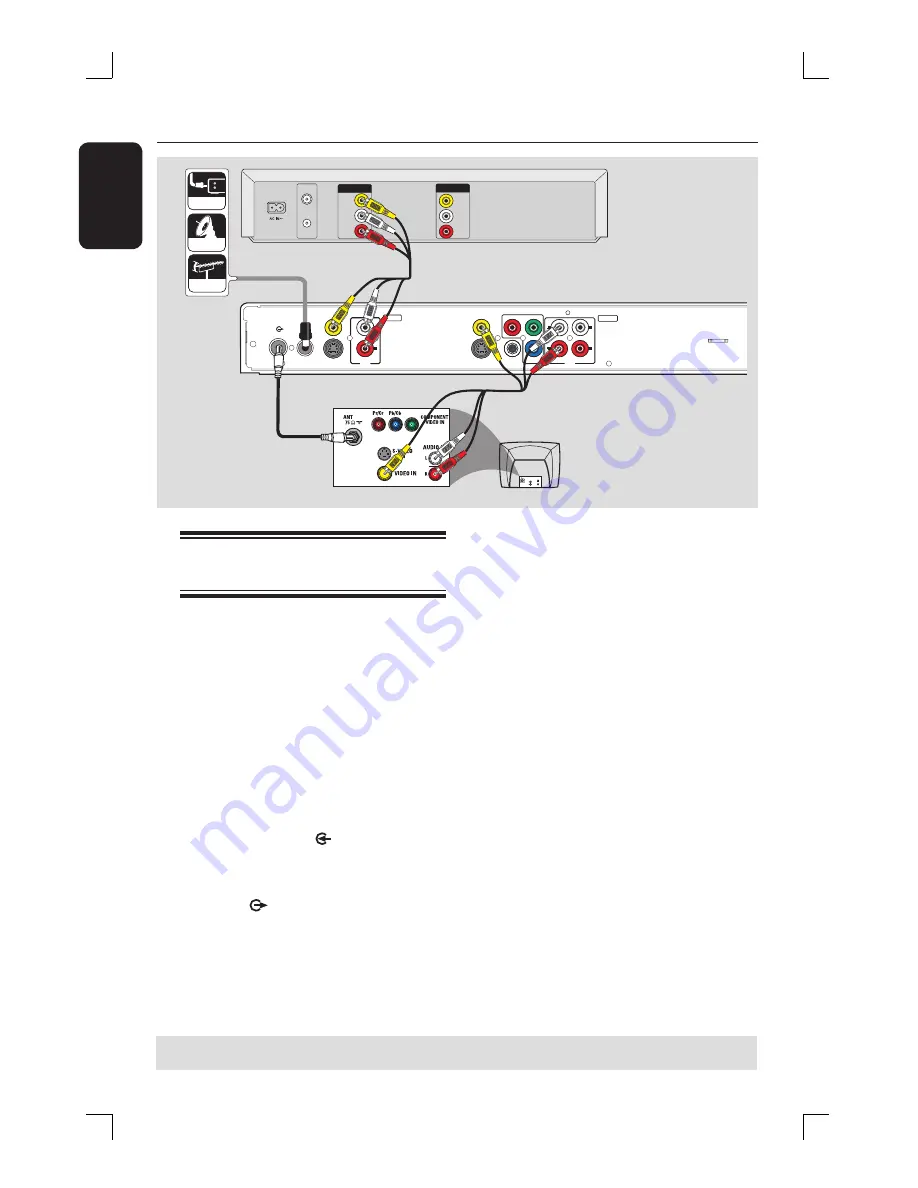
Connecting to a VCR or 
other similar device

This connection enables you to record
from video tape to a DVD±R/±RW and
allows the VCR to be used for playback if
the recorder is turned off. 

Before you start...
Your new recorder can replace the
VCR for all your recording needs.
Just unplug all the connections from 
your VCR.

A

 Connect the Antenna/Cable TV signal to  

the 

ANTENNA-IN 

 jack on the 

recorder.

B

 Use a RF coaxial cable to connect the 

TV-OUT 

 jack on the recorder to 

the antenna input jack on your TV (VHF/
UHF RF IN.)

C

 Use the audio/video cables to connect 

the 

VIDEO (CVBS) EXT1/ AUDIO 

INPUT

 jacks on the recorder to the 

matching VIDEO/AUDIO output jacks on 
the VCR.

D

 Use the audio/video cables to connect 

the 

VIDEO (CVBS) / AUDIO 

OUTPUT

 jacks on the recorder to the 

matching VIDEO/AUDIO input jacks on 
the TV.

Helpful Hints:
–  Most commercial video cassettes and
DVDs are copy-protected and therefore
cannot be recorded.
–  Connect the recorder directly to the
TV. If there is a VCR or an additional device 
in between, the picture quality may be poor
because of the copy protection system built
into the recorder.

TIPS: 

Before making or changing any connections, make sure that all the devices are disconnected 
from the power outlet.

Содержание DVDR3390

Страница 1: ...English DVD Player Recorder DVDR3390 User Manual 6 Manuel D utilisation 68 Manual de Instrucciones 132 ...

Страница 2: ...uarantees that your date of purchase will be on file so no additional paperwork will be required from you to obtain war ranty service Product Safety Notification By registering your product you ll receive notification directly from the manufacturer in the rare case of a product recall or safety defect Additional Benefits Registering your product guar antees that you ll receive all of the privilege...

Страница 3: ...ing the cart apparatus combination to avoid injury from tip over 13 Unplug this apparatus during lightning storms or when unused for long periods of time 14 Refer all servicing to qualified service personnel Servicing is required when the apparatus has been damaged in any way such as power supply cord or plug is damaged liquid has been spilled or objects have fallen into the apparatus the apparatu...

Страница 4: ...CH SPARRENAR URKOPPLAD BETRAKTA EJ STRÅLEN DANGER Invisible laser radiation when open AVOID DIRECT EXPOSURE TO BEAM or CAUTION Use of controls or adjustments or performance of procedures other than herein may result in hazardous radiation exposure or other unsafe operation ATTENTION L utilisation des commandes ou réglages ou le non respect des procédures ciincluses peuvent se traduire par une expo...

Страница 5: ...4 NOTE This equipment has been tested and found to comply with the limits for a Class B digital device pursuant to Part 15 of the FCC Rules These limits are designed to provide reasonable protection against harmful interference in a residential installation This equipment generates uses and can radiate radio frequency energy and if not installed and used in accordance with the instructions may cau...

Страница 6: ...Satellite Receiver 19 Connecting to a VCR or other similar device 20 Connecting to a VCR and Cable Box Satellite Receiver 21 Connecting a camcorder to the front jacks 22 Step 3 Installation and Setup 24 Finding the correct viewing channel 24 Setting your TV channel programs 24 CHANNEL SETUP settings 25 Setting the language 26 Setting the time date 26 LANGUAGE settings 27 CLOCK settings 27 Recordin...

Страница 7: ...g a disc 44 Starting disc playback 45 Additional Playback Features 48 Changing to another chapter track 48 Pausing playback and step play 48 Searching forward backward 48 Zooming in 48 Using T C options 49 Other Information DVD System Menu Options 52 Accessing the System Menu 52 GENERAL settings 53 PLAYBACK settings 55 CLOCK settings 57 Firmware Upgrade 58 Installing the latest firmware 58 Frequen...

Страница 8: ...ce any sources of danger on the apparatus e g liquid filled objects lighted candles Cleaning discs Some problems occur because the disc inside the recorder is dirty frozen picture sound disruptions picture distortions To avoid these problems discs should be cleaned on a regular basis To clean a disc use a micro fibre cleaning cloth and wipe the disc from the center to the edge in a straight line C...

Страница 9: ...r Troubleshooting If you need further assistance please call the customer support service for your country The corresponding telephone numbers and e mail addresses are given in the guarantee booklet Refer to the type plate on the rear or bottom of the product for identification and supply ratings Accessories supplied Remote control and batteries Audio Video AV cables RF coaxial cable Quick Use Gui...

Страница 10: ...icense This is a simple programming system for recorders To use it enter the programming number associated with your television program You can find this number in your favourite listings magazine i LINK is also known as FireWire and IEEE 1394 This connection is used for the transfer of high bandwidth digital signals as used by digital video DV devices It carries all audio and video signals via a ...

Страница 11: ...ng the current TV channel or the current video input source Press repeatedly to set up a One Touch Recording at 30 60 or 90 minutes interval Jacks behind the flap Flip down the door as indicated by the OPEN X label at the right hand corner g CAM1 Video input for camcorders or video recorders Press REC SOURCE on the remote control to select CAM1 in order to view the input source h L R AUDIO Audio i...

Страница 12: ...the current TV channel or the current video input source Press repeatedly to set up a One Touch Recording at 30 60 or 90 minutes interval g Skips to previous or next chapter track Press and hold to make a fast forward fast reverse search h TOP MENU For DVD R RW only Enters the disc editing menu i ANGLE Selects a DVD disc camera angle if available j RETURN Returns to the previous menu of a video CD...

Страница 13: ...ers exits the video editing menu r PLAYÉ Plays a disc s STOP Stops playback recording Press and hold the button will open and close the disc tray t Å Pauses the playback or recording Press repeatedly to advance a paused picture one frame at a time u AUDIO Selects an audio language DVD VCD or an audio channel TUNER toggles bewteen stereo mono and SAP refer to your TV manual for available sound mode...

Страница 14: ... a long time Do not use old and new or different types of batteries in combination Batteries contain chemical substances so they should be disposed of properly Using the remote control to operate the system A Aim the remote control directly at the remote sensor IR on the front panel B Press REC SOURCE button on the remote control to select the mode you wish to control for example TUNER CAM1 C Then...

Страница 15: ...ep 2 Optional Connections TV has only an antenna input jack for the complete connection to your TV If you want to connect to a VCR and or Cable Box Satellite Receiver See Step 2 Optional Connections for the complete connections to your TV A Connect the existing Antenna Cable TV signal or from the Cable Box Satellite Receiver RF OUT or TO TV to the ANTENNA IN jack on the recorder B Use the supplied...

Страница 16: ...video cables red blue green not supplied to connect the Y PB PR OUTPUT jacks on the recorder to the corresponding component video input jacks or labeled as Y Pb Cb Pr Cr or YUV on the TV B If your TV accepts Progressive Scan signal see the section GENERAL settings Progressive Scan for detailed set up IMPORTANT The progressive scan video quality is only available through Y PB PR connection and a pr...

Страница 17: ...eceiver with two channel analog stereo Option 2 Using a coaxial cable You can connect the recorder to an AV amplifier receiver with a digital mutlichannel sound decoder in order to enjoy multichannel surround sound Use a coaxial cable not supplied Connect the recorder to the receiver amplifier from the COAXIAL DIGITAL AUDIO jack on the recorder to the digital input of the receiver Before you start...

Страница 18: ...ack on the recorder to the antenna input jack on the RF modulator C Use a RF coaxial cable not supplied to connect the TO TV jack on the RF modulator to the antenna input jack on your TV D Use the supplied AV cables yellow plug to connect the VIDEO CVBS OUTPUT jack on the recorder to the video input jack or labeled as A V In Video In Composite or Baseband on the RF modulator E Use the supplied AV ...

Страница 19: ...udio video cables to connect the VIDEO CVBS EXT1 AUDIO INPUT on the recorder to the matching VIDEO AUDIO output jacks on the Cable Box Satellite Receiver C Use the audio video cables to connect the VIDEO CVBS AUDIO OUTPUT on the recorder to the matching VIDEO AUDIO input jacks on the TV R L Y PB PR VIDEO CVBS COMPONENT VIDEO EXT 2 S VIDEO Y C VIDEO CVBS S VIDEO Y C AUDIO COAXIAL R L R L DIGITAL AU...

Страница 20: ... your VCR A Connect the Antenna Cable TV signal to the ANTENNA IN jack on the recorder B Use a RF coaxial cable to connect the TV OUT jack on the recorder to the antenna input jack on your TV VHF UHF RF IN C Use the audio video cables to connect the VIDEO CVBS EXT1 AUDIO INPUT jacks on the recorder to the matching VIDEO AUDIO output jacks on the VCR D Use the audio video cables to connect the VIDE...

Страница 21: ...bles to connect the VIDEO CVBS AUDIO OUTPUT on the recorder to the matching VIDEO AUDIO input jacks on the TV F Use another set of audio video cables to connect the CAM1 L AUDIO R jacks on the front panel of the recorder to the to the matching VIDEO AUDIO output jacks on the VCR R L Y PB PR VIDEO CVBS COMPONENT VIDEO EXT 2 S VIDEO Y C VIDEO CVBS S VIDEO Y C AUDIO COAXIAL R L R L DIGITAL AUDIO INPU...

Страница 22: ...es the best picture quality Use an i LINK 4 pin cable not supplied to connect the DV IN jack on the DVD recorder to the appropriate DV OUT jack on the camcorder Before you start operating press REC SOURCE on the remote control repeatedly to select DV as the input channel For recording see Recording RECORD settings Helpful Hints The DV IN jack does not support a connection to a Personal Computer It...

Страница 23: ...outlet Front panel of recorder Option 3 Using the S VIDEO In jack Use the S VIDEO connection if you have a Hi8 or S VHS C camcorder It provides good picture quality A Use an S Video cable not supplied Connect the S VIDEO Y C EXT2 jack on the rear panel of the recorder to the corresponding S VHS output jack on the camcorder B Use an audio cable red white plugs to connect the AUDIO INPUT L R jacks o...

Страница 24: ...you may go to channel 1 on your TV then press the Channel down button repeatedly until you see the Video In channel Or the TV remote control may have a button or switch that chooses different video modes Or set the TV to channel 3 or 4 if you are using a RF modulator Setting your TV channel programs Before this recorder can start recording any TV channel programs you need to search for the availab...

Страница 25: ...und will appear on the TV Modify Channel Information Modify your preset TV channels 1 Use ST keys to highlight Modify Channel Information Edit and press X The modify channel options will be displayed 2 Use ST keys to select one of the options and press X Name Use numeric keypad 0 9 to enter the TV channel and press OK to confirm Frequency Adjust the frequency of the channel Use WX keys to adjust t...

Страница 26: ...lish English System Menu Language English C Use ST keys to highlight one of the options and press OK See next page for details D Use ST keys to highlight the desired language and press OK to confirm Setting the time date If the recorder has not set the time and date correctly set the clock manually by following the steps below A Press SYSTEM MENU The system menu appears B Use ST keys to select Sys...

Страница 27: ... the number and use WX keys to select different entry fields Press OK to confirm OR enter the numbers using the numeric keypad 0 9 on the remote control Step 3 Installation and Setup continued On Screen Display Language Default Disc Menu Language Default Subtitle Language Default Audio Language Select the menu language for this recorder s on screen display Select the preferred language of the Disc...

Страница 28: ...D R 1x 16x DVD RW 2x 4x IMPORTANT Unrecordable pictures Television programs films video tapes discs and other materials may be copyrighted and therefore cannot be recorded on this recorder Recording settings The default recording settings allow you to set the auto chapter markers preferred recording input source and recording mode Any changes made using the remote control will only apply to the cu...

Страница 29: ...out changing the default setting you can press REC SOURCE button on the remote control 1 Use ST keys to select one of the options Tuner Input source from TV programs CAM1 Input source from the device connected to the CAM1 and AUDIO L R jacks on the front panel EXT 1 Input source from the device connected to the VIDEO CVBS EXT1 and AUDIO L R jacks on the rear panel EXT 2 Input source from the devic...

Страница 30: ... REC MODE key on the remote control 1 Use ST keys to select one of the following recording modes Record Mode HQ SP EP SLP Picture Quality High quality DVD quality Standard Play VHS quality Extended Play VHS quality Super Long Play Maximum Recording Time per Disc 1 hour 2 hours 4 hours 6 hours 2 Press OK to confirm your selection Default Recording Mode Recording continued ...

Страница 31: ... and AUDIO L R INPUT jacks on the rear panel EXT 2 Input source from the device connected to the S VIDEO Y C EXT2 and AUDIO L R INPUT jacks on the rear panel D Press REC to start recording The recording will automatically start after the last recording on the DVD R RW E To stop the recording press STOP Pausing a recording A During a recording press PAUSE Å You can use this function to avoid record...

Страница 32: ... B Press TIMER on the remote control The timer schedule list appears 1 2 3 4 5 6 Source RecMode Date Start End Timer Schedule C Press OK on the remote control The VCR Plus System menu appears Enter the PlusCode programming number for the show you wish to record or select CANCEL for manual timer recording To go back to timer schedule press RETURN CONFIRM CANCEL D Select CANCEL in the menu and press...

Страница 33: ...appear three minutes before the recording starts The TIMER icon will light up on the display panel if a timer recording is set Helpful Hint Set the timer recording one minute ahead of the program s start time This helps ensure the entire program is recorded as the disc requires about 30 seconds to prepare for recording Setting a timer recording from an external Cable Box Satellite Receiver If you ...

Страница 34: ...ow you wish to record e g 5 312 4 or 5 312 4 key in 53124 To clear the VCR Plus programming number press CLEAR on the remote control To cancel the VCR Plus programming use ST keys to select CANCEL in the menu and press OK E To confirm your entry select CONFIRM in the menu and press OK The system will store the timer entry and return to the timer editor menu If the channel number of the TV channel ...

Страница 35: ...imer program Timer Editor Rec Mode Mode Date Start End SP Once Source Ch003 01 31 06 10 33 PM 11 03 PM OK Cancel OK F Select the entry field and make the necessary changes G Once complete select OK in the menu and press OK to save the changes H Press TIMER to exit the menu Watching anotherTV channel during recording You can watch another TV channel while recording is in progress by using the TV s ...

Страница 36: ... player eg hidden chapters to remain hidden Lock Unlock Disc DVD RW only Lock or unlock a disc to prevent accidental erasure or changes being made Finalize Disc DVD R only Finalize the disc to enable playback on other DVD players Further recording and editing to the disc are not allowed It is not possible to unfinalize the disc Accessing disc editing menu TOP MENU REC OK A Insert a recorded DVD R ...

Страница 37: ...d press OK Erase disc DVD RW only This erases the content of the DVD RW including those that was not recorded on this recorder Once the existing content is erased it can be used again for recording A Press TOP MENU then use ST keys to select Erase Disc and press OK A warning message will appear B Select YES in the menu to proceed or NO to abort Press OK to confirm Record new title This function al...

Страница 38: ...nlock Disc B If you want to overwrite or edit on the protected disc select Unlock Disc Playing your recordings DVD R on other DVD players It is necessary to finalize a DVD R disc before you can play it on any other DVD player Otherwise the DVD R will only playback on this recorder After a DVD R disc has been finalized no further recordings or editing can be made to it Make sure that you have compl...

Страница 39: ...ected title onwards to the end of the disc Append Title Insert a new recording to the last existing recording Accessing title editing menu A Insert a recorded DVD R RW into the recorder The Index Picture screen appears on the TV During playback press DISC MENU to access the Index Picture screen B Use ST keys to highlight a title recording and press X The title editing menu appears 2 My movie 10 01...

Страница 40: ...ys to select Erase Title and press OK A warning message will appear B Select YES in the menu to proceed or NO to abort then press OK to confirm Overwrite title DVD RW only This function allows you to record a new title from the beginning of the current title in the DVD RW The other titles will not be affected A In title editing menu use ST keys to select Overwrite Title and press OK B Select the s...

Страница 41: ...in the recording Index Picture Select a scene in the recording as the index picture screen Split Title DVD RW only Divide the recording into two under separate title Editing Finalizing Recording continued TIPS No further recording and editing can be carried out on a full or finalized DVD R Press W to go back to the previous menu Accessing video editing menu EDIT PLAY OK A Insert a recorded DVD R R...

Страница 42: ...y inserting chapter markers at any point within a title during playback This will allow you to access a specific point in the recording easily or set a chapter you wish to hide Title Chapter Chapter Chapter Chapter chapter markers A During playback press EDIT to display the video editing menu Use ST keys to select Chapter Marker and press OK B Use ST keys to select one of the options and press OK ...

Страница 43: ...s to select Unhide Chapter and press OK The current chapter will be visible during playback Helpful Hints All the hidden chapters will be played back while in video editing mode To locate a specific frame during playback press PAUSEÅrepeatedly to forward search to the frame that you want Changing Index Picture The index picture is the picture of the title you will see when the recorder loads up th...

Страница 44: ... make sure the disc is for the same region as your player Do not push on the disc tray or put any objects other than discs on the disc tray It may cause the disc player to malfunction Inserting a disc A Press STANDBY ON to turn on the recorder B Press OPEN CLOSE ç on the front of the recorder The disc tray opens C Carefully place the disc into the tray with the label facing up then press OPEN CLOS...

Страница 45: ... on the remote control to access the T C menu Then use ST keys to select Title or Chapter and input your title chapter number using the numeric keypad 0 9 B To stop playback press STOP Playing a Super Video CD Super Video CDs may feature PBC Play Back Control This allows you to play the video CDs interactively following the menu on the display A Insert a Super Video CD If the PBC is on the disc in...

Страница 46: ...he disc content menu appears File Play Stop0 00 00 0 00 00 Directory Selection Bee Gees Phil Collins Bryan Adams Collin Raye Nat King Cole UB40 Jordan Hill Faith Hill 1 2 3 4 5 6 7 8 Note It may require longer time for the recorder to display the disc content menu on the TV due to the large number of songs pictures compiled into one disc B Use ST keys to navigate within the menu and press OK to ac...

Страница 47: ...back then select a picture file in the menu and press OK to start the musical slide show playback Playback continued TIPS The operating features described here might not be possible for certain discs Always refer to the instructions supplied with the discs File Play PIC Normal Play Top to bottom Fitscreen Clockwise 0 Type Mode Trick Wipe Zoom Rotate Top to bottom Down to top Left to right Right to...

Страница 48: ...rching forward backward You can search forward or backward on a disc at two four sixteen or thirty two times the normal playback speed A During playback press W reverse or X forward to switch to the search function The search status bar appears It displays the search speed FREV x2 FREV x4 FREV x16 FREV x32 FFWD x2 FFWD x4 FFWD x16 FFWD x32 The sound will be muted B Press W reverse or X forward to ...

Страница 49: ...t options Repeat A B Select this to repeat the playback of a specific segment within a title chapter track Press OK to mark the start and end of the segment you want to repeat Repeat Chapter Select this to repeat playback of the current chapter DVD DVD R RW only Repeat Track Title Select this to repeat playback of the current track title Repeat Directory Select this to repeat playback of the curre...

Страница 50: ...CLEAR on the remote control To start program play F Press X key to move to the right screen and press OK Playback will start from the selected track file chapter according to the programmed sequence To exit program play G Press STOP to exit program play Changing the audio soundtrack language This operation works only on DVDs with multiple soundtrack language or VCDs with multiple audio channels Th...

Страница 51: ...with DVDs that contain sequences recorded from different camera angles This allows you to view the picture from different angles This function can be also accessed via ANGLE key on the remote control A Press T C on the remote control The T C menu appears B Use ST keys to select Angle and press X to enter its options The camera angles available for selection appears C Use ST keys to select the came...

Страница 52: ...Screen Saver On System Menu General See next page TIPS Press W to go back to previous menu item Press SYSTEM MENU to exit the menu item Parental Rating Level Digital Audio Output Off All TV Aspect Ratio 4 3Panscan System Menu Playback System Menu Record Default Recording Source Default Recording Mode Tuner SP Auto Chapter Marker On DefaultDiscMenuLanguage DefaultSubtitleLanguage Off OnScreenDispla...

Страница 53: ...een saver 2 Press OK to confirm your selection Progressive scan delivers a higher picture quality than the standard interlaced TV channel scan It only works when you have connected the recorder s Y Pb Pr jacks to your TV that supports the progressive video input Otherwise the image may not appear or will be distorted Please check your TV user manual for more information 1 Use ST keys to select one...

Страница 54: ...C color system It will change the video signal of a PAL disc and output it to NTSC format PAL Select this if the connected TV has the PAL color system It will change the video signal of an NTSC disc and output it to PAL format 2 Press OK to confirm your selection Helpful Hint If a blank distorted TV screen appears wait for 15 seconds for the auto recovery Restore Factory Settings This option will ...

Страница 55: ... set a playback limitation level 1 Press OK to access this menu and you will be prompted to enter your four digit pin code 2 Use the numeric keypad 0 9 to enter your four digit pin code When doing this for the first time enter the default password 3308 The set rating level menu appears If you forget your four digit pin code the default password is 3308 3 Use ST keys to select the desired parental ...

Страница 56: ...cover The rating level feature does not prohibit play of such discs To change your password 1 Select Parental Rating Level and press OK You will be prompted to enter your four digit pin code 2 Use the numeric keypad 0 9 to enter your four digit pin code and select OK in the menu and press OK on the remote control to confirm The set rating level menu appears 3 Select New in the menu and press OK to...

Страница 57: ...M Pulse Code Modulation 2 Press OK to confirm your selection CLOCK settings Set the date for the recorder s system clock See the chapter Step 3 Installation and Setup CLOCK Settings Set the time for the recorder s system clock See the chapter Step 3 Installation and Setup CLOCK Settings Philips provides you the DivX VOD Video On Demand registration code that allows you to rent and purchase videos ...

Страница 58: ...fined for greater stability and compatibility of the recorder Caution Power supply must not be interrupted during upgrade Visit Philips website at www philips com usasupport to check for the availability of the latest firmware upgrade Note When checking for the latest firmware upgrade please also check for any accompanying instructions on installing the firmware Firmware Upgrade ...

Страница 59: ...itles and Chapters A DVD disc contains Titles and Chapters which are similar to the Titles and Chapters of a book A Title is often a complete movie and is broken down into Chapters or individual scenes from the movies Title Chapter Title Chapter Chapter Chapter Chapter chapter markers Programs are recorded as a single title it may consist of one chapter or a few chapters within a title depending o...

Страница 60: ...ol Aim the remote control towards the set at different angles and or distances Batteries are weak replace the batteries Press REC SOURCE on the remote control to select an input source Insert the disc with the label facing up Wrong region code The DVD must be coded for ALL regions or Region 1 in order to be played back on this DVD recorder There is no recording on the disc or it is a wrong type of...

Страница 61: ...hapter Step 3 Installation and Setup Setting your TV channel programs for details Check the video connection between the DVD recorder and the TV You can further fine tune the signal of the TV channel Read chapter on Step 3 Installation and Setup CHANNEL SETUP Settings Modify channel information Press CH to search for the same TV channel which may have a clearer picture The disc does not match with...

Страница 62: ...t use the DVD recorder to duplicate copyrighted materials DVDs or videotapes onto a DVD R RW A finalized DVD R has been inserted Change disc If a recording is too short it is possible that a DVD player cannot detect it Please observe the following minimum recording times Recording mode HQ 5 mins SP 10 mins EP 20 mins SLP 30 mins You have to finalize the DVD R Refer to chapter Playing your recordin...

Страница 63: ...the steps below 1 Connect the supplied AV cable red white yellow from your DVD recorder OUT2 on the rear panel to the TV s Video In and Audio In jacks 2 Switch on the TV and use the TV s remote control to select the corresponding video in channel on the TV eg AV EXT1 3 Switch on the DVD recorder and wait until the display panel shows No DISC Then use the recorder s remote control to enter the code...

Страница 64: ...R Still Picture Playback Disc formats DVD R RW DVD R RW Picture CD Picture compression formats JPEG Picture enhancement Rotate Zoom Storage Media Recording media DVD R RW DVD R RW Tuner Reception Transmission TV system NTSC Aerial Input 75 Ohm coaxial IEC75 Connectivity Rear Connections Component Video Out S Video Out In Video CVBS Out In Audio left right Out In Digital audio out coaxial RF Antenn...

Страница 65: ...Disc is being recognized by the recorder MENU The system setup menu disc menu title menu or timer menu display is on NO DISC No disc has been inserted If a disc has been inserted then it is possible that the disc cannot be read OPEN Disc tray is opening or opened PHOTO A picture disc has been inserted STARTUP The recorder has been turned on REGION When the DVD inserted is in a wrong region code as...

Страница 66: ...compression system proposed by the Joint Photographic Expert Group which features small decrease in image quality in spite of its high compression ratio MP3 A file format with a sound data compression system MP3 is the abbreviation of Motion Picture Experts Group 1 or MPEG 1 Audio Layer 3 By using the MP3 format one CD R or CD RW can contain about 10 times more data then a regular CD MPEG Motion P...

Страница 67: ...llation of programs data or other information is not covered under this Limited Warranty This warranty does not apply a to damage caused by accident abuse misuse misapplication or non Philips product b to damage caused by service performed by anyone other than Philips or Philips Authorized Service Location c to a product or a part that has been modified without the written permis sion of Philips o...

Отзывы: