background image

3139 246 14871

14

English

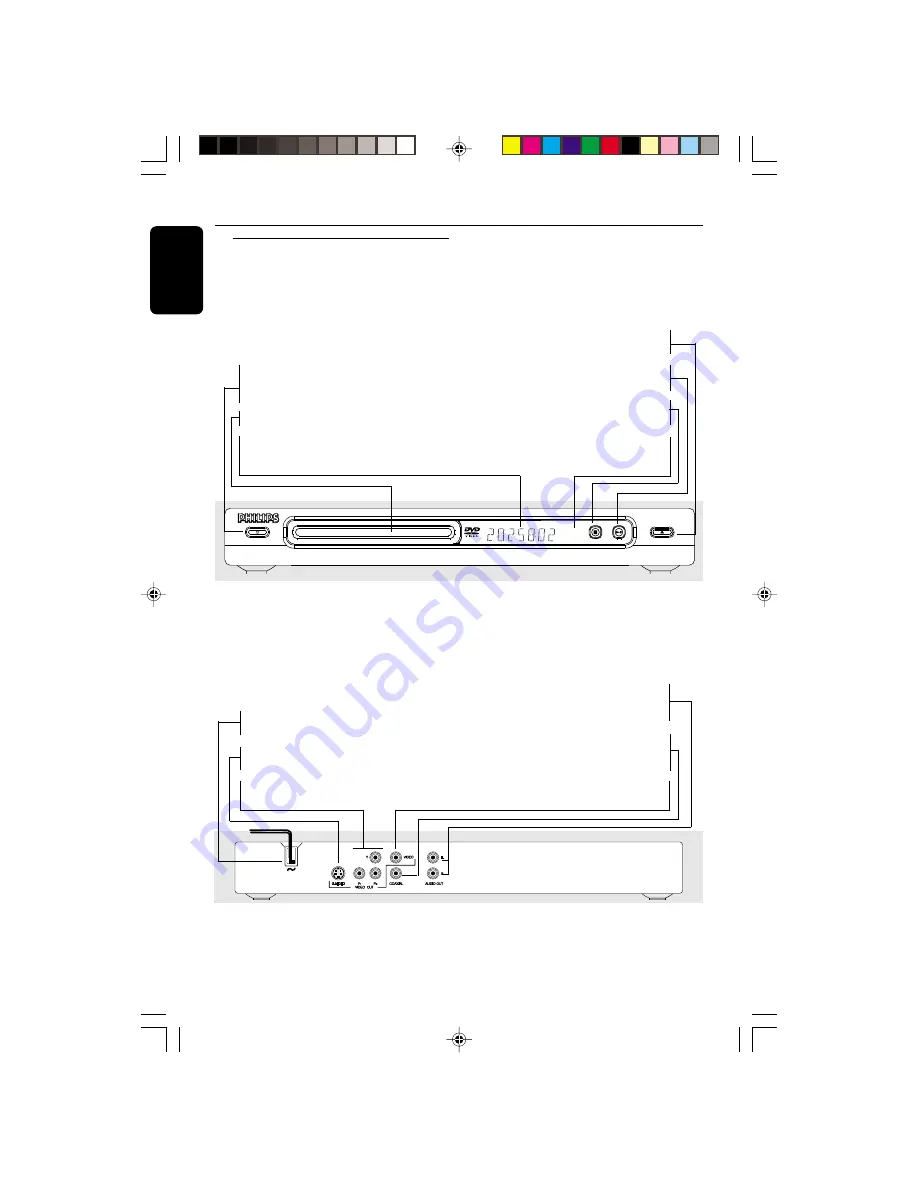
Functional Overview

Front and Rear Panels

Audio Out (Left/Right)

– Connect to AUDIO inputs of an amplifier,

receiver or stereo system

COAXIAL (Digital audio out)

–  Connect to coaxial AUDIO input of a

digital audio equipment

CVBS (VIDEO Out)

– Connect to CVBS Video input of a TV

OPEN/CLOSE

STANDBY-ON

STOP

PLAY/PAUSE

Mains (AC Power Cord)

Connect to a standard AC outlet

S-Video Out

Connect to S-Video input of a TV

YPbPr

Connect to YPbPr input of a TV

OPEN/CLOSE 

/

– Open/Close the disc tray

2;

 PLAY/PAUSE

– To start or interrupt playback

STOP

– To stop playback

IR Sensor

– Point the remote control towards this

sensor

STANDBY-ON 

B

To switch the DVD Player to Standby
mode or ON

Disc tray

Display

Shows the current status of the DVD
Player

Caution: Do not touch the inner pins of the jacks on the rear panel.
Electrostatic discharge may cause permanent damage to the unit.

01-36 DVD622_372

18/01/2005, 2:21 AM

14

Содержание DVD-622

Страница 1: ...es à simplifier l utilisation de votre produit Philips Toutefois si vous ne parvenez pas à résoudre votre problème vous pouvez accéder à notre aide en ligne à l adresse www philips com support ou formez le 1 800 661 6162 Francophone 1 888 PHILIPS 744 5477 English speaking Veillez à avoir votre produit à portée de main Gracias por escoger Philips Necesita ayuda inmediata Lea primero la Guía de uso ...

Страница 2: ...rvice networks in the industry What s more your purchase guarantees you ll receive all the information and special offers for which you qualify plus easy access to accessories from our convenient home shopping network Most importantly you can count on our uncompro mising commitment to your total satisfaction All of this is our way of saying welcome and thanks for investing in a PHILIPS product P S...

Страница 3: ... cart is used use caution when moving the cart apparatus combination to avoid injury from tip over 13 Unplug this apparatus during lightning storms or when unused for long periods of time 14 Refer all servicing to qualified service personnel Servicing is required when the apparatus has been damaged in any way such as power supply cord or plug is damaged liquid has been spilled or objects have fall...

Страница 4: ...tes dans le Règlement sur le Brouillage Radioélectrique édicté par le Ministère des Communications du Canada WARNING To reduce the risk of fire or electric shock do not expose this appliance to rain or moisture Use of controls or adjustments or performance of procedures other than herein may result in hazardous radiation exposure The set complies with the FCC Rules Part 15 and with 21 CFR 1040 10 ...

Страница 5: ...refer them to your CD Audio disc retailer CONSUMERS SHOULD NOTE THAT NOT ALL HIGH DEFINITION TELEVISION SETS ARE FULLY COMPATIBLE WITHTHIS PRODUCT AND MAY CAUSE ARTIFACTS TO BE DISPLAYED IN THE PICTURE IN CASE OF 525 OR 625 PROGRESSIVE SCAN PICTURE PROBLEMS IT IS RECOMMENDED THAT THE USER SWITCH THE CONNECTION TO THE STANDARD DEFINITION OUTPUT IF THERE ARE QUESTIONS REGARDINGYOUR TV SET COMPATIBIL...

Страница 6: ...OCATION ONTHE BACKPLATE OFTHE SET NEVER MAKE OR CHANGE CONNECTIONS WITHTHE POWER SWITCHED ON Laser safety This unit employs a laser Due to possible eye injury only a qualified service person should remove the cover or attempt to service this device NOTE PICTURES SHOWN MAYBE DIFFERENT BETWEEN COUNTRIES Environmental Information All unnecessary packaging has been omitted The packaging has been made ...

Страница 7: ...3139 246 14871 E n g l i s h Français E s p añ o l 7 Index English 8 Français 37 Español 65 01 36 DVD622_372 18 01 2005 2 20 AM 7 ...

Страница 8: ...ting language preference 18 Setting the OSD Language 18 Setting the Audio Subtitle and DVD menu language 18 Disc Operations Playable Discs 19 Region Codes 19 Playing discs 20 Using Disc Menu 20 Basic playback controls 21 23 Pausing playback 21 Selecting track chapter 21 Zoom 21 Repeat 22 Repeat A B 22 Slow Motion 23 Forward Reverse Searching 23 Preview 23 Special DVD features 24 Selecting aTitle 2...

Страница 9: ...onment until the moisture evaporates Do not block the vents Do not operate the DVD Player in an enclosed cabinet allow about 10 cm 4 inch of free space all around the player for adequate ventilation 10 cm 4 inches 10 cm 4 inches 10 cm 4 inches PHILIPS Care of the cabinet Use a soft cloth slightly moistened with a mild detergent solution Do not use a solution containing alcohol spirits ammonia or a...

Страница 10: ...DVD Player through your TV use the audio cables white red to connect AUDIO OUT L R jacks of the DVD Player to the corresponding AUDIO IN jacks on theTV cable supplied AUDIO IN V Pr Cr U Pb Cb Y S VIDEO IN VIDEO IN COMPONENT VIDEO IN AUDIO OUT V Pr Cr U Pb Cb Y S VIDEO IN VIDEO IN COMPONENT VIDEO IN 1 2 IMPORTANT S Video connection provides better picture quality This option must be available on yo...

Страница 11: ... DVD Player through your TV use the audio cables white red to connect AUDIO OUT L R jacks of the DVD Player to the corresponding AUDIO IN jacks on theTV cable supplied IMPORTANT If yourTV only has a single Antenna In jack or labeled as 75 ohm or RF In you will need an RF modulator in order to view the DVD playback on theTV See your electronics retailer or contact for details on RF modulator availa...

Страница 12: ... on the display panel OPEN CLOSE MIC LEVEL STOP STOP PLAY PLAY PAUSE PAUSE IR DVD VIDEO CD PLAYER TANDBY ON Connecting the power cord NO DISC Stereo system has Dolby Pro Logic or Right Left Audio In jack 1 Select one of the video connections CVBSVIDEO IN S VIDEO IN SCART or COMPONENTVIDEO IN depending on the options available on yourTV 2 Use the audio cables white red to connect AUDIO OUT L R jack...

Страница 13: ...AL jack of the DVD Player to the corresponding Digital Audio In jack on your Receiver cable not supplied 3 Set the DVD Player s Digital Output to PCM or ALL depending on the capabilities of your Receiver see page 27 Digital Output Helpful Hint If the audio format of the Digital Output does not match the capabilities of your receiver the receiver will produce a strong distorted sound or no sound at...

Страница 14: ...nnect to a standard AC outlet S Video Out Connect to S Video input of aTV YPbPr Connect toYPbPr input of aTV OPEN CLOSE Open Close the disc tray 2 PLAY PAUSE To start or interrupt playback 9 STOP To stop playback IR Sensor Point the remote control towards this sensor STANDBY ON B To switch the DVD Player to Standby mode or ON Disc tray Display Shows the current status of the DVD Player Caution Do ...

Страница 15: ...rt playback PAUSE To pause playback temporarily frame by frame playback REPEAT Selects various repeat modes REPEAT A B Repeats playback a specific section on a disc PREVIEW To search chapter track during playback MUTE Disables or enables sound output POWER B To switch the DVD player to standby mode or ON 0 9 numerical key pad Selects numbered items in a menu DISPLAY Displays information onTV scree...

Страница 16: ...s are between the lowest and highest channels and may be called FRONT A V IN orVIDEO See your TV manual for more details Or you may go to channel 1 on your TV then press the Channel down button repeatedly until you see theVideo In channel Or the TV Remote Control may have a button or switch that chooses different video modes Or set the TV to channel 3 or 4 if you are using an RF modulator 3 If you...

Страница 17: ...llow the instructions shown on the TV to confirm the selection if any If a blank distortedTV screen appears wait for 15 seconds for auto recovery Getting Started TIPS To return to the previous menu press OK To remove the menu press SYSTEM MENU Setting theTV Display Set the aspect ratio of the DVD Player according to the TV you have connected The format you select must be available on the disc If i...

Страница 18: ...and press OK Getting Started Setting the Audio Subtitle and DVD menu language You can choose your own preferred language or soundtrack from audio subtitles and DVD menu languages If the language selected is not available on the disc the disc s default language will be used instead Language OSD Menu Subtitle Audio DVD Menu Audio Rating Video English Off English English 1 Press SYSTEM MENU 2 Press 2...

Страница 19: ...or DVD R RW in all cases due to the type of disc or condition of the recording Unfinalised discs should have the last session closed before playing If you are having trouble playing a certain disc remove the disc and try a different one Improper formatted disc will not play on this DVD Player TIPS The operating features described here might not be possible for certain discs Always refer to the ins...

Страница 20: ...e TV see Using the Disc Menu If the disc is locked by parental control you must enter your four digit password See page 29 6 At any time simply press STOP to stop playback Disc Operations Using the Disc Menu Depending on the disc a menu may appear on the TV screen once you load the disc To select a playback feature or item Use the 1 2 3 4 or numeric keypad 0 9 on the Remote Control then press PLAY...

Страница 21: ...the next chapter track 2 Press S to go to the previous track or current 3 To go directly to any chapter track enter the chapter track number using the numerical keys 0 9 Zoom DVD VCD JPEG Zooming allows you to enlarge or to return to original size of the video image during playback 1 Press ZOOM repeatedly to increase or to return to original size 2 Press 1 2 3 4 to pan across the TV screen Resumin...

Страница 22: ...chapter REPEAT TITLE DVD to repeat playback of the current title REPEAT SINGLE VCD to repeat playback of the current track REPEAT ALL VCD to repeat playback of all the disc OFF DVD VCD to cancel the repeat mode Helpful Hint REPEAT function is not available forVCD 2 0 when PCB is on Repeat A B DVD VCD CD 1 Press REPEAT A B at your chosen starting point 2 Press REPEAT A B again at your chosen end po...

Страница 23: ...playback to select the required speed 1 2 1 4 1 8 or 1 16 backward or forward Sound will be muted 2 To return to normal speed press PLAY B Preview DVD VCD The Time Search function allows you to start playing at any chosen time on the disc 1 Press PREVIEW 2 Use 2 keys to select an option 3 Enter hours minutes and seconds from left to right in the time edit box using remote control numerical key pad...

Страница 24: ...image 6 7 image 7 MP3 1 10 MP3 8 music 8 9 music 9 10 music 10 1 music 1 2 music 2 3 music 3 4 music 4 5 music 5 6 music 6 7 music 7 3 Press 3 4 or use the numeric keypad 0 9 to highlight an option 4 Press OK to confirm Special DVD features Selecting a title Some DVDs may contain several titles If the disc has a title menu recorded on it you can start playback from the selected movie title 1 Press...

Страница 25: ... Use 1 2 3 4 to view the zoomed picture Playback with multi angles JPEG During playback press 3 4 1 2 to rotate the picture on the TV screen 3 rotate the picture vertically by 180º 4 rotate the picture horizontally by 180º 1 rotate the picture counter clockwise by 90º 2 rotate the picture clockwise by 90º Scan Effect JPEG Press ANGLE repeatedly to choose different scan effect Various scan effect a...

Страница 26: ...nguage on the screen For details see page 18 Audio Subtitle DVD Menu These menus contain various language options for audio subtitle and DVD menu which may be recorded on the DVD disc For details see page 18 Video Setup 1 Press SYSTEM MENU 2 Press 2 repeatedly to select VIDEO 3 Press OK to confirm Language TV Display TV Type Video Output Progressive Audio Rating Video TV Display This menu contains...

Страница 27: ...have connected the DVD Player to your TV using S Video jack YPbPr Select this if you have connected the DVD Player to your TV using component video output jack 4 Select an item and press OK Progressive turning on off This feature is only applicable if you have connected this DVD Player to a Progressive Scan TV through theY Pb Pr jacks see page 11 Language TV Display TV Type Video Output Progressiv...

Страница 28: ...on Language Digital Output LPCM Output Night Mode Audio Rating Video PCM All Off PCM 48Khz On 1 In AUDIO SETUP press OK to enter the submenu 2 Press 3 4 to highlight DIGITAL OUTPUT then press OK 3 Press 34 to highlight one of the options below OFF Turn off the digital output ALL If you have connected your DIGITAL AUDIO OUT to a multi channel decoder receiver PCM Only if your receiver is not capabl...

Страница 29: ...ack a disc recorded at the sampling rate of 96kHz that can only be achieved in Stereo Classic mode 4 Select an item and press OK Helpful Hint LPCM Output can be selected only when PCM is activated Night Mode turning on off In this mode the high volume outputs are softened and low volume outputs are brought upward to an audible level It is useful for watching your favourite action movie without dis...

Страница 30: ... four digit password when prompted on the screen The default password is 0000 1 In RATING press OK to enter the submenu 2 Use the numeric keypad 0 9 to enter your old four digit password When doing this for the first time key in 0000 If you forget your old four digit password key in 0000 3 Enter the new four digit password 4 Enter the new four digit password a second time to confirm The new four d...

Страница 31: ...ype of discs This applies to most illegal DVD discs Some DVDs are not encoded with a rating though the movie rating may be printed on the Disc cover The rating level feature does not work for such Discs Rating explanations 1 KID SAFE Kids material recommended especially for children and viewers of all ages 2 G General Audience recommended as acceptable for viewers of all ages 3 PG Parental Guidanc...

Страница 32: ... Player Ensure that the DVD Player sTVType is set to match that of the Disc and yourTV No sound or distorted sound Adjust the volume Check that the speakers are connected correctly No audio at digital output Check the digital connections Check if your receiver can decode MPEG 2 or DTS and if not please make sure the digital output is set to PCM Check if the audio format of the selected audio langu...

Страница 33: ...tlet for 5 10 seconds Player does not respond to some Operations may not be permitted by the disc operating commands during playback Refer to the instructions of the disc jacket DVD Player cannot read Use a commonly available cleaning CD DVD to CDs DVDs clean the lens before sending the DVD Player for repair Menu items cannot be selected Press STOP twice before selecting System Menu Depending on t...

Страница 34: ...IO PERFORMANCE DA Converter 24 bit 192 kHz DVD fs 96 kHz 4Hz 44kHz fs 48 kHz 4Hz 22kHz CD VCD fs 44 1kHz 4Hz 20kHz Signal Noise 1kHz 90 dB Dynamic range 1kHz 90 dB Crosstalk 1kHz 100 dB Distortion noise 1kHz 80 dB MPEG MP3 MPEG Audio L3 CONNECTIONS YPbPr Output Cinch 3x S Video Output Mini DIN 4 pins Video Output Cinch yellow Audio Output L R Cinch white red Digital Output 1 coaxial IEC60958 for C...

Страница 35: ...image quality in spite of its high compression ratio MP3 A file format with a sound data compression system MP3 is the abbreviation of Motion Picture Experts Group 1 or MPEG 1 Audio Layer 3 By using MP3 format one CD R or CD RW can contain about 10 times as much data volume as a regular CD can Parental Control A function of the DVD to limit playback of the disc by the age of the users according to...

Страница 36: ...uct repair and or part replacement because of improper installation connections to improper voltage supply abuse neglect misuse accident unauthorized repair or other cause not within the control of Philips Damage occurring to product during shipping when improp erly packaged or cost associated with packaging A product that requires modification or adaptation to enable it to operate in any country ...

Отзывы: