


3
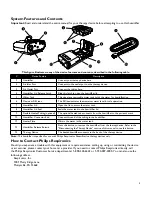
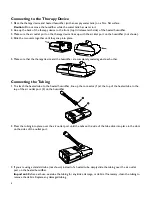
System Features and Contents
Important:
Read and understand the entire manual for your therapy device before attempting to use this humidifier.
This figure illustrates many of the device features and contents, described in the following table.
#
Device Feature
Description
1
Humidifier
Connect your therapy device here.
2
Air Inlet Port
Connects to the outlet port on the therapy device.
3
Air Outlet Port
Connect the tubing here.
4
Humidifier Lid Release Latch
Slide this latch to open the humidifier lid.
5
Water Tank
This one piece removable water tank holds the water for humidification.
6
Maximum Fill Lines
The fill lines indicates the maximum water level for safe operation.
7
Humidifier Lid
Open the lid to access the water tank.
8
Humidifier Lid Seal
Seals the water tank to the humidifier lid.
9
Flexible Heated Tubing (optional)
The optional heated tube connects from the humidifier to the patient’s mask.
10
Humidifier Connector End
Connect this end of the tubing to the humidifier.
11
Heater Plate
Warms the water in the water tank.
12
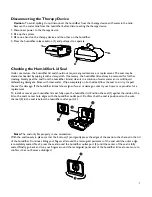
Humidifier Release Button
Press this button to remove the humidifier from the therapy device. Refer to the
“Disconnecting the Therapy Device” section of this manual to see this button.
13
Therapy Device
The heated humidifier connects to the back of the therapy device.
Note:
This humidifier is specified for use with Philips Respironics DreamStation therapy devices only.
How to Contact Philips Respironics
Should you experience trouble with this equipment or require assistance setting up, using, or maintaining the device
or accessories, please contact your home care provider. If you need to contact Philips Respironics directly, call
the Philips Respironics Customer Service department at 1-800-345-6443 or 1-724-387-4000. You can also use the
following address:
Respironics, Inc.
1001 Murry Ridge Lane
Murrysville, PA 15668
Содержание DreamStation
Страница 1: ...User manual DreamStation Heated Humidifier ...
Страница 16: ...1120833 1120833 R00 JR 4 13 2015 EN DOM ...


