Philips DreamStation Скачать руководство пользователя страница 12

10

Troubleshooting

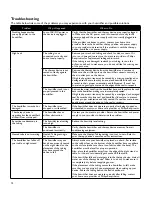
The table below lists some of the problems you may experience with your humidifier and possible solutions.

Problem

Why it Happened

What to Do

Nothing happens when 

you apply power to the 

humidifier.

Loss of AC/DC power or 

the device is unplugged.

Verify that the humidifier and therapy device are properly plugged 

in. Make sure the AC power cord is connected correctly to the 

power supply and the power supply cord is correctly plugged into 

the wall.  
If the problem continues to occur, contact your home care 

provider. Return the humidifier, therapy device, and power supply 

to your provider to determine if the problem is with the therapy 

device, humidifier, or power supply.
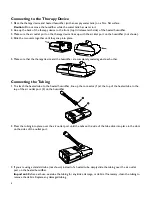
High Leak

The tubing is not 

connected correctly and 

doesn’t seal properly. 

Remove your mask and tubing and check for kinks or tears. If it 

is torn or damaged, contact your home care provider or Philips 

Respironics for replacement tubing and/or mask.

If the tubing is not damaged, reattach your tubing, turn on the 

airflow, and check to make sure you do not still feel air coming out 

of the port area.

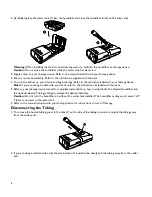
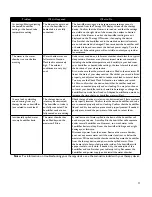
The therapy device is not 

seated correctly against 

the humidifier.

Remove the therapy device from the humidifier and reconnect. 

Make sure the air inlet port on the humidifier connects securely to 

the air outlet port on the device.
If high leak persists, issue may be caused by a missing, misaligned or 

damaged seal. Ensure that dry box seal and humidifier lid seal are 

present, in their proper orientation and fully seated. If a seal has 

come loose, gently press around the edges of the seal to reseat it.

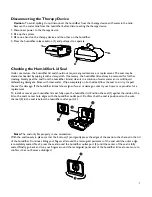
The humidifier tank is not 

properly seated in the 

humidifier.

Remove the water tank from the humidifier base, and then place the tank 

back in the humidifier, making sure it is completely seated.

If high leak persists, issue may be caused by a misaligned or damaged 

seal. Ensure that dry box seal and humidifier lid seal are in present, 

in their proper orientation and fully seated. If a seal has come loose, 

gently press around the edges of the seal to reseat it.

The humidifier is cracked or 

damaged.

The humidifier was 

dropped or mishandled.

If the humidifier does not operate properly after being dropped or 

mishandled, contact your home care provider or Philips Respironics.

The therapy device is 

operating but the humidifier’s 

airflow is low or stopped.

The humidifier has an 

airflow obstruction.

Contact your home care provider. Return the humidifier and power 

supply to your provider to determine the problem.  

Excessive condensation in 

the tubing.

The humidity level setting 

is too high.

Reduce the humidity level setting.

The humidifier is 

positioned incorrectly.

Verify that the humidifier and therapy device are away from air 

conditioning equipment.

Heated tube is not warming.

Heated Tubing setting is 

set to zero.

Make sure the Heated Tubing setting is not set to zero. Refer to 

your  therapy device’s user manual for instructions.

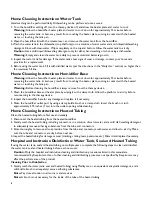
The humidifier has fallen off 

your table or night stand.

The humidifier may not 

have been properly seated 

on the night stand, or the 

placement of the tubing 

may have caused the 

device to fall. 

Always make sure your humidifier is placed on a hard, flat surface 

so the rubber feet on the bottom of the humidifier base can adhere 

to the surface (make sure there is no fabric under the base). The 

humidifier must be level for proper operation.
Also, place the humidifier away from the edge of the night stand or 

table, so it doesn’t accidentally get knocked off the table.
If the humidifier falls and water gets into the therapy device, drain all 

water out of the therapy device. Allow it to air dry to make sure it 

is completely dry before reapplying power.

If the placement of the tubing causes the humidifier to fall, make 

sure that you use proper hose management when setting up your 

device. Route the tubing behind the bed’s headboard.
If the humidifier does not operate correctly after falling, contact 

your home care provider or Philips Respironics. 

Содержание DreamStation

Страница 1: ...User manual DreamStation Heated Humidifier ...

Страница 2: ...ng the Tubing 4 Daily Use 5 Disconnecting the Tubing 6 Disconnecting the Therapy Device 7 Checking the Humidifier Lid Seal 7 Home Cleaning Instructions Water Tank 8 Home Cleaning Instructions Humidifier Base 8 Home Cleaning Instructions Heated Tubing 8 Hospital and Institution Disinfection 8 Service 9 Traveling with the System 9 Disposal 9 Troubleshooting 10 DreamStation Heated Humidifier Specific...

Страница 3: ... care provider Before cleaning the humidifier always remove from the therapy device Empty and clean the water tank daily to prevent mold and bacteria growth Repairs and adjustments must be performed by Philips Respironics authorized service personnel only Unauthorized service could cause injury invalidate the warranty or result in costly damage Do not use any accessories detachable parts and mater...

Страница 4: ...tubing For information related to the mask to be used including any need for a separate exhalation device consult the instructions for use that accompany both the mask and therapy device The DreamStation Heated Humidifier with Heated Tubing is designed to deliver humidification to provide added comfort during therapy This humidification level is controlled through the output of the heated humidifi...

Страница 5: ...onal The optional heated tube connects from the humidifier to the patient s mask 10 Humidifier Connector End Connect this end of the tubing to the humidifier 11 Heater Plate Warms the water in the water tank 12 Humidifier Release Button Press this button to remove the humidifier from the therapy device Refer to the Disconnecting the Therapy Device section of this manual to see this button 13 Thera...

Страница 6: ...rapy device and the humidifier are completely seated against each other Connecting the Tubing 1 To attach the heated tube to the heated humidifier line up the connector 1 at the top of the heated tube to the top of the air outlet port 2 on the humidifier 2 Press the tubing into place over the air outlet port until the tabs on the side of the tube click into place in the slots on the sides of the o...

Страница 7: ...t surface Fill the tank with water 2 no higher than the maximum fill line To avoid spilling the water level should not rise above the bottom of the tube 3 in the back of the water tank Note Clean the water tank before first use Refer to the Home Cleaning Instructions Water Tank section in this manual Caution Do not attempt to fill the tank while it is still inside the humidifier Caution Use only r...

Страница 8: ...e having trouble with your mask refer to the instructions included with the mask 8 Refer to your therapy device manual for complete instructions on how to adjust both the Heated Humidifier and the optional Heated Tubing settings to achieve the desired humidity Caution Do not turn the humidifier on without the water tank installed The humidifier setting must remain off if there is no water in the w...

Страница 9: ...completely on both sides Allow the seal to air dry Inspect the seal for damage If the humidifier lid seal show signs of wear or damage contact your home care provider for a replacement To install or reseat your humidifier lid seal fully open the humidifier lid Position the seal 1 against the inside of the lid so the seal s center hole aligns with the humidifier outlet port Confirm that the seal is...

Страница 10: ...se and heater plate by wiping it with a damp cloth Allow the platform to air dry before reconnecting to the therapy device 2 Inspect the humidifier base for any damage and replace it if necessary 3 Clean the humidifier outlet port by using a damp bottle brush or a damp cloth Insert the brush or cloth approximately 2 75 inches 7 cm into the outlet opening while cleaning Home Cleaning Instructions H...

Страница 11: ...scribed in the chemical disinfection instructions separately rinse the tank seal and heated tubing a minimum of 1 time each in at least 3 gallons 11 4 liters of water and air dry out of direct sunlight Note Discoloration of the seal is normal after disinfection Service The humidifier does not require routine servicing If any part of the humidifier is worn or damaged contact Philips Respironics or ...

Страница 12: ...l and humidifier lid seal are in present in their proper orientation and fully seated If a seal has come loose gently press around the edges of the seal to reseat it The humidifier is cracked or damaged The humidifier was dropped or mishandled If the humidifier does not operate properly after being dropped or mishandled contact your home care provider or Philips Respironics The therapy device is o...

Страница 13: ...fier seals and tube are connected properly and not leaking You may also choose to lower your humidifier and or heated tube settings or change the humidification mode from Fixed to Adaptive humidification mode to increase the time that your humidifier water will last I hear a leak or whistling sound coming from my therapy device or humidifier not related to mask leak The therapy device air inlet ma...

Страница 14: ...heated humidifier is used with a Philips Respironics therapy device AC Power Consumption with 80W power supply 100 240 VAC 50 60 Hz 2 0 1 0 A DC Power Consumption 12 VDC 6 67 A Type of Protection Against Electric Shock Class II Equipment Degree of Protection Against Electric Shock Type BF Applied Part Degree of Protection against Ingress of Water Drip Proof IP22 Mode of Operation Continuous Electr...

Страница 15: ...rized distributors of Respironics Inc products and Respironics Inc reserves the right to charge dealers for warranty service of failed product not purchased directly from Respironics Inc or authorized distributors Respironics Inc disclaims all liability for economic loss loss of profits overhead or consequential damages which may be claimed to arise from any sale or use of this product Some states...

Страница 16: ...1120833 1120833 R00 JR 4 13 2015 EN DOM ...

Отзывы: