background image

17

EN

Bluetooth


Bluetooth profiles: A2DP


Bluetooth version: 4.1

Main unit


Power supply: 

•  Model (Philips branded AC power 

adapter):   DYS602-210309W; 

AS650-210-AA309

•  Input: 100-240 V~, 50/60 Hz 1.5 A

•  Output: 21V  , 3.09A


Standby power consumption: ≤ 0.5 W 


Dimensions (W x H x D): 

580 x 51.5 x 98 mm


Weight:1.2 kg


Built-in speakers

•  2 x midrange 

(90mm/3.5" x 34mm/1.3", 8 ohm)

•  1 x tweeter (25.4mm/1", 8 ohm)

Front/rear speakers

•  Speaker drivers: 

•  2 x midrange (63.5 mm/2.5", 10 ohm)

•  1 x tweeter (25.4 mm/1", 8 ohm)

•  Dimensions (W x H x D): 

110 x 301 x 110 mm

•  Weight: 1.3 kg/each

•  Cable length: 5 m/each

Subwoofer

•  Power supply: 110-127 V~, 50-60 Hz

•  Power consumption: 60 W

• 

Standby power consumption: ≤ 0.5 W 

•  Impedance: 3 ohm

•  Speaker drivers: 1 x 165 mm (6.5") woofer

•  Dimensions (W x H x D): 

228 x 406 x 265 mm

•  Weight: 5.7 kg

Wireless box/receiver

•  Power supply: 110-240 V~, 50-60 Hz


Power consumption: 20 W


Standby power consumption: ≤ 0.5 W


Dimensions (W x H x D): 

150 x 44.5 x 126 mm;


Weight: 0.4 kg 

Remote control batteries

•  1  x AAA-R03-1.5 V 

Standby power management

•  When the product remains inactive for 

15 minutes, it automatically switches to 

standby or networked standby.

•  The power consumption in standby or 

networked standby is less than 0.5W.

•  To deactivate Bluetooth connection, press 

and hold the Bluetooth button on the 

remote control.

•  To activate Bluetooth connection, enable 

Bluetooth connection on your Bluetooth 

device, or enable Bluetooth connection via 

the NFC tag (if available).

Содержание CSS5530B

Страница 1: ...www philips com support User manual Always there to help you Register your product and get support at CSS5530B Question Contact Philips ...

Страница 2: ......

Страница 3: ...with the rear speakers 8 Pair up with the subwoofer 9 Connect audio fromTV 9 Connect audio from other devices 10 Set up speakers 10 4 Use your product 12 Adjust the volume 12 Choose your sound 12 MP3 player 12 Play music via Bluetooth 13 Connect Bluetooth via NFC 13 USB storage devices 14 Auto standby 14 Apply factory settings 14 5 Update software 15 Check software version 15 Update software via U...

Страница 4: ...g the cart apparatus combination to avoid injury from tip over Unplug this apparatus during lightning storm or when unused for long periods of time Refer all servicing to qualified service personnel Servicing is required when the apparatus has been damaged in any way such as power supply cord or plug is damaged liquid has been spilled or objects have fallen into the apparatus the apparatus has bee...

Страница 5: ...uninsulated material within your unit may cause an electrical shock For the safety of everyone in your household please do not remove product covering The exclamation point calls attention to features for which you should read the enclosed literature closely to prevent operating and maintenance problems WARNING To reduce the risk of fire or electric shock this apparatus should not be exposed to ra...

Страница 6: ...ntact note down the model number and serial number of your product You can find this information on the back or bottom of your product 2 Your product Congratulations on your purchase and welcome to Philips To fully benefit from the support that Philips offers register your product at www philips com welcome Main unit This section includes an overview of the main unit a Switch this product on or to...

Страница 7: ... hold three seconds to break the current Bluetooth connection HDMI ARC Switch your source to HDMI ARC connection c Skip to the previous or next track in Bluetooth mode only for AVRCP supported Bluetooth devices d Start pause or resume play in Bluetooth mode only for AVRCP supported Bluetooth devices e BASS Increase or decrease bass f Volume control Increase or decrease volume Mute or restore volum...

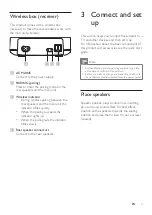
Страница 8: ... g AUDIO IN Audio input from an external device with 3 5 mm jack such as MP3 player or with red white audio jacks a b c d e g f Wireless subwoofer This product comes with a wireless subwoofer a PAIRING pairing Press to enter the pairing mode for the subwoofer b Subwoofer indicator When the power is turned on the indicator lights up During wireless pairing between the subwoofer and the main unit th...

Страница 9: ...Rear speaker connectors Connect to the rear speakers a c b d 3 Connect and set up This section helps you connect this product to a TV and other devices and then set it up For information about the basic connections of this product and accessories see the quick start guide Note For identification and supply ratings see the type plate at the back or bottom of the product Before you make or change an...

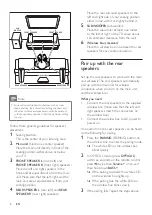
Страница 10: ...behind it 5 SUBWOOFER subwoofer Place the subwoofer at least one meter to the left or right of theTV Leave about 10 centimeter clearance from the wall 6 Wireless box receiver Place the wireless box in between the rear speakers for easy cable connection Pair up with the rear speakers Set up the rear speakers to work with the main unit wirelessly The rear speakers automatically pair up with the main...

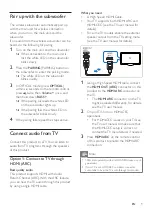
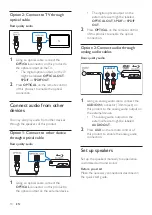
Страница 11: ...akers of this product Option 1 Connect to TV through HDMI ARC Best quality audio This product supports HDMI with Audio Return Channel ARC With the ARC feature you can hear theTV audio through this product by using a single HDMI cable What you need A High Speed HDMI Cable YourTV supports both HDMI ARC and HDMI CEC see theTV user manual for details For someTV models enable the external speaker outpu...

Страница 12: ... product to the optical output on the external device TV The digital optical output on the external device might be labeled OPTICAL OUT SPDIF or SPDIF OUT 2 Press OPTICAL on the remote control of this product to enable the optical connection Option 2 Connect audio through analog audio cables Basic quality audio 1 Using an analog audio cable connect the AUDIO IN connector 3 5mm jack on this product...

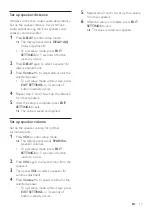
Страница 13: ...and 3 to set up the distance for other speakers 5 After the setup is complete press EXIT SETTINGS to exit The value is saved and applied Set up speaker volume Set up the speaker volume for optimal surround sound 1 Press VOL to enter setup mode The display panel scrolls SPKRVOL speaker volume To exit setup mode press EXIT SETTINGS or 3 seconds of button inactivity occurs 2 Press VOL again to play t...

Страница 14: ...reo Ideal for party music STEREO Create two channel stereo Ideal for listening to music Equalizer Change the high frequency treble and low frequency bass settings of this product 1 Press TREBLE or BASS to change the frequency Synchronize video and sound If the audio and video are not synchronized delay the audio to match the video 1 Press AUDIO SYNC to synchronize the audio with the video Night mo...

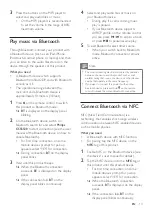
Страница 15: ...nel blinks continuously 4 Select and play audio files or music on your Bluetooth device During play if a call is coming music play is paused If your Bluetooth device supports AVRCP profile on the remote control you can press to skip to a track or press to pause resume play 5 To exit Bluetooth select other source When your switch back to Bluetooth mode Bluetooth connection remains active Note The m...

Страница 16: ...epeat mode is turned off OFF RPT scrolls once on the display panel Note If a USB storage device has a large media library it takes some time to load those contents This product may not be compatible with certain types of USB storage device If you use a USB extension cable USB HUB or USB multi reader the USB storage device may not be recognized Digital camera PTP and MTP protocols are not supported...

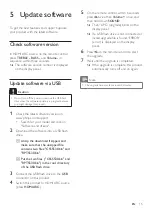
Страница 17: ... flash drive a Unzip the download if zipped and make sure that the unzipped file contains two files CSS5530 bin and RPT5530 bin b Put the two files CSS5530 bin and RPT5530 bin in the root directory of the USB flash drive 3 Connect the USB flash drive to the USB connector on this product 4 Switch this product to HDMI ARC source press HDMI ARC 5 On the remote control within 6 seconds press twice the...

Страница 18: ...cure two suitable screws on the wall as indicated by two holes 2 Fix a supplied wall bracket onto a speaker 3 Hang the speaker on the screws which are secured on the wall 9 mm 0 35 3 5 mm 0 14 25 mm 0 98 7 Product specifications Note Specifications and design are subject to change without notice Amplifier FTC total output power 170W Front rear speakers 56W 1 THD 8ohm 150Hz 20kHz Center speaker 14W...

Страница 19: ...sumption 60 W Standby power consumption 0 5 W Impedance 3 ohm Speaker drivers 1 x 165 mm 6 5 woofer Dimensions W x H x D 228 x 406 x 265 mm Weight 5 7 kg Wireless box receiver Power supply 110 240V 50 60 Hz Power consumption 20 W Standby power consumption 0 5 W Dimensions W x H x D 150 x 44 5 x 126 mm Weight 0 4 kg Remote control batteries 1 x AAA R03 1 5V Standby power management When the product...

Страница 20: ...cho If you play audio from theTV through this product make sure that theTV is muted Audio and video are not synchronized Press AUDIO SYNC to synchronize the audio with the video Bluetooth A device cannot connect with this product The device does not support the compatible profiles required for this product You have not enabled the Bluetooth function of the device See the user manual of the device ...

Страница 21: ...rovide reasonable protection against harmful interference in a residential installation This equipment generates uses and can radiate radio frequency energy and if not installed and used in accordance with the instruction manual may cause harmful interference to radio communications However there is no guarantee that interference will not occur in a particular installation If this equipment does c...

Страница 22: ...ons USA Inc 3070 Windward Plaza Suite F Box 735 Alpharetta GA 30005 Canada CAN ICES 3 B NMB 3 B This device complies with Industry Canada s licence exempt RSSs Operation is subject to the followingTwo conditions 1 this device may not cause harmful interference and 2 this device must accept any interference received including interference that may cause undesired operation The device meets the exem...

Страница 23: ...r registered trademarks of HDMI Licensing LLC in the United States and other countries The Bluetooth word mark and logos are registered trademarks owned by Bluetooth SIG Inc and any use of such marks by Gibson Innovations Limited is under license Other trademarks and trade names are those of their respective owners The N Mark is a trademark or registered trademark of NFC Forum Inc in the United St...

Страница 24: ...22 P F USA Inc PO Box 2248 Alpharetta GA 30023 2248 ...

Страница 25: ......

Страница 26: ...been manufactured by and is sold under the responsibility of Gibson Innovations Ltd and Gibson Innovations Ltd is the warrantor in relation to this product Philips and the Philips Shield Emblem are registered trademarks of Koninklijke Philips N V and are used under license from Koninklijke Philips N V CSS5530B_37_UM_V3 0 ...

Отзывы: