background image

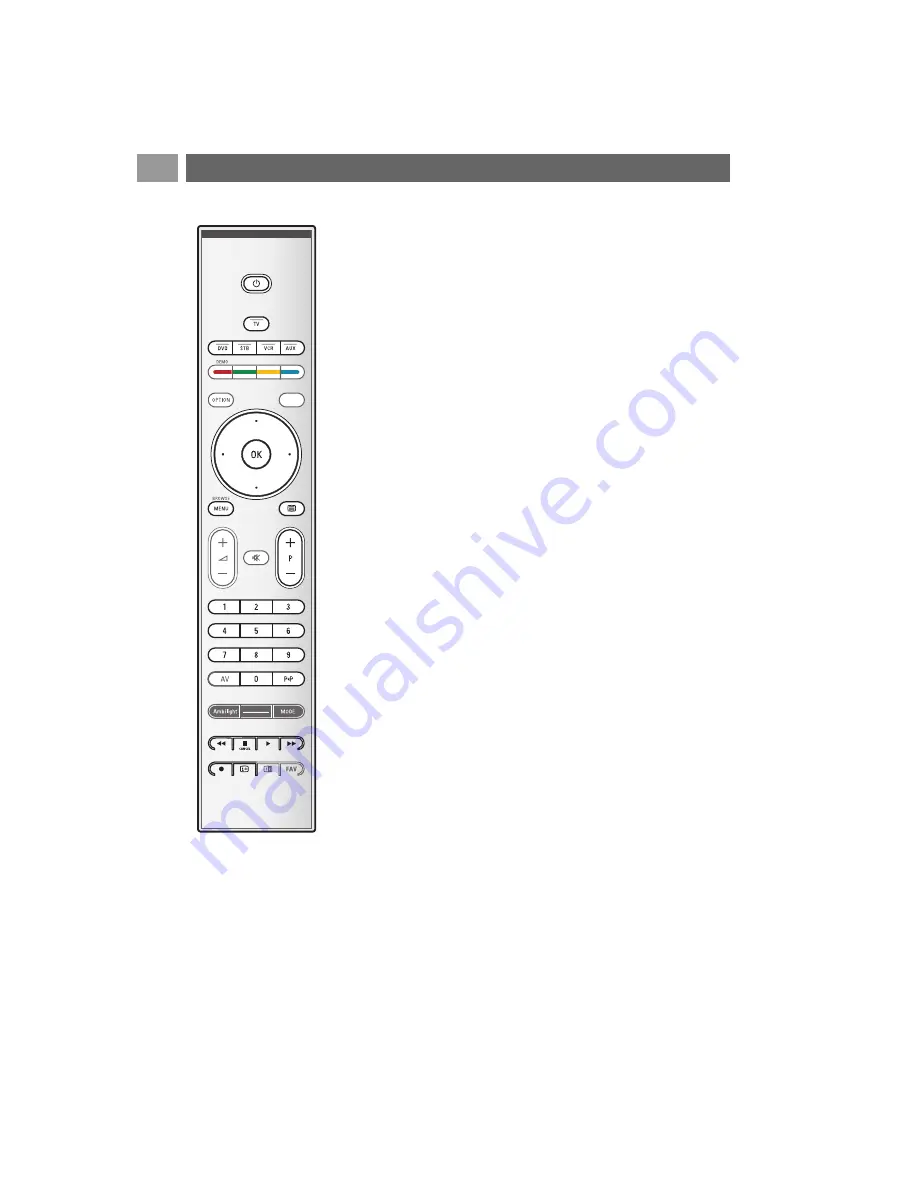
Most of the audio and video equipment from our range of
products can be operated with the remote control of your TV.
Press one of the keys after you pressed one of the mode keys
(

DVD

,

STB

,

VCR

,

AUX

) according to the equipment you want to

operate with this remote control.
See Use of the Remote control, p. 5-6.

B

to switch to standby 

®

for record,

Ò

for rewind (

VCR

,

CD

);

search down (

DVD

)

for stop,

π

for play, for pause

for fast forward (

VCR

,

CD

);

search up (

DVD

)

i

to display information

MENU/BROWSE

to switch the menu on or off 

- P +

for chapter, channel, track selection

0 to 9

digit entry,

cursor up/down

to select the next or the previous disc
(

CD

)

cursor left/right

to select the previous or following
track (

CD

)

0

to select a DVD title/chapter;
index (

AUX

)

b

to select your choice of
subtitle language (

DVD

)

Normal mode

: if no action is being undertaken within 30

seconds, the remote control returns to TV mode.

Expert mode

: in Expert mode the remote will stay in the

selected mode even when the 30 seconds time-out is elapsed.

To select between Normal and Expert mode

1. Select TV mode with the 

TV

key.

2. Press the 

OK

key simultaneously with the 

¬

key for four

seconds.

>

When the 

B

key is On for one second, the Expert mode

is selected and the remote control will remain in the
mode selected.

3. Select the desired mode (

DVD

,

STB

,

VCR

,

AUX

)

4. To go back to the TV mode, select 

TV

and repeat steps 

1 to 3.

Audio- and video equipment keys

EN

54

a

v

Содержание Cineos 42PF9641D

Страница 1: ... 48 a DVD player satellite or HD receiver 49 a PC 50 a Home Cinema amplifier 51 Use the Common Interface slot 52 Select connected equipment 53 Record with your recorder 53 Audio and video equipment keys 54 Troubleshooting 55 Annex 1 Philips TV software upgrade with portable memory 57 Annex 2 Philips TV Slideshow Format with background music 60 Annex 3 Philips TV Digital camera and USB issues 62 An...

Страница 2: ...el logo present a problem if they are bright and stationary Moving or low contrast graphics are less likely to cause uneven aging of the screen Stock market stickers presented at the bottom of the TV screen Shopping channel logos and pricing displays bright and shown constantly or repeatedly in the same location on the TV screen Examples of still pictures also include logos computer images time di...

Страница 3: ...ning disconnect all power sources before making any connections Tip it is preferable to connect peripherals with RGB output to EXT1 or EXT2 as RGB provides a better picture quality Before you start Overview of the rear connector panel Pr Pb Y DIGITAL AUDIO AUDIO HDTV Progressive DISPLAY SYNCHRONIZED 480p 576p 720p 1080i IN IN L R EXT3 AUDIO OUT AUDIO OUT L R DIGITAL AUDIO OUT COMMON INTERFACE COMM...

Страница 4: ...pressor cable supplied Warning verify that the mains supply voltage corresponds to the voltage printed on the sticker at the rear of the TV USB Overview of the side connector panel Connect the antenna Connect the mains Insert the mains cord supplied into the mains at the bottom of the TV and in the wall socket Remote control Insert the 2 batteries supplied Type R6 1 5V Be sure the and ends of the ...

Страница 5: ...to enlarge the teletext page display See Teletext p 41 aTo open and close the Electronic Programme Guide See EPG Electronic Programme Guide p 35 Cursor keys Press the cursor keys up down left right to navigate through the menus OK To activate a setting Starts playing content in the Multimedia Browser application BROWSE MENU To open and close the main menu See How to navigate through the menus p 11...

Страница 6: ...mbilight p 20 MODE Press this key repeatedly to toggle through the Ambilight modes Ò π Audio and Video equipment keys See Audio and Video equipment keys p 54 See Multimedia browser functional keys p 39 CANCEL Only for UK Digital text Interactive services Press this key to cancel those special services and the function bar at the bottom of the screen no function iOn screen information Press to disp...

Страница 7: ... 3 Press the OK key to jump to the selected menu item in the TV menu Except for the Clock option 4 Use the cursor keys to make a selection 5 Press the OPTION key to exit a Note digital related menu items will only be accessible in case of digital TV broadcasting Use of the OPTION key Quick access Digital audio language Digital subtitle language Subtitles Picture format Equalizer Clock In case your...

Страница 8: ...l guide you through the installation of your TV Follow the instructions on screen Besides traditional analogue broadcasts you can also receive digital broadcasts via a roof or loft mounted digital antenna in countries where those signals are available and which are supported by this TV Verify if the country you are now located and you have selected during the installations see further supports dig...

Страница 9: ...the search is completed Notes reception of digital terrestrial TV channels is applicable dependent on the country selected if you choose to install the channels at a later time select the Automatic installation in the TV menu Installation Channels to scan available channels 1 Press the green colour key on your remote control when Television is highlighted 2 Select the country where you are now loc...

Страница 10: ...any screens there are in total The Settings assistant will step sequentially through the following settings Picture Sound and Ambilight 5 Press the green colour key again to store all the settings and to return to the TV installation menu 6 Press the red colour key again to finish the First time installation procedure and to display the first stored TV channel First time installation Continued EN ...

Страница 11: ...ss detailed information about individual digital TV programmes According to the type of Electronic Programme Guide it also allows you to access the table of scheduled Digital TV programmes and easily select and tune to a desired programme See EPG Electronic Programme Guide p 35 Multimedia allows you to access the Multimedia browser application It lets you display your personal multimedia files Mul...

Страница 12: ...settings to the factory standard settings to upgrade your TV software 5 Press the cursor right to enter the highlighted menu item The content of the right panel is moved to the left panel and the right panel now shows the content of the newly highlighted item in the left panel 6 Press the MENU BROWSE key to exit the main menu Note in some cases it is important that the picture can be watched while...

Страница 13: ... key on the remote control The main menu appears on the screen 2 Select TV menu and press the cursor right The TV menu is displayed 3 Select TV settings and press the cursor right The TV settings menu is moved to the left 4 Press the MENU BROWSE key to exit the menu To make it easier to change the settings of the TV there are 3 ways of doing it Adjust viewing and listening settings The TV menu all...

Страница 14: ...one of the standard settings for viewing and listening Current shows your current settings for viewing and listening If you select Natural it allows you to set your picture sound and ambilight settings to the recommended standard values In most cases this will give the best balanced viewing experience If you select Vivid it allows you to set your picture sound and ambilight settings to rich values...

Страница 15: ...u Contrast Adjusts the intensity of bright parts in the picture but keep the dark parts unchanged Brightness Adjusts the light output of the complete picture which will mainly affect the darker areas of the picture Colour Adjusts the saturation level of the colours to suit your personal preference Hue Compensates for the colour variations in NTSC encoded transmissions Sharpness Adjusts the sharpne...

Страница 16: ... is the most ideal setting as it fully processes the image to make every single pixel the best it can be improving contrast sharpness picture depth and colour reproduction and brilliance from every source including High Definition Select On or Off to activate de activate Pixel Plus Digital Natural Motion Reduces the field and line flicker and reproduces smooth movement especially in movies Select ...

Страница 17: ...oose among the following picture formats Auto format Super zoom 4 3 Movie Expand 14 9 Movie Expand 16 9 or Wide screen Auto format makes the picture fill the screen as much as possible In case of subtitles in the bottom black bar Auto format makes the subtitles visible In case of a broadcaster logo in the corner of the top black bar the logo disappears from the screen Super zoom removes the black ...

Страница 18: ... to adjust the output of the right and left speakers to obtain the best stereo reproduction for your listening position Digital audio language only with Digital TV broadcasting Allows you to select an audio language out of the list of the available broadcasted languages for the current digital programme EN 18 Note dependent on the input signal one or more menu items may not be selectable Tip this ...

Страница 19: ...dphones AVL Automatic Volume Leveler Automatically reduces the volume differences between channels and programmes providing a more constant overall level This will also reduce the dynamics of sound Delta volume Allows you to correct for any permanent volume differences between TV channels or external sources Auto surround When switched On this allows the TV to automatically switch to the best surr...

Страница 20: ...se the cursor up down to select the Ambilight menu items 6 Press the cursor right to enter the selected Ambilight menu item 7 Use the cursor keys to adjust the settings 8 Press the cursor left to return to the Ambilight menu Ambilight Allows you to switch the lights On or Off at the rear of the TV Select Off to switch off the ambient lights and downlight all other ambilight menu items Select On to...

Страница 21: ...s the rate of change is limited as not to cause uncomfortable sensations according to the selection made some Ambilight menu items will be downlighted and can not be selected Enjoy Ambilight Continued EN 21 Colour Allows you to select or adjust the colour of the light to your own personal choice Warm white is matched to that of most normal lightbulbs Select this setting if you want the Ambilight t...

Страница 22: ... is in standby mode ambilight can be used to provide a unique ambience for the room Press the Ambilight key on the remote control to switch between Ambilight On or Off See Use of the remote control p 6 Press the MODE key repeatedly to toggle through the Ambilight modes Enjoy Ambilight Continued EN 22 Note only available when Custom has been selected in the Colour menu Note when the TV is switched ...

Страница 23: ...on teletext and select the proper subtitle page from the index 2 Switch off teletext 3 Select Subtitle On to display the subtitles on the selected TV channels On during mute to automatically display the subtitles only when the sound has been muted with the key on the remote control Adjust feature menu settings EN 23 Digital subtitle language only with Digital TV broadcasting This allows you to tem...

Страница 24: ...rsor left Select Time and press the cursor right Enter the time with the cursor up down and right Channel lock to lock a certain TV channel or external Press the OK key to activate deactivate Parental rating to set an age rating to a digital programme if the programme is parental rated The ratings applied are according the selected country in the initial installation Press the cursor right and sel...

Страница 25: ...me 1 Select On timer 2 Press the cursor right to enter the On timer menu 3 Select Timer and press the cursor right 4 Select On 5 Select Channel and then the TV channel you want your TV to switch to on a selected time and day 6 Select Day and then a day of the week or select Daily 7 Select Time and enter the time with the digit keys or with the cursor up down 8 Press the OK key to activate 9 Press ...

Страница 26: ... red colour key to stop the demo and to return to the demo menu 6 Press the red colour key to exit the demo menu Note this menu item and the common interface applications are only selectable when an authenticated Common Interface card is present and some Common Interface card user interface sessions are listed The CI service provider is responsible for the messages and texts on screen In case of f...

Страница 27: ...gs related to the installation of the TV channels language and country and to the initial installation of your TV 1 Press the MENU BROWSE key on the remote control The main menu appears 2 Select TV menu and press the cursor right The TV Menu is moved to the left 3 Select Installation and press the cursor right The Installation menu is moved to the left panel 4 Use the cursor up down to select the ...

Страница 28: ...ion update This allows you to automatically tune to and update all available channels Select your country Select the time zone only with Digital TV broadcasting Notes if you select a wrong country the channel numbering will not be according to the standard for your country in case the country selected is not DVB T supported by your TV digital related menu items will not be accessible This allows y...

Страница 29: ...firm with the OK key Select Store as new channel if you want to store the fine tuned frequency under a new channel number Press the cursor right and confirm with the OK key 9 Use the rearrange menu to rename or reshuffle the channels See next page Note when on a frequency where a DVB signal is broadcasted the tuner will try to decode an analogue TV channel and hence will not show video Tip if you ...

Страница 30: ...ible to tune to This also allows you to reinstall an earlier uninstalled channel 1 Select the channel you want to uninstall 2 Press the green colour key to uninstall the selected channel The uninstalled channel is indicated in the list by an icon in front of the uninstalled channel 3 Press the green colour key again to reinstall the uninstalled channel Rearrange the channel number list EN 30 Notes...

Страница 31: ...of the volume bar and a reduced or extended on screen display of programme and channel information Select Minimum to activate the display of reduced channel information Select Normal to activate the display of extended channel and programme information For example information on the programme input signal quality of connected peripheral equipment the screen format and sound mode selected audio lan...

Страница 32: ...d Dolby Digital audio via the DIGITAL AUDIO OUT connector to an external amplifier or receiver If your amplifier or receiver has a matching connector for Digital Audio In you can connect it with a single cable to the TV s DIGITAL AUDIO OUT See To make video and audio connections Connect a Home Cinema amplifier p 51 Select your connections EN 32 Select a Decoder channel number This allows you to de...

Страница 33: ...control if you want to be reminded later on Press the green colour key on your remote control to confirm you have read the message Once you have confirmed the message will not pop up again If however you want to see the last broadcasted announcement again select Announcement in the Software upgrade menu This allows you to reset most of the predefined factory states 1 Select and press the cursor ri...

Страница 34: ...ct a channel 7 Press the OK key to check or uncheck the highlighted channel and to add it to or remove it from your selected favourite list 8a Press the green colour key again to leave the Edit mode The modified favourite channel list appears Press the FAV key again to exit With the P key you will be able to browse through the TV channels of the selected list 8b Press the red colour key to remove ...

Страница 35: ...ed programme appears When the All channels list is displayed or selected you may filter the list and select a list with only the TV channels or a list with only the radio channels 1 Press the FAV key The last selected channel list appears 2 Press the cursor left 3 Select the All channels list and press the cursor right 4 Press the red colour key to filter 5 Select your desired channels list 6 Pres...

Страница 36: ...data is currently being acquired This menu allows you to mark unmark up to 50 preferred EPG channels Acquire EPG data allows you to update the information for the preferred programme guide channels Follow the instructions on screen 6 To quit the Electronic Programme Guide press the a key again EPG Electronic Programme Guide Continued EN 36 Tips the EPG screen will not include TV channels which are...

Страница 37: ...y stick or a digital camera connect it to the USB connector at the side See To make video and audio connections Side panel overview p 44 When a USB device is inserted the Multimedia browser menu is displayed automatically See further To remove the USB device 1 Press the MENU BROWSE key on the remote control to switch off the main menu 2 Remove the USB device Multimedia Browser EN 37 a To view cont...

Страница 38: ... 10 To stop playing content press the key on the remote control Multimedia Browser Continued EN 38 Note press the green colour key to display all the image files in the current directory as thumbnails when browsing pictures Press the green key again to display the image files in a list Tip the blue colour key can if necessary be used to let the colour keys reappear Notes your TV supports slide sho...

Страница 39: ... zoom magnifications x1 x2 x4 with the cursor up down Additionally you can shift the selected zoom window over the screen with the cursor keys Full small screen to toggle between a full or a small screen Multimedia function keys on the remote control Ò to fast rewind displaying content to stop playing content π to play a single file start a slide show playback of a folder or other collection to pa...

Страница 40: ... broadcasts Press i A T O P overview of the teletext subjects available is displayed Select with the cursor up down left right the desired subject and press the OK key Select subpages When a selected teletext page consists of different subpages a list of available subpages appears on the screen Press the cursor left or right to select the next or previous subpage Picture Teletext 1 Press the b key...

Страница 41: ...part and then to return to the normal teletext page size Teletext Continued EN 41 The Teletext menu offers various functions to control teletext 1 Switch teletext on and press the MENU BROWSE key to activate the menu 2 Press the cursor up down to select the menu items 3 Press the OK key to activate 4 Press the MENU BROWSE key to leave the teletext menu Reveal Reveals conceals hidden information on...

Страница 42: ...e instructions on screen to return to picture 5 Press CANCEL to cancel digital text or interactive services Text info Some digital channels also offer information on the programme being broadcast In that case a message may appear at the bottom of the screen for a few seconds Follow the instructions on screen and use the cursor keys to scroll through the next pages Teletext Continued EN 42 Note UK ...

Страница 43: ...YPbPr connection is necessary to view video sources for example digital broadcastings coming from a HD receiver in 1080i 720p 576i 576p 480i or 480p PC equipped with a VGA connector see p 50 S VIDEO HDMI VIDEO 75 EUROCONNECTOR Pr Pb Y DIGITAL AUDIO AUDIO HDTV Progressive 480p 576p 720p 1080i IN IN L R EXT3 Pr Pb Y DIGITAL AUDIO AUDIO HDTV Progressive 480p 576p 720p 1080i IN IN L R EXT3 Pr Pb Y DIG...

Страница 44: ...one 1 Insert the plug into the headphone socket L as shown 2 The headphone impedance must be between 8 and 4000 Ohm The headphone socket has a 3 5 mm jack In the Sound menu select Headphone volume to adjust the headphone volume USB See Multimedia browser p 37 To make video and audio connections Side panel overview EN 44 1 2 3 USB Warning do not connect cable 1 and 2 at the same time This may cause...

Страница 45: ... 1 HDMI ETHERNET ANTENNA VGA EXT2 EXT1 AUDIO OUT DIGITAL AUDIO IN HDMI 2 ANTENNA 75 o o o PC VGA AUDIO IN L R o o EXT3 EXT2 EXT1 ETHERNET o AUDIOINL R VGA AUDIOINL R DVI DVI DVI AUDIOINL R DIGITAL AUDIO IN CABLE YPbPr AUDIO IN VCR DVD player Satellite receiver 1 DVD recorder 1VCR 2 DVD recorders 2VCRs Decoder PC DVI PC VGA DVD player HD receiver DVD player HD receiver HD receiver Decoder VCR Digit...

Страница 46: ...See Analogue manual installation p 29 See also the handbook of your recorder Connect a decoder and a VCR Connect a eurocable 4 to your decoder and to the special euroconnector of your recorder See also the handbook of your recorder Warning do not place your recorder too close to the screen as some recorders may be susceptible for signals from the display Keep a minimum distance of 0 5 m from the s...

Страница 47: ...ables 1 2 and 3 as shown 2 Tune in your recorder s testsignal and store the testsignal under programme number 0 See Analogue manual installation p 29 See also the handbook of your recorder With a eurocable 1 Connect the aerial cables 1 and 2 as shown 2 Connect your satellite receiver to EXT1 or 2 with a eurocable 3 3 Select the equipment you have connected in the Installation menu Select your conn...

Страница 48: ...the DVI to HDMI cable to one of the HDMI connectors of your TV 1 2 Connect the audio cable 2 to the DIGITAL AUDIO IN connector of the TV 3 Select the equipment you have connected in the Installation menu Select your connections p 32 and link it HDMI 1 or 2 4 Also select DIGITAL AUDIO IN in the same Connections menu Tip if necessary you can adjust the picture position to the centre of the screen wi...

Страница 49: ...nd the aerial cable 5 Tip if necessary you can adjust the picture position to the centre of the screen with the cursor keys Notes cables are often colour coded Connect red to red white to white etc the labels for the component video sockets may differ depending on the DVD player connected Although the abbreviations may vary the letters B and R stand for the blue and red component signals respectiv...

Страница 50: ...end to the VGA connector at the bottom of the TV Fix the connector firmly with the screws on the plug 2 In case of a Multimedia computer connect the audio cable 2 to the AUDIO outputs of your computer and to the AUDIO IN L R input of the TV 3 Select VGA in the Installation menu Select your connections p 32 and link it to VGA 4 Also select AUDIO IN L R in the same Connections menu PC equipped with ...

Страница 51: ...e Home Cinema amplifier According to the type of connector cables and the connector input available on your Home Cinema amplifier connect your receiver to the AUDIO OUT L and R connectors 3 or to EXT1 or 2 2 at the bottom or the rear of the TV Tip to avoid visible delay between picture and sound use this DIGITAL AUDIO OUT connector to connect your Home Cinema amplifier Pr Pb Y DIGITAL AUDIO AUDIO ...

Страница 52: ... a CA module Insert the specified Conditional Access module into the Common Interface slot as far as it will go It may take a few minutes before the CA module is activated and service information is downloaded To access common interface applications see TV menu Adjust feature menu settings Common Interface p 26 COMMON INTERFACE HDMI 1 COMMON INTERFACE HDMI 2 o o COMMON INTERFACE TOP o o Use the Co...

Страница 53: ...ted 8 Press the cursor right again to enter the list of types of peripherals connected to the selected input 9 Select the peripheral equipment with the cursor up down a Record a TV programme You can record a TV programme using your recorders tuner without affecting your TV 1 Select the channel number on your recorder 2 Set your recorder to record See the handbook for your recorder Note when record...

Страница 54: ... or the previous disc CD cursor left right to select the previous or following track CD 0 to select a DVD title chapter index AUX b to select your choice of subtitle language DVD Normal mode if no action is being undertaken within 30 seconds the remote control returns to TV mode Expert mode in Expert mode the remote will stay in the selected mode even when the 30 seconds time out is elapsed To sel...

Страница 55: ...to HDMI If it occurs persistently see the manual of your connected equipment to verify the connection necessary adjustments Alternatively connect an extra audio cable either an analogue or a digital audio cable from your connected peripheral to your TV Verify whether you selected the connected equipment in the Installation menu Select your connections and also select the respective audio input in ...

Страница 56: ...the remote of other peripheral function well equipment No photo or music Verify if the source complies with a supported code play or in poor quality No stable or not Verify if you have selected the correctVGA mode in your PC synchronisedVGA See Connect a PC p 50 picture Verify the connections between the TV and the PC No solution found Switch off your TV off and then on again once for your picture...

Страница 57: ... What do you need A personal computer with web browsing capability An archive utility that supports the ZIP format e g WinZip for Windows A preferably empty USB portable memory New software can be downloaded from the www philips com support website 1 Insert a USB portable memory device into a PC linked to the internet 2 Go to www philips com support 3 Choose your country or area language 4 Enter y...

Страница 58: ...ing You are not allowed to remove the USB portable memory during the software upgrade procedure In case of a power drop during the upgrade procedure don t remove the USB portable memory from the TV The TV will continue the upgrade as soon as the power comes back If an error occurs during the upgrade you should retry the procedure or contact your Local Customer Service Centre Note once the upgrade ...

Страница 59: ...pgrade 6 Select Software Upgrade in the Installation menu Go to Local upgrades The TV will list all compatible software available on the USB portable memory and display the data for each selected upgrade version 7 Select the correct upgrade version and press the red colour key to start the upgrade Your TV will restart and will automatically go to the upgrade mode After a few seconds it will displa...

Страница 60: ...ess of the content Content on a Portable Memory PM doesn t have a global address as a result content from a PM can never be referenced from a slideshow not stored on the PM itself To maintain portability a slideshow stored on a PM should ONLY reference content on the same PM Referencing global addresses can result in inconsistencies if the PM is used on a non networked CE device The latter is howe...

Страница 61: ... background during the slideshow A single song or playlist m3u pls are the only valid audio references Other reference will not result in any audio playback If a single song is referenced the song will be repeated forever If a playlist is referenced the playlist will be played in sequence with a repeat at the end of the playlist The default display time in 0 1 second of a slide The TV application ...

Страница 62: ...try them one by one or contact the reseller of your camera to find out the correct setting USB Memory Device Issues Devices connected to the USB port of your TV must be Mass Storage Class compliant If your device digital camera MP3 player portable harddisk is not Mass Storage Class compliant it will not be detected by the content browser of the TV The following subsets of the Mass Storage Class sp...

Страница 63: ...e audio cable 1 Connect your peripheral equipment with the HDMI 2 connector 1 2 Connect the analogue audio output of your peripheral equipment to the AUDIO L R input of your TV 2 3 Select the equipment you have connected in the Installation menu Select your connections p 32 and link it to HDMI 2 4 Also select AUDIO IN L R in the same Connections menu Extra digital audio cable 1 Connect your periph...

Страница 64: ...51 hue 15 hypertext 41 installation menu 27 language preferences 27 light sensor 17 location 31 manual installation 29 menu key 11 MPEG reduction 17 multimedia browser 37 mute key 5 navigate through the menus 11 on screen language 9 on screen information 6 on timer 25 option key 7 OK key 5 PC 50 picture adjustment menu 15 picture format 17 PIN code 25 pixel plus 16 preferences menu 31 preferred au...

Страница 65: ... Please check on how to dispose of exhausted batteries according to local regulations Recycling Recycling Product information Your TV consumes energy in standby mode Energy consumption contributes to air and water pollution Very low standby power consumption Specifications see the product leaflet on www philips com support If you need further assistance please call the customer support service in ...

Отзывы: