background image

25

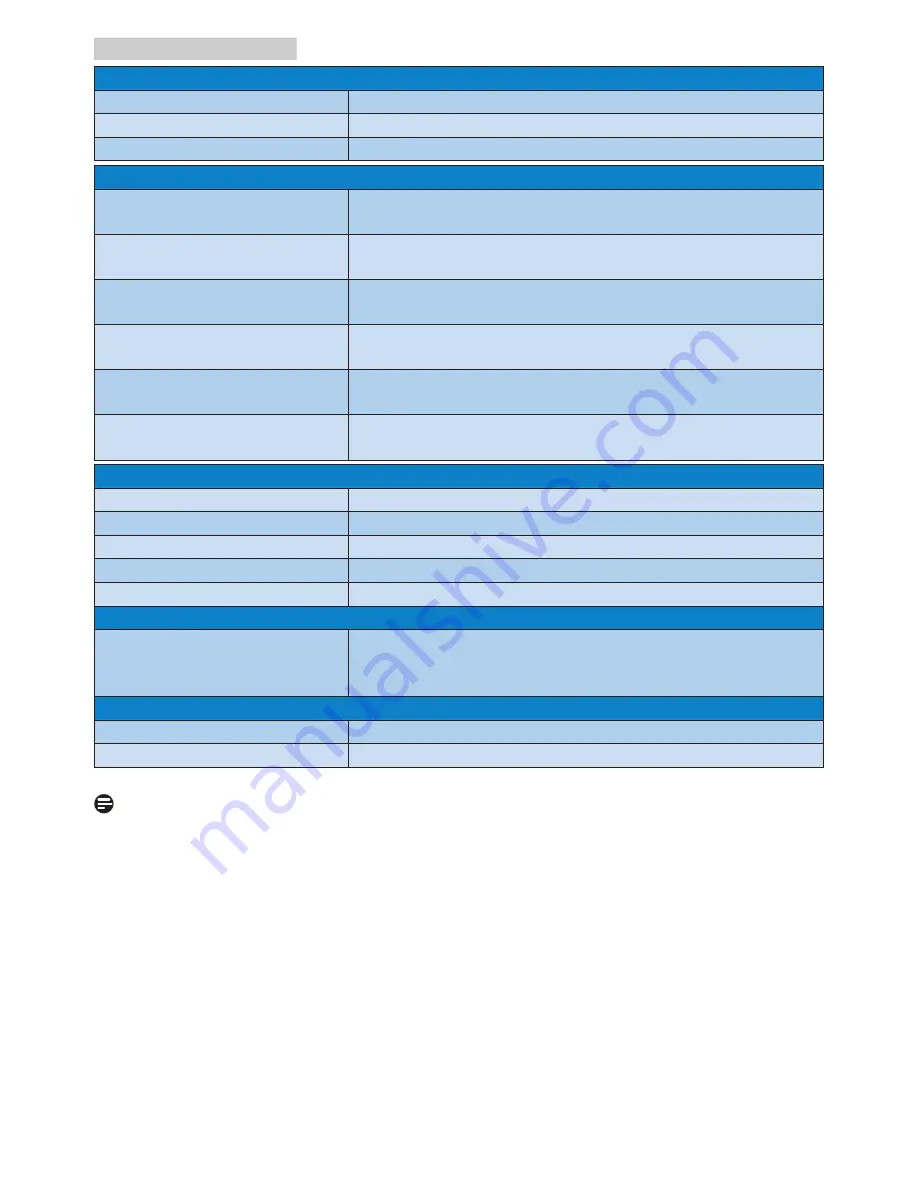
6. Technical Specifications

Weight

Product with stand 

10.63 kg

Product without stand

7.33 kg

Product with packaging

14.43 kg

Operating Condition

Temperature range 
(operation)

0°C to 40 °C

Relative humidity 
(operation)

20% to 80%

Atmospheric pressure 
(operation)

700 to 1060hPa

Temperature range  
(Non-operation) 

-20°C to 60°C 

Relative humidity
(Non-operation) 

10% to 90%

Atmospheric pressure
 (Non-operation) 

500 to 1060hPa

Environmental and energy

ROHS 

YES

EPEAT

YES (Refer to note 1 for more details)

Packaging

100% recyclable

Specific Substances

100% PVC BFR free housing

EnergyStar

YES

Compliance and standards

Regulatory Approvals

CCC, WEEE, RCM, CE, FCC Doc, China RoHS, 
UKRAINIAN, ICES-003, CU-EAC, cETLus, GS, ERGO, 
Semko, TCO, TCOedge, CEL, EPA

Cabinet

Color

Black

Finish

Texture

 Note 

1.  EPEAT Gold or Silver is valid only where Philips registers the product. Please visit 

www.epeat.net for registration status in your country.

2.  This data is subject to change without notice. Go to www.philips.com/support to 

download the latest version of leaflet.

3.  Smart response time is the optimum value from either GtG or GtG (BW) tests.

4.  SmartUniformity and Delta E information sheets are included in the box.

5.  To enable USB docking, USB C or USB C-A (when your data transmission is 

through HDMI/DP) cable is required. 

6.  This display fully support the charging to Mac book and Chrome book through 

USB C-C cable. 

Содержание Brilliance 329P9

Страница 1: ...230S8 S line Brilliance 329P9 www philips com welcome EN User manual 1 Customer care and warranty 28 Troubleshooting FAQs 32 ...

Страница 2: ...bcam 12 2 4 MultiView 14 2 5 Remove the Base Assembly for VESA Mounting 16 3 Image Optimization 17 3 1 SmartImage 17 3 2 SmartContrast 19 4 PowerSensor 20 5 LightSensor 22 6 Technical Specifications 23 6 1 Resolution Preset Modes 26 7 Power Management 27 8 Customer care and warranty 28 8 1 Philips Flat Panel Displays Pixel Defect Policy 28 8 2 Customer Care Warranty 31 9 Troubleshooting FAQs 32 9 ...

Страница 3: ... ventilation holes on the cabinet When positioning the monitor make sure the power plug and outlet are easily accessible If turning off the monitor by detach ing the power cable or DC power cord wait for 6 seconds before attaching the power cable or DC power cord for normal operation Please use approved power cord provided by Philips at all times If your power cord is missing please contact your l...

Страница 4: ... In order to maintain the best performance of your monitor and use it for a longer lifetime please use the monitor in a location that falls within the following temperature and humidity ranges Temperature 0 40 C 32 104 F Humidity 20 80 RH Important information for Burn in Ghost image Always activate a moving screen saver program when you leave your monitor unattended Always activate a periodic scr...

Страница 5: ...ompanied by an icon In such cases the specific presentation of the warning is mandated by the relevant regulatory authority 1 3 Disposal of product and packing material Waste Electrical and Electronic Equipment WEEE This marking on the product or on its packaging illustrates that under European Directive 2012 19 EU governing used electrical and electronic appliances this product may not be dispose...

Страница 6: ... Philips end of life management primarily entails participation in national take back initiatives and recycling programs whenever possible preferably in cooperation with competitors which recycle all materials products and related packaging material in accordance with all Environmental Laws and taking back program with the contractor company Your display is manufactured with high quality materials...

Страница 7: ...ts affiliates Top Victory Investments Ltd is the warrantor in relation to this product Philips and the Philips Shield Emblem are registered trademarks of Koninklijke Philips N V used under license Quick Start Register your product and get support at www philips com welcome 329P9 Brilliance Different according to region 2 Install the base 1 Place the monitor face down on a smooth surface Pay attent...

Страница 8: ... a nearby outlet 5 Turn on your computer and display If the display displays an image installation is complete 4 USB C driver installation for RJ45 Before using the USB C docking display please ensure to install the USB C driver You can find the LAN Drivers from CD disk if bundled or directly download using the link below https www realtek com zh tw component zoo category network interface control...

Страница 9: ...d ON at all times to be able to use this function Some select Philips displays may not Power or Charge your device when it enters to Sleep mode White power LED blinking In that case please enter to OSD Menu and select USB Standby Mode then turn the function to ON mode default OFF This will then keep the USB power and charging functions active even when the monitor is in sleep mode Note If you Turn...

Страница 10: ...ustomize your own preference function from OSD to become the user 2 5 User preference key Customize your own preference function from OSD to become the user 1 6 Return to previous OSD level 7 SmartImage hot key There are multiple modes to select EasyRead Office Photo Movie Game Economy LowBlue Mode SmartUniformity Off 2 Webcam 2 1 1 3 2 4 1 2 3 1 Microphone 2 IR of Face identification 3 2 0 Megapi...

Страница 11: ...hotkey directly on the front bezel Only your pre selected function will appear for quick access 4 Description of the On Screen Display What is On Screen Display OSD On Screen Display OSD is a feature in all Philips LCD displays It allows an end user to adjust screen performance or select functions of the displays directly through an on screen instruction window A user friendly on screen display in...

Страница 12: ... Off Sharpness 0 100 PowerSensor On Off 0 1 2 3 4 LowBlue Mode On Off 1 2 3 4 LightSensor On Off 2 HDMI 2 0 DisplayPort USB C Over Scan On Off Small Middle Large Top Right Top Left Bottom Right Bottom Left PIP Size PIP Position Auto On Off Audio 0 100 Volume On Off HDMI1 HDMI2 DisplayPort USB C Mute Audio Source Swap User 1 User 2 Audio Source Volume Input PowerSensor Brightness Input MultiView Vo...

Страница 13: ...11 2 Setting up the monitor 6 Physical Function Tilt 25 5 Swivel 175 175 Height adjustment 180mm Pivot or 90 90 ...

Страница 14: ...ingly from the KVM section of your OSD menu Now the webcam with Windows Hello is ready to work as long as the Windows Hello setting in Windows10 is complete Refer to Windows official website for the settings https www windowscentral com how set windows hello windows 10 Please note that Windows 10 system is required for setting up Windows Hello facial recognition with an edition lower than Windows ...

Страница 15: ...ll unlock d You ll now see which options are available to set up under Windows Hello e Click on Get started The setting is complete Note 1 Please always go to Windows official website to access the latest information the information in EDFU is subject to change without further notice 2 Different regions have different voltages with inconsistent voltage setting may cause water ripple when using thi...

Страница 16: ...st blog or you may want to edit an Excel file from your Ultrabook while logged into secured company intranet to access files from a desktop 3 How to enable MultiView by OSD menu 1 Press button on the front bezel to enter OSD Menu Screen Press or button to select main menu PBP then press button Press or button to select PBP Mode then press button Press or button to select PBP Now you can move backw...

Страница 17: ...ub display source 1 HDMI 2 0 2 HDMI 2 0 DisplayPort and USB C Please refer below table for compatibility of main sub input source SUB SOURCE POSSIBILITY xl Inputs 1 HDMI 2 0 2 HDMI 2 0 DP USB C MAIN SOURCE xl 1 HDMI 2 0 2 HDMI 2 0 DP USB C PiP Size When PiP is activated there are three sub window sizes to choose Small Middle Large B A main Small Middle Large PiP Position When PiP is activated ther...

Страница 18: ... the monitor base to its maximum height 2 Place the monitor face down on a smooth surface Pay attention not to scratch or damage the screen Then lift the monitor stand 3 While keeping the release button pressed tilt the base and slide it out Note This monitor accepts a 100mm x 100mm VESA Compliant mounting interface VESA Mounting Screw M4 Always contact manufacturer for wall mount installation 100...

Страница 19: ...your display viewing experience How does it work SmartImage is an exclusive leading edge Philips technology that analyzes the content displayed on your screen Based on a scenario you select SmartImage dynamically enhances the contrast color saturation and sharpness of images to enhance the contents being displayed all in real time with the press of a single button How to enable SmartImage 1 Press ...

Страница 20: ...cuit for best response time reduce jaggy edges for fast moving objects on screen enhance contrast ratio for bright and dark scheme this profile delivers the best gaming experience for gamers Economy Under this profile brightness contrast are adjusted and backlighting finetuned for just right display of everyday office applications and lower power consumption LowBlue Mode LowBlue Mode for easy on t...

Страница 21: ...larity and viewing comfort for every type of content SmartContrast dynamically controls contrast and adjusts backlighting for clear crisp bright gaming and video images or displays clear readable text for office work By reducing your display s power consumption you save on energy costs and extend the lifetime of your display How does it work When you activate SmartContrast it will analyse the cont...

Страница 22: ...er detection please position yourself directly in front of your monitor If you choose to position yourself more than 100 cm or 40 inches from the monitor use the maximum detection signal for distances up to 120 cm or 47 inches Setting 4 Since some dark colored clothing tends to absorb infrared signals even when the user is within 100 cm or 40 inches of the display step up signal strength when wear...

Страница 23: ...ntil it is readjusted or the default mode is recalled If you find that the PowerSensor is excessively sensitive to nearby motion for some reason please adjust to a lower signal strength Keep sensor lens clean if the sensor lens is dirty wipe it with alcohol to avoid reducing of distance detection ...

Страница 24: ...gnal to automatically adjust picture quality settings Light Sensor uses a sensor to adjust the picture brightness depending on the room light conditions How to enable LightSensor 1 Press button on the front bezel to enter OSD menu screen 2 Press or button to select main menu LightSensor then press button OK 3 Press or button to turn on or off the LightSensor ...

Страница 25: ...ical Refresh Rate 23 80 Hz Horizontal Frequency 30 160KHz sRGB YES SmartUniformity YES Delta E YES LowBlue Mode YES EasyRead YES Connectivity Signal Input DisplayPort 1 2 x 1 HDMI 2 0 x 2 DisplayPort out USB C 3 1 Gen 2 x1 upstream power delivery up to 65W USB Upstream USB Type C Downstream USB 3 1x4 with 1 fast charge B C 1 2 Power Delivery USB C 5V 3A 9V 3A 10V 3A 12V 3A 15V 3A 20V 3 25A RJ 45 E...

Страница 26: ...4 27 W typ 53 25 W typ Sleep Standby 0 5 W typ 0 5 W typ 0 5 W typ Off 0 3 W typ 0 3 W typ 0 3 W typ Off AC switch 0W typ 0W typ 0W typ Heat Dissipation AC Input Voltage at 100VAC 50Hz AC Input Voltage at 115VAC 60Hz AC Input Voltage at 230VAC 50Hz Normal Operation 186 75 BTU hr typ 185 22 BTU hr typ 181 72 BTU hr typ Sleep Standby 1 71 BTU hr typ 1 71 BTU hr typ 1 71 BTU hr typ Off 1 02 BTU hr ty...

Страница 27: ...nd standards Regulatory Approvals CCC WEEE RCM CE FCC Doc China RoHS UKRAINIAN ICES 003 CU EAC cETLus GS ERGO Semko TCO TCOedge CEL EPA Cabinet Color Black Finish Texture Note 1 EPEAT Gold or Silver is valid only where Philips registers the product Please visit www epeat net for registration status in your country 2 This data is subject to change without notice Go to www philips com support to dow...

Страница 28: ... 768 75 03 44 77 1280x 720 59 86 63 89 1280 x 1024 60 02 79 98 1280 x 1024 75 03 55 94 1440 x 900 59 89 70 64 1440 x 900 74 98 65 29 1680 x 1050 59 95 67 50 1920 x 1080 60 00 74 56 1920 x 1200 59 89 66 64 2560 x 1080 59 98 88 79 2560 x 1440 59 95 67 50 2560 x 1440 30 00 133 32 2560 x 1440 PBP mode 60 00 66 625 3840x1080 60 00 133 312 3840 x 1080 59 99 78 063 3840x1080 70 00 65 688 3840 x 2160 29 9...

Страница 29: ... the power consumption and signaling of this automatic power saving feature Power Management Definition VESA Mode Video H sync V sync Power Used LED Color Active ON Yes Yes 54 9 W typ 185 W max White Sleep Standby OFF No No 0 5 W typ White blink Switch Off OFF 0 W typ OFF The following setup is used to measure power consumption on this display Native resolution 3840 x 2160 Contrast 50 Brightness 1...

Страница 30: ...igher quality standards for certain types or combinations of pixel defects that are more noticeable than others This policy is valid worldwide Sub pixels Pixels Pixels and Sub pixels A pixel or picture element is composed of three sub pixels in the primary colors of red green and blue Many pixels together form an image When all sub pixels of a pixel are lit the three colored sub pixels together ap...

Страница 31: ...adjacent lit sub pixels one white pixel Note A red or blue bright dot must be more than 50 percent brighter than neighboring dots while a green bright dot is 30 percent brighter than neighboring dots Black Dot Defects Black dot defects appear as pixels or sub pixels that are always dark or off That is a dark dot is a sub pixel that stands out on the screen when the display displays a light pattern...

Страница 32: ...cts of all types 3 BLACK DOT DEFECTS ACCEPTABLE LEVEL 1 dark subpixel 5 or fewer 2 adjacent dark subpixels 2 or fewer 3 adjacent dark subpixels 0 Distance between two black dot defects 15mm Total black dot defects of all types 5 or fewer TOTAL DOT DEFECTS ACCEPTABLE LEVEL Total bright or black dot defects of all types 5 or fewer Note 1 1 or 2 adjacent sub pixel defects 1 dot defect 2 This monitor ...

Страница 33: ...l be responsible for all costs accrued If the Certified Service Partner cannot perform the required repairs under the offered extended warranty package we will find alternative solutions for you if possible up to the extended warranty period you have purchased Please contact our Philips Customer Service Representative or local contact center by Consumer care number for more details Philips Custome...

Страница 34: ...y connected to your computer Also refer to the Quick Start Guide Check to see if the display cable has bent pins Make sure the computer is turned on AUTO button doesn t function The auto function is applicable only in VGA Analog mode If the result is not satisfactory you can do manual adjustments via the OSD menu Note The Auto Function is not applicable in DVI Digital mode as it is not necessary V...

Страница 35: ... imaging will disappear gradually over a period of time after the power has been switched off Always activate a moving screen saver program when you leave your display unattended Always activate a periodic screen refresh application if your LCD display will display unchanging static content Failure to activate a screen saver or a periodic screen refresh application may result in severe burn in or ...

Страница 36: ...stall the drivers inf and icm Ans These are the driver files for your display Follow the instructions in your user manual to install the drivers Your computer may ask you for display drivers inf and icm files or a driver disk when you first install your display Q4 How do I adjust the resolution Ans Your video card graphic driver and display together determine the available resolutions You can sele...

Страница 37: ...o your Mac system Please contact your Philips sales representative for more information Q10 Are Philips LCD displays Plug and Play Ans Yes the displays are Plug and Play compatible with Windows 10 8 1 8 7 Q11 What is Image Sticking or Image Burn in or After Image or Ghost Image in LCD panels Ans Uninterrupted display of still or static images over an extended period may cause burn in also known as...

Страница 38: ...r independently regardless of the video source input you can press to enter OSD menu Select your preferred Audio Source option from the Audio main menu Please note that the next time you turn on your Display the Display will by default select the audio source you chose last time In case you want to change it again you need to go through the above steps to select your new preferred audio source whi...

Страница 39: ... behalf of Top Victory Investments Ltd or one of its affiliates Top Victory Investments Ltd is the warrantor in relation to this product Philips and the Philips Shield Emblem are registered trademarks of Koninklijke Philips N V used under license Specifications are subject to change without notice Version M9329BE1T ...

Отзывы: