background image

E

ngl

ish

31

EN

3  Getting started

Installing filters

Remove all packaging of the filters 
before using the appliance. Unpack 
them and place them into the 
appliance described as follows:

Note


• There is one set of filters on 

each side of the appliance. 
Each side is equipped with one 
pre-filter and one air purification 
filter.


• Make sure that you place the 

air purification filter in the 
appliance first and then the pre-
filter.


• Make sure that the side with 

the tag is pointing towards you 
when installing the filter.

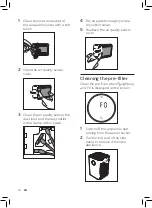
Remove all packaging materials 
of the air purification filters.

Pull the top part of the side 
panel to remove it from the 
appliance.

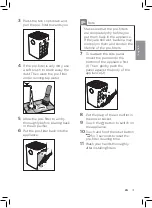
Press the two clips down and 
pull the pre-filter towards you.

Put the unpacked air purification 
filter back into the appliance.

Содержание AC5668

Страница 1: ...ZH S 用户手册 3 EN User manual 25 AC5668 ...

Страница 2: ......

Страница 3: ...i 指示灯 9 Wi Fi 连接 9 4 使用产品 10 了解空气质量指示灯 10 打开和关闭 10 更改自动模式设置 11 更改风速 12 使用灯光开 关功能 13 设置童锁 13 5 清洁 14 清洁计划 14 清洁产品机身 14 清洁出风口盖 14 清洁空气质量传感器 15 清洁预过滤网 16 6 更换空气净化 滤网 17 了解健康空气智能锁 17 更换过滤器 17 过滤网强行重置 19 更换过滤网类型 19 7 存放 21 8 故障排除 22 9 保修与服务 24 订购部件或附件 24 10 注意事项 24 电磁场 EMF 24 回收 24 ...

Страница 4: ...使用本产品 本产品适合由 8 岁或以上年 龄的儿童以及肢体不健全 感觉或精神上有障碍或缺乏 相关经验和知识的人士使 用 但前提是有人对他们使 用本产品进行监督或指导 以确保他们安全使用 并且 让他们明白相关的危害 不 得让儿童玩耍本产品 请勿 让儿童在无人监督的情况下 清洁和保养产品 请勿堵塞进风和出风口 例 如不要将物体放置在出风口 上或进风口前方 确保异物未通过出风口进入 产品内部 小心 本产品不能替代正常通风 日常吸尘或者在烹饪时使用 的抽油烟机 如果连接产品的电源插座接 触不良 则产品的插头可能 会变得很热 确保所连接的 电源插座接触良好 一定要在干燥 稳固 平整 且水平的表面上放置和使用 本产品 产品的后侧及两侧均要留出 至少 20 厘米的空间 产品 上方至少要留出 30 厘米的 空间 切勿在本产品上放置任何 物品 请勿坐在或站在产品上面 坐在或站在产品上面可能导 致潜在的人身伤...

Страница 5: ...物理损坏或发生故障 当您使用室内喷雾式驱虫剂 或在充满油污 易燃气体或 化学烟雾的地方时 请勿使 用本产品 请勿在气体用具 加热装置 或火炉附近使用本产品 使用之后和清洁产品或执行 其他维护或更换滤网之前 请务必先拔掉产品的电源 插头 请勿在温度变化较大的房间 内使用本产品 因为这可能 导致产品内部的冷凝 为防止产生干扰 产品与使 用无线电波的电器 例如电 视机 收音机和无线电控制 时钟 之间至少应保持 2 米 距离 本产品仅限于家用并在正常 运行条件下使用 请勿在潮湿环境或高温环境 中 例如浴室 卫生间或厨 房 使用本产品 本产品不能去除一氧化碳 CO 或氡 Rn 因此在发生 燃烧和危险化学品事故时 不能作为安全设备使用 如果需要移动产品 请先断 开产品的电源 请勿通过拉扯电源线来移动 产品 更换滤网后 请务必清洗 双手 ...

Страница 6: ... 您的空气净化器 感谢您的惠顾 欢迎光临飞利浦 为了您能充分享受飞利浦提供的支持 请在以下网站注册您的产品 www philips com welcome 本产品可与空气过滤系统一起使用 使用本产品之前 请仔细阅读本用户手册 并 妥善保管以备日后参考 产品概述 出风口盖 控制按钮 预过滤网 侧外罩 空气质量 传感器 型号 过滤器 FY5186 纳米级劲护滤网 专业S3型 在下文统称为 空气净化滤网 纳米级劲护滤网 专业 S3型 ...

Страница 7: ...7 ZH S 简体中文 控件概览 控制按钮 电源开 关按钮 风速按钮 灯光开 关按钮 童锁按钮 自动模式按钮 过滤网重置按钮 显示面板 PM2 5 指示 预滤网清洁提醒 气态污染物指示 过滤网更换提醒 室内过敏原指数指示 速度 1 睡眠模式 速度 2 去污染原模式 速度 3 去甲醛模式 劲速 去过敏原模式 Wi Fi 指示灯 童锁指示灯 ...

Страница 8: ...的空气净化滤网放回 产品内 5 将预过滤网放回产品内部 注意 确保预过滤网的所有挂钩均已正确 连接到净化器上 3 使用入门 安装过滤网 在使用本产品之前 先拆掉过滤网的所 有包装 请按以下所述拆掉过滤网的包 装 然后将其放入产品中 注意 产品的两侧各有一组滤网 每侧均 配备一个预过滤网和一个空气净化 滤网 确保先在产品内放入空气净化滤 网 然后再放置预过滤网 确保在安装过滤网时带拉片的一面 朝向您 1 拆掉空气净化滤网的所有包装 材料 2 拉出侧面板的上半部分以将其从产 品上卸下 ...

Страница 9: ...碍物 如果空气净化器安装在房间角落 Wi Fi 信号较弱的位置 建议设置 Wi Fi 信号增强器 以便远程 使用 1 扫描以下二维码 或从应用程序市场 下载京东智能助手 小京鱼 App 然后将该应用程序安装到您的智能设 备上 ម ι㐡 䒪ᄼϙ冩 ϙ 䉓तࢠज ᒂApp 2 确保您的智能设备已经连接至 Wi Fi 网络 启动应用程序 3 轻击 扫描用户手册或包装 盒上的二维码 4 确保 Wi Fi 指示灯 呈橙色闪 烁 轻击下一步 注意 如果 Wi Fi 指示灯 不是橙色闪 烁 请轻触并按住 和 按钮进 入配对模式 5 填入 Wi Fi 信息 然后轻击下一步 以添加新设备 6 在配对并且连接成功后 轻击完 成 Wi Fi 指示灯 会呈白色 亮起 7 如果要添加多台便携式设备与本空 气净化器连接 请轻击应用程序右 上角的 设置 在点击 共享给 家人 扫描生成的二维码 8 在要连接到本产品的设备...

Страница 10: ...的悬浮颗粒污染 物 常见的室内微粒源有烟草烟雾 烹 饪 点燃的蜡烛 此外 一些悬浮细 菌 最小的霉菌芽孢 宠物过敏原和尘 螨过敏原颗粒也属于 PM2 5 PM2 5 水平 空气质量指示灯 颜色 12 蓝色 13 35 蓝紫色 36 55 紫红色 55 红色 IAI 专业级 AeraSense 传感器可检测室内 空气过敏原的级别 然后用 1 至 12 之 间的数字进行级别反馈 显示室内空气 过敏原的潜在风险级别 1 表示最佳空 气质量 IAI 级别 空气质量指示灯 颜色 1 3 蓝色 4 6 蓝紫色 7 9 紫红色 10 12 红色 气态污染物显示 使用高级气体传感器 范围为 L1 至 L4 的显示值可显示检测到的潜在有害气 体 包括VOC 异味等 变化情况 L1 表示最佳空气质量 Gas 水平 空气质量指示灯 颜色 L1 蓝色 L2 蓝紫色 L3 紫红色 L4 红色 打开和关闭 注意 务必...

Страница 11: ...在测量空气质量后 空气净化 器会显示 PM2 5 IAI Gas 空 气质量传感器会自动选择相应 的空气质量指示灯颜色 空气净化器将在自动模式下工 作 并且屏幕上会显示 图标 3 轻触并按住 3 秒可关闭空气 净化器 注意 如果空气净化器关闭后仍与电源插 座连接 则再次打开后 其将以之 前的设置运行 更改自动模式设置 您可以选择去污染原模式 去 甲醛模式 或去过敏原模式 去污染原模式 专门设计的去污染原模式可有效去除 PM2 5 等空气污染物 轻触自动模式按钮 可选择去污染 原模式 将显示在屏幕上 注意 轻触风速按钮 空气净化器将 自动切换至手动模式 ...

Страница 12: ...空气质量 变化 它不会自动调节风速 睡眠模式 在睡眠模式下 空气净化器将以非常低 的速度安静地运行 轻触风速按钮 以选择睡眠模式 睡眠模式指示灯 将亮起 手动 反复轻触风速按钮 选择所需的 风速 速度 1 速度 2 速度 3 去甲醛模式 独特的去甲醛模式旨在快速去除室内甲 醛 并将该物质在空气中的含量保持在 安全级别 轻触自动模式按钮 可选择去甲醛 模式 图标将显示在屏幕上 去过敏原模式 超敏感的去过敏原模式经过精心设计 旨在对周围空气中的微小过敏原等级变 化作出反应 轻触自动模式按钮 以选择去过敏 原模式 图标将显示在屏幕上 ...

Страница 13: ... 速 以便更快地净化空气 劲速 在劲速模式下 空气净化器会以最高速 度运行 轻触风速按钮 以选择劲速模式 劲速指示灯 将亮起 使用灯光开 关功能 借助灯光开 关按钮 您可以打开或关 闭空气质量指示灯 显示屏和功能指示 灯 如果需要 1 轻触灯光开 关按钮 一次 空气 质量指示灯将熄灭 显示面板将会 变暗并显示 2 再次轻触灯光开 关按钮 所有 指示灯都会亮起 设置童锁 1 轻触并按住童锁按钮 3 秒可激 活童锁 童锁图标 将显示在屏幕上 打开童锁时 其他所有按钮均 将没有反应 2 再次轻触并按住童锁按钮 3 秒 可禁用童锁 童锁图标 消失 注意 即使已启用童锁功能 您仍可通过 应用程序控制本产品 ...

Страница 14: ...剂 例如漂白剂或酒精 清洁 本产品的任何部件 只有预过滤网可以用水清洗 空气 净化器滤网不可水洗 也不可用吸 尘器清洁 清洁计划 频率 清洁方法 必要时 使用干软布擦拭产 品表面 清洁出风口盖 每两个月 使用干棉签清洁空 气质量传感器 预过滤网清洁 指示灯 会亮 起 屏幕上会 显示 F0 清洁预过滤网 清洁产品机身 定期清洁空气净化器的内侧和外侧 以 防止灰尘积聚 1 使用柔软的干布清洁空气净化器的 内部和外部 2 出风口也可用柔软的干布进行 清洁 清洁出风口盖 1 要解锁出风口盖 请握住盖子上的 手柄 然后向上拉动 2 用刷子清洁出风口盖 ...

Страница 15: ...产品以最佳性能运行 如果产品用 在多尘的环境中 请经常进行清洁 注意 如果将空气净化器用于多尘环境 则可能需要更频繁地进行清洁 如果室内的湿度非常高 则空气质 量传感器上可能会形成冷凝水 即 使空气质量确实很好 空气质量指 示灯也可能会指示空气质量较差 如出现此情况 请清洁空气质量传 感器或以手动速度设置使用空气净 化器 1 使用软刷清洁空气质量传感器的进 风口和出风口 2 打开空气质量传感器保护盖 3 使用湿棉签清洁空气质量传感器 进风口和出风口 4 使用干棉签彻底擦干所有部件 5 重新装上空气质量传感器的 保护盖 ...

Страница 16: ...上显示 F0 时 请清 洁预过滤网 1 关闭空气净化器 从电源插座上 拔下插头 2 拉出侧面板的上半部分以将其从产 品上卸下 3 向下按两个固定夹 然后朝您自己 的方向拉动预过滤网 4 如果很脏 请使用软刷清除上面的 灰尘 然后 在水龙头下清洗预过 滤网 5 待预过滤网完全晾干后再将其装回 空气净化器中 6 将预过滤网放回产品内部 注意 确保预过滤网完全干燥后再将其放 回产品 如果仍然是湿的 细菌可 能会乘虚而入 从而缩短预过滤网 的使用寿命 ...

Страница 17: ...11 安装滤网后 彻底洗净双手 6 更换空气净化 滤网 了解健康空气智能锁 该空气净化器配有滤网更换指示灯 旨 在确保空气净化器运行时 空气净化滤 网处于最佳工作状态 当需要更换滤网 时 会在屏幕上显示滤网代码 请参阅 滤网提示图 且滤网更换提醒 将呈红色亮起 如果未及时更换滤网 则空气净化器 将停止运行并自动锁定 以保护室内 的空气质量 应尽快根据滤网代码更 换滤网 更换过滤器 注意 滤网不可水洗 也不可重复使用 在更换过滤网之前 务必先关闭空 气净化器并从电源插座上拔下插头 请勿用吸尘器清洁滤网 如果预滤网已损毁 磨损或损坏 请勿使用 请访问 www philips com support 或联系 您所在国家 地区的客户服务中心 ...

Страница 18: ...4 将无包装的空气净化滤网放回 产品内 5 将空气净化器的插头插入电源 插座 6 轻触 按钮启动产品 7 轻触并按住重置按钮 3 秒可重 置过滤网使用寿命计数器 注意 更换滤网后 请洗净双手 滤网提示灯状态 动作 屏幕上显示 A3 且过滤网更换提醒 会亮起 更换纳米级劲护 滤网 专业S3型 FY5186 1 取出产品两侧的预过滤网 2 取下已过期的滤网 丢弃用过的 滤网 注意 请勿接触滤网的褶皱面 或闻滤网 的气味 因为其包含从空气中收集 的污染物 ...

Страница 19: ...同时触摸 和 3 秒钟即可进 入过滤网类型更改模式 纳米级劲护滤网 专业S3型的代 码 A3 会显示在屏幕上 3 2 轻触 即可为您要使用的新过滤 网选择过滤网代码 过滤网强行重置 即使屏幕上没有显示过滤网更换代码 您也可以更换过滤网 在更换过滤网 后 您需要手动重置过滤网使用寿命 计数器 1 同时轻触 和 3 秒钟 即可 进入过滤网重置模式 纳米级劲护滤网 专业S3型的代 码 A3 会显示在屏幕上 3 2 轻触并按住 3 秒可强行重置过 滤网使用寿命计数器 3 3 重置过滤网后 屏幕上将显示 将 ...

Страница 20: ...接下 来轻击并按住 3 秒钟以确 认选择 然后退出过滤网类型 更改模式 3 如果您没有第二个过滤网 则只 需轻击并按住 3 秒钟确认 过滤网代码 然后退出过滤网 类型更改模式 3 注意 如需详细了解适合您产品的不同过 滤网组合 请参阅过滤网包装内随 附的单独手册 3 轻触并按住 3 秒即可确认新过 滤网的过滤网代码 3 注意 当您使用 按钮选择了新过滤网 的过滤网代码之后 若您在 10 秒 钟内未轻触任何其他按钮 产品将 自动确认新过滤网的过滤网代码 4 一旦确认新过滤网代码 将显示 在屏幕上 ...

Страница 21: ...21 ZH S 简体中文 7 存放 1 关闭空气净化器 从电源插座上拔 下插头 2 清洁空气净化器 空气质量传感器 和预过滤网 请参阅 清洁 一章 3 待所有部件完全晾干后再进行 存放 4 将滤网和预过滤网分别装入密封的 塑料袋中 5 将空气净化器 滤网和预过滤网存 放在阴凉干燥处 6 拆装滤网后 务必彻底洗净双手 ...

Страница 22: ...料是否已去除 某一过滤网可能没有放在产品内部 确保按照以下顺序安 装所有滤网 先从最里面的滤网开始 1 纳米级劲护滤网 专业S3型 2 预过滤网 空气质量感应器是湿的 室内湿度过高 因此形成了冷凝 水 确保空气质量传感器清洁干燥 请参阅 清洁 一章 空气质量指示灯的颜 色始终保持不变 空气质量感应器变脏 清洁空气质量传感器 请参阅 清洁 一章 产品散发出一种奇怪 的味道 前几次使用产品时 其可能会产生塑料味 这是正常的 不过 如果产品发出烧焦的气味 请联系飞利浦经销商或 经授权的飞利浦服务中心 由于吸收室内气体 该过滤网 可能会在使用后发出气味 过滤网经过日晒之后即可重复 使用 建议您采用这种方式再次激活过滤网 如果异味仍 然存在 建议更换过滤网 产品声音过大 如果产品声音过大 您可以将风速更改为较低的风速级 别 当夜间在卧室使用本产品时 可选择静音低速 我已经更换过了过滤 网 但是产品还...

Страница 23: ...如果您的净化器连接到的路由器为双频段且当前未连接到 2 4GHz 网络 请切换至同一路由器 2 4GHz 的另一频段 并尝试再次将净化器配对 不支持 5GHz 网络 不支持 Web 验证网络 检查净化器是否在 Wi Fi 路由器的范围内 您可以尝试使 空气净化器更靠近 Wi Fi 路由器 检查网络名称是否正确 网络名称区分大小写 检查 Wi Fi 密码是否正确 密码区分大小写 使用 在网络已更改时设置 Wi Fi 连接 部分中的说明重 试设置 Wi Fi 连接可能被电磁或其他干扰中断 使本产品远离可能 造成干扰的其他电子设备 检查移动设备是否处于飞行模式 确保在连接 Wi Fi 网络 时禁用飞行模式 参阅应用程序中的帮助部分 以获得广泛和最新的故障排 除技巧 ...

Страница 24: ...其产品使用得 当 则对人体毫无危害 长期以来 飞利浦始终在国际 EMF 和 安全标准的制定工作中扮演着积极的角 色 这就使飞利浦总能预知标准的发展 趋势 并率先应用到其产品中去 回收 弃置产品时 请不要将它与一般生活垃 圾一同丢弃 应将其交给官方指定的回 收中心 这样做有利于环保 请遵循您所在国家 地区的电器及电子 产品分类回收规定 正确弃置产品有 助于避免对环境和人类健康造成负面 影响 9 保修与服务 如果您需要了解信息或有任何疑问 请 访问飞利浦网站 www philips com 或 联系您所在国家 地区的飞利浦客户服 务中心 可在全球保修卡中找到飞利浦 客户服务中心的电话号码 如果您所 在的国家 地区没有飞利浦客户服务中 心 请向当地的飞利浦经销商求助 订购部件或附件 如果您必须更换部件或需要购买额外的 部件 请联系您的飞利浦经销商或访问 www philips com suppo...

Страница 25: ... 36 Using the light on off function 37 Setting the child lock 38 5 Cleaning 38 Cleaning schedule 38 Cleaning the body of the appliance 39 Cleaning the air outlet cover 39 Cleaning the air quality sensor 39 Cleaning the pre filter 40 6 Replacing the air purification filter 42 Understanding the healthy air protect lock 42 Replacing the filter 42 Filter force reset 43 Changing filter type 44 7 Storag...

Страница 26: ...he appliance If the power cord is damaged you must have it replaced by Philips a service center authorized by Philips or similarly qualified persons in order to avoid a hazard Do not use the appliance if the plug the power cord or the appliance itself is damaged This appliance can be used by children aged from 8 years and above and persons with reduced physical sensory or mental capabilities or la...

Страница 27: ...m free space above the appliance Do not place anything on top of the appliance Do not sit or stand on the appliance Sitting or standing on the appliance may lead to potential injuiry Do not place the appliance directly below an air conditioner to prevent condensation from dripping onto the appliance Make sure all filters are properly installed before you switch on the appliance Only use the origin...

Страница 28: ...cord Always cleanse your hands after changing the filters Do not insert your fingers or objects into the air outlet or the air inlet to prevent physical injury or malfunctioning of the appliance Do not use this appliance when you have used indoor smoke type insect repellents or in places with oily residues burning incense or chemical fumes Do not use the appliance near gas appliances heating devic...

Страница 29: ... welcome This appliance works with an air filtration system Read this user manual carefully before you use the appliance and save it for future reference Product Overview Air outlet cover Control buttons Pre filter Side covers Air quality sensor Type number Filter FY5186 NanoProtect filter Pro S3 Hereinafter referred to as air purification filter Display panel NanoProtect filter Pro S3 ...

Страница 30: ...hild lock button Auto mode button Filter reset button Display panel PM2 5 display Pre filter cleaning alert Gas display Filter replacement alert Indoor Allergen Index display Speed 1 Sleep mode Speed 2 Pollution mode Speed 3 Formaldehyde mode Turbo speed Allergen mode Wi Fi indicator Child indicator ...

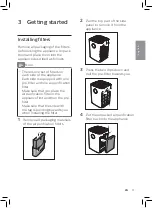
Страница 31: ...er and one air purification filter Make sure that you place the air purification filter in the appliance first and then the pre filter Make sure that the side with the tag is pointing towards you when installing the filter 1 Remove all packaging materials of the air purification filters 2 Pull the top part of the side panel to remove it from the appliance 3 Press the two clips down and pull the pr...

Страница 32: ... Adding a device Orange Connected to the air purifier but not yet connected to the App White Conntected to the server White blinking Connecting to the server Off Wi Fi function disabled Wi Fi connection Note If you want to connect more than one air purifier to your smart device you have to do this one by one Complete the set up of one appliance before you turn on the other appliance Make sure the ...

Страница 33: ...blink orange touch and hold the and button to enter pairing mode 5 Fill the Wi Fi information and tap Next to add a new device 6 After the successful pairing and connection tap Finish The Wi Fi indicator will light up white 7 If you want to add more smart device to connect with this air purifier tap Settings on the top right of the App Tap Share with family to scan the generated QR code 8 On the d...

Страница 34: ...or L1 Blue L2 Blue purple L3 Purple red L4 Red 4 Using the appliance Understanding the air quality light Air quality light color Air quality level Blue Good Blue purple Fair Purple red Poor Red Very poor The air quality light automatically goes on when the air purifier is switched on and lights up all colors in sequence After approximately 30 seconds the air quality sensors select the color that c...

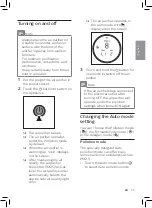
Страница 35: ...suring the air quality the air purifier shows the PM2 5 IAI Gas level the air quality sensor automatically selects the appropriate air quality light color The air purifier operates in the auto mode with displayed on the screen 3 Touch and hold the button for 3 seconds to switch off the air purifier Note If the air purifier stays connected to the electrical outlet after turning OFF the air purifier...

Страница 36: ...llergen mode is designed to react to even a small change in allergen levels in the surrounding air Touch the Auto mode button to select Allergen mode The icon displays on the screen Changing the fan speed In addition to the Auto modes there are several fan speeds available When using the manual fan speed settings the air purifier will still monitor the air quality but it will not automatically adj...

Страница 37: ...indicates that the air quality is unhealthy and you can select a higher fan speed to purify the air more quickly Turbo In Turbo mode the air purifier operates on the highest speed Touch the fan speed button to select the Turbo mode The turbo speed indicator goes on Using the light on off function With the light on off button you can switch on or off the air quality light the display screen and the...

Страница 38: ...ock is activated 5 Cleaning Note Always unplug the appliance before you clean it Never immerse the appliance in water or any other liquid Never use abrasive aggressive or flammable cleaning agents such as bleach or alcohol to clean any part of the appliance Only the pre filter is washable The air purifier filter is not washable nor vacuum cleanable Cleaning schedule Frequency Cleaning method When ...

Страница 39: ...a brush 3 Reattach the cover properly Cleaning the air quality sensor Clean the air quality sensor every two months for optimal functioning of the appliance Clean it more frequently if you use the appliance in a dusty environment Note If the air purifier is used in a dusty environment it may need to be cleaned more often If the humidity level in the room is very high condensation may develop on th...

Страница 40: ...F0 is displayed on the screen 1 Switch off the air purifier and unplug from the power socket 2 Pull the top part of the side panel to remove it from the appliance 1 Clean the inlet and outlet of the air quality sensor with a soft brush 2 Open the air quality sensor cover 3 Clean the air quality sensor the dust inlet and the dust outlet with a damp cotton swab ...

Страница 41: ... 8 Put the plug of the air purifier in the power socket 9 Touch the button to switch on the appliance 10Touch and hold the reset button for 3 seconds to reset the pre filter cleaning time 11 Wash your hands thoroughly after installing filters 3 Press the two clips down and pull the pre filter towards you 4 If the pre filter is very dirty use a soft brush to brush away the dust Then wash the pre fi...

Страница 42: ...PA Series 3 FY5186 1 Take out the pre filters on both sides of the appliance 6 Replacing the air purification filter Understanding the healthy air protect lock This air purifier is equipped with a filter replacement indicator to make sure that the air purification filter is in optimal condition when the air purifier is operating When the filter needs to be replaced the filter code displays on the ...

Страница 43: ...ent code displayed on the screen After replacing a filter you need to reset the filter lifetime counter manually 1 Touch and simultaneously for 3 seconds to enter the filter reset mode Code A3 of the NanoProtect filter Pro S3 displays on the screen 3 2 Take out the expired filter Discard used filter Note Do not touch the pleated filter surface or smell the filter as it has collected pollutants fro...

Страница 44: ...plays on the screen 3 2 Touch to select filter code of the new filter you will use 3 Touch and hold for 3 seconds to confirm the filter code of the new filter 3 2 Touch and hold for 3 seconds to force reset the filter lifetime counter 3 3 After the filter is reset displays on the screen 4 Touch and hold for 3 seconds to exit the filter reset mode 3 ...

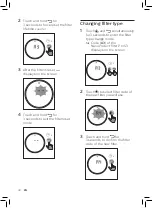
Страница 45: ...our choice Note After you have selected the filter code of the new filter using the button if you do not touch any other buttons in 10 seconds the appliance will automatically confirm the filter code of the new filter 4 After the new filter code is confirmed displays on the screen If you have the second filter to change the filter type tap first to choose the new filter code and then tap and hold ...

Страница 46: ... air quality sensor and pre filter see chapter Cleaning 3 Let all parts air dry thoroughly before storing 4 Wrap the filters and pre filter separately in air tight plastic bags 5 Store the air purifier filters and pre filters in a cool dry location 6 Always thoroughly wash hands after handling filters ...

Страница 47: ...t of the air outlet is significantly weaker than before The pre filter is dirty Clean the pre filter see the chapter Cleaning The air quality does not improve even though the appliance has been operating for a long time Check if the packing material is removed from the filters One of the filters has not been placed in the appliance Make sure that all filters are properly installed in the following...

Страница 48: ... If odor still exists replace the filter The appliance is extra loud If the appliance is too loud you can change the fan speed to a lower fan speed level When using the appliance in a bedroom at night choose the silent speed The appliance still indicates that I need to replace a filter but I already did Perhaps you did not reset the filter lifetime counter Switch on the appliance Then touch and ho...

Страница 49: ...loser to the Wi Fi router Check if the network name is correct The network name is case sensitive Check if the Wi Fi password is correct The password is case sensitive Retry the setup with the instructions in section Set up the Wi Fi connection when the network has changed The Wi Fi connectivity can be interrupted by electromagnetic or other interferences Keep the appliance away from other electro...

Страница 50: ...d regulations regarding exposure to electromagnetic fields Compliance with EMF Koninklijke Philips N V manufactures and sells many products targeted at consumers which like any electronic apparatus in general have the ability to emit and receive electromagnetic signals One of Philips leading Business Principles is to take all necessary health and safety measures for our products to comply with all...

Страница 51: ...its life but hand it in at an official collection point for recycling By doing this you help to preserve the environment Follow your country s rules for the separate collection of electrical and electronic products Correct disposal helps prevent negative consequences for the environment and human health ...

Страница 52: ...修服务中心 或向飞利浦服务热线咨询 中国顾客服务热线 4008 800 008 用户需承担本地通话费 网址 http www philips com cn 网上会员注册与产品注册 1 登陆 http www philips com cn welcome 2 点击 创建新账户 创建您的飞利浦账号 3 点击 注册产品 通过产品名称或产品型号查找产品 完成产品注册 服务须知 需要此产品的售后服务 拨打服务热线 4008 800 008 在维修服务过程中有任何意见 欢迎致函飞利浦 中国 投资有限公司解决疑难 飞利浦 中国 投资有限公司 上海市静安区灵石路718号A1幢 保修及服务 此产品是一件设计精良 用高品质元件制造之家用电 器 在正常使用及保养下应能 发挥其优越性能 在购买日期 后二年内 若发生任何因制造 工艺或元器件造成之损坏 飞利浦中国维修服务中心将为 持证用户提供免费门市维修服 务 视情...

Страница 53: ...灾害 电压异常 等 造成的损坏 2 一般家庭以外使用 如工业 商业用 而造成的损坏 3 正常使用引起的产品老化 磨损等 但不影响产品的正 常使用 保修证作为在规定期限及条 件之内进行免费维修的保 证 并不限制消费者的法定 权利 飞利浦提供2年全球联保服 务 在产品由飞利浦正式销 售的所有国家中 都提供保 修和保修期满的维修服务 要求保修时 您需提供发票 正本 且请求保修的日期还 在保修期限之内 服务须知 需要此产品的售后服务 拨打 服务热线 4008 800 008 在维修服务过程中有任何意 见 欢迎致函飞利浦 中国 投资有限公司解决疑难 飞利浦 中国 投资有限公 司上海市静安区灵石路718 号A1幢 4222_005_0422_7_Guarantee Card_A5_v4 indd 2 10 01 2019 11 39 ...

Страница 54: ...53制造 飞利浦 中国 投资有限公司 上海市静安区灵石路 718 号 A1 幢 全国顾客服务热线 4008 800 008 本设备包含型号EMW3080 核准代码 CMIIT ID 2017DP1516的无线发射模块 目标污染物 洁净空气量 CADR 累计净化量 CCM 净化能效等级 颗粒物 高效级 甲 醛 高效级 噪声 声功率级 适用面积 产品性能指标 适用面积是按照国标GB T18801 2015根据颗粒物洁净空气量计算得出 以上性能指标数据是在第三方试验室按照国标GB T18801 2015 以特定 的烟尘颗粒物或气态污染物为目标污染物测试得出 600 m3 h P4 F4 42 72 m2 300 m3 h 66 dB A 能源效率标识见机身能效标识 ...

Страница 55: ...物质在该部件所有均质材料中的含量均在GB T 26572 规定的限量要求以下 表示该有害物质至少在该部件的某一均质材料中的含量超出 GB T 26572规定的限量要求 部件名称 铅 Pb 汞 Hg 镉 Cd 六价铬 Cr6 多溴联苯 PBB 多溴二苯醚 PBDE 有害物质 气体传感器电路板 主控制电路板 马达组件 电源电路板 该表格中所显示的 有害物质 在产品正常使用情况下不会对人身和 环境产生任何伤害 该表格中所显示的 有害物质 及其存在的部件向消费者和回收处理 从业者提供相关物质的存在信息 有助于产品废弃时的妥善处理 ...

Страница 56: ... 2020 Koninklijke Philips N V 保留所有权利 4241 211 00903 ...

Отзывы: