background image

35

ID

Indonesia

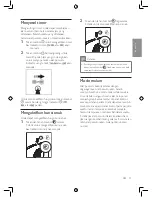
Colokkan alat pemurni udara ke 

stopkontak dan tekan tombol   untuk 

menghidupkan pemurni udara.

Tekan dan tahan tombol   selama 3 detik 

untuk mereset masa pakai filter.


»

 padam.

3s

Catatan


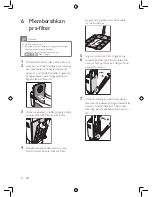
Pastikan bahwa pra-filter benar-benar kering. Jika masih 

basah, bakteri bisa berkembang-biak di dalamnya dan 

memperpendek masa pakai pra-filter.


Pastikan bahwa sisi yang ada dua tonjolan mengarah ke 

Anda, dan bahwa semua kait pra-filter telah dipasang 

dengan benar ke alat pemurni.

Содержание AC4372

Страница 1: ...ways there to help you Register your product and get support at www philips com welcome Question Contact Philips AC4372 AC4374 EN User Manual 3 ID Buku Petunjuk Pengguna 22 TH คู มือผู ใช 42 ZH HK 使用手冊 61 ...

Страница 2: ......

Страница 3: ...10 Set the sensitivity of the air quality sensor 11 Select the fan speed 11 Set the timer 12 Activate child lock 12 Night mode 12 5 Clean your air purifier 13 Clean the air purifier 13 Clean the air quality sensor 13 6 Clean the pre filter 14 7 Replace the filters 16 Reset filter lock 18 8 Troubleshooting 19 9 Guarantee and service 20 Order parts or accessories 20 10 Notices 21 Electromagnetic fie...

Страница 4: ...pliance if the plug the power cord or the appliance itself is damaged This appliance can be used by children aged from 8 years and above and persons with reduced physical sensory or mental capabilities or lack of experiences and knowledge if they have been given supervision or instruction concerning use of the appliance in a safe way and understand the hazards involved Children shall not play with...

Страница 5: ...tlet Do not use this appliance when you have used indoor smoke type insect repellents or in places with oily residues burning incense or chemical fumes Do not use the appliance near gas appliances heating devices or fireplaces Always unplug the appliance after use and before you clean it Do not use the appliance in a room with major temperature changes as this may cause condensation inside the app...

Страница 6: ...ncluding bacteria and virus According to 2008 Microbiological Risk Assessment Report of the World Health Organization WHO the avian influenza human influenza viruses Legionella Hepatitus viruses and SARS coronavirus are larger than 0 02 micron Read this user manual carefully before you install and use the unit Save it for future reference Overview for AC4372 a b c d e Touchscreen control panel Lig...

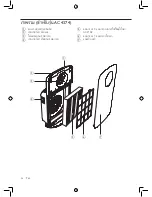
Страница 7: ... g l i sh Overview for AC4374 a b c d Touchscreen control panel Light sensor Air quality light Air quality sensor e f g Filter 2 Integrated Multi care filter AC4138 Filter 1 Pre filter Front panel d b c e f g a ...

Страница 8: ... correct position 1 Place your fingers in the recesses of the side panels and gently pull the top part of the front panel towards you 2 Lift the hooks at the bottom of the panel out of the bottom of the appliance 3 To remove the pre filter grab the two projections and pull the filter towards you 4 Remove all the filters from the appliance 5 Remove all packaging material from the filters 6 For AC43...

Страница 9: ...g towards you 7 Place the pre filer in the appliance 2 1 Note Make sure that the side with the two projections is pointing towards you and that all hooks are properly attached to the appliance 8 To reattach the front panel insert the bottom hooks into the bottom of the appliance first 1 Then push the panel against the body of the appliance 2 ...

Страница 10: ...ifier into the power socket All lights go on from left to right in cycle and you hear a beep Then the lights go out again The air quality light shows 4 colors successively 2 Press the button to switch on the purifier The fan speed indicators and goes on Note When the purifier is switched on the air quality sensor will take some time to measure the air quality in the room The air quality light chan...

Страница 11: ...eously The purifier beeps twice and one of the fan speed indicators or flashes to show the current sensitivity level of the air quality sensor Fan speed indicator Sensitivity level Extra sensitive default sensitivity Sensitive Standard 4 Press the button to adjust the sensitivity level of the air quality sensor One of the indicators or goes on to show the preferred sensitivity level of the air qua...

Страница 12: ...o activate the child lock The child lock indicator lights up 3 2 Press and hold the button again for 3 seconds to deactivate the child lock 3 Note When the child lock function is activated all buttons are locked except the button There will be no audio feedback when you press the buttons Night mode The purifier works in harmony with its surroundings The purifier automatically switches to night mod...

Страница 13: ...n the air inlet and the air outlet with a soft dry cloth Clean the air quality sensor Clean the air quality sensor every 2 months for optimal functioning of the purifier Clean it more frequently if you use the purifier in a dusty environment Note When the humidity level in the room is very high it is possible that condensation develops on the air quality sensor As a result the air quality light ma...

Страница 14: ...ift the hooks at the bottom of the panel out of the top of the purifier 3 To remove the pre filter grab the two projections and pull the filter towards you 4 Use a vacuum cleaner or wash the pre filter under a running tap If the pre filter is very dirty use a soft brush to brush away the dust 5 Air dry the pre filter 6 Put the pre filter back into the purifier Attach all hooks properly to the puri...

Страница 15: ...or 3 seconds to reset the filter lifetime go off 3s Note Make sure that the pre filter is completely dry If it is still wet bacteria may multiply in it and shorten the lifetime of the pre filter Make sure that the side with the two projections is pointing towards you and that all hooks of the pre filter are properly attached to the purifier ...

Страница 16: ...e the purifier is switched on all lights on the control panel will be off Once the front panel is placed back to the purifier it starts to run as its previous status The replaceable filters are not washable nor vacuum cleanable For AC4372 Replace the multi care filter the activated carbon filter and the HEPA filter when the respective indicators and go on For AC4374 Replace the integrated Multi ca...

Страница 17: ...by the two sides and deposit it gently into the household trash bin Note Do not touch the pleated filter surface or smell the filter as it has collected pollutants from the air Wash your hands with tap water and soap after you have touched the used filter 6 Remove all packaging material from the new filters that need replacement 7 For AC4372 put the HEPA filter activated carbon filter and multi ca...

Страница 18: ...tors and All indicators are off except if it has been activated and buttons remain active while and buttons are deactive See Replace the filters section to reset the filter lock 9 To reattach the front panel insert the bottom hooks into the bottom of the purifier first 1 Then push the panel against the body of the purifier 2 10 Press and hold the button for 3 seconds to reset the filter lifetime F...

Страница 19: ...ng time One of the filters has not been placed in the purifier Make sure that all filters are properly installed in the following order starting with the innermost filter For AC4372 HEPA filter 4 activated carbon filter 3 multi care filter 2 and pre filter 1 For AC4374 Integrated Multi care filter 2 pre filter 1 The air quality sensor is wet The humidity level in your room is high and causes conde...

Страница 20: ...ldwide guarantee leaflet If there is no Consumer Care Centre in your country go to your local Philips dealer Order parts or accessories If you have to replace a part or want to purchase an additional part go to your Philips dealer or visit www philips com support If you have problems obtaining the parts please contact the Philips Consumer Care Center in your country you will find its phone number ...

Страница 21: ...ic fields Compliance with EMF Koninklijke Philips N V manufactures and sells many products targeted at consumers which like any electronic apparatus in general have the ability to emit and receive electromagnetic signals One of Philips leading Business Principles is to take all necessary health and safety measures for our products to comply with all applicable legal requirements and to stay well w...

Страница 22: ...kaan sensor kualitas udara 30 Memilih kecepatan kipas 30 Menyetel timer 31 Mengaktifkan kunci anak 31 Mode malam 31 5 Membersihkan alat pemurni udara Anda 32 Membersihkan alat pemurni udara 32 Membersihkan sensor kualitas udara 32 6 Membersihkan pra filter 34 7 Mengganti filter 36 Mereset kunci filter 38 8 Pemecahan Masalah 39 9 Garansi dan servis 40 Memesan komponen atau aksesori 40 10 Pemberitah...

Страница 23: ...ngan gunakan alat ini jika steker kabel listrik atau alat ini rusak Alat ini dapat digunakan oleh anak anak berusia 8 tahun ke atas dan orang dengan cacat fisik indera atau kecakapan mental yang kurang atau kurang pengalaman dan pengetahuan jika mereka diberi pengawasan atau petunjuk mengenai cara penggunaan alat yang aman dan mengerti bahayanya Anak anak dilarang memainkan alat ini Pembersihan da...

Страница 24: ...obat nyamuk jenis asap dalam ruangan atau di tempat yang terdapat residu minyak dupa bakar atau uap kimia Jangan gunakan alat dekat alat yang menggunakan gas perangkat pemanas atau perapian Selalu cabut alat setelah alat digunakan dan sebelum Anda membersihkannya Jangan gunakan alat di ruangan yang perubahan suhunya besar karena hal ini dapat menyebabkan pengembunan di dalam alat Untuk mencegah in...

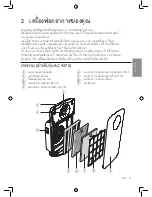
Страница 25: ...uran 0 02 mikron termasuk bakteri dan virus Menurut Laporan Penilaian Risiko Mikrobiologi 2008 dari WHO flu burung virus flu manusia Legionella virus Hepatitis dan virus pernapasan SARS berukuran lebih besar dari 0 02 mikron Baca petunjuk pengguna ini dengan saksama sebelum Anda memasang dan menggunakan unit Simpanlah sebagai referensi nanti Ikhtisar untuk AC4372 a b c d e Panel kontrol layar sent...

Страница 26: ... untuk AC4374 a b c d Panel kontrol layar sentuh Sensor cahaya Lampu kualitas udara Sensor kualitas udara e f g Filter 2 Filter Multi perawatan terpadu AC4138 Filter 1 Pra filter Panel depan Panel depan d b c e f g a ...

Страница 27: ...h ini Catatan Masukkan filter dalam posisi yang benar 1 Letakkan jari Anda di lubang panel samping dan pelan pelan tarik bagian atas panel depan ke arah Anda 2 Lalu angkat kait di bagian bawah panel hingga lepas dari bagian bawah alat 3 Untuk melepaskan pra filter pegang kedua tonjolan dan tarik filter ke arah Anda 4 Keluarkan semua filter dari alat 5 Lepaskan semua bahan kemasan dari filter 6 Unt...

Страница 28: ...tag mengarah ke Anda 7 Masukkan pra filter ke dalam alat 2 1 Catatan Pastikan bahwa sisi yang ada dua tonjolan mengarah ke Anda dan semua kait telah dipasang dengan benar pada alat 8 Untuk memasang kembali panel depan masukkan kait bawah ke bagian bawah alat terlebih dahulu 1 Kemudian tekan lagi panel pada badan alat 2 ...

Страница 29: ...ari kiri ke kanan secara berurutan lalu terdengar bunyi bip Kemudian semua lampu akan padam lagi Lampu kualitas udara menampilkan 4 warna secara berurutan 2 Tekan tombol untuk menghidupkan alat pemurni Indikator kecepatan kipas dan menyala Catatan Ketika alat pemurni dihidupkan sensor kualitas udara memerlukan waktu beberapa saat untuk mengukur kualitas udara dalam ruangan Lampu kualitas udara aka...

Страница 30: ...ampu atau akan berkedip untuk menunjukkan tingkat kepekaan sensor kualitas udara saat ini Indikator kecepatan kipas Tingkat kepekaan Ekstra sensitif kepekaan default Sensitif Standar 4 Tekan tombol untuk menyesuaikan tingkat kepekaan sensor kualitas udara Salah satu indikator atau akan menyala untuk menunjukkan tingkat kepekaan yang dipilih untuk sensor kualitas udara 5 Tekan dan tahan tombol sela...

Страница 31: ...detik untuk mengaktifkan kunci anak Indikator kunci anak menyala 3 2 Tekan dan tahan tombol lagi selama 3 detik untuk menonaktifkan kunci anak 3 Catatan Saat fungsi kunci anak diaktifkan semua tombol akan dikunci kecuali tombol Tidak akan ada umpan balik suara saat Anda menekan tombol Mode malam Alat pemurni bekerja selaras dengan lingkungannya Alat pemurni akan beralih secara otomatis ke mode mal...

Страница 32: ...luar alat pemurni untuk mencegah menumpuknya debu 1 Seka debu dengan kain kering yang halus dari badan alat pemurni 2 Bersihkan masukan udara dan keluaran udara dengan kain kering dan lembut Membersihkan sensor kualitas udara Bersihkan sensor kualitas udara setiap 2 bulan agar alat pemurni berfungsi secara optimum Bersihkan lebih sering jika Anda menggunakan alat pemurni di lingkungan yang berdebu...

Страница 33: ...s ia 3 Bersihkan sensor kualitas udara saluran masuk debu dan saluran keluar debu dengan kapas telinga yang sedikit dibasahi 4 Keringkan dengan kapas telinga yang kering 5 Pasang kembali penutup sensor kualitas udara ...

Страница 34: ...gian bawah panel hingga lepas dari bagian atas alat pemurni 3 Untuk melepaskan pra filter pegang kedua tonjolan dan tarik filter ke arah Anda 4 Gunakan penyedot debu atau cuci pra filter di bawah air keran Jika pra filter sangat kotor gunakan sikat halus untuk menyikat debunya 5 Angin anginkan pra filter hingga kering 6 Letakkan kembali pra filter ke dalam alat pemurni Pasang semua kait dengan ben...

Страница 35: ...selama 3 detik untuk mereset masa pakai filter padam 3s Catatan Pastikan bahwa pra filter benar benar kering Jika masih basah bakteri bisa berkembang biak di dalamnya dan memperpendek masa pakai pra filter Pastikan bahwa sisi yang ada dua tonjolan mengarah ke Anda dan bahwa semua kait pra filter telah dipasang dengan benar ke alat pemurni ...

Страница 36: ...at alat pemurni dihidupkan semua lampu pada panel kontrol akan mati Setelah panel depan dipasang kembali ke pemurni udara pemurni akan kembali beroperasi sesuai status sebelumnya Filter yang dapat diganti tidak dapat dicuci maupun dibersihkan dengan penyedot debu Untuk AC4372 Ganti filter multi perawatan filter karbon aktif dan filter HEPA ketika indikator masing masing filter dan menyala Untuk AC...

Страница 37: ...skan filter multi perawatan terpadu dari pemurni udara 5 Ambil filter bekas pakai dengan memegang dua sisinya dan buang secara perlahan ke keranjang sampah Anda Catatan Jangan menyentuh permukaan filter yang terlipat atau mengendus filter karena filter berisi polutan dari udara Cuci tangan Anda dengan air keran dan sabun setelah menyentuh filter bekas 6 Lepaskan semua bahan kemasan dari filter bar...

Страница 38: ...an kunci filter direset Lampu menyala berbarengan dengan indikator penggantian filter dan Semua indikator mati kecuali jika sudah diaktifkan Tombol dan tetap aktif sementara tombol dan nonaktif Lihat bagian Mengganti filter untuk mereset kunci filter 10 Tekan dan tahan tombol selama 3 detik untuk mereset masa pakai filter Untuk AC4372 dan padam 3s Untuk AC4374 dan padam 3s ...

Страница 39: ... alat pemurni Pastikan bahwa semua filter telah dipasang dengan benar dalam urutan berikut dimu lai dengan filter paling dalam Untuk AC4372 filter HEPA 4 filter karbon aktif 3 filter multi perawatan 2 dan pra filter 1 Untuk AC4374 Filter multi perawatan terpadu 2 pra filter 1 Sensor kualitas udara basah Tingkat kelembapan dalam ruangan Anda tinggi dan menyebabkan kondensasi Pastikan sensor kualita...

Страница 40: ...sional Jika di negara Anda tidak terdapat Pusat Layanan Pelanggan kunjungi dealer Philips setempat Memesan komponen atau aksesori Jika Anda harus mengganti komponen atau ingin membeli komponen tambahan kunjungi dealer Philips Anda atau kunjungi www philips com support Jika Anda mengalami kesulitan dalam memperoleh komponen tersebut harap hubungi Pusat Layanan Konsumen Philips di negara Anda nomor ...

Страница 41: ...ps N V memproduksi dan menjual berbagai produk yang ditargetkan untuk konsumen seperti peralatan elektronik yang secara umum dapat mengirim dan menerima sinyal elektromagnetik Salah satu Prinsip Bisnis utama Philips adalah mengambil semua tindakan kesehatan dan keselamatan yang diperlukan bagi berbagai produk kami agar sesuai dengan semua persyaratan hukum yang berlaku dan agar tetap mematuhi berb...

Страница 42: ... จักกับไฟแสดงคุณภาพอากาศ 49 เปิด 49 ตั งค าระดับความไวของ เซนเซอร ตรวจวัดคุณภาพอากาศ 50 เลือกความเร วพัดลม 50 ตั งค าตัวตั งเวลา 51 เปิดใช งานระบบป องกันเด ก 51 โหมดกลางคืน 51 5 ทำ ความสะอาดเครื อง ฟอกอากาศของคุณ 52 ทำ ความสะอาดเครื องฟอกอากาศ 52 ทำ ความสะอาดเซนเซอร ตรวจวัดคุณภาพอากาศ 52 6 ทำ ความสะอาดแผ นกรองชั นแรก 53 7 เปลี ยนแผ นกรอง 55 รีเซ ตระบบล อคแผ นกรอง 57 8 การแก ไขปัญหา 58 9 การรับประก...

Страница 43: ...ี ผ านการฝึกอบรม ด ำเนินการเปลี ยนให เพื อหลีกเลี ยง อันตรายที อาจเกิดขึ น ห ามใช งานเครื องหากปลั กไฟ สายไฟ หรือตัวเครื องช ำรุด เด กอายุ 8 ปีขึ นไป และผู ที มีสภาพ ร างกายไม สมบูรณ หรือสภาพจิตใจ ไม ปกติ หรือขาดประสบการณ และ ความรู ความเข าใจสามารถใช งาน เครื องนี ได โดยต องอยู ในการควบคุม ดูแลหรือได รับค ำแนะน ำในการ ใช งานที ปลอดภัยและเข าใจถึง อันตรายที เกี ยวข องในการใช งาน ห ามเด กเล นเครื อ...

Страница 44: ...ควันภายในอาคาร หรือ ห ามใช ในสถานที ๆ มีเศษตกค างที มี ลักษณะเหมือนน ำมัน บริเวณที มี การจุดธูป หรือควันของสารเคมี ห ามใช เครื องใกล กับอุปกรณ ที เกี ยวกับก าซเชื อเพลิง อุปกรณ ให ความร อน หรือเตาไฟ ปิดเครื องทุกครั งหลังใช งานและ ก อนท ำความสะอาดเครื อง ห ามใช งานเครื องในห องที มีการ เปลี ยนแปลงของอุณหภูมิอย างมาก เนื องจากภายในเครื องอาจก อให เกิด การกลั นตัวเป นหยดน ำได เพื อเป นการป องกันการร...

Страница 45: ...ไมครอน รวมทั งแบคทีเรียและไวรัส ได อย างมีประสิทธิภาพ ตามรายงานการวัดความเสี ยงทางจุลชีววิทยาปี 2008 ขององค การอนามัยโลก WHO ไวรัสไข หวัดนก ไข หวัดใหญ แบคทีเรียลิเจียนแนร ไวรัสตับอักเสบ และโคโรนาไวรัสซาร ส มีขนาดใหญ กว า 0 02 ไมครอน อ านคู มือการใช งานนี โดยละเอียดก อนการติดตั งและใช งานเครื อง และเก บไว เพื ออ างอิงต อไป ภาพรวม ส ำหรับรุ น AC 4372 a b c d e แผงควบคุมหน าจอสัมผัส เซนเซอร ตรวจจับแส...

Страница 46: ...รับรุ น AC 4374 a b c d แผงควบคุมหน าจอสัมผัส เซนเซอร ตรวจจับแสง ไฟแสดงคุณภาพอากาศ เซนเซอร ตรวจวัดคุณภาพอากาศ e f g แผ นกรอง 2 แผ นกรองหลายชั นที ติดตั งในตัว AC4138 แผ นกรอง 1 แผ นกรองชั นแรก แผงด านหน า d b c e f g a ...

Страница 47: ...านล าง หมายเหตุ เสียบแผ นกรองในต ำแหน งที ถูกต อง 1 ใช นิ วจับที ช องบริเวณแผงด านข าง แล วค อยๆ ดึง ส วนบนสุดของแผงด านหน าเข าหาตัวคุณ 2 ยกขอที อยู ด านล างของแผงออกจากส วนล าง ของเครื อง 3 ในการถอดแผ นกรองชั นแรกออก ให จับส วนยื น ทั งสองไว แล วดึงแผ นกรองเข าหาตัวคุณ 4 น ำแผ นกรองออกจากตัวเครื อง 5 น ำบรรจุภัณฑ ทั งหมดออกจากแผ นกรอง 6 ส ำหรับรุ น AC4372 ให ใส แผ นกรอง HEPA แผ นกรองผงถ านกัมมัน...

Страница 48: ...าด านที มีแท กหันเข าหาคุณ 7 ใส แผ นกรองชั นแรกลงในเครื อง 2 1 หมายเหตุ ตรวจสอบให แน ใจว า ด านข างที มีส วนยื นอยู สองอันนั นหัน เข าหาตัวคุณ และขอเกี ยวทั งหมดติดตั งเข ากับเครื องเรียบร อยดี 8 ในการประกอบแผงด านหน า ให เสียบขอเกี ยว ตัวล างเข ากับส วนล างของเครื องก อน 1 จากนั น ให กดแผงเข ากับตัวเครื อง 2 ...

Страница 49: ...ลั กไฟของเครื องฟอกอากาศเข ากับเต ารับ ไฟทั งหมดสว างขึ นโดยวนจากซ ายไปขวา และมีเสียงบี พ จากนั นไฟจะดับอีกครั ง ไฟแสดงคุณภาพอากาศจะแสดง 4 สีต อ เนื องกันไป 2 กดปุ ม เพื อเปิดเครื องฟอกอากาศ สัญญาณแสดงความเร วพัดลม และ จะสว างขึ น หมายเหตุ เมื อเครื องฟอกอากาศเปิดอยู เซนเซอร ตรวจวัดคุณภาพอากาศ จะใช เวลาสักครู ในการวัด คุณภาพอากาศภายในห อง ไฟแสดง คุณภาพอากาศจะเปลี ยนสี และในที สุดก จะอยู ในสีที ถูก...

Страница 50: ...ส งเสียงบี พสองครั ง จากนั นสัญญาณแสดงความเร วพัดลม หรือ จะกะพริบ เพื อแสดง ระดับความไวของเซนเซอร ตรวจวัดคุณภาพ อากาศในขณะนั น สัญญาณแสดง ความเร วพัดลม ระดับความไว ระดับไวเป นพิเศษ ความไวเริ มต น Sensitive มาตรฐาน 4 กดปุ ม เพื อปรับระดับความไวของเซนเซอร ตรวจวัดคุณภาพอากาศ สัญญาณ หนึ งดวง หรือ จะสว างขึ น เพื อแสดงระดับความไวของ เซนเซอร ตรวจวัดคุณภาพอากาศตามที ต องการ 5 กดปุ ม ค างไว 3 วินาทีเพื อป...

Страница 51: ...ก ชันระบบป องกันเด กได 1 กดปุ ม ค างไว 3 วินาทีเพื อเปิดใช งานระบบ ป องกันเด ก สัญญาณแสดงระบบป องกันเด กจะสว างขึ น 3 2 กดปุ ม ค างอีกไว 3 วินาทีเพื อปิดใช งาน ระบบป องกันเด ก 3 หมายเหตุ เมื อเปิดใช งานระบบป องกันเด ก ปุ มทั งหมดจะถูกล อค ยกเว น ปุ ม จะไม มีการตอบกลับด วยเสียง เมื อคุณกดปุ ม โหมดกลางคืน เครื องฟอกอากาศจะท ำงานสอดคล องกับสภาพ แวดล อม เครื องฟอกอากาศจะสลับเป นโหมดกลางคืน ใน 3 นาที ห...

Страница 52: ...ง ฟอกอากาศออกให หมด 2 ใช ผ าแห งและนุ มท ำความสะอาดทางลมเข า และทางลมออก ท ำความสะอาดเซนเซอร ตรวจวัดคุณภาพอากาศ ท ำความสะอาดเซนเซอร ตรวจวัดคุณภาพอากาศทุกๆ 2 เดือน เพื อประสิทธิภาพการท ำงานที เป นเยี ยมของ เครื องฟอกอากาศ หากคุณใช เครื องฟอกอากาศภายใต สภาพแวดล อมที มีฝุ นมาก ควรท ำความสะอาด ให บ อยยิ งขึ น หมายเหตุ เมื อระดับความชื นในห องสูงมาก อาจมีหยดน ำที กลั นตัวบน เซนเซอร ตรวจวัดคุณภาพอากาศ ด...

Страница 53: ...าเข าหาตัวคุณ จาก นั นยกขอที อยู ด านล างของแผงออกจากส วนบน ของเครื องฟอกอากาศ 3 ในการถอดแผ นกรองชั นแรกออก ให จับส วนยื น ทั งสองไว แล วดึงแผ นกรองเข าหาตัวคุณ 4 ท ำความสะอาดแผ นกรองชั นแรกโดยใช เครื อง ดูดฝุ น หรือล างโดยเปิดก อกน ำไหลผ าน หากแผ นกรองชั นแรกสกปรกมาก ให ใช แปรง ขนนุ มเพื อปัดฝุ นออก 5 ผึ งแผ นกรองชั นแรกให แห ง 6 ใส แผ นกรองชั นแรกกลับเข าสู เครื องฟอกอากาศ ใส ขอทั งหมดให เข าที ...

Страница 54: ...ุ การใช งานของแผ นกรอง ดับลง 3s หมายเหตุ ตรวจสอบให แน ใจว าแผ นกรองชั นแรกแห งสนิทแล ว หากยังเปียกอยู แบคทีเรียอาจสะสมตัว และท ำให อายุใช งาน ของแผ นกรองชั นแรกสั นลง ตรวจสอบให แน ใจว า ด านข างที มีส วนยื นอยู สองอันนั นหัน เข าหาตัวคุณ และขอเกี ยวทั งหมดของแผ นกรองชั นแรกติดตั ง เข ากับเครื องฟอกอากาศเรียบร อยดี ...

Страница 55: ...ดสวิตช อยู ไฟทุกดวงบนแผงควบคุม จะดับลง เมื อใส แผงด านหน ากลับคืนไปยังเครื องฟอกอากาศแล ว เครื องจะเริ มท ำงานตามสถานะก อนหน า แผ นกรองแบบถอดเปลี ยนได ไม สามารถท ำความสะอาด ด วยการล างหรือการใช เครื องดูดฝุ นได ส ำหรับรุ น AC4372 เปลี ยนแผ นกรองหลายชั น แผ นกรองผงถ านกัมมันต และแผ นกรอง HEPA เมื อสัญญาณ และ สว างขึ น ส ำหรับรุ น AC4374 เปลี ยนแผ นกรองหลายชั นที ติดตั งในตัว เมื อสัญญาณ สว างขึ น ซ...

Страница 56: ... องฟอกอากาศ ส ำหรับรุ น AC4374 ให ถอดแผ นกรองหลายชั น ที ติดตั งในตัวออกจากเครื องฟอกอากาศ 5 ถือแผ นกรองที ใช แล วทั งสองข าง แล วค อยๆ น ำไปทิ งในถังขยะ หมายเหตุ อย าสัมผัสพื นผิวแผ นกรองที เป นรอยจีบ หรือสูดดมแผ นกรอง เนื องจากแผ นกรองมีมลพิษที สะสมจากอากาศ ล างมือทั งสองข างด วยน ำประปาและสบู หลังจากคุณสัมผัสกับ แผ นกรองที ใช แล ว 6 แกะบรรจุภัณฑ ทั งหมดออกจากแผ นกรองใหม ที น ำมาเปลี ยน ...

Страница 57: ...แผ นกรอง และ สัญญาณ ทั งหมดจะปิดลง ยกเว น หากเปิด ใช งานเอาไว ปุ ม และ จะยังคงเปิดใช งาน อยู ในขณะที ปุ ม และ จะปิดการใช งาน โปรดดูที ส วน เปลี ยนแผ นกรอง เพื อรีเซ ตระบบล อค แผ นกรอง 8 ใส แผ นกรองชั นแรกกลับเข าสู เครื องฟอกอากาศ 2 1 9 ในการประกอบแผงด านหน า ให เสียบขอเกี ยว ตัวล างเข ากับส วนล างของเครื องฟอกอากาศ ก อน 1 จากนั น ให กดแผงเข ากับตัวเครื อง ฟอกอากาศ 2 10 กดปุ ม ค างไว 3 วินาทีเพื อ...

Страница 58: ...าที ในเครื องฟอกอากาศ ตรวจสอบใจว า ติดตั งแผ นกรองทั งหมดอย างถูกต องเรียงตามล ำดับโดยเริ มจากด านในสุด ดังนี ส ำหรับรุ น AC4372 แผ นกรอง HEPA 4 แผ นกรองผงถ านกัมมันต 3 แผ นกรองหลายชั น 2 และแผ นกรองชั นแรก 1 ส ำหรับรุ น AC4374 แผ นกรองหลายชั นที ติดตั งในตัว 2 แผ นกรองชั นแรก 1 เซนเซอร ตรวจวัดคุณภาพอากาศเปียก ระดับความชื นในห องของคุณสูง และท ำให เกิดหยดน ำ ตรวจสอบว า เซนเซอร ตรวจวัดคุณภาพอากาศนั...

Страница 59: ... เกี ยวกับการรับประกันทั วโลก หากในประเทศของคุณ ไม มีศูนย บริการลูกค า โปรดติดต อตัวแทนจ ำหน าย ผลิตภัณฑ Philips ในประเทศ สั งซื อชิ นส วนหรืออุปกรณ เสริม หากคุณต องเปลี ยนชิ นส วนหรือต องการสั งซื อชิ นส วน เพิ มเติมโปรดไปที ตัวแทนจ ำหน ายของ Philips หรือไปที www philips com support หากคุณมีปัญหาในการหาชิ นส วน โปรดติดต อศูนย บริการลูกค า Philips ในประเทศของคุณ คุณสามารถ ดูหมายเลขโทรศัพท ของศูนย ...

Страница 60: ... าที มีทุกประการ การปฏิบัติตามมาตรฐาน EMF Koninklijke Philips N V ผลิตและจ ำหน ายผลิตภัณฑ จ ำนวนมากที มีผู บริโภคเป นกลุ มเป าหมาย โดยผลิตภัณฑ ดังกล าวสามารถปล อยและรับ คลื นแม เหล กไฟฟ าได เช นเดียวกันกับอุปกรณ อิเล กทรอนิกทั วไป หนึ งในหลักการด ำเนินธุรกิจที ส ำคัญของ Philips คือการค ำนึงถึงสุขภาพและความปลอดภัยส ำหรับ ผลิตภัณฑ ของคุณ เพื อให สอดคล องกับกฎหมาย และมาตรฐาน EMF ซึ งต องใช ในช วงเวลา...

Страница 61: ... 概覽 64 AC4374 概覽 65 3 開始使用 66 安裝過濾網 66 4 使用空氣淨化器 68 認識空氣質素燈 68 開啟 68 設定空氣質量感測器的靈敏度 69 選擇風扇速度 69 設定定時功能 70 啟用兒童安全鎖 70 夜間模式 70 5 清潔您的空氣 淨化器 71 清潔空氣淨化器 71 清潔空氣質量感測器 71 6 清洗預過濾網 72 7 更換過濾網 74 重設過濾網鎖 76 8 疑難排解 77 9 保養及服務 78 訂購零件或配件 78 10 注意 79 電磁場 EMF 79 環保 79 ...

Страница 62: ...廠或其維 修部或類似的專職人員來 更換 若插頭 電線或產品本身已 受損 請勿使用 如該等人仕已就使用本產品 給予監督或有關安全使用本 產品的指導及明白本產品的 使用所涉及的危險 此產品 則可供八歲及以上兒童 體 能 感官或心智能力低下人 仕 或缺乏知識及經驗人仕 使用 請勿讓孩童將本產品 當成玩具 兒童不應於沒有 監督情況下對產品進行清潔 及維護 請勿阻塞進氣口和排氣口 例如在排氣口上面或進氣口 前面放置物件 注意 本產品並不是適當通風設 備 正規吸塵器或煮食時使 用的抽油煙機或風扇的代 替品 若為本產品提供電力的電源 插座沒有妥善連接 本產品 的插頭便會發熱 請確保您 已妥善連接電源插座 在乾燥 穩定 平滑和水平 表面上使用產品 在本產品的後面和兩側至少 留出 20 厘米的自由空間 本產品上方至少留出 30 厘米 空間 請勿在本產品頂部放置任何 物件 不要坐在本產品上 ...

Страница 63: ...他濾網 避免以硬物碰撞產品 尤其是 產品的通風口和排氣口 請勿以手指或其他物件插入 排氣口 若您使用室內煙型驅蚊劑 或該地方有油跡 香火或化 學煙霧 請勿使用本產品 請勿在煤氣用具 暖氣設備 或壁爐旁邊使用本產品 在使用本產品後或清潔本產 品前必需先拔去插頭 請勿在溫度變化較大的房間 內使用本產品 這可能導致 產品內產生冷凝物 為了防止干擾 請與使用空 中無線電波的電器距離 2 米 的地方使用本產品 本產品只適合一般操作環境 下的家居使用 請勿在洗手間或廚房等濕潤 環境或高溫環境使用本 產品 本產品不會去除一氧化碳 CO 或氡 Rn 本產品不能 在含有燃燒過程和危險化學 品的意外中充當安全裝置 ...

Страница 64: ... NanoCloud 技術可確保您 時刻擁有清新空氣 VitaShield IPS 技術可有效去除尺寸 0 02 微米的污染物 超細粒子 過敏原 細菌和病毒 包括細菌和病毒 根據世界衛生組織 WHO 的 2008 年微生物風險評估報告 禽流感 人類流感 退伍軍人 症病菌 肝炎病毒及 SARS 冠狀病毒均大約 0 02 微米 安裝及使用本產品前請先閱讀本用戶手冊 保管本用戶手冊以作將來參考 AC4372 概覽 a b c d e 輕觸屏幕控制板面 光源感測器 空氣質素燈 空氣質素感應器 濾網 4 HEPA 過濾網 AC4154 f g h i 濾網 3 活性碳濾網 AC4153 濾網 2 全效濾網 AC4151 濾網 1 預過濾網 前面板 d b c e f g h i a ...

Страница 65: ...繁 體中 文 65 ZH HK AC4374 概覽 a b c d 輕觸屏幕控制板面 光源感測器 空氣質素燈 空氣質素感應器 e f g 濾網 2 整合式全效濾網 AC4138 濾網 1 預過濾網 前面板 d b c e f g a ...

Страница 66: ...上所有過濾網 但您必須在 使用本產品前除下所有過濾網的包裝 移 除所有過濾網並除下所有包裝 然後根據 以下方法重新裝上過濾網 提示 在正確的地方裝上過濾網 1 把手指放在兩則面板的凹處 讓正面板 的頂部向著自己 並輕輕拉出 2 從產品底部提出面版下方的鉤 3 要移除預過濾網 抓住兩個突起物並將 過濾網拉向您自己 4 從產品移除所有過濾網 5 除下所有過濾網的包裝 6 適用於型號 AC4372 將 HEPA 過濾 網 活性碳過濾網和全效濾網裝回 空氣淨化器 ...

Страница 67: ...繁 體中 文 67 ZH HK 適用於型號 AC4374 將整合式全效濾網裝 回空氣淨化器 提示 確保有標籤的一邊正向著您 7 裝上預過濾網 2 1 提示 確保有兩個投影的一邊正向著您 且所有鉤已妥 善連接產品 8 要重新連接前面板塊 先把底部鉤子插 入本產品底部 1 然後將板塊推向本 產品的機身 2 ...

Страница 68: ...選擇 適當的空氣質素燈顏色 當空氣乾淨時 空氣質 素燈為藍色 當空氣質素轉差時 空氣質素燈由 深紫色變為紅色 開啟 1 將空氣淨化器插頭插入電源插座 所有燈會由左至右循環發亮 您 亦會聽到嗶嗶聲 然後所有燈會 熄滅 空氣質素燈依次顯示 4 種顏色 2 按 按鈕開啟本淨化器 風扇速度指示燈 和 會 亮起 提示 當開啟本淨化器後 空氣質素感應器需一段時間 才能測量室內空氣質素 空氣質素燈會改變顏 色 最後根據空氣質素顯示相應的顏色 3 按住 按鈕 2 秒以關閉本淨化器 2 貼士 本淨化器設有記憶模式 記憶模式可以用回上次 使用的設定 如果您在關閉本淨化器後拔除電源供應 下次使 用時淨化器將會自動進入預設模式 風扇速度是 ...

Страница 69: ...時 有較大機會選擇比標準模式更高的風扇 速度 1 將空氣淨化器的插頭從電源插座拔除 2 稍等一會 然後將插頭重新插入電源 插座 3 同時按 及 按鈕 本淨化器會發出兩下嗶聲 其中一 個風扇速度指示燈 或 會閃動 顯示目前的空氣質素感應 器的靈敏度 風扇速度 指示燈 靈敏度 極靈敏 預設靈敏度 靈敏 標準 4 按 按鈕調整空氣質量感測器的靈 敏度 其中一個 指示燈 或 會亮起以顯示空氣質素感應器 的偏好靈敏度 5 按住 按鈕 3 秒以關閉本淨化器 並 將會儲存靈敏度設定 提示 設定靈敏度時 如果 10 秒內沒有按下任何按鈕 淨化器將會跳過靈敏度設定模式並使用上一次的 設定 選擇風扇速度 提示 當您變更靈敏度後 開啟本淨化器時便會自動以 設定的靈敏度運作 您可以選擇所需的風扇速度 1 按 按鈕一次或多次以選擇所需的 風扇速度 或 ...

Страница 70: ... 所需小時數 相應的燈 或 會亮起 要停用定時功能 重複按 按鈕 直到 燈 或 熄滅 啟用兒童安全鎖 您可以啟用兒童安全鎖 1 按住 按鈕 3 秒即可啟用兒童安 全鎖 兒童安全鎖指示燈就會亮起 3 2 再次按住 按鈕 3秒即可停用兒童 安全鎖 3 提示 當兒童安全鎖功能啟用時 按鈕以外的所有按 鈕將會被鎖定 按下按鈕時將不會有聲訊回饋 夜間模式 本淨化器會跟周圍互相協調 本淨化器會 在房間燈光變暗 3 分鐘後自動轉為夜間模 式 控制面板上的所有燈將會慢慢熄滅 此時您可以按下控制面板上的任何按鈕 燈便會再次亮起 不過 如果淨化器閒置 5 秒燈便會再次熄滅 當房間回復光亮 5 分鐘或更久 本淨化器 會回復正常運作 ...

Страница 71: ... 不可清洗或以吸塵機 清潔其他空氣淨化器過濾網 清潔空氣淨化器 請定時清潔本淨化器的內外 以避免本體 內積聚塵埃 1 使用柔軟的乾布擦掉淨化器本體內的 塵埃 2 使用柔軟的乾布清潔通風口和排氣口 清潔空氣質量感測器 每兩個月清潔空氣質量感測器 以達至淨 化器的最佳運作 若在多塵的地方使用本 淨化器 請更頻密清潔 提示 若房間內的濕度水平很高 空氣質量感測器上可 能會凝結水滴 因此 即使空氣質素良好 空氣 質素燈可能會顯示空氣質素為差 在此情況下 您必須清潔空氣質量感測器或使用其中一個手動 設定 1 使用柔軟毛刷清潔空氣質量感測器的 出入口 2 移除空氣質量感測器護蓋 3 使用有一點濕潤的棉花棒清潔空氣質量 感測器和塵埃的出入口 4 再以乾爽的棉花棒刷乾 5 重新裝上空氣質量感測器護蓋 ...

Страница 72: ...佳 運作 預過濾網需要清潔時 會亮起 1 關閉本淨化器並拔除插頭 2 將手指放在側面板塊的空位並向自己輕 輕拉出前面板塊的頂部 然後把板塊底 部的鉤子從淨化器底部拖出 3 要移除預過濾網 抓住兩個突起物並將 過濾網拉向您自己 4 使用吸塵機或在水龍頭的水流下清洗預 過濾網 如果預過濾網內部十分骯髒 可用軟刷將塵埃刷走 5 吹乾預過濾網 6 將預過濾網放回本淨化器內 將所有鉤 子正確裝回本淨化器上 2 1 7 要重新連接前面板塊 先把底部鉤子插 入本淨化器底部 1 然後將板塊推向 本淨化器的機身 2 ...

Страница 73: ...繁 體中 文 73 ZH HK 8 將淨化器接上電源 按下 按鈕以 開啟淨化器 9 按住 按鈕 3 秒即可重設濾網壽命 計算 關閉 3s 提示 請確保預過濾網完全乾透 如果預過濾網仍是濕 的 細菌可能會滋生 縮短預過濾網的壽命 確保有兩個投影的一邊正向著您 且所有預過濾 網的鉤已妥善連接淨化器 ...

Страница 74: ...壽命需視乎淨化空氣量以及使用方法而 定 在污染嚴重的環境 過濾網壽命可能會短於 建議時間 當淨化器為開啟時 如果您移除前面板塊以更換 過濾網 控制面板上的所有燈將會熄滅 當前面板塊放回淨化器時 淨化器會以前一狀態 運作 不可清洗或以吸塵機清潔可更換過濾網 AC4372 當相應指示燈 和 亮起時 請更 換全效濾網 活性碳濾網及 HEPA 過 濾網 AC4374 當相應指示燈 亮起時 請更換全效 濾網 這維持大約兩星期 在這兩星期的最後一日 淨化器會每 30 分 鐘發出嗶聲 通知您需要更換一個過 濾網 提示 在正確的地方裝上過濾網 對於型號 AC4372 請確保您按以下順序裝上過濾 網 HEPA 過濾網 活性碳過濾網 全效濾網 最 後為預過濾網 對於型號 AC4374 請確保您按以下順序裝上過濾 網 整合式全效濾網然後為預過濾網 確保有標籤的一邊正向著您 ...

Страница 75: ...4374 將整合式全效濾 網裝回空氣淨化器 8 將預過濾網放回本淨化器內 2 1 對於型號 AC4374 從本淨化器移除整 合式全效濾網 5 抓住過濾網兩側並輕輕地將其放入家用 集塵箱 提示 請勿觸摸折疊的過濾網表面 或去聞過濾網上的 氣味 因為過濾網上聚集了空氣中的污染物 接觸使用過的過濾網請後使用肥皂和清水清洗 雙手 6 拆去新過濾網上的所有包裝物料 7 適用於型號 AC4372 將 HEPA 過濾 網 活性碳過濾網和全效濾網裝回空氣 淨化器 ...

Страница 76: ...爍後 2 星期仍未更 換過濾網 淨化器便會停止運作 直到您 更換過濾網和重設過濾網鎖 和過濾網替換指示燈會亮起 和 所有指示燈會熄滅 除外 如已啟用 和 按鈕在 和 按鈕停用時仍可使用 有關如何重設過濾網鎖 請參閱 更換濾 網 章節 9 要重新連接前面板塊 先把底部鉤子插 入本淨化器底部 1 然後將板塊推向 本淨化器的機身 2 10按住 按鈕 3 秒即可重設濾網壽命 計算 對於型號 AC4372 和 關閉 3s 對於型號 AC4374 和 關閉 3s ...

Страница 77: ...參閱 清洗預過 濾網 您並未拆去過濾網的所有包裝物料 確保您已移除所有包裝 材料 本淨化器經過長時間 運作 空氣質素仍沒有 改善 其中一個過濾網沒有裝在本淨化器內 請確認所有過濾網均按 正確次序裝上 從最內部數起 AC4372 HEPA 過濾網 4 活性碳濾網 3 全效濾網 2 及預過濾網 1 對於型號 AC4374 全效濾網 2 及預過濾網 1 空氣質量感測器變濕 您的房間濕度高 導致水分凝結 確保空 氣質量感測器乾淨及乾爽 請參閱 清潔空氣質量感測器 空氣質素光環的顏色永遠 保持同一顏色 空氣質量感測器處於骯髒的狀態 清潔空氣質量感測器 請參閱 清潔空氣質量感測器 我需要更潔淨的空氣 因為我有過敏症 您可改變空氣質量感測器的敏感度 請參閱 設定空氣質量感測 器的靈敏度 以令本淨化器更能淨化空氣 本淨化器聲浪太大 請檢查是否拆去過濾網上的所有包裝物料 如果產品噪音仍然很大 可調低風扇速度...

Страница 78: ...hilips 網站 www philips com 或聯絡您的國家的 Philips 顧客服務中心 電話號碼將於全球保 障小冊子上找到 如果您的國家沒有顧 客服務中心 請前往當地的 Philips 經 銷商 訂購零件或配件 如果您需要更換零件或想訂購額外配件 請前往您的 Philips 經銷商或瀏覽 www philips com support 如果您取得有關零件時遇上問題 請聯絡 您的國家的 Philips 顧客服務中心 您將會 在全球保障小冊子上找到其電話號碼 ...

Страница 79: ...成刑 事責任 本設備不應被用於以上行為 電磁場 EMF 這款 Philips 產品符合一切有關電磁場暴露 的適用安全標準及條例 符合 EMF 標準 Koninklijke Philips N V 專為消費者製造及銷 售許多產品 例如任何電器用品 而這些 產品都能發出與接收電磁訊號 Philips 貫徹執行的一項主要商業準則是對 我們的產品採取所有必要的健康和安全措 施 遵循一切可行的法律規定 並在產品 生產期間嚴格遵守 EMF 標準 Philips 致力於開發 生產及銷售對健康無 害的產品 Philips 確認如果產品在目標用 途中操作得當 根據當今權威科學論證 將不會存在任何安全隱患 Philips 在開發國際 EMF 和安全標準中扮演 著積極作用 有助其預見未來標準化的發 展趨勢以便盡早融入至產品中 ...

Страница 80: ...Specifications are subject to change without notice 2014 Koninklijke Philips N V All rights reserved 4241 210 77993 ...

Отзывы: