background image

EN   

19

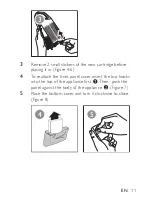
Place the bottom cover back, and turn it clockwise to 

close. (Figure 8)

4


5


6


7


8


Содержание AC4030/00

Страница 1: ...User manual Always there to help you Register your product and get support at www philips com welcome AC4030 00 AC4030 10 Question Contact Philips ...

Страница 2: ......

Страница 3: ...2 For automobile 12 For home or office 13 Switch on and change the fan speed 14 4 Clean your air purifier 16 5 Replace the anti virus cartridge 17 6 Replace the AC filter 20 7 Troubleshooting 22 8 Guarantee and service 24 Order parts or accessories 24 9 Notices 25 Electromagnetic fields EMF 25 Compliance with EMF 25 Recycling 26 ...

Страница 4: ...heck if the voltage indicated on the bottom or at the rear of the appliance corresponds to an automobile outlet for 12V or to the local power voltage before you connect the appliance This appliance is designed for use in vehicles with 12V batteries Do not use it in large trucks buses or other vehicles with 24V batteries Do not pull on the power cord when unplugging the automobile adapter or the co...

Страница 5: ...ower and remove the automobile adapter from the cigar socket when the appliance is not in use for an extended period of time If the cigar socket and ashtray are in one integrated unit use the product after the cigar light is gone Caution This appliance is not a substitute for proper ventilation regular vacuum cleaning or use of deodorizer If the power socket used to power the appliance has poor co...

Страница 6: ...appliance after use and before you clean it Do not use the appliance in a room or in a vehicle with major temperature changes as this may cause condensation inside the appliance For residential use place the appliance at least 2m away from electrical appliance that use airborne radio waves such asTVs radios and radio controlled clocks to prevent interference The appliance is only intended for hous...

Страница 7: ...s on your purchase and welcome to Philips To fully benefit from the support that Philips offers register your product at www Philips com welcome Read this user manual carefully before you install and use the unit Save it for future reference ...

Страница 8: ...8 EN Overview Check and identify the product parts a b c d g h i e f j k ...

Страница 9: ...EN 9 a Fan speed button b Light button c Air inlet d Bottom cover e Air outlet f Power in socket g AC filter Activated carbon filter h Anti virus cartridge i Brush j AC DC adapter k Automobile adapter ...

Страница 10: ... it in the appliance before you can use it Remove the plastic and the 2 small stickers and place it into the appliance as described below Note Always unplug the purifier before you install the anti virus cartridge Figure 1 Insert the cartridge in the correct position 1 Turn the bottom cover anti clockwise to open Figure 2 2 Detach the front panel cover Figure 3 1 2 ...

Страница 11: ...before placing it in Figure 4 6 4 To reattach the front panel cover insert the top hooks into the top of the appliance first Then push the panel against the body of the appliance Figure 7 5 Place the bottom cover and turn it clockwise to close Figure 8 4 5 ...

Страница 12: ...nnect For automobile Caution Do not block the air outlet when installing the product If you place the product in front of an air conditioner it might be heated when the car heater is on Be careful not to get injured ...

Страница 13: ...apter to the power in socket Figure 1 2 Connect the cigar plug to the cigar socket Figure 2 1 2 For home or office 1 Connect the AC DC adapter into the power in socket Figure 1 2 Connect the power plug to the power socket Figure 2 1 2 ...

Страница 14: ... speed when you restart your car There are 2 levels of fan speed 1 Press the fan speed button to switch on the air purifier The air purifier operates in level 1 fan speed Figure 1 The light indicator illuminates automatically To turn off the light indicator you can press the light button to turn off Figure 4 5 2 Press the fan speed button again to change to higher fan speed Figure 2 3 Press the fa...

Страница 15: ...EN 15 1 x 1 2 x 2 3 x 3 4 x 1 5 x 2 ...

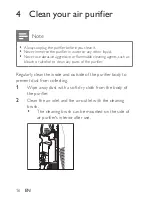
Страница 16: ...cleaning agents such as bleach or alcohol to clean any parts of the purifier Regularly clean the inside and outside of the purifier body to prevent dust from collecting 1 Wipe away dust with a soft dry cloth from the body of the purifier 2 Clean the air inlet and the air outlet with the cleaning brush The cleaning brush can be mounted on the side of air purifier s interior after use ...

Страница 17: ...e the anti virus cartridge Note Always unplug the purifier before you replace the anti virus cartridge Figure 1 Replace the anti virus cartridge every 3 months Insert the anti virus cartridge in the correct position ...

Страница 18: ...nt panel cover Figure 3 1 2 3 3 Remove the plastic and 2 small stickers of the new cartridge before placing it in Figure 4 6 4 To reattach the front panel cover insert the top hooks into the top of the appliance first Then push the panel against the body of the appliance Figure 7 ...

Страница 19: ...EN 19 5 Place the bottom cover back and turn it clockwise to close Figure 8 4 5 6 7 8 ...

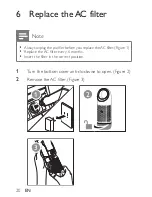
Страница 20: ...ways unplug the purifier before you replace the AC filter Figure 1 Replace the AC filter every 6 months Insert the filter in the correct position 1 Turn the bottom cover anti clockwise to open Figure 2 2 Remove the AC filter Figure 3 1 2 3 ...

Страница 21: ...EN 21 3 Remove the packaging material of the filter then insert the new filter Figure 4 5 4 Place the bottom cover back and turn it clockwise to close Figure 8 4 5 7 ...

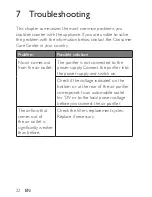
Страница 22: ...mes out from the air outlet The purifier is not connected to the power supply Connect the purifier into the power supply and switch on Check if the voltage indicated on the bottom or at the rear of the air purifier corresponds to an automobile outlet for 12V or to the local power voltage before you connect the air purifier The airflow that comes out of the air outlet is significantly weaker than b...

Страница 23: ...emits a distinct scent This scent comes from the natural ingredients that remove the viruses in the indoor air around you The intensity of the perceived smell decreases if you position the device at a larger distance and or out of direct sunlight at a cooler position Tested for MS2 virus species removal at Intertek Institute USA tested in 11m3 chamber ...

Страница 24: ...ldwide guarantee leaflet If there is no Consumer Care Center in your country go to your local Philips dealer Order parts or accessories If you have to replace a part or want to purchase an additional part go to your Philips dealer or visit www philips com support If you have problems obtaining the parts please contact the Philips Consumer Care Center in your country you will find its phone number ...

Страница 25: ...ufactures and sells many products targeted at consumers which like any electronic apparatus in general have the ability to emit and receive electromagnetic signals One of Philips leading Business Principles is to take all necessary health and safety measures for our products to comply with all applicable legal requirements and to stay well within the EMF standards applicable at the time of produci...

Страница 26: ...standardization for early integration in its products Recycling Never dispose your product with other household waste Please inform yourself about the local rules on the separate collection of electrical and electronic products The correct disposal of your old product helps prevent potentially negative consequences on the environment and human health ...

Страница 27: ...EN 27 ...

Страница 28: ...Specifications are subject to change without notice 2013 Koninklijke Philips N V All rights reserved AC4030_Speed_UM_EN for China_V1 0 ...

Отзывы: