background image

NTSC A

NALOG

F

EATURE

M

ENU

C

ONTROLS

NTSC

NTSC

ANALOG MAIN MENU

PICTURE

FEATURES

SOUND

EXIT

EXIT

1 OF 2

SMART

PICTURE

MORE...

CLOSED

CAPTIONS

FEATURE MENU

CHANNEL

MEMORY

CABLE 

TUNING

1ST TIME SETUP

+

+

+

+

mute

volume

channel

M

exit

menu

TV

Analog

DTV

4/4

1

2

3

1

2

EXIT

CABLE

NORMAL

CABLE TUNING

CABLE TUNING

13

FEATURES

EXIT

MAIN MENU

SOUND

PICTURE

1ST TIME SETUP

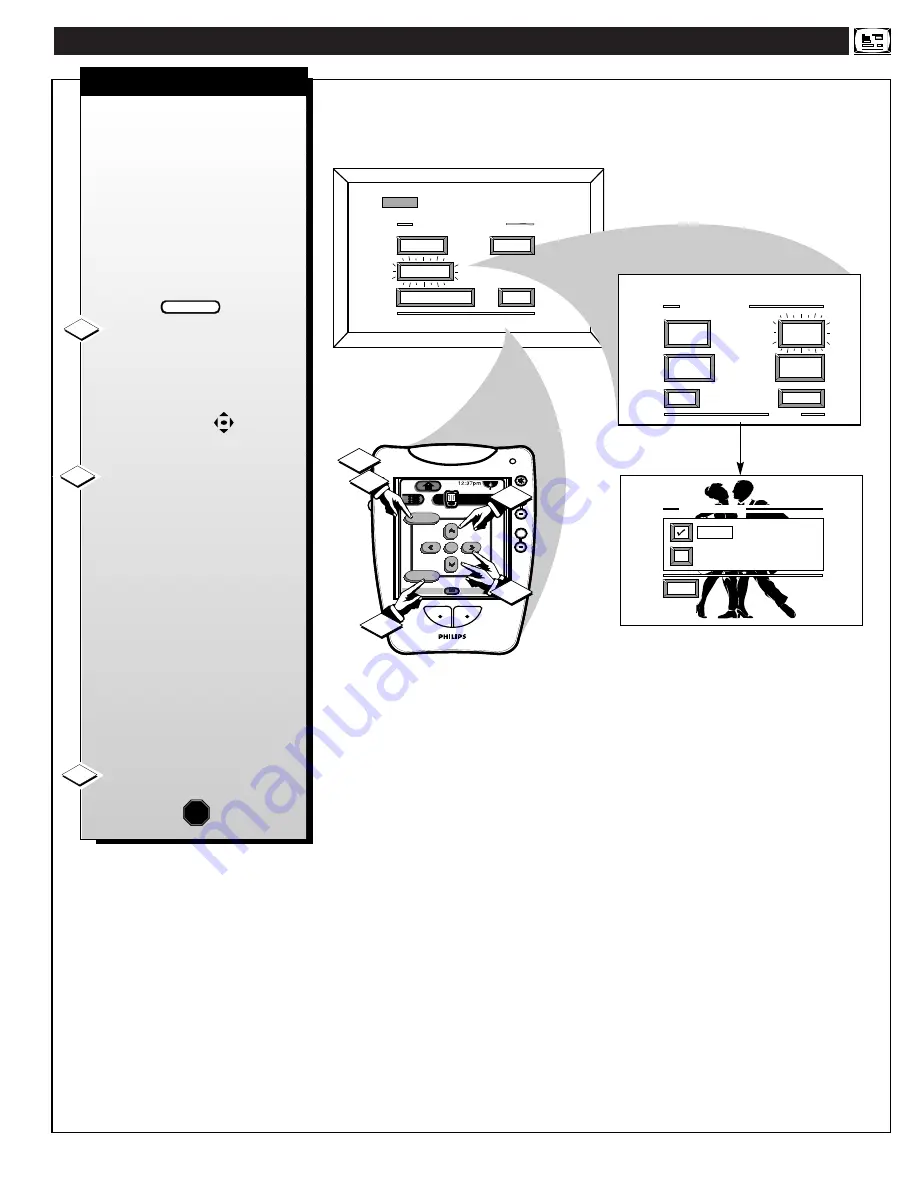
Y

ou need to make sure the
DPTV is set to pick up either

Cable TV or Antenna signals. In
other words, the DPTV needs to
know if you connected a Cable TV
signal or a normal antenna to its
ANTENNA plug.

NOTE: If you went through First
Time Setup (see page 6), this task
has already been completed for
you.

Select CABLE CHANNEL

TUNING control.

With the FEATURES MENU on-
screen, move the RED highlight
with the MENU (M)       buttons.
Then press the MENU button.

Press the MENU 

▲▼ 

buttons

to move the RED highlight. Press
the MENU button to select (

U

) the

desired  mode - For Example:
CABLE.

CABLE-

If you DO have 
Cable TV 
connected 
to the DPTV. 
Channels 1-125 
available.

NORMAL- If you have an 

Antenna connected 
to the DPTV. 
Channels 2-69 
available.

Press the “exit” button to clear

the screen.

STOP

1

2

3

BEGIN

Содержание 64PH9901

Страница 1: ...Instructions for use Digital Projection Television 64PH9901 A T S C C E R T I F I E D D I G I T A L T E L E V I S I O N TM ...

Страница 2: ...ich may cause an electrical shock For the safety of everyone in your household please do not remove product covering s The exclamation point calls attention to features for which you should read the enclosed literature closely to prevent operating and maintenance problems WARNING TO PREVENT FIRE OR SHOCK HAZARD DO NOT EXPOSE THIS EQUIPMENT TO RAIN OR MOISTURE CAUTION To prevent electric shock matc...

Страница 3: ...ns or as marked on the appliance 11 Power Cord Protection Power supply cords should be routed so that they are not likely to be walked on or pinched by items placed upon or against them paying particular attention to cords and plugs convenience receptacles and the point where they exit from the appliance 12 Cleaning The appliance should be cleaned only as recommended by the manufacturer 13 Power L...

Страница 4: ...ut 26 Audio Video Outputs 27 System Audio Output Connections 28 FEATURES EXIT MAIN MENU SOUND PICTURE 1ST TIME SETUP ATSC Digital On Screen Menu Features DTV SETUP Automatic Programming of area Digital over the air Broadcast Channels 29 PICTURE MENU Adjusting Color Brightness Sharpness Tint and Picture Controls 30 Adjusting DTV Convergence 31 SOUND MENU Surround Sound Speaker Connections 32 Select...

Страница 5: ...e with analog NTSC and all 18 digital ATSC formats as specified by the Federal Communications Commission FCC High Definition Digital with full 1920 x 1080 interlaced image resolution capability to achieve superior image performance 64 Widescreen Display with a super large 64 Widescreen 16 9 display format which provides for a true home theater or cinematic experience If a 4 3 aspect ratio picture ...

Страница 6: ...ght to receive program information This completes the First Time Setup Press M to Exit Setup Note FIRST TIME SETUP 6 SMART HELP M exit menu TV Analog DTV 4 4 FEATURES EXIT MAIN MENU SOUND PICTURE 1ST TIME SETUP 1 3 2 2 Press the Pronto remote s analog TV or the Source button on the DPTV s local keyboard to select the NTSC operating mode First Time Setup automatically takes care of some basic contr...

Страница 7: ...the Menu Press MENU or M to select RED highlighted feature 7 FEATURES EXIT MAIN MENU SOUND PICTURE 1ST TIME SETUP To adjust your DPTV color and picture controls select a TV channel and follow the steps shown below Select BRIGHTNESS PICTURE COLOR TINT or SHARPNESS picture control With the PICTURE MENU on screen move the RED highlight with the MENU M buttons Then press the MENU button Press the or a...

Страница 8: ...W 8 FEATURES EXIT MAIN MENU SOUND PICTURE 1ST TIME SETUP Clearview is a sharpness feature which smoothes out background snow or picture noise without losing picture image detail or crispness Select CLEARVIEW control With the PICTURE MENU on screen move the RED highlight with the MENU M buttons Then press the MENU button Press the MENU buttons to move the RED highlight Press the MENU button to sele...

Страница 9: ...re necessary Select CONVERGENCE control With PICTURE MENU 2 of 2 on screen move the RED highlight with the MENU M buttons Then press the MENU button Press the MENU buttons to select either the Red or Blue Convergence control press the MENU button to continue Press the MENU buttons to move the selected red or blue convergence cross directly over the white cross on the DPTV screen The red or blue cr...

Страница 10: ... settings contained within the memory of the DPTV See the next page for more details on the labeling options and use of Smart Picture Select the SMART PICTURE control With the FEATURES MENU on screen move the RED highlight with the MENU M buttons Then press the MENU button Press the MENU buttons to highlight the category list for Smart Picture Press the MENU button to select U the desired title Pr...

Страница 11: ...and video control settings for that title Select the SMART PICTURE control With the FEATURES MENU on screen move the RED highlight with the MENU M buttons Then press the MENU button Press the MENU M buttons with the list of SMART PICTURE categories on the DPTV screen to highlight the desired category Then press the Menu M button to select the audio and video control settings for that particular ti...

Страница 12: ... or networks may occasionally use color to highlight or draw attention to certain areas CLOSED CAPTION NOTE The ON DURING MUTE ONLY control can be used to set the DPTV to turn the Closed Caption mode ON whenever the MUTE button on the remote is pressed SMART HELP 12 FEATURES EXIT MAIN MENU SOUND PICTURE 1ST TIME SETUP Closed Captioning CC allows you to read the voice content of NTSC television pro...

Страница 13: ... needs to know if you connected a Cable TV signal or a normal antenna to its ANTENNA plug NOTE If you went through First Time Setup see page 6 this task has already been completed for you Select CABLE CHANNEL TUNING control With the FEATURES MENU on screen move the RED highlight with the MENU M buttons Then press the MENU button Press the MENU buttons to move the RED highlight Press the MENU butto...

Страница 14: ...ea when the CHANNEL buttons are pressed NOTE If you went through First Time Setup see page 6 this task has already been completed for you Select CHANNEL MEMORY START AUTO PROGRAMMING control With the FEATURES MENU on screen move the RED highlight with the MENU M buttons Then press the MENU button Press the MENU buttons to select the START AUTO PROGRAMMING option then press the Menu button to begin...

Страница 15: ...nd on your Antenna or Cable TV system into the DPTV s memory Add Delete Channels makes it easy for you to add other channels or drop unwanted channels from the list of channels in the DPTV s memory Select CHANNEL MEMORY ADD DELETE CHANNELS control With the FEATURES MENU on screen move the RED highlight with the MENU M buttons Then press the MENU button Press the CHANNEL or number buttons on the Pr...

Страница 16: ...on screen clock During normal operation the clock appears on the screen with every channel change and when the STATUS button is pressed Select SET CLOCK control With FEATURES MENU 2 of 2 on screen move the RED highlight with the MENU M buttons Then press the MENU button Press the remote s number buttons on the Pronto s 2 4 touchscreen display to set the time clock Press the exit button to set the ...

Страница 17: ... 17 FEATURES EXIT MAIN MENU SOUND PICTURE 1ST TIME SETUP With the Channel Display control you can change the size and location of the on screen channel and clock information Select CHANNEL DISPLAY control With FEATURES MENU 2 of 2 on screen move the RED highlight with the MENU M buttons Then press the MENU button Press the MENU and MENU M buttons to highlight and select U the LARGE or SMALL displa...

Страница 18: ...he MENU buttons to move up and down the Channel Label list Just stop on any label you might want to use The selected label automatically appears with channel changes and when the STATUS button is pressed Press the STATUS button to clear the screen when finished 18 FEATURES EXIT MAIN MENU SOUND PICTURE 1ST TIME SETUP Do you ever have trouble remembering on which channel a particular station or netw...

Страница 19: ...ding For Example Treble Balance Stereo etc 19 FEATURES EXIT MAIN MENU SOUND PICTURE 1ST TIME SETUP Your DPTV also has individual sound adjustment controls The BASS low frequency TREBLE high frequency and Speaker BALANCE may all be used to adjust the sound playback of NTSC TV programs Select BASS or TREBLE or BALANCE sound control With the SOUND MENU on screen move the RED highlight with the MENU M...

Страница 20: ...lifier and speaker system through which the stereo sound can be heard Select STEREO sound control With the SOUND MENU on screen move the RED highlight with the MENU M buttons Then press the MENU button Press the MENU and MENU M buttons to highlight and turn ON U the STEREO mode Press the exit button to clear the screen STOP 1 2 3 BEGIN Second Audio Program SAP is part of the stereo broadcast syste...

Страница 21: ...ENU SOUND PICTURE 1ST TIME SETUP Use the DISPLAY VOLUME control to see program volume level settings on the DPTV screen Once set the Volume Display will be seen each time the VOLUME buttons on the DPTV local keyboard or Pronto remote are pressed Select DISPLAY VOLUME control With SOUND MENU on screen move the RED highlight with the MENU M buttons Then press the MENU button Press the MENU and MENU ...

Страница 22: ...VL control allows you to preset a desired volume level that the DPTV sound will not go above This makes for an even more consistent sound by reducing the peaks and valleys that can occur during program changes or commercial breaks Select AVL Automatic Volume Limiter control With SOUND MENU on screen move the RED highlight with the MENU M buttons Then press the MENU button Press the MENU or and the...

Страница 23: ...TV screen A CH button Press Alternate Channel A CH to select previously viewed channels Enter the desired two channel numbers from the Pronto remote s number buttons and then press A CH to toggle back and forth between the two channel selections ext input button Press to quickly select NTSC auxiliary input modes AUX1 2 3 as well as cycle through the DPTV s other input option modes Monitor VGA EXT ...

Страница 24: ...DEO OUTPUT JACKS ON VCR 24 The Analog Audio Video Input jacks are for direct NTSC picture and sound connections between the DPTV and auxiliary equipment VCR DVD Player etc that has Audio Video Output jacks To view the playback of a VCR tape by using the Analog AUX1 Audio Video Input jacks Connect the VIDEO OUT jack from the VCR to the AUX 1 VIDEO IN jack on the DPTV Connect the AUDIO OUT jacks R i...

Страница 25: ...E AUDIO VIDEO OUTPUT JACKS ON CAMCORDER 25 For more convenient Direct playback connections the DPTV s Front Audio Video Input panel can be used Located on the DPTV s right front side panel these Input jacks allow for quick and easy connections particularly for the playback of Camcorder tape recordings To view the playback of a Camcorder recording using the AUX3 Analog Audio Video Input jacks Conne...

Страница 26: ...Video connections on the rear of the DPTV offer improved picture detail and clarity for the playback of S VHS VCR tapes or DVDs over a standard composite video input connection Note The VCR or DVD Player must have a S VIDEO OUT put jack in order for you to complete the connections shown on this page Connect the S VIDEO S VHS OUT jack from the VCR to the AUX1 S VIDEO input plug on the DPTV The S VI...

Страница 27: ...Audio Video Input jacks To record TV programs by using the Audio Video Output jacks on the DPTV Connect the VIDEO OUT jack from the DPTV to the VIDEO IN jack on the VCR Connect the AUDIO OUT jacks R ight and L eft from the DPTV to the AUDIO IN jacks on the VCR Press the ext input button on the Pronto or the Source button on the DPTV s local keyboard to place the DPTV in the NTSC mode Select the ch...

Страница 28: ...olby Pro Logic Receiver SPEAKERS USED FOR PLAYBACK SOUND AUDIO INPUT JACKS SMART HELP Note To eliminate sound playback through the DPTV cabinet speakers when using an external amplifier audio connection you can either Press the MUTE button on the Pronto remote to eliminate sound through the DPTV speakers OR Place the FRONT SPEAKERS switch on the rear of the DPTV to the EXT ernal position which wil...

Страница 29: ...Program and System Info option in order to display and program the DTV channels and avoid any difficulties in first time setup or autoprogramming of the DPTV Program and System Information PSIP Once connected to receive digital ATSC broadcast signals available area channels can be added into the DPTV s channel scan memory by the use of the DTV Setup Menu Note Refer to the 64PP9901 Quick Use guide ...

Страница 30: ...l channel and follow the steps shown below Select the ATSC Picture Menu With the DTV Main Menu on screen move the highlight with the MENU M buttons Then press the MENU button Press the Menu or arrow buttons to adjust the selected picture or color control Press the Menu M buttons to move up and down the list of on screen Picture controls Press the exit button to clear the screen STOP 1 2 3 BEGIN Co...

Страница 31: ...Convergence control With Picture Menu on screen move the highlight with the MENU M buttons Then press the MENU button Press the MENU buttons to select either the Align Red or Align Blue Convergence control press the MENU button to continue Press the MENU buttons to move the selected red or blue convergence cross directly over the white cross on the DPTV screen The red or blue cross is properly adj...

Страница 32: ... VIEWING AREA DPTV REAR SPEAKER REAR SPEAKER REAR SURROUND SOUND SPEAKER TERMINALS Operational only in ATSC or Monitor Diplay modes By adding optional external speakers to the DPTV s sound system you can create the feeling of reflected sound that surrounds you at a movie theater or concert hall Connect both external speakers to the speaker wire terminals on the DPTV Recommended speakers 25W 8 ohm ...

Страница 33: ...non powered types of optional Subwoofer speakers Contact your Philips dealer for further details on Dolby Digital Surround Sound system speakers and their use REAR OF DPTV Subwoofer Speaker nonpowered 25W 8Ω Min Ask your dealer about subwoofer and surround sound speakers suggested for use with your your TV Rear Surround Speaker Rear Surround Speaker The Surround Sound control option allows you to ...

Страница 34: ...e DPTV for additional Dolby Digital Surround sound connection options This input can be used to connect an external Dolby Digital or Home Theater Surround Sound capable Amplifier with Center Channel output in order to play Center Channel sound through the DPTV s internal cabinet speakers For example With the use of an external Amplifier capable of Dolby Digital 5 1 or Home Theater Surround Sound t...

Страница 35: ...ss are set to factory midpoint or default levels when the barscale adjustments are placed to the center detent position ATSC ATSC mute volume channel M exit menu TV Analog DTV 4 4 1 3 DTV Main Menu Picture Sound Speakers Features DTV Setup Exit 2 1 Sound Menu Surround Mode Treble Bass Auto Volume Back Surround ON compressed AUTO VOLUME Performing a function similar to the AVL sound control in the ...

Страница 36: ...tems and the use of the DPTV as a source for center channel speaker sound Normal Front in Line is for the speaker arrangement where the center left and right speakers are evenly lined up and roughly equidistant from the user Center Forward setting compensates for a center speaker being placed a few feet in front of the external left and right speakers Center Back setting compensates for a center s...

Страница 37: ...ith the Test Tone speaker signal active press the MENU arrow buttons to select the desired DPTV system speaker for individual volume level adjustment for example Front Left Rear Right etc Press the MENU arrow buttons on the Pronto remote or the Volume buttons on the DPTV s local keyboard to adjust the selected speaker volume levels Continue and select the other DPTV system speakers for adjustment ...

Страница 38: ...tem not all CC modes will currently be active or available for all program selections Check your local listings for CC program details Press the exit button to clear the screen The selected Closed Caption mode will be active with the Captions On Off control also set to the Always On position To cancel set the Captions On Off control to Always Off 1 2 3 STOP BEGIN SMART HELP Due to the increased da...

Страница 39: ...dditional information on major and sub channel digital channel selections and how they are used within the ATSC broadcast system Select the ATSC Features Menu With the DTV Main Menu on screen move the highlight with the MENU M buttons Then press the MENU button Press the Menu M buttons to select the Add Delete Channel control Then press the MENU button Press the CHANNEL or number buttons on the Pr...

Страница 40: ...to its previous level dtv freeze Press to freeze or stop the current picture on the DPTV screen Program sound will continue to play Repress the freeze button or wait for a 60 second time out to return to live program action The Pronto remote contains touchscreen displays for DTV related controls Use the Pronto s touchscreen buttons to access and adjust the DPTV for dedicated ATSC mode features as ...

Страница 41: ...or Source buttons Use the DVX8000 MMHT as the video and or audio playback source for material to be displayed on the DPTV 1 2 3 STOP BEGIN 4 REAR OF DPTV REAR OF DVX8000 MMHT 15 PIN VGA Connection Cable Left Right Audio IN HD COMPONENT VIDEO IN SYSTEM AUDIO OUT STEREO IN 6 CHANNEL AUDIO IN R L C RS LS SW VGA IN 75 ohm HIGH SYNC H H V V R Pr G Y B Pb HD COMPONENT VIDEO IN INTERNAL TV SPEAKERS USED ...

Страница 42: ...r picture features such as Picture Sharpness etc to adjust overall DPTV screen intensity for optimum light dark screen areas and shading details Turn the Volume Bar control ON to display the volume level settings for external audio sourced material on the DPTV screen Select the Bass Treble Balance controls to adjust low high fre quency sound and speaker balance for external input audio source mate...

Страница 43: ... process to take place For ATSC sub channel selections be sure to enter the desired four digit channel number using the Pronto remote Please make these simple checks before calling for service These tips can save you time and money since charges for DPTV installation and adjustment of customer controls are not covered under your warranty Note The DPTV is equipped with protective circuitry that shu...

Страница 44: ... tested and found to comply with the limits for a Class B digital device pursuant to part 15 of the FCC Rules These limits are designed to provide reasonable protection against harmful interference in a residential installation this equipment generates uses and can radiate radio frequency energy and if not installed and used in accordance with the instructions may cause harmful interference to rad...

Страница 45: ...me tone balance and all other controls that affect the sound Programming The procedure of adding or deleting channel numbers into the DPTV s memory circuits In this way the DPTV remembers only the locally available or desired channel numbers and skips over any unwanted channel numbers PSIP Program and System Information Protocol PTV Projection Television Rear and or Front projection design systems...

Страница 46: ...r bénéficier d un service sans frais Pour les produits non couverts par la garantie contactez le centre le plus près de chez vous NOTA Si Ud reside en una de nuestras zonas para sucursales Philips de servicio al de fábrica ver directorio más abajo Ud puede comunicarse con la sucursal de servicio más cercana para obtener una reparación oportuna y eficaz de su producto Si su producto está todavía ba...

Страница 47: ...RSE CON EL CENTRO DE SERVICIO DE FABRICA MAS CERCANO PARA ESTOS LUGARES DENTRO DE UN RADIO DE 80 A 120 KM 50 A 75 MILLAS DEL CENTRO DE SERVICIO LOCAL GEORGIA Philips Factory Service of Georgia 200 N Cobb Pkwy Suite 120 Marietta GA 30062 770 795 0085 FLORIDA Philips Factory Service of Florida 1911 US Highway 301 North Tampa FL 33619 813 621 8181 WESTERN U S A Philips Factory Service Western Region ...

Страница 48: ...rvice is available in all countries where the product is officially distributed by Philips Consumer Electronics Company In countries where Philips Consumer Electronics Company does not distribute the product the local Philips service organization will attempt to provide service although there may be a delay if the appropriate spare parts and technical manual s are not readily available MAKE SURE Y...

Отзывы: