55BDL4051T
41
CCT
10000º K 9300 º K 7500 º K 6500 º K 5000 º K 4000 º K 3000 º K
X
0.279 ±
0.030
0.283 ±
0.030
0.299 ±
0.030
0.313 ±
0.030
0.346±
0.030
0.382±
0.030
0.440±
0.030
Y
0.292 ±
0.030
0.298 ±
0.030
0.315 ±
0.030
0.329 ±
0.030
0.359±
0.030
0.384±
0.030
0.403±
0.030
Color control
The color levels of red, green, and blue are adjusted by the color bars.
R: Red gain, G: Green gain, B: Blue gain.
Smart picture
PQ setting
PC mode: {Standard} / {Highbright} / {sRGB}.
Video mode: {Standard} / {Highbright} / {Cinema}.
Smart Contrast
Auto detect black data and white data on content and set suitable
backlight.
Surface Ratio Backlight Setting
5%-90%
(MaxBacklight-MinBacklight)* Surface Ratio/100
<5%
Min Backlight
>90%
Max Backlight
Smart power
Smart Power control is not relative to brightness control:
1. Initial setting Brigthness
70 (in the range from 0-100)
Power consumption 70% of maximum power consumption
2. Smart Power
OFF: no adaptation
MEDIUM: 80% of power consumption relative to current settings
HIGH: 65% of power consumption relative to current settings
3. Panel saving/Brightness ON: 40% of maximum power consumption
The controls settings should only be visible on its own controls. It
should not have secondary effects on other controls
(ea brightness setting changes when smart power setting has
changed).
Overscan
Change the display area of the image.
ON: Set to display area about 95%.
OFF: Set to display area about 100%.
Picture reset
Reset all settings in the Picture menu.
Select “Yes” and press “SET” button to restore to factory preset data.
Press “EXIT” button to cancel and then return to the previous menu.
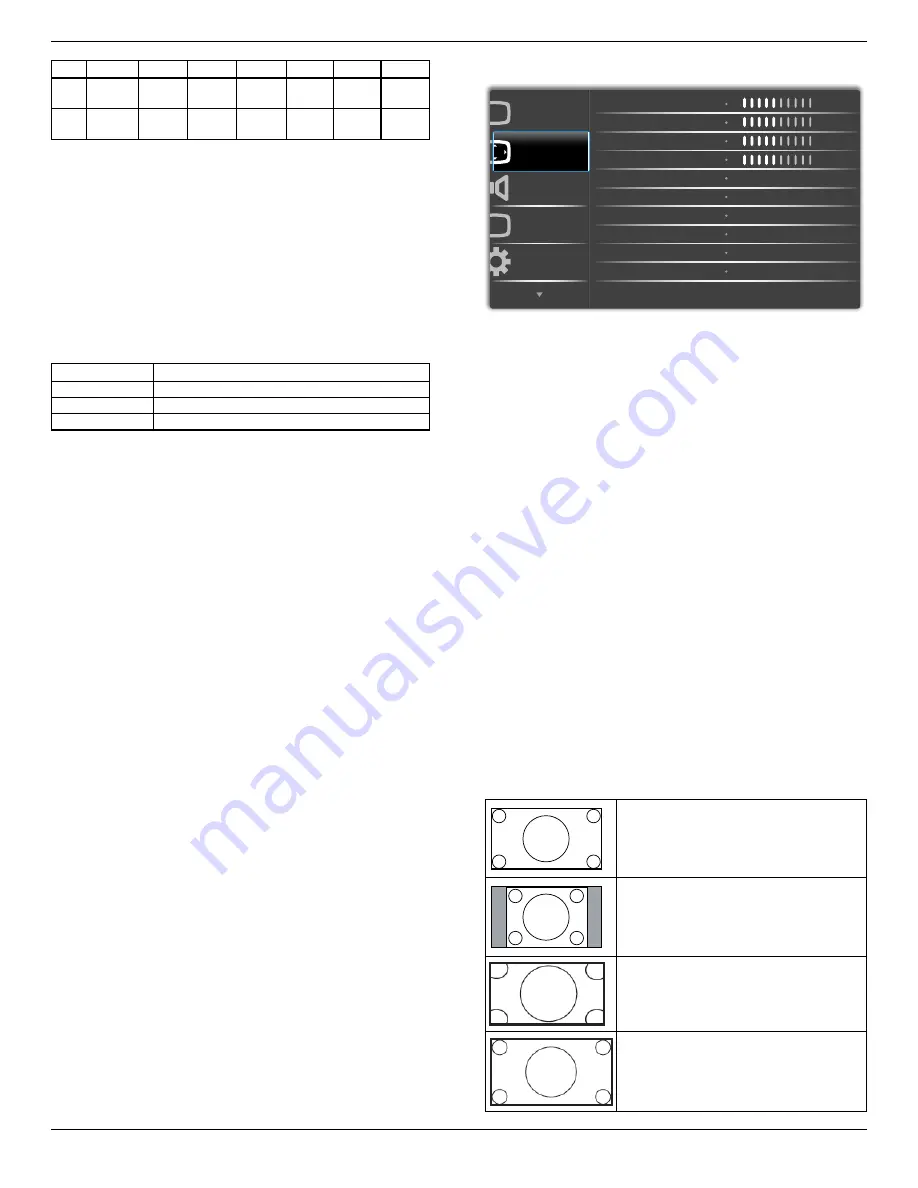
6.2.2. Screen menu
P
Audio
PIP
Screen
Picture
Configuration 1
V position
Clock
Zoom mode
Custom zoom
H position
Clock phase
Auto adjust
Screen reset
50
50
50
50
Action
Action
Zoom
Full
H position
Control Horizontal Image position within the display area of the LCD.
Press + button to move screen to right.
Press - button to move screen to left.
V position
Control Vertical Image position within the display area of the LCD.
Press + button to move screen to up.
Press - button to move screen to down.
Clock
Press + button to expand the width of the image on the screen the
right.
Press - button to narrow the width of the image on the screen the left.
NOTE: VGA input only.
Clock phase
Improves focus, clarity and image stability by increasing or decreasing this
setting.
NOTE: VGA input only
Zoom mode
PC mode: {
Full
} / {
4:3
} / {
1:1
} / {
16:9
}/ {
21:9
}/ {
Custom
}.
Video mode: {
Full
} / {
4:3
} / {
1:1
} / {
16:9
}/ {
21:9
}/ {
Custom
}.
*Zoom mode setting is by input. If input in multi-windows, the setting
will apply for windows with the same input.
And the INFO OSD will show the latest setting
.
Full
This mode restores the correct proportions
of pictures transmitted in 16:9 using the full
screen display.
4:3
The picture is reproduced in 4:3 format and
a black band is displayed on either side of the
picture.
1:1
This mode displays the image pixel-by-pixel
on screen without scaling the original image
size.
16:9
The picture is reproduced in 16:9 format and
a black band at the top and bottom.


