background image

7

English

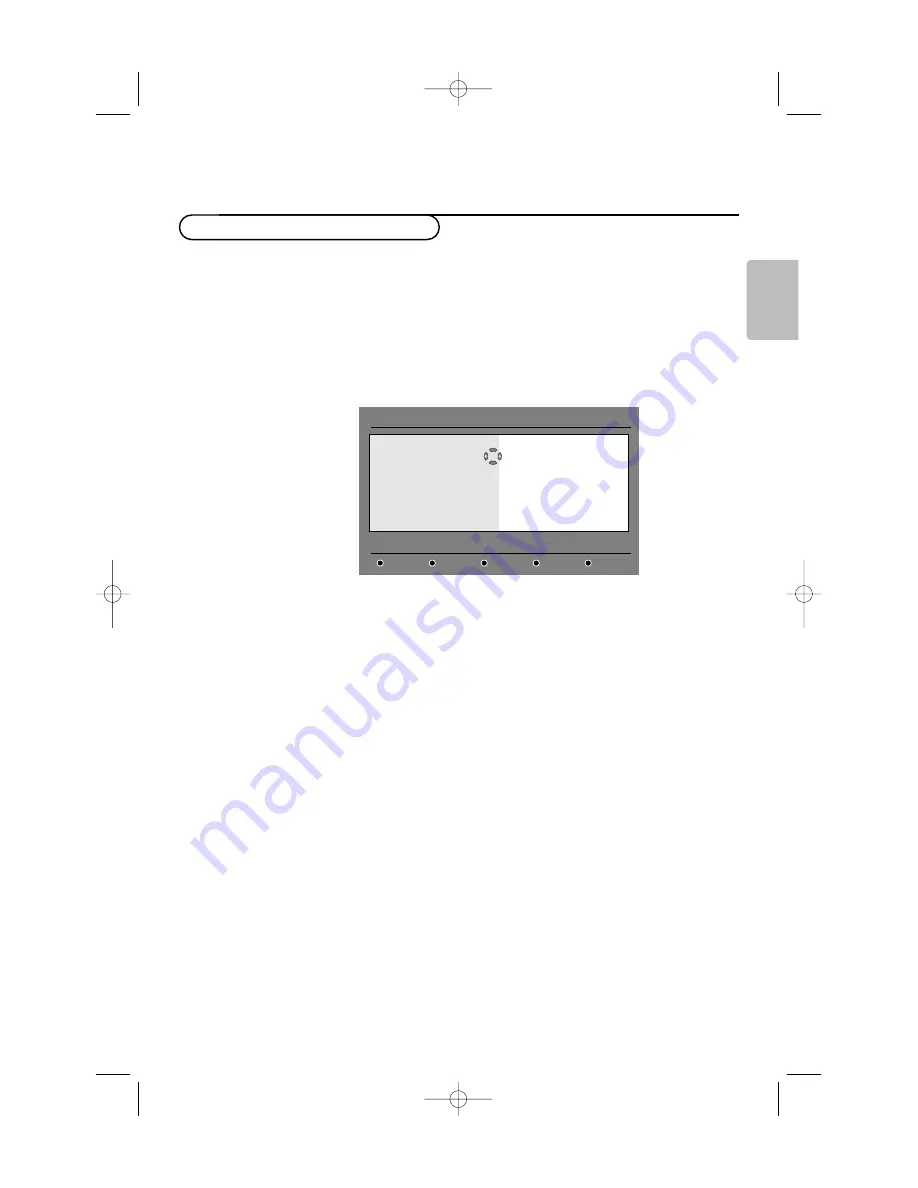
The first time the TV is switched on, a congratulation message will
appear on screen.The language of which changes every 5 seconds.

Note: If the menu is not displayed, see Reinstall all services, p. 10.

&

Press the 

OK

key on the remote control,

the moment your preferred

language is visible on the screen

.The 

Setup

menu is displayed.

é

With the cursor keys, select 

Language

,

Country

or 

Time zone

and

check if the adjustment is according to your preferences. If necessary,
use the cursor keys to make your adjustment and press 

OK

to exit.

Caution : if you select a wrong country, the channel numbering will not be
according to the standard for your country.

Select 

Service scan

from the menu and press 

OK 

to start the

installation.The service scan menu is displayed.
All digital and analogue programmes are searched for and stored
automatically.When the search is complete, the menu will indicate the
number of digital services and analogue programmes found.

(

Press the 

OK

key twice to start watching TV.

The television then displays the current programme.The installation is
now complete.

Digital TV  mode

Switch on for the first time

Installation

Set options and start a service scan

Language

Country   

Time Zone   

Service Scan   

English
Español
Français
Italiano
Suomi

24571.1 en.qxd  31-08-2005  11:59  Pagina 7

Содержание 42PF9967D

Страница 1: ... use liquid cleaners or aerosol cleaners Wipe off saliva or water drops as soon as possible Their long time contact with the screen causes deformations and colour fading Recycling R The packaging of this product is intended to be recycled Apply to the local authorities for correct disposal Disposal of your old product Your product is designed and manufactured with highly quality material and compo...

Страница 2: ...TV channels 18 Automatic installation 18 Manual installation 18 Give name 19 Reshuffle the programme list 19 Select Favourite TV channels 19 TV Setup 20 General 20 Source 21 Decoder 21 Demo 22 TV menu 22 Picture menu 22 Active Control 23 Sound menu 24 Ambilight 24 Features menu 26 Digital Teletext 26 Analogue Teletext 27 Teletext menu 28 Equipment to connect to the side connections 29 Connect Peri...

Страница 3: ... socket x at the bottom of the TV For best picture quality use the suppressor aerial cable supplied Insert the mains cord supplied into the mains at the bottom of the TV and in the wall socket having a mains voltage of 198 264V To prevent damaging the power AC cord which could cause a fire or electric shock do not place the TV on the cord Do not insert the power plug in a wall socket before all co...

Страница 4: ... the dash disappears To switch immediately to a selected one digit TV channel keep the digit key pressed a bit longer 0 Previous programme Press to alternate between the currently viewed and the previously viewed TV channel Ambilight see also p 24 ON OFF Press to switch Ambilight on or off MODE Press repeatedly to select one of the predefined ambient light settings Note When the TV is switched to ...

Страница 5: ...ible with the cursor up down Note With signals via the DVI connector less picture formats are selectable h Active control see p 23 x Pixel Plus 2 demo on off Press to switch the Pixel Plus 2 demo on or off In the right part of the screen Pixel Plus 2 is switched on Press longer to display the list of digital options settings Use the cursor up down to select one of the settings See also Picture men...

Страница 6: ...annels Then use the P key or the digit keys to select TV channels Only for digital channels j Continuous subtitles on off Press this key to activate deactivate the subtitle mode See Setup Language and location preferences menu p 11 OPTIONS Options menu on off see p 14 MHEG CANCEL UK only Some Digital TV channels transmit interactive television applications signalled by the MHEG icon in the banner ...

Страница 7: ...you select a wrong country the channel numbering will not be according to the standard for your country Select Service scan from the menu and press OK to start the installation The service scan menu is displayed All digital and analogue programmes are searched for and stored automatically When the search is complete the menu will indicate the number of digital services and analogue programmes foun...

Страница 8: ...play or remove it j subtitling is available If you want to display them press the j key or the OPTIONS key to access the OPTIONS menu and select subtitles X Other audio languages are available and can be selected in the OPTIONS menu s The selected Favourite list is displayed in the one of the colour red green yellow or blue of the activated list Note A white colour s will appear if the programme i...

Страница 9: ... are in the required order ç Press the DIGITAL MENU key to exit the menu This menu allows you to check the availability of new TV channels or new radio stations that have been launched by the broadcaster after the initial installation From the digital mode press the DIGITAL MENU key to display the Setup menu é Use the cursor down to select Installation and press the cursor right twice to select th...

Страница 10: ...ll the digital TV channels and radio stations From the digital mode press the DIGITAL MENU key to display the Setup menu é Use the cursor down to select Installation and press the cursor right Use the cursor down to select Service setup and press the cursor right Use the cursor down to select Reinstall all services and press the cursor right Press the OK key to start the installation A search is t...

Страница 11: ...ight Use the cursor up down to select Languages Location or Digital Audio Output and press the cursor right Use the cursor up down to select a setting and press the cursor right to enter into the sub menu Make your adjustment and press the OK key or the cursor left to exit Language default settings Audio to select the audio sound language Subtitle Teletext to select the subtitle teletext language ...

Страница 12: ...e OK key Radio station select the radio station you want to lock and press the OK key Change pin code press the cursor right to enter in the menu Follow the on screen instruction to change your access code The default pin code is 1234 If you have forgotten your personal code you can reset to the default pin code 1234 by enter the universal code 0711 Press the DIGITAL MENU key to exit the menu The ...

Страница 13: ...lect the characters When the name has been entered press the OK key to exit Select TV channels use the cursor up down to select your favourite TV channels and confirm with the OK key Press the cursor left to exit Select radio stations use the cursor up down to select your favourite radio station and confirm with the OK key Press the cursor left to exit Add all services press the OK key if you want...

Страница 14: ...ee a message when you switch on the TV This menu gives you direct access to the favourite list the language selection and some other selections From the digital mode press the OPTIONS key on the remote control to display the options menu é Use the cursor up down to select a setting and press the cursor right to enter the sub menu Favourites use the cursor up down to select your favourite list and ...

Страница 15: ...o record a digital channel even the TV is in standby mode You will still have to program your video recorder Record list green key this menu gives the list of recording schedules You can check modify delete or add a new schedule by using the cursor or coloured keys as indicated on the screen Top yellow key to go directly to the top of the list Close blue key to exit from the TV guide Options white...

Страница 16: ...me Audio language select your language and confirm with the OK key Subtitle language make your selection and confirm with the OK key Subtitles for hearing impaired select Yes or No and confirm with the OK key Occurrence select Once Daily or Weekly and confirm with the OK key Press the red colour key to store your recording The TV guide reappears You can press the green colour key to display the li...

Страница 17: ...relevant are displayed in a light grey colour and cannot be selected The Install menu allows you to reinstall all the analogue TV channels and contains the following items If you want to change your menu language and or the country where you are now located go to Language and location preferences p 11 Analogue TV mode DVD R SAT TV VCR AUX MENU MENU Ò π º Select DIGITAL b A D TV OK B v P V cursor t...

Страница 18: ...e list appears Without ACI broadcast the channels are numbered according your language and country selection You can use Reshuffle to renumber them See p 19 It is possible that the cable company or the TV channel displays a broadcast selection menu Layout and items are defined by the cable company or the TV channel Make your choice with the cursor and press the OK key Manual installation Automatic...

Страница 19: ... or lowercase characters on the keyboard Special to display special characters on the keyboard Press OK to confirm Press the cursor left repeatedly when you have finished the name giving Select another programme number and repeat steps to p π Space Delete ABCDEFG 123 HIJKLMN 456 OPQRSTU 789 VWXYZ 0 Shift Special Give name Install VCR1 BBC1 BBC2 CNN TVE You can change the order of the stored TV cha...

Страница 20: ...icer pictures in the teletext pages Select Teletext 2 5 é Press the cursor right to select Teletext 2 5 On to take advantage of this feature Press the cursor right again to select Teletext 2 5 Off if you like the more neutral teletext layout The selection made is valid for all channels which broadcast teletext 2 5 Note It may take a few seconds before teletext broadcast switches over to Teletext 2...

Страница 21: ...akers of the TV can act as centre speaker making a separate centre speaker unnecessary Select Centre input On When having selected On you can adjust the Centre in volume with the cursor left right to correct volume level differences of the external audio receiver and speakers 21 English Set Change code The Child lock feature see TV Features p 26 allows you to lock channels to prevent others from w...

Страница 22: ...lso be displayed when in digital mode Press the cursor right to select Picture é Select the menu items in the Picture menu with the cursor up down Adjust the settings with the cursor left right or enter the list of submenu items with the cursor right Select a submenu item with the cursor up down Note To remove the menu background before adjusting the picture settings see Select TV setup General p ...

Страница 23: ... for the colour variations in NTSC encoded transmissions Picture format This will adjust the size of the picture dependent on the broadcast format and your preferred setting See also Use of the remote control Picture format p 4 The TV continuously measures and corrects all incoming signals in order to provide the best picture possible The ambient light sensor adjusts the settings according to the ...

Страница 24: ...ghts can be set to any fixed colour and many shades of white Ambilight creates the ideal viewing environment for your TV resulting in improved relaxed viewing improved perceived picture detail contrast and colour In standby mode the lights can be set operated to any colour and create a unique ambiance in the room Select Ambilight in the TV menu é Press the cursor down to enter the Ambilight menu S...

Страница 25: ...ht Off or On Infrared interference on external devices To avoid bad remote control reception place your external devices out of sight of the ambient lights of your TV set Note Ambilight does not function well when the room temperature is less than 15 C Smart Colour modes Personal Select any Colour or hue to match to your personal taste e g your interior the program content sports movie etc the moo...

Страница 26: ...e onwards Press the cursor right and enter the time with the cursor up down and right Press the OK key to validate Programme lock if you want to lock a certain TV channel or external Select Unlock to disable all locks you have set Off On On during mute Features Programme list Subtitle Sleeptimer Child lock TV Child lock Lock Custom lock Unlock Lock after Programme lock Press the i key to get infor...

Страница 27: ...atedly to display the upper teletext part the lower teletext part and then to return to the normal teletext page size When the teletext page is enlarged you can scroll the text line by line using the cursor up down Hypertext With hypertext you can quickly jump to a pagenumber or search for a specific word shown on the current teletext page Press the OK key to highlight the first word or a number o...

Страница 28: ...ecial to display special characters on the keyboard and press the OK key Press the cursor left repeatedly to return to the Teletext menu again Searching a word Type in the word on screen or select a word from the history list on the right and press OK é Select Accept and press OK again The message Searching appears To cancel the searching or to search for a new word select Keyboard and press OK Wh...

Страница 29: ...BW IN ANTENNA R L R L EXT3 Camera Camcorder or Game Connect your camera camcorder or Game as shown é Connect to VIDEO 2 and AUDIO L 3 for mono equipment For stereo equipment also connect AUDIO R 3 S VHS quality with an S VHS camcorder is obtained by connecting the S VHS cables with the S VIDEO input 1 and AUDIO inputs 3 Do not connect cable 1 and 2 at the same time This may cause picture distortio...

Страница 30: ...n is via the aerial cable You will therefore need to tune in your recorder s test signal and store the test signal under a programme number between 90 and 99 see Manual installation p 18 See the handbook of your recorder Decoder and Recorder Connect a eurocable 4 to your decoder and to the special euroconnector of your recorder See also the recorder handbook See Decoder p 21 You can also connect y...

Страница 31: ...tter picture quality If your recorder does not have a euroconnector the only possible connection is via the aerial cable You will therefore need to tune in your recorder s test signal and store the test signal under a programme number between 90 and 99 see Manual installation p 18 See the handbook of your recorder é Make a selection in the Setup Source menu p 21 CABLE EXTERNAL CABLE 1 2 RECORDER 4...

Страница 32: ...round receiver also to the DIGITAL AUDIO OUT connector 3 to have digital sound being reproduced é Digital sound will be reproduced if the selected digital channel is broadcasted with AC3 sound transmission Select AC3 in the digital Setup menu Preferences Digital Audio Output See p 11 Select Digital Audio input on your digital MultiChannel Surround receiver Warning If no AC3 signal is transmitted t...

Страница 33: ...onnector of your TV 1 Computer PC with a DVI connector connect the DVI to DVI cable to the DVI connector of your TV 1 with a VGA connector connect the VGA cable to a VGA to DVI adapter 4 and connect to the DVI connector of your TV 1 é Connect the audio cable 2 to the DVI AUDIO R right and L left inputs of the TV when the TV expects analogue audio for a connected peripheral equipment to come from a...

Страница 34: ...esent on the subwoofer Adjust the volume level of the external subwoofer presumed this control is present on the subwoofer See also the instruction manual of the external subwoofer SUBWOOFER A common interface is available to connect a CAM Conditional Access Module and a SmartCard Please contact your service provider to get more information about these modules Note The television should always be ...

Страница 35: ...the system standby function when you press the B key for 3 seconds both TV and the recorder are switched to standby Ò p π Ï Rwd Play Stop Play Ffw Eject Recorder Ò p π Ï Prev Play Stop Play Next Eject DVD Press the v key on the remote control repeatedly to select EXT1 EXT2 EXT3 Side or DVI according to where you connected your equipment Remark Most equipment decoder recorder carries out the switch...

Страница 36: ... Select DIGITAL b q h b æ j i 0 A D TV DIGITAL OK B v P V B to switch to standby ºæ for pause VCR DVD CD RDS news TA AMP to shuffle play CD R for record Ò for rewind VCR CD search down DVD AMP for stop π for play for fast forward VCR CD search up DVD AMP b RDS display AMP to select your choice of subtitle language DVD i display information MENU TV to switch the menu on or off P for chapter channel...

Страница 37: ...ty of some digital picture material may be the cause of digital image distortion In this case select the Soft setting using the Picture menu Smart Picture without changing the picture settings manually No sound No sound on any channel Check the volume isn t at minimum Is the sound interrupted with the mute key No solution found Switch your TV off and then on again once Never attempt to repair a de...

Страница 38: ...f the screen Stock market stickers presented at the bottom of the TV screen Shopping channel logos and pricing displays bright and shown constantly or repeatedly in the same location on the TV screen Examples of still pictures also include logos computer images time display teletext and images displayed in 4 3 mode static images or characters etc Notes reduce contrast and brightness when viewing o...

Отзывы: