background image

7

MAINS INLET

RS232

VGA 1

VGA 2

DVI-d

RC OUT

Y/C S-VHS

G/Y/Y

CVBS

B/Pb/Cb

R/Pr/Cr

V

H

VIDEO 2

(AV2)

VIDEO 1

(AV1)

VIDEO 3

(AV3)

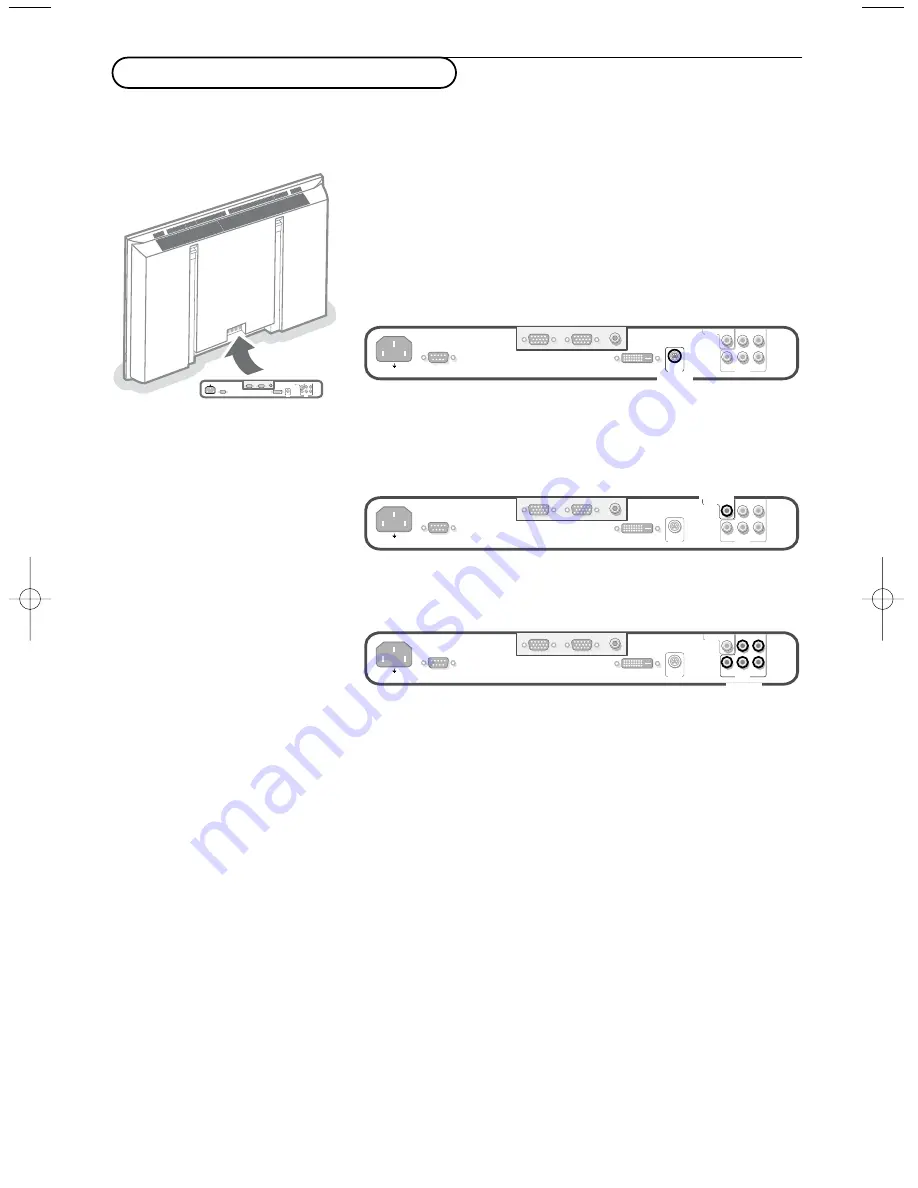
You may connect 3 possible VGA sources (

VGA 1

,

VGA 2

or 

DVI-D

)

and 3 possible video sources (

VIDEO 1 (AV1)

,

VIDEO 2 (AV2)

and

VIDEO 3 (AV3)

) to the monitor.

The following diagrams show you where you can connect your
peripheral equipment.

Note: in case the monitor is operating in combination with a receiver box, the
VGA and video inputs on the monitor will be disabled and the VGA 2
connector becomes an output.

Equipment with Y/C-SVHS output connectors

Connect the video cable to the 

Y/C S-VHS VIDEO 2 (AV2)

connector.

Equipment with CVBS output connectors

Connect the video cable to the

CVBS VIDEO 1 (AV1)

connector.

Equipment with Component Video Output connectors

Note: VIDEO 3 (AV3) can handle the following video signals:YCbCr, HD-PbPr
and HD-RGB. The discrimination between the various input formats and the
appropriate video processing is done automatically. It is however possible to
overrule the automatic detection. See Setup menu, p. 6.

&

Connect the video cables of your equipment with YPbPr output with
composite sync on Y, or of your equipment with YCbCr output with
composite sync on Y to the YPbPr, resp.YCbCr input 

VIDEO 3 (AV3)

IN

sockets of the monitor.

é

Connect the video cables of your equipment with RGB output with
separate Horizontal and Vertical sync to the RGB input sockets and to
the H and V sockets 

VIDEO 3 (AV3)

of the monitor.

Note: when High Definition signals are inputted to the monitor via the
YPbPr/RGB input, the monitor switches to the HD Video Mode.
The following HD and ED video modes are supported by the monitor on the
YPbPr, RGB and VGA 2 HD input:

1920x1080/60I 720x480/60P
1280x720/60P 720x576/50P

The following SD video modes are supported by the monitor on the YCbCr
input:

720x480/60I
720x576/50I

~ MAINS

RS232

DVI-D

Y/C S-VHS

G/Y/Y

CVBS

B/Pb/Cb

R/Pr/Cr

V

H

VGA 1

VGA 2

RC-OUT

VIDEO 3

(AV3)

VIDEO 2

(AV2)

VIDEO 1

(AV1)

VIDEO 2

(AV2)

~ MAINS

RS232

DVI-D

Y/C S-VHS

G/Y/Y

CVBS

B/Pb/Cb

R/Pr/Cr

V

H

VGA 1

VGA 2

RC-OUT

VIDEO 3

(AV3)

VIDEO 2

(AV2)

VIDEO 1

(AV1)

VIDEO 1

(AV1)

~ MAINS

RS232

DVI-D

Y/C S-VHS

G/Y/Y

CVBS

B/Pb/Cb

R/Pr/Cr

V

H

VGA 1

VGA 2

RC-OUT

VIDEO 3

(AV3)

VIDEO 2

(AV2)

VIDEO 1

(AV1)

VIDEO 3

(AV3)

Connect peripheral equipment

1024.4 en 16x24  26-06-2003  15:44  Pagina 7

Содержание 420P30

Страница 1: ... MAINS RS232 DVI D Y C S VHS G Y Y CVBS B Pb Cb R Pr Cr V H VGA 1 VGA 2 RC OUT VIDEO 3 AV3 VIDEO 2 AV2 VIDEO 1 AV1 ...

Страница 2: ...ederlands BE NL Een telefoontje is voldoende De Philips service desk is bereikbaar van over de gehele wereld U kunt contact opnemen met Philips van maandag t m vrijdag van 8 00 20 00 u Mid europese tijd en op zaterdag en zondag van 10 00 tot 18 00 uur door een van de onderstaande telefoonnummers te bellen Italiano IT CH Basta una telefonata I centri di assistenza clienti della Philips sono disloca...

Страница 3: ...8 00 CET Suomi FI Philipsin asiakaspalvelupisteitä löytyy joka puolelta maaiimaa Voit ottaa yhteyttä Philipsiin maanantalsta perjantaihin klo 8 00 20 00 Keski Euroopan CET sekä lauantaisin ja sunnuntaisin klo 10 00 18 00 Keski Euroopan CET Greek GR To γραφείo βoηθείας της Philips Philips Helpdesk είναι διεθνές Mπoρείτε να επικoινωνήσετε απ ευτέρα έως και Παρασκευή απ τις 08 00 20 00 ώρα κεντρικής ...

Страница 4: ... a Multimedia computer connect the audio cable to the audio outputs of your Multimedia computer and to the AUDIO IN R and L inputs of the receiver box For sound reproduction connect your external amplifier to the receiver box Note Only use the VGA cable supplied with the monitor Daisy chaining The Loop Through facility makes it possible to make a daisy chain with a second monitor Connect one end o...

Страница 5: ...k on how to dispose of batteries according to local regulations Make sure that your receiver box and or PC are switched on and that your PC is in the correct display mode When a VGA computer is connected the display selection is made automatically A message is displayed when the monitor does not support the connected VGA mode Switch your computer to a correct display mode Switch the monitor on Pre...

Страница 6: ...eiver no function except when in combination with a receiver box and a Home Cinema audio receiver CH PR Program selection To browse through the sources selected B to switch to standby or on again MENU to switch the menu on off cursor buttons to select your choice and to alter a selected adjustment OK to activate your choice AV MUTE to mute the picture or restore it if the monitor is used in monito...

Страница 7: ...his control allows you to adjust the brightness level of the picture Contrast This control allows you to adjust the contrast level of the picture Colour only available when the source is AV1 AV2 or AV3 YCbCr This control allows you to adjust the saturation level of the colours to suit your personal preference Colour temperature This control allows you to select the Colour temperature of the pictur...

Страница 8: ...cal way Use the cursor left right up down to adjust é Press the OK key when done Clock frequency only available in VGA mode on VGA 1 or VGA 2 See Connect Peripheral equipment p 7 This control allows you when necessary to adjust the values of the clock frequency so that especially text can be displayed with an optimal overall sharpness Use the cursor left right to adjust Phase only available in VGA...

Страница 9: ... the AV3 input to HD RGB YCbCr or HD YPbPr When having selected Auto the monitor makes the selection automatically between YCbCr HD YPbPr or HD RGB See also p 7 Equipment with Component Video Output connectors Use the cursor down to select AV3 é Press the cursor right to enter the list with options Press the cursor up down to select one of the options VGA 2 This control allows you to select whethe...

Страница 10: ...ection See Setup menu p 6 Connect the video cables of your equipment with YPbPr output with composite sync on Y or of your equipment with YCbCr output with composite sync on Y to the YPbPr resp YCbCr input VIDEO 3 AV3 IN sockets of the monitor é Connect the video cables of your equipment with RGB output with separate Horizontal and Vertical sync to the RGB input sockets and to the H and V sockets ...

Страница 11: ...e used with the monitor as stand alone This connector allows you to control the monitor via your PC as a replacement of the remote control Note This connector can also be used for dealer service tools MAINS RS232 DVI D Y C S VHS G Y Y CVBS B Pb Cb R Pr Cr V H VGA 1 VGA 2 RC OUT VIDEO 3 AV3 VIDEO 2 AV2 VIDEO 1 AV1 DVI D MAINS RS232 DVI D Y C S VHS G Y Y CVBS B Pb Cb R Pr Cr V H VGA 1 VGA 2 RC OUT V...

Страница 12: ...nce is deteriorating The plasma display might then also produce a humming sound Bringing the set below 2000 m local air pressure equal or above 800 hPa it works fine again Transportation has no influence Control of peripheral equipment The infrared radiation of the screen may influence the reception sensitivity of other peripherals Solution replace the batteries of the remote control or change pos...

Страница 13: ......

Отзывы: