background image

English

   - 3 -

Switching on/off

To switch the TV on

To switch on the TV from standby mode either:
• Press the “ ” button, 

CH- or CH+ 

or a numeric 

button on the remote control.

• Press the side function switch until the TV comes 

on from standby. 

Note

: If the TV has been left on and not been operated for a 

while, the TV will go into standby. When you next switch-on, 

the following message will be displayed. “

Standby Cause 

No Operation

” Press 

OK

 to continue.

To switch the TV off

• Press  the  “ “  button  on  the  remote  control  or 

press the side function switch until the TV switches 

into standby mode.

Note: To power down the TV completely, unplug the power 

cord from the mains socket.

First time installation

You will see the language selection screen when you 

first turn on your TV. Select your preferred language 

and press OK followed by the selection Home Mode/ 

Shop Mode. 
You can set up your TV by following the First Time 

Installation (FTI) screen with the following selections.

Aerial installation

Select the 

AERIAL

  option  from  the 

Search Type


screen to search for terrestrial digital TV broadcasts. 
Optional a  channel list, which is generated by LCN (*), 

will be displayed on screen when the search is over. 

Select “Yes” and press OK to store this list. 
Press “

” button to quit channel list and watch TV.

(*) LCN is the Logical Channel Number system that 

organizes available broadcasts in accordance with a 

recognizable channel sequence (if available).

Cable installation

Select 

CABLE

 option and press 

OK

 on the remote 

control. For automatic installation in case your Cable 

network  supplier  supports  a  Network-ID  based 

installation (e.g. Unitymedia), select 

YES

 in following 

screen and press OK.
In case your Cable network supplier does not support 

a Network-ID based installation please select “

NO

”, 

press 

OK 

and follow the instruction on the screen.

You can also select frequency ranges from this screen. 
Enter the frequency range manually by using the 

numeric button. 

Note:

 Searching duration will change depending 

on the selected search step.

Notifications, features and accessories
Energy efficiency

This TV is designed with energy efficieny features:

• Power save mode (ECO): 

You  can  apply  a 

combination of energy saving picture settings. While 

you watch TV, press the Menu button and, the Power 

Save Mode settings can be found in the ‘Picture’ 

section of the Main Menu.

• Picture off mode: 

If you only want to listen to audio 

from the TV, you can switch off the display. Other 

functions continue to operate normally. While you 

watch TV, press Menu and select Picture, and from 

there  select  ‘Picture  off’  under  the  Power  Save 

Mode option. 

• Note: Disconnect your TV from the mains plug in 

case your TV is going to be inactive for a long time.

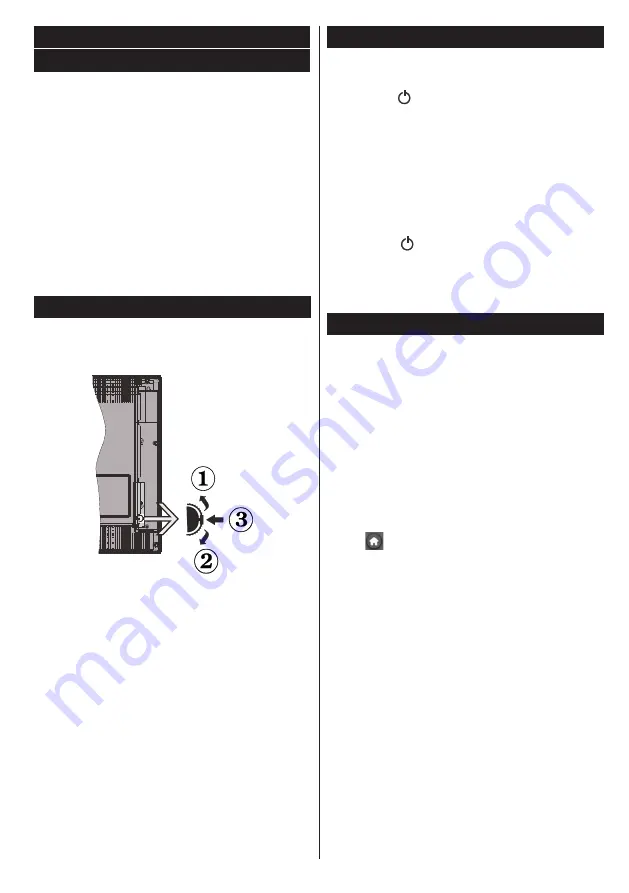
TV scroll button

The TV Scroll button on the side of the TV allows you 

to control the volume, change channels and put the 
TV into standby.

To change volume

: Increase the volume by scrolling 

up.  Decrease the volume by scrolling down.

To change channel:


1. 

Press the middle of the scroll button, the channel 

information banner  will appear on screen. 

2. 

Scroll through the stored channels by pushing the 

button up or down.

To change source

1. 

Press the middle of the button twice, the source list 

will appear on screen.  

2. 

Scroll through the available sources by pushing the 

button up or down.

To switch the TV to standby:

 Press the middle of 

the button down and hold it down for a few seconds, 
the TV will turn into standby mode.

Содержание 40PFL3018K/12

Страница 1: ...Register your product and get support at www philips com welcome ...

Страница 2: ...ogram guide EPG 5 Program options 6 Update your TV 6 Troubleshooting 6 Specifications 7 Important Read and understand all information in the accompanying Safety booklet before you install and use your TV If damage is caused by failure to follow these instructions the warranty does not apply Disposal of old Equipment and Batteries Please do not disposed this TV or battery as general household waste...

Страница 3: ...Return Index page in TXT mode Swap 23 Mono Stereo Dual I II Current Language in DVB channels 24 Okay Confi rm Hold in TXT mode Channel List 25 Info Reveal in TXT mode 26 Menu on off Exit in Media Browser mode 27 Picture zoom 28 Rapid advance in Media Browser mode 29 Pause in Media Browser mode Time shift recording Use your TV Remote control NOTE The Remote Control range is approximately 7m 23ft Te...

Страница 4: ...nitymedia select YES in following screen and press OK In case your Cable network supplier does not support a Network ID based installation please select NO press OK and follow the instruction on the screen You can also select frequency ranges from this screen Enter the frequency range manually by using the numeric button Note Searching duration will change depending on the selected search step Not...

Страница 5: ...ccess the Picture Sound and Settings menu options Pressing the button again will exit from this screen You can set your Media Browser preferences by using the Settings Menu IMPORTANT Back up your files before making any connections to the TV The manufacturer will not be responsible for any file damage or data loss Certain types of USB devices for example MP3 players or USB hard disk drives memory ...

Страница 6: ...depending on the content Color Sets the color value Backlight Controls the brightness of the backlight Noise reduction Reduces the noise level in the image Sound options Volume Adjusts volume level Equalizer Changes the equalizer mode Balance Adjusts whether the sound is coming mainly from the right or left speakers Headphone Sets headphone volume Sound mode Sets the preferred sound mode AVL Sets ...

Страница 7: ... will not turn on Make sure the power cord is plugged in securely to wall outlet The batteries in the remote control may be exhausted Press the Power button on the TV Poor picture Have you selected the correct TV system Low signal level can cause picture distortion Please check antenna access Check if you have entered the correct channel frequency if you have done manual tuning The picture quality...

Страница 8: ...0 Hz 3 1024x768 60 Hz 4 1280x768 60 Hz 5 1360x768 60 Hz 6 720x400 60 Hz 7 800x600 56 Hz 8 800x600 60 Hz 9 1024x768 60 Hz 10 1024x768 66 Hz 11 1280x768 60 Hz 12 1360x768 60 Hz 13 1280x1024 60 Hz 14 1280x960 60 Hz 15 1280x1024 60 Hz 16 1400x1050 60 Hz 17 1600x1200 60 Hz 18 1920x1080 60 Hz Specifications PC input typical display modes The following table is an illustration of some of the typical vide...

Страница 9: ...LPCM ADPCM H 264 1080Px2 25fps 1080P 50fps Other 1080P 30fps 50Mbit sec avi MPEG1 2 4 Xvid H 264 VC1 WMV3 Sorenson H 263 Motion JPEG MPEG1 2 Layer 1 2 3 AAC HEAAC AC3 EAC3 LPCM ADPCM WMA H 264 1080Px2 25fps 1080P 50fps Other 1080P 30fps 50Mbit sec flv H 264 Sorenson H 263 MPEG1 2 Layer 3 AAC HEAAC LPCM ADPCM H 264 1080Px2 25fps 1080P 50fps Other 1080P 30fps 50Mbit sec 3gp 3g2 MPEG4 H 264 1920x1080...

Страница 10: ...Specifications are subject to change without notice Philips and the Philips shield emblem are registered trademarks of Koninklijke Philips Electronics N V and are used under license from Koninklijke Philips Electronics N V 2012 TPVision Netherlands B V All rights reserved www philips com ...

Отзывы: