


9
EN
2
Press
ÎïÍÆ
to select the
[Installer TV settings]
and
press
ÎïÍÆ
to go one level down to
[Energy Saving
Features]
option.
3
Press
ÎïÍÆ
to select to select one of the followings to
configure the settings:
•
[EcoPower]
: Sets a power saving mode. Selection one of the
options :
•
[Off]
: Rich and dynamic settings, ideal for daylight use.
Disable power savings.
•
[Low]
: Natural picture setting. Achieve low power
savings.
•
[Medium]
: Ideal settings for watching movies. Achieves
medium power savings.
•
[High]
: Applies low-energy settings. Achieves highest
possible power savings.
•
[Auto Sense]
(Available for 40HFL5783H only)
: Enable/disable
the Light sensor of the TV. If enabled, the ambient light
conditions of the room will be measured to automatically
configure the optimum power consumption and picture
performance of the TV, according to the room ambience
conditions.
•
[ESP]
: Enables the customization of the duration (in hours)
in which TV will automatically turn off if there is no user
interaction via remote control or keyboard.
•
[Standby]
: Enables the customization of the TV standby
behavior. Set to
[Standard]
, the TV will consume the least
power during standby, but startup time will be longer and
hospitality communication is not possible. Set to
[Fast]
,
the TV will be best performing in terms of turn-on time
and hospitality communication is also available, but power
consumption will be higher.
Configure the guide categories
This section provides information to configure Guide
Categories icons. Guests can access these icons by pressing the
SMART GUIDE
on the guest remote control.
1
Press
MENU
on the setup remote control to display the
setup menu.
2
Press
ÎïÍÆ
to select the
[Installer TV settings]
and
press
ÎïÍÆ
to go one level down to
[Guide category]
.
3
Press
ÎïÍÆ
and
OK
on remote control to select one
of the followings settings :
•
[High Definition]
: Enables the High Definition icon in the
Guide categories.
•
[Sports]
: Enables the Sports icon in the Guide categories.
•
[News]
: Enables the News icon in the Guide categories.
•
[Kids]
: Enables the Kids icon in the Guide categories.
•
[Movies]
: Enables the Movies icon in the Guide categories.
•
[Network]
: Enables the Network icon in the Guide categories.
•
[Adult/Hospital]
: Enables the Adult/Hospital icon in the Guide
categories.
•
[Lifestyle]
: Enables the Lifestyle icon in the Guide categories.
•
[Other/Education]
: Enables the Other/Education icon in the
Guide categories.
Configure the premisecure settings
Note
•
PREMISECURE feature prevents theft as TV only works when connected to
the property distribution system.
•
PREMISECURE is available on selected models only.
•
PREMISECURE must be used with a Gateway Network Appliance (GNA)
device. Do not enable PREMISECURE unless the GNA has been configured
at your location. For more information on the GNA, contact your Philips
authorized agent or dealer.
This section allows the Installer to customize the Security
settings of the TV.
1
Press
MENU
on the setup remote control to display the
setup menu.
2
Press
ÎïÍÆ
to select the
[Installer TV settings]
and
press
ÎïÍÆ
to go one level down to
[Security]
.
3
Press
ï
and
Æ
to go to
[PremiSecure]
menu.
4
Press
ÎïÍÆ
to disable or enable
[PremiSecure]
via
[RF]
or
[BLAN]
*.
* This is only available on certain models.
5
Press
ÎïÍÆ
to select
[PremiSecure RF channel]
if
[RF]
is selected.
»
The TV checks for the PremiSecure ID on specific TV
channel (when enabled). If the ID is found, the TV will
function. If the ID is not found, the TV will display an
error message and not function.
Configure the auto update settings
This section allows the Installer to enables/disables the
[Auto
Update]
feature of the TV. If set to
[Yes]
, then Auto Update
will automatically check for new TV upgrades at regular
intervals at specific RF channel and upgrade the TV software
accordingly.
1
Press
MENU
on the setup remote control to display the
setup menu.
2
Press
ÎïÍÆ
to select the
[TV Upgrade]
.
3
Press
ÎïÍÆ
to select
[ Auto Update]
.
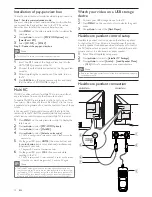
Clone TV configuration data
You can copy the configuration data from a USB storage or RF
channel to a TV or vice versa (TV to USB only). This enables
you to bypass the setup menu and configure multiple TVs by
simply using the USB storage device or RF channel.
This section describes how to clone the configuration data
from a TV to USB storage device or from a USB storage
device to a TV.
1
Press
MENU
on the setup remote control to display the
setup menu.
2
Press
ÎïÍÆ
to select the
[TV Clone]
.
3
Press
ÎïÍÆ
to select
[Source]
to enable selection of
[RF]
or
[USB]
clone data to be sent to TV.
•
[Source]
: Select the Source from which the Clone data will
be received from (RF or USB).
•
[RF Channel Number]
: When selecting RF, ensure that this is
the channel that will be used to stream the data.
•
[Source to TV]
: This option allows for selection of clone data
from Source to TV.
•
[TV to USB]
: This option allows for cloning of data from TV
to USB device.
Note
•
When selecting
[RF]
, ensure that this is the channel that will be used to
stream the data.
•
RF cloning must be used with a Gateway Network Appliance (GNA) device.
For more information on the GNA, contact your Philips authorized agent or
dealer.


