background image

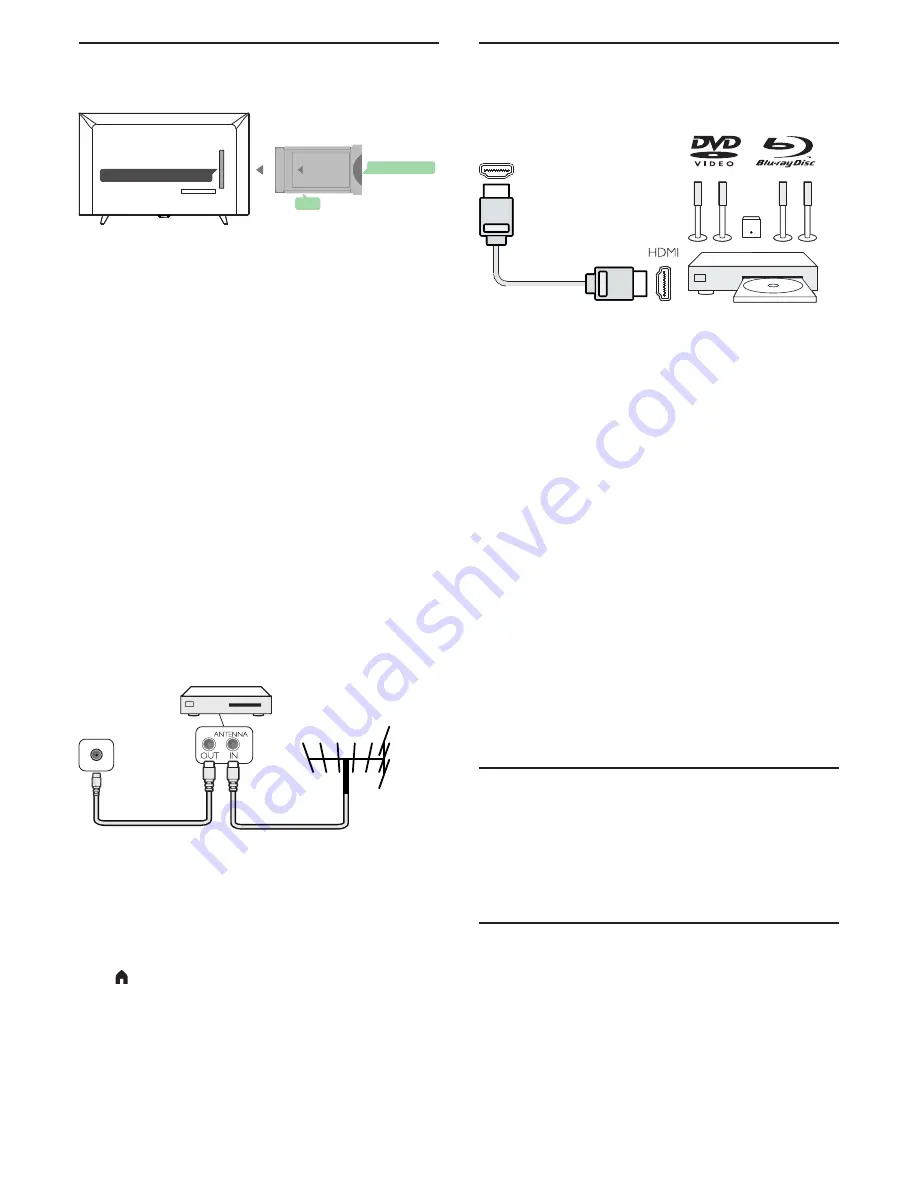
TV

Digital Receiver STB

Common Interface-CAM 

CI+

This TV is ready for the CI+ Conditional Access.
With CI+ you can watch premium HD programmes, like 
movies and spor ts live offered by digital TV operator in 
your region. These programmes are scrambled by the TV 
operator and descrambled with a prepaid CI+ module.
Contact a digital TV operator for more information on 
terms and conditions.


CAM

Inser t a C AM module.
Switch off the TV before inser ting a C AM.
Inser t the C AM module proper ly. Incorrect inser tion can 
damage the C AM and TV.
Use the CI Interface slot on the TV to inser t the C AM card. 
With the front of the card facing to you, gently inser t the 
C AM as deep as it will go.
Leave the card in the slot permanently.
It may take a few minutes before the C AM is activated. 
Removing the C AM will deactivate the broadcast ser vice 
on the TV. 
If a C AM is inser ted and subscription fees have been paid 
(connection method can differ), you can watch the TV 
broadcast. The inser ted C AM is exclusive for your TV.

STB(Set-Top Box)

Use a RF signal cable to connect the antenna to the STB(a 
digital receiver), then add an HDMI cable to connect the 
STB to the TV.

Notice

If you just want to use the remote control of the Set-Top 
Box, you can follow below operations to avoid the TV 
entering auto standby.
Press      MENU key, select the Time, then press OK key and 
set the Auto Standby status to off.

FRONT

COMMON INTERFACE

CAM

SMART CARD

Home Theatre 

HDMI
(ARC)

Home Theatre System

Connect with HDMI ARC

Use an HDMI cable to connect a Home Theatre System 
(HTS) to the TV. You can connect a Philips Soundbar or 
HTS with a built-in disc player.

HDMI ARC

HDMI 1 connection on the TV have HDMI ARC (Audio 
Return Channel). If the device, typically a Home Theatre 
System (HTS), also has the HDMI ARC connection, 
connect it to HDMI 1 on this TV. With the HDMI ARC 
connection, you do not need to connect the extra audio 
cable that sends the sound of the TV to the HTS. The HDMI 
ARC connection combines both signals. 

Audio to video synchronisation (sync)

If the sound does not match the video on the screen, you 
can set a delay on most Home Theatre System with a disc 
player to match the sound with video.

Connect with HDMI

Use an HDMI cable to connect a Home Theatre System 
(HTS) to the TV. You can connect a Philips Soundbar or an 
HTS with a built-in disc player. 
If the Home Theatre System has no HDMI ARC connection, 
add an optical audio cable (Toslink) to send the sound of 
the TV to the Home Theatre System. 

Blu-ray Disc player

Use a High speed HDMI cable to connect the Blu-ray Disc 
player to the TV. 
If the Blu-ray Disc player has EasyLink HDMI CEC , you can 
operate the player with the TV remote control. 

DVD player

Use an HDMI cable to connect the DVD player to the TV. 
If the DVD player has EasyLink HDMI CEC , you can 
operate the player with the TV remote control.

6

Содержание 32PHT4012/05

Страница 1: ...4000 Series ...

Страница 2: ...tion or serious damage to human and property During the Environmental Protection Use Period please use this product according to the instructions given in this user manual The Environmental Protection Use Period does not cover consumable parts the battery Suggestive Description of the Recycling Administrative Regulations for Waste Electrical and Electronic Products In order to protect the Earth in...

Страница 3: ...de 12 Recording PauseTV 9 Recording Programme 13 13 13 10 Sources 14 11 Time and Clock 15 Time Clock 15 15 12 Lock 16 13 Setting 17 General Settings 17 14 Picture 18 Picture Settings 18 15 Sound 19 Sound Settings 19 16 Multimedia 20 From a USB Connection 20 17 Product Information 21 Display resolutions Multimedia Sound power Inherent resolution Tuner Reception Transmission Remote control Power sup...

Страница 4: ...ty Pixel Characteristics This LCD LED product has a high number of colour pixels Although it has effective pixels of 99 999 or more black dots or bright points of light red green or blue may appear constantly on the screen This is a structural property of the display within common industry standards and is not a malfunction Mains Fuse ThisTV is fitted with an approved moulded plug Should it become...

Страница 5: ... power outlet ensure that the power voltage matches the value printed on the back of theTV Never connect theTV to the power outlet if the voltage is different care to avoid injury and damage Risk of Injury to Children Follow these precautions to prevent theTV from toppling over and causing injury to children Never place theTV on a surface covered by a cloth or other material that can be pulled awa...

Страница 6: ...c products Please act according to your local rules and do not dispose of your old products with your normal household waste Correct disposal of your old product helps to prevent potential negative consequences for the environment and human health Your product contains batteries covered by the European Directive 2006 66 EC which cannot be disposed of with normal household waste Please inform yours...

Страница 7: ...tection signal that prevents copying content from a DVD Disc or Blu ray Disc Also referred to as DRM Digital Rigital Management COMPONENT AUDIO L R IN COMPONENT The COMPONENT connection is a video connection It can be used for receiving High Definition HD signals Please use the mini YPbPr cable to make connection When you want to use the COMPONENT connection you need to plug the mini YPbPr cable w...

Страница 8: ...heTime then press OK key and set the Auto Standby status to off FRONT COMMON INTERFACE CAM SMART CARD HomeTheatre HDMI ARC Home Theatre System Connect with HDMI ARC Use an HDMI cable to connect a HomeTheatre System HTS to theTV You can connect a Philips Soundbar or HTS with a built in disc player HDMI ARC HDMI 1 connection on theTV have HDMI ARC Audio Return Channel If the device typically a HomeT...

Страница 9: ...nd use theTV as a PC monitor With HDMI Use an HDMI cable to connect the computer to theTV With DVI to HDMI Alternatively you can use a DVI to HDMI adapter to connect the PC to HDMI and an audio L R cable mini AV cable to AUDIO L R IN port on the back of theTV Headphones You can connect a set of headphones to HEADPHONE port on the back of theTV Press key on the remote control to adjust the volume U...

Страница 10: ...To start the next or previous chapter on a disc Numeric keys 0 9 To select a channel or value TEXT To displayTeletext information SUBTITLE To open or close subtitile menu choose a type of subtitle VOL To adjust the volume level Mute To mute the sound or to restore it BACK To switch back to the previous channel you selected To close a menu without changing a setting INFO To open or close programme ...

Страница 11: ... on the screen Press left or right In non OSD menu operation press left or right to decrease or increase the volume In OSD menu operation to navigate left or right Press up or down In non OSD menu operation press up or down to increase or decrease channel only work under ATV or DTV source In OSD menu operation press up or down to to navigate up or down Note Different models may have different appe...

Страница 12: ...y disconnect the power plug When disconnecting the power plug always pull the power plug never the cord Ensure that you have full access to the power plug power cord and outlet socket at all times 10 Turn on off the TV or switch to Standby Turn on the TV If the indicator is off please insert theTV power cord into a power outlet Press the power switch to turn on thTV as shown in the figure When the...

Страница 13: ...to start searching Channel Edit Select Channel press OK key to enter channel menu select Channel Edit press OK key to enter channel list press key to select the item you d like to edit You can select the colour keys to edit these programmes with the tips on the screen Delete Press key on the remote control to delete the selected channel Move Press key on the remote control to highlight a channel a...

Страница 14: ...IDE again to close The first time you open theTV guide theTV scans allTV channels for programme information This may take several minutes TV guide data is stored in theTV Record You can press key on the remote control to record the programmes you desire Remind Press to set a reminder for a programme A message will alert you at the start of the programme You can tune to this channel immediately Pre...

Страница 15: ... 7 days away TheTV will use the data from theTV Guide to start and end the recording To schedule a recording 1 Press TV GUIDE 2 On theTV guide select the channel and programme you wish to record Press to scroll through the programmes of a channel 3 With the programme highlighted press the colour key Record The programme is scheduled for recording A warning will show automatically when overlapping ...

Страница 16: ...ch Sources Source List To open the Sources menu press SOURCES To switch to a connected device select the device with the key and press OK To close the Sources menu without switching to a device press SOURCES again 14 ...

Страница 17: ...mer TV will switch to Standby automatically after a preset period of time Press key to select a period of time 10 20 30 60 90 120 180 240 minutes Press key to select off to switch off sleep timer OSD Timer OSD will be closed after a preset period of timer Press key to select a period of time 5 15 30 60s Press key to select off to switch OSDTimer off Auto Standby If theTV receives aTV signal but yo...

Страница 18: ...ent children from watching a channel you can press key lock a channel in channel lock To watch a locked channel you must enter the 4 digit Child Lock PIN code first You cannot lock programmes from connected devices The locked channel will have next to the channel logo Parental Guidance Set a minumum age to watch rated programmes Key Lock To lock the keys onTV Off to unlock keys onTV Partial to loc...

Страница 19: ...annels broadcast special audio and subtitles adapted for the hard of hearing or deaf people Switched on theTV automatically switches to the adapted audio and subtitles if available PVR File System Manage the USB device for recording programme First Time Installation Configure the language country and channel when setting up theTV for the first time or when resetting the unit Software Update USB Up...

Страница 20: ...rease contrast value to reduce power consumption Brightness Press to adjust the sharpness value of the picture Colour Press to adjust the colour saturation value of the picture Noise Reduction Select High Middle Low Off to set the level for removing the noise in video content Noise is mostly visible as small moving dots in onscreen picture Colour Temp Select Normal Warm or Cold to set the colour t...

Страница 21: ... Levelling you can set theTV to automatically level out sudden volume differences Typically at the beginning of adverts or when you are switching channels To switch on or off Digital Output Set the audio out signal of theTV to fit the sound capabilities of the connected HomeTheatre System Audio Description DigitalTV channels can broadcast special audio commentary describing what is happening on sc...

Страница 22: ...ported USB file systems USB FAT FAT 32 only connect USB devices that consume 500 mA of power or less Image Codec JPEG PNG BMP Audio Codec MP3 AC3 AAC Video Codec AVI MKV H 264 MPEG 1 MPEG 2 MPEG 4 HEVC FLV Subtitle SRT SMI SSA SUB ASS TXT 20 ...

Страница 23: ...VB T T2 720 400 70Hz Remote Control Batteries 2 AAA Power Supply Main Power Supply 100 240V 50 60Hz Standby Energy Consumption 0 5W Environment Temperature 5 40 Power consumption 32 65W 43 75W Supported TV Mounts To mount theTV please purchase a PhilipsTV mount or anyTV mount compliant with theVESA standard To prevent damage to cables and connectors be sure to leave a clearance gap of at least 2 2...

Страница 24: ...ESS FOR A PARTICULAR PURPOSE REGARDINGTHIS SOFTWARE Philips offers no support for this software The preceding does not affect your warranties and statutory rights regarding any Philips product s you purchased It only applies to this source code made available to you ThisTV contains open source software TPVision Europe B V hereby offers to deliver upon request a copy of the complete corresponding s...

Страница 25: ...er theTV switches off after 4 hours if no remote control signals were received To avoid this automatic switch off you can deactivate this switch off Also if theTV does not receive a TV signal nor a remote control command for 10 minutes theTV switches off automatically Remote control TV does not respond to the remote control TheTV requires some time to start up During this time theTV does not respo...

Страница 26: ...Some devices may require you to manually enable HDMI audio output If HDMI audio is already enabled but you still do not hear audio try changing the digital audio format of the device to PCM Pulse Code Modulation Refer to the documentation accompanying your device for instructions HDMI Note that HDCP High bandwidth Digital Content Protection support can delay the time taken for aTV to display conte...

Страница 27: ...risk of electric shock Never remove theTV cover Always contact PhilipsTV Customer Care for service or repairs Find the telephone number in the printed documentation that came with theTV Or consult our website www philips com support and select your country if needed Any operation expressly prohibited in this manual or any adjustments and assembly procedures not recommended or authorised in this ma...

Отзывы: