Service Modes, Error Codes, and Fault Finding
5.
5.4.2
How to Read the Error Buffer
You can read the error buffer in three ways:
•
On screen via the SAM/SDM/CSM (if you have a picture).
Example:
–
ERROR: 0 0 0 0 0
: No errors detected
–
ERROR: 6 0 0 0 0
: Error code 6 is the last and only
detected error
–
ERROR: 9 6 0 0 0
: Error code 6 was detected first and
error code 9 is the last detected (newest) error
•
Via the blinking LED procedure (when you have no
picture). See paragraph
5.5 The Blinking LED Procedure
.
•
Via ComPair.
5.4.3
Error codes
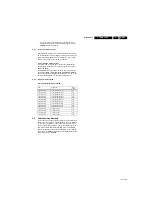
The “layer 1” error codes are pointing to the defective board.
They are triggered by LED blinking when CSM is activated. In
the LC10 platform, only two boards are present: the SSB and
the PSU/IPB, meaning only the following layer 1 errors are
defined:
•
2: SSB
•
3: IPB/PSU
•
4: Display
Table 5-1 Error code table
5.4.4
How to Clear the Error Buffer
The error code buffer is cleared in the following cases:
•
By using the CLEAR command in the SAM menu:
•
By using the following key sequence on the remote control
transmitter: “
062599
” directly followed by the
OK
button.
•
If the contents of the error buffer have not changed for 50
hours, the error buffer resets automatically.
Note:
If you exit SAM by disconnecting the mains from the
television set, the error buffer is not reset.
5.5
The Blinking LED Procedure
5.5.1
Introduction
The software is capable of identifying different kinds of errors.
Because it is possible that more than one error can occur over
time, an error buffer is available, which is capable of storing the
last five errors that occurred. This is useful if the OSD is not
working properly.
Errors can also be displayed by the blinking LED procedure.
The method is to repeatedly let the front LED pulse with as
many pulses as the error code number, followed by a period of
1.5 seconds in which the LED is “off”. Then this sequence is
repeated.
Example (1)
: error code 4 will result in four times the sequence
LED “on” for 0.25 seconds / LED “off” for 0.25 seconds. After
this sequence, the LED will be “off” for 1.5 seconds. Any RC
command terminates the sequence. Error code LED blinking is
in red color.
Example (2)
: the content of the error buffer is “
12 9 6 0 0
”
After entering SDM, the following occurs:
•
1 long blink of 5 seconds to start the sequence,
•
12 short blinks followed by a pause of 1.5 seconds,
•
9 short blinks followed by a pause of 1.5 seconds,
•
6 short blinks followed by a pause of 1.5 seconds,
•
1 long blink of 1.5 seconds to finish the sequence,
•
The sequence starts again with 12 short blinks.
5.5.2
Displaying the Entire Error Buffer
Additionally, the entire error buffer is displayed when Service
Mode “SDM” is entered.
5.6
Fault Finding and Repair Tips
Notes:
•
It is assumed that the components are mounted correctly
with correct values and no bad solder joints.
•
Before
any fault finding actions, check if the correct
options are set.
5.6.1
NVM Editor
In some cases, it can be convenient if one directly can change
the NVM contents. This can be done with the “NVM Editor” in
SAM mode. With this option, single bytes can be changed.
Caution:
•
Do not change these, without understanding the
function of each setting, because incorrect NVM
settings may seriously hamper the correct functioning
of the TV set!
•
Always write down the existing NVM settings, before
changing the settings. This will enable you to return to the
original settings, if the new settings turn out to be incorrect.
5.6.2
Load Default NVM Values
It is possible to download default values automatically into the
NVM in case a blank NVM is placed or when the NVM first 20
address contents are “FF”. After the default values are
downloaded, it is possible to start-up and to start aligning the
TV set. To initiate a forced default download the following
action has to be performed:
1.
Switch “off” the TV set with the mains cord disconnected
from the wall outlet (it does not matter if this is from “Stand-
by” or “Off” situation).
2.
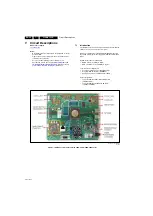
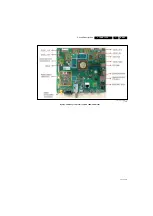
Short-circuit the SDM pads on the SSB (keep short
circuited, see
3.
Press “P+” or “CH+” on the local keyboard (and keep it
pressed).
4.
Reconnect the mains supply to the wall outlet.
5.
Release the “P+” or “CH+” when the set is started up and
has entered SDM.
When the downloading has completed successfully, the set will
perform a restart. After this, put the set to Stand-by and remove
the short-circuit on the SDM pads.
Alternative method:
It is also possible to upload the default values to the NVM with
ComPair in case the SW is changed, the NVM is replaced with
a new (empty) one, or when the NVM content is corrupted.
After replacing an EEPROM (or with a defective/no EEPROM),
default settings should be used to enable the set to start-up and
allow the Service Default Mode and Service Alignment Mode to
be accessed. Refer also to section
for checking/setting the correct parameters for the
Ambilight units.
Layer-1
error code
Defective
board
Layer-2
error code Defective device
3
IPB/PSU
16
+12 V missing/low, PSU defective
3
IPB/PSU
17
POK line defective (only 7000/8000 range)
2
SSB
13
general I2C bus error on SSB
2
SSB
35
EEPROM I2C error on SSB, 24MC64-W
2
SSB
34
tuner I2C error on SSB
2
SSB
27
channel decoder on SSB
6
Light
sensor
43
light sensor board error/defective
6
RF4CE
46
RF4CE board error/defective

