


Service Modes, Error Codes, and Fault Finding
5.
How to Exit the Factory mode
Use one of the following methods:
•
Select EXIT_FACTORY from the menu and press the “OK”
button.
Note
: When the TV is switched “off” by a power interrupt, or
normal switch to “stand-by” while in the factory mode, the TV
will show up in “normal operation mode” as soon as the power
is supplied again. The error buffer will not be cleared.
5.2.4
Customer Service Mode (CSM)
Purpose
The Customer Service Mode shows error codes and
information on the TVs operation settings.The call centre can
instruct the customer (by telephone) to enter CSM in order to
identify the status of the set.This helps the call centre to
diagnose problems and failures in the TV set before making a
service call.
The CSM is a read-only mode; therefore, modifications are not
possible in this mode.
Specifications
•
Ignore “Service unfriendly modes”.
•
Line number for every
line (to make CSM language independent).
•
Set the screen mode to full
screen (all contents on screen is visible).
•
After leaving the Customer Service Mode, the original
settings are restored.
•
Possibility to use “CH+” or “CH-” for channel surfing, or
enter the specific channel number on the RC.
How to Activate CSM
To activate CSM, press the following key sequence on a
standard remote control transmitter: “123654” (do not allow the
display to time out between entries while keying the sequence).
After entering the Customer Service Mode, the following items
are displayed.
Note
: Activation of the CSM is only possible if there is no (user)
menu on the screen!
Contents of CSM
•
1.1 Set Type
This information is very helpful for a
helpdesk/workshop as reference for further diagnosis. In
this way, it is not necessary for the customer to look at the
rear of the TV-set. Note that if an NVM is replaced or is
initialized after corruption, this set type has to be re-written
to NVM.
•
1.2 Production code
Displays the production
code (the serial number) of the TV. Note that if an NVM is
replaced or is initialized after corruption, this production
code has to be re-written to NVM.
•
1.3 Installation date
Indicates the date of the first
installation of the TV. This date is acquired via time
extraction.
•
1.4a Option Code 1
Gives the option codes of option
group 1 as set in SAM.
•
1.4b Option Code 2
Gives the option codes of option
group 2 as set in SAM.
•
1.5 SSB
Gives an identification of the SSB as stored in
NVM. Note that if an NVM is replaced or is initialized after
corruption, this identification number has to be re-written to
NVM. This identification number is the 12NC number of the
SSB.
•
1.6 Display
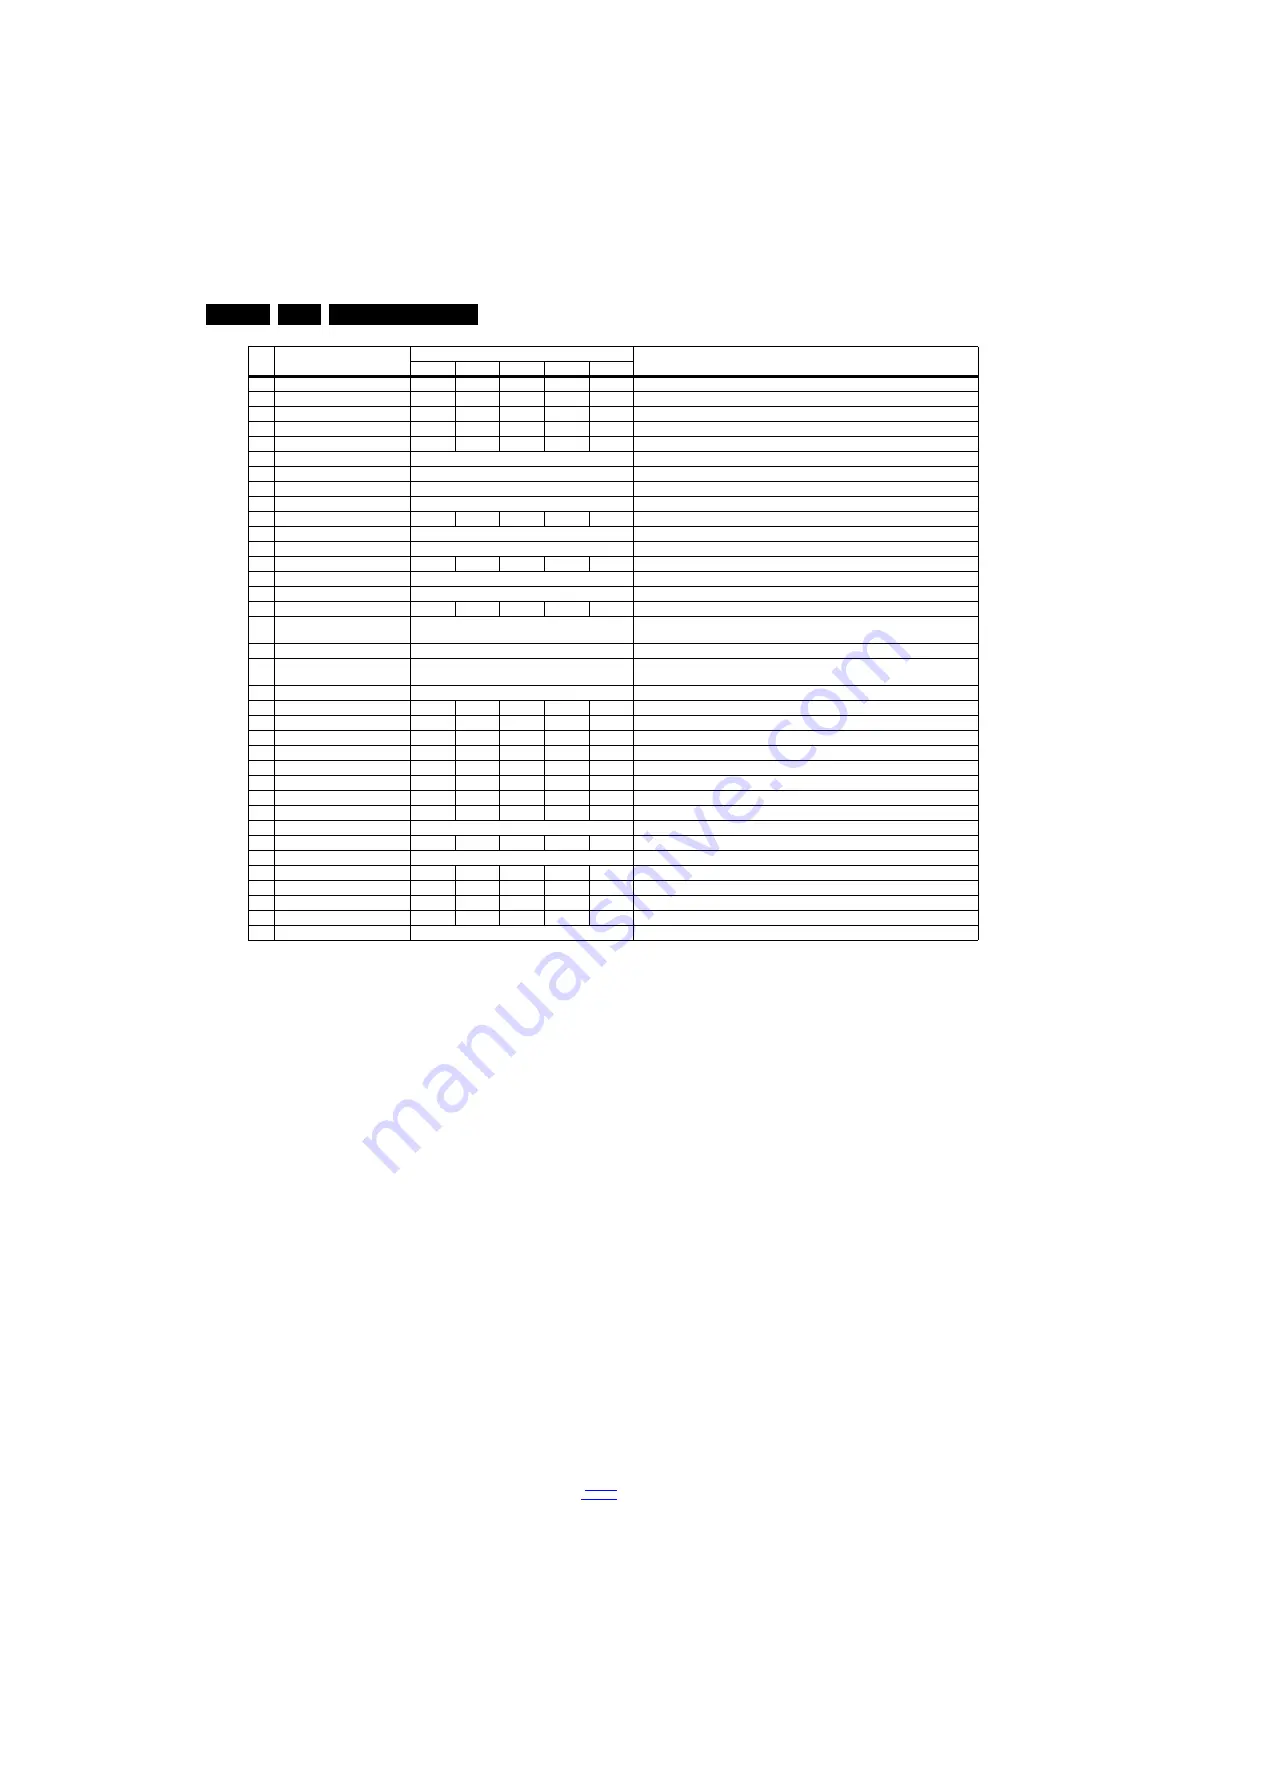
12NC NVM read/write.
57
ESTICKER NVM17
0
-
0
0
0
ESTICKER value
58
ESTICKER NVM18
0
-
0
0
0
ESTICKER value
59
ESTICKER NVM19
0
-
0
0
0
ESTICKER value
60
ESTICKER NVM20
0
-
0
0
0
ESTICKER value
61
ESTICKER RESET
Press OK -
Press OK Press OK Press OK
ESTICKER reset
62
DIM_LIB RESET
Press OK
Reset the Dimming
63
SRC_METER-RESET
Press OK
Reset the Source meter
64
AMBLIGHT RESET
Press OK
AMBLIGHT RESET
65
ACFG RESET
Press OK
REST ACFG
66
AQ_INDEX
9
2
9
2
9
Audio Quality index
67
AUDIO TEST MODE
off
Used for audio testing during production
68
AUDIO CHANNEL TYPE
2.0
Defines the installed speaker system
69
AUDIO SRS
-
off
-
-
-
AUDIO SRS
70
TEST PATTERN
Press OK
With the “left” and “right” keys of the remote control various test patterns can be chosen
71
EDID UPDATE
Press OK
Used to enter a new EDID codes into the NVM
72
TCON_GAMMA_UPDATE
Invalid
-
Invalid
Invalid
Invalid
TCON gamma update
73
DUMP PQ FROM TV
Press OK
Saves the picture quality data to a file “pq.bin” to the root of a FAT formatted USB
memory stick
74
LOAD PQ to TV
Press OK
Loads the picture quality data from a file “pq.bin” in to the TV
75
DUMP AQ FROM TV
Press OK
Saves the audio quality data to a file “AQ.bin” to the root of a FAT formatted USB
memory stick
76
LOAD AQ to TV
Press OK
Loads the audio quality data from a file “AQ.bin” in to the TV
77
PANEL FLIP
off
on
off
on
off
Flip panel
78
VGA_SOURCE
-
off
-
-
-
Enable/Disable VGA source
79
HDMI3
-
on
-
-
-
Enable/Disable HDMI3 source
80
HDMI4
-
off
-
-
-
Enable/Disable HDMI4 source
81
USB2
-
on
-
-
-
Enable/Disable USB2 source
82
USB3
-
off
-
-
-
Enable/Disable USB3 source
83
KEYBOARD CONFIG
-
on
-
-
-
KEYBOARD CONFIG
84
LIGHT SENEOR TUNING
3
0
3
0
3
Light sensor
85
LIGHT SENSOR TYPE
3
Light sensor
86
TEMP SENSOR TYPE
-
0
-
-
-
Tempreture sensor
87
AMBILIGHT_DRIVER
0
Drive the Ambient light
88
AMBILIGHT TYPE
0
1
1
0
1
The type of Ambient light
89
LED TYPE
-
2
-
-
-
The type of LED
90
3D
3
3
0
3
3D on/off
91
SMALL SCREEEN
-
off
-
-
-
Small screen
92
EXIF_FACTORY
Press OK
Exits the Factory mode
Item Item value
Default value
Description
32"
40"
42"
48"
55"


