background image

20

T

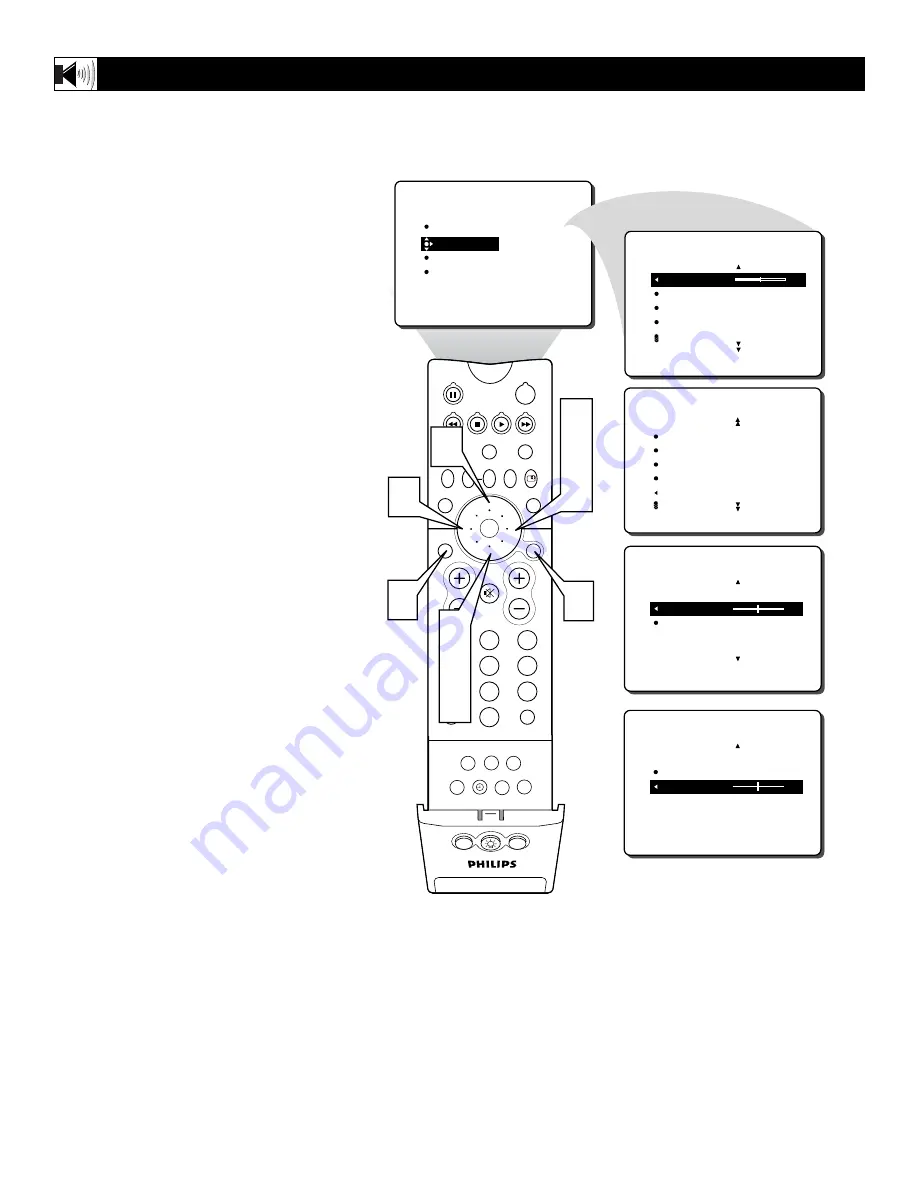
he Headphone Jack located on the side of
the television’s cabinet has independant

volume and balance controls. Using these
controls, you can set a comfortable volume
for use when a set of headphones are in use.
The headphones will also allow you to hear
the audio when the PIP feature is on.

1

Press the MENU/SELECT button 

on

the remote control to show the
onscreen menu.

2

Press the CURSOR RING DOWN

once to highlight SOUND.

3

Press the CURSOR RING RIGHT

and the menu will shift to the left.
TREBLE will be highlighted and an
adjustment bar will be shown to the
right.

4

Press the CURSOR RING DOWN

repeatedly until HEADPHONE is high-
lighted.  

5

Press the CURSOR RING RIGHT

to

highlight the Headphone options.

6

Press the CURSOR RING UP or
DOWN 

to select the VOLUME or

BALANCE Control.

7

Press the CURSOR RING LEFT or
RIGHT

to ajdust either control.

8

Press the STATUS/EXIT button 

to

remove the menu from the screen.

H

OW TO

A

DJUST THE

H

EADPHONE

V

OLUME AND

B

ALANCE

C

ONTROLS

HEADPHONE
   

VOLUME

   30

   BALANCE

SOUND

PICTURE

SOUND

FEATURES
INSTALL

TREBLE
BASS
BALANCE
AVL
INCR. SURROUND

TREBLE

30

BASS
BALANCE
AVL
INCR. SURROUND

SOUND

BASS

BALANCE
AVL
INCR. SURROUND
HEADPHONE

SOUND

PIP ON/OFF

2

1

3

5

4

6

8

7

9

0

TV

SWAP

PIP CH

DN

UP

ACTIVE

CONTROL FREEZE

SOUND

MUTE

SURF

A/CH

POWER

PICTURE

STATUS/

EXIT

SURF

ITR/

RECORD

HOME
VIDEO

HOME

MOVIES

PERSONAL

SLEEP

REC •

PIP

POSITION

VCR

ACC

MENU/

SELECT

VOL

CH

TV/VCR

CC

SAP

PROG.LIST

DOLBY V

AV

8

7

1

3
5
7

2
4
6

VOLUME
BALANCE

HEADPHONE
   VOLUME

   30


BALANCE

   0

SOUND

OR

6

Содержание 30PW8520

Страница 1: ...oblems Philips Representatives can help you get the most from your new product by explaining Hookups First Time Setup and Feature Operation Do not attempt to return this product to the store For fast help call us first 1 800 531 0039 Thank you for making Philips a part of your home Important Return your Warranty Registration Card within 10 days See why inside Model No Serial No ...

Страница 2: ...use an elec trical shock For the safety of everyone in your household please do not remove product cov ering s The exclamation point calls attention to features for which you should read the enclosed literature closely to prevent operating and maintenance problems WARNING TO PREVENT FIRE OR SHOCK HAZARD DO NOT EXPOSE THIS EQUIP MENT TO RAIN OR MOISTURE CAUTION To prevent electric shock match wide ...

Страница 3: ...ave fallen or liquid has been spilled into the appli ance or C The appliance has been exposed to rain or D The appliance does not appear to operate normally or exhibits a marked change in performance or E The appliance has been dropped or the enclosure damaged 17 Tilt Stability All televisions must comply with recommended international global safety standards for tilt and stability properties of i...

Страница 4: ...Blue Mute Control 43 REMOTE CONTROL RELATED FEATURES How to set the Sleep Timer Control 44 How to Use the Freeze Control 45 Using the AutoPicture Control 46 Using the AutoSound Control 47 Using the Surf Control and Alternate Channel 48 Using the Remote Control with accessory devices Direct Access Method 49 Code Entry Method 50 Search Method 51 Direct Entry Code list for accessory devices 52 53 Rem...

Страница 5: ...ality by improving the contrast between the darkest and brightest parts of the picture Eye Fidelity also know as Digital Options give a choice of two different scanning technics Progressive Scan or Interlaced Progressive Scan doubles the number of visible lines per field by displaying all picture frame lines at once eliminating any picture flicker The Interlaced mode provides a double vertical dis...

Страница 6: ...m an antenna or a cable TV company to the antenna jack on the back of the TV Coaxial cables use F connectors A two way signal splitter enables you to take a single antenna or cable TV signal and supply it to two different inputs A 300 to 75 ohm twin lead adapter accepts the antenna cables called twin lead wires from an antenna allowing you to connect the antenna signal to the TV An S Video cable p...

Страница 7: ...jack on the back of the VCR 4 Connect the AUDIO red and white cables to the AUDIO left and right OUT jacks on the rear of the VCR 5 Turn the VCR accessory device and the TV ON 6 Press the AV button on the remote control to select the AV1 channel AV1 will appear in the upper left corner on the TV screen 7 With the VCR or accessory device ON and a prerecorded tape CD DVD etc inserted press the PLAY ...

Страница 8: ... the TV 2 Connect the AUDIO red and white cables to the AUDIO left and right AV2 in jacks on the rear of the TV 3 Connect the VIDEO yellow cable to the VIDEO OUT jack on the back of the VCR 4 Connect the AUDIO red and white cables to the AUDIO left and right OUT jacks on the rear of the VCR 5 Turn the VCR accessory device and the TV ON 6 Press the AV button on the remote control to select the AV2 ...

Страница 9: ...ner on the TV screen 7 With the camera or accessory device ON and a prerecorded tape CD DVD Game Card etc depending on type of accessory device inserted press the PLAY button to view the tape on the television USING THE SIDE AV 3 INPUT JACKS S VIDEO VIDEO AUDIO L R SIDE S VIDEO VIDEO AUDIO LEFT RIGHT 3 1 4 7 5 2 PIP ON OFF 2 1 3 5 4 6 8 7 9 0 TV SWAP PIP CH DN UP ACTIVE CONTROL FREEZE SOUND MUTE S...

Страница 10: ... Audio L eft and R ight cables from the AUDIO Outputs on the HD Receiver to the AV4 AUDIO Inputs on the back of the TV With both the HD Receiver and the tele vision ON Press the AV button on the remote to tune to the AV 4 Channel and view the video input from the VGA sup plied signal USING THE AV 4 INPUT JACKS b P b P AV4 2 1 3 5 PIP ON OFF 2 1 3 5 4 6 8 7 9 0 TV SWAP PIP CH DN UP ACTIVE CONTROL F...

Страница 11: ...te your accessory device Please refer to the Using the Remote control with Accessory Devices section starting on page 46 6 Insert a DVD disc into the DVD player and press the PLAY button on the remote b P b P CVI 2 1 3 6 PIP ON OFF 2 1 3 5 4 6 8 7 9 0 TV SWAP PIP CH DN UP ACTIVE CONTROL FREEZE SOUND MUTE SURF A CH POWER PICTURE STATUS EXIT SURF ITR RECORD HOME VIDEO HOME MOVIES PERSONAL SLEEP REC ...

Страница 12: ...on the remote control to select the AV2 channel AV2 will appear in the upper left corner on the TV screen 7 With the VCR or accessory device ON and a prerecorded tape inserted press the PLAY button to view the tape on the television USING THE S VIDEO INPUT JACKS The S Video jack and the AV 2 jacks work together When a device is connected to the S Video jack do not connect a signal to the AV 2 in V...

Страница 13: ...instruc tions on how to tune to the AV 1 channel to view a pre recorded tape The following steps allow you to connect a second VCR to record the program while your watching it 3 Connect one end of the yellow Video Cable to the Monitor Out VIDEO plug Connect the other end to the VIDEO IN plug on the second VCR 4 Connect one end of the red and white Audio cable from the Monitor Out AUDIO L and R plu...

Страница 14: ...ESS and TINT Controls will not be available for adjust ments when tuned to the AV4 Inputs AV4 Channel and CVI Inputs CVI Channel BRIGHTNESS adds or subtracts light from the darkest part of the picture COLOR adds or eliminates color PICTURE improves the detail of the light est parts of the picture SHARPNESS improves the detail in the picture TINT adjusts the picture to obtain natural skin tones COL...

Страница 15: ...ment bar will be shown to the right 3 Press the CURSOR RING DOWN repeatedly until the Digital Options control is highlighted 4 Press the CURSOR RING RIGHT or LEFT until you select the option you want either PROGRESSIVE or 1050i 5 Press the STATUS EXIT button to remove the menu from the screen HOW TO USE THE DIGITAL OPTIONS CONTROL PICTURE SOUND FEATURES INSTALL BRIGHTNESS COLOR PICTURE SHARPNESS T...

Страница 16: ...s the CURSOR RING RIGHT or LEFT until you select the option you want either OFF MIN MED or MAX 5 Press the STATUS EXIT button to remove the menu from the screen HOW TO SET THE DYNAMIC CONTRAST CONTROL PICTURE SOUND FEATURES INSTALL BRIGHTNESS COLOR PICTURE SHARPNESS TINT BRIGHTNESS 30 COLOR PICTURE SHARPNESS TINT PICTURE SHARPNESS TINT COLOR TEMP DIGITAL OPTIONS DYN CONTRAST OFF PICTURE DYN CONTRA...

Страница 17: ...RSOR RING DOWN to select another sound adjustment BASS or BALANCE 6 Press the CURSOR RING RIGHT or LEFT to adjust the selected control 7 Press the STATUS EXIT button to remove the menu from the screen ADJUSTING THE TREBLE BASS AND BALANCE CONTROLS PICTURE SOUND FEATURES INSTALL TREBLE BASS BALANCE AVL INCR SURROUND TREBLE 30 BASS BALANCE AVL INCR SURROUND SOUND TREBLE BASS 30 BALANCE AVL INCR SURR...

Страница 18: ... TREBLE will be highlighted and an adjustment bar will be shown to the right 4 Press the CURSOR RING DOWN repeatedly until AVL is highlighted 5 Press the CURSOR RING RIGHT or LEFT to toggle AVL ON or OFF 6 Press the STATUS EXIT button to remove the menu from the screen HOW TO USE THE AVL CONTROL TREBLE BASS BALANCE AVL OFF INCR SURROUND SOUND PICTURE SOUND FEATURES INSTALL TREBLE BASS BALANCE AVL ...

Страница 19: ... remote control HOW TO USE THE INCREDIBLE SURROUND CONTROL PICTURE SOUND FEATURES INSTALL TREBLE BASS BALANCE AVL INCR SURROUND TREBLE 30 BASS BALANCE AVL INCR SURROUND SOUND TREBLE BASS BALANCE AVL ON INCR SURROUND STEREO SOUND If the signal is in STEREO choose from INCR SURROUND STEREO INCR SURROUND INCR SURROUND INCR SURROUND DOLBY VIRTUAL If the signal is in MONO choose from INCR SURROUND MONO...

Страница 20: ...ss the CURSOR RING RIGHT to highlight the Headphone options 6 Press the CURSOR RING UP or DOWN to select the VOLUME or BALANCE Control 7 Press the CURSOR RING LEFT or RIGHT to ajdust either control 8 Press the STATUS EXIT button to remove the menu from the screen HOW TO ADJUST THE HEADPHONE VOLUME AND BALANCE CONTROLS HEADPHONE VOLUME 30 BALANCE SOUND PICTURE SOUND FEATURES INSTALL TREBLE BASS BAL...

Страница 21: ...ROL FREEZE SOUND MUTE SURF A CH POWER PICTURE STATUS EXIT SURF ITR RECORD HOME VIDEO HOME MOVIES PERSONAL SLEEP REC PIP POSITION VCR ACC MENU SELECT VOL CH TV VCR CC SAP PROG LIST DOLBY V AV 6 1 2 4 3 5 5 An SAP is an additional part of the stereo broadcast system Sent as a third audio channel an SAP can be heard apart from the current TV program sound TV stations are free to use SAP for any numbe...

Страница 22: ... button to remove the menu from the screen HOW TO USE THE AUDIO OUT CONTROL PICTURE SOUND FEATURES INSTALL TREBLE BASS BALANCE AVL INCR SURROUND TREBLE 30 BASS BALANCE AVL INCR SURROUND SOUND INCR SURROUND HEADPHONE STEREO SAP AUDIO OUT FIXED SOUND OR INCR SURROUND HEADPHONE STEREO SAP AUDIO OUT VARIABLE SOUND PIP ON OFF 2 1 3 5 4 6 8 7 9 0 TV SWAP PIP CH DN UP ACTIVE CONTROL FREEZE SOUND MUTE SUR...

Страница 23: ...RIGHT or LEFT to turn the television s speak ers ON or OFF 6 Press the STATUS EXIT button to remove the menu from the screen HOW TO TURN THE TV SPEAKERS ON OR OFF PICTURE SOUND FEATURES INSTALL TREBLE BASS BALANCE AVL INCR SURROUND TREBLE 30 BASS BALANCE AVL INCR SURROUND SOUND HEADPHONE STEREO SAP AUDIO OUT SPEAKERS ON SOUND OR HEADPHONE STEREO SAP AUDIO OUT SPEAKERS OFF SOUND PIP ON OFF 2 1 3 5 ...

Страница 24: ...IT button to remove the menu from the screen 7 You can also press the ACTIVE CONTROL button on the remote control to toggle the ACTIVE CON TROL ON or OFF HOW TO USE THE ACTIVE CONTROL PICTURE SOUND FEATURES INSTALL TIMER ACTIVE CTRL AutoLock PIP CLOSED CAP FEATURES TIMER ACTIVE CTRL AutoLock PIP CLOSED CAP OFF FEATURES TIMER ACTIVE CTRL OFF AutoLock PIP CLOSED CAP 4 3 ACTIVE CTRL ON OR ACTIVE CONT...

Страница 25: ...USING THE TIMER CONTROL PICTURE SOUND FEATURES INSTALL TIMER ACTIVE CTRL AutoLock PIP CLOSED CAP FEATURES TIMER ACTIVE CTRL AutoLock PIP CLOSED CAP TIME START TIME STOP TIME CHANNEL ACTIVATE FEATURES TIME _ _ _ _ AM START TIME STOP TIME CHANNEL ACTIVATE TIMER TIME 10 30 AM START TIME STOP TIME CHANNEL ACTIVATE TIMER FEATURES FEATURES FEATURES TIME 10 _ _ AM START TIME STOP TIME CHANNEL ACTIVATE TI...

Страница 26: ...ILY for the START TIME Control to take effect Press the STATUS EXIT button to remove the menu from the screen SETTING THE TV TO TURN ITSELF ON USING THE START TIME CONTROL PICTURE SOUND FEATURES INSTALL TIMER ACTIVE CTRL AutoLock PIP CLOSED CAP FEATURES TIMER ACTIVE CTRL AutoLock PIP CLOSED CAP TIME START TIME STOP TIME CHANNEL ACTIVATE FEATURES TIME _ _ _ _ AM START TIME STOP TIME CHANNEL ACTIVAT...

Страница 27: ...e effect Press the STATUS EXIT button to remove the menu from the screen SETTING THE TV TO TURN ITSELF OFF USING THE STOP TIME CONTROL PICTURE SOUND FEATURES INSTALL TIMER ACTIVE CTRL AutoLock PIP CLOSED CAP FEATURES TIMER ACTIVE CTRL AutoLock PIP CLOSED CAP TIME START TIME STOP TIME CHANNEL ACTIVATE FEATURES TIME _ _ _ _ AM START TIME STOP TIME CHANNEL ACTIVATE TIMER FEATURES FEATURES TIME 10 _ _...

Страница 28: ...29 must be set to ONCE or DAILY for this Channel Control to take effect 7 Press the STATUS EXIT button to remove the menu from the screen PICTURE SOUND FEATURES INSTALL TIMER ACTIVE CTRL AutoLock PIP CLOSED CAP FEATURES TIMER ACTIVE CTRL AutoLock PIP CLOSED CAP TIME START TIME STOP TIME CHANNEL ACTIVATE FEATURES TIME _ _ _ _ AM START TIME STOP TIME CHANNEL ACTIVATE TIMER FEATURES FEATURES TIME STA...

Страница 29: ...ME STOP TIME CHANNEL ACTIVATE FEATURES TIME _ _ _ _ AM START TIME STOP TIME CHANNEL ACTIVATE TIMER FEATURES FEATURES TIME START TIME STOP TIME CHANNEL ACTIVATE OFF TIMER FEATURES ACTIVATE ONCE OR ACTIVATE DAILY OR PIP ON OFF 2 1 3 5 4 6 8 7 9 0 TV SWAP PIP CH DN UP ACTIVE CONTROL FREEZE SOUND MUTE SURF A CH POWER PICTURE STATUS EXIT SURF ITR RECORD HOME VIDEO HOME MOVIES PERSONAL SLEEP REC PIP POS...

Страница 30: ... the menu from the screen HOW TO VIEW THE TIME USING THE DISPLAY CONTROL PICTURE SOUND FEATURES INSTALL TIMER ACTIVE CTRL AutoLock PIP CLOSED CAP FEATURES TIMER ACTIVE CTRL AutoLock PIP CLOSED CAP TIME START TIME STOP TIME CHANNEL ACTIVATE FEATURES TIME _ _ _ _ AM START TIME STOP TIME CHANNEL ACTIVATE TIMER FEATURES FEATURES START TIME STOP TIME CHANNEL ACTIVATE DISPLAY ON TIMER FEATURES DISPLAY O...

Страница 31: ...is type of pro gramming contains one or more of the follow ing Moderate violence V some sexual situa tions S infrequent coarse language L or some suggestive dialogue D TV 14 Parents Strongly Cautioned This program contains some material that many parents would find unsuitable for children under 14 years of age This type of programming contains one or more of the following intense violence V intens...

Страница 32: ...VIDEO HOME MOVIES PERSONAL SLEEP REC PIP POSITION VCR ACC MENU SELECT VOL CH TV VCR CC SAP PROG LIST DOLBY V AV 1 10 3 5 2 4 6 7 8 9 PICTURE SOUND FEATURES INSTALL TIMER ACTIVE CTRL AutoLock PIP CLOSED CAP OPEN CLOSE TUNER A B TIMER ACTIVE CTRL AutoLock PIP CLOSED CAP FEATURES TIMER ACTIVE CTRL AutoLock PIP CLOSED CAP FEATURES TIME START TIME STOP TIME CHANNEL ACTIVATE ACCESS CODE TIMER ACTIVE CTR...

Страница 33: ...ACC MENU SELECT VOL CH TV VCR CC SAP PROG LIST DOLBY V AV 1 10 6 7 8 9 2 4 3 5 PICTURE SOUND FEATURES INSTALL TIMER ACTIVE CTRL AutoLock PIP CLOSED CAP TIMER ACTIVE CTRL AutoLock PIP CLOSED CAP FEATURES TIMER ACTIVE CTRL AutoLock PIP CLOSED CAP FEATURES TIME START TIME STOP TIME CHANNEL ACTIVATE ACCESS CODE AutoLock FEATURES BLOCK CHANNEL SETUP CODE CLEAR ALL MOVIE RATING TV RATING 12 13 14 15 16 ...

Страница 34: ...CK PIP ON OFF 2 1 3 5 4 6 8 7 9 0 TV SWAP PIP CH DN UP ACTIVE CONTROL FREEZE SOUND MUTE SURF A CH POWER PICTURE STATUS EXIT SURF ITR RECORD HOME VIDEO HOME MOVIES PERSONAL SLEEP REC PIP POSITION VCR ACC MENU SELECT VOL CH TV VCR CC SAP PROG LIST DOLBY V AV 9 1 6 3 5 8 2 4 7 PICTURE SOUND FEATURES INSTALL TIMER ACTIVE CTRL AutoLock PIP CLOSED CAP TIMER ACTIVE CTRL AutoLock PIP CLOSED CAP FEATURES T...

Страница 35: ...ON MOVIE RATINGS PIP ON OFF 2 1 3 5 4 6 8 7 9 0 TV SWAP PIP CH DN UP ACTIVE CONTROL FREEZE SOUND MUTE SURF A CH POWER PICTURE STATUS EXIT SURF ITR RECORD HOME VIDEO HOME MOVIES PERSONAL SLEEP REC PIP POSITION VCR ACC MENU SELECT VOL CH TV VCR CC SAP PROG LIST DOLBY V AV 3 5 8 10 11 1 6 9 2 4 7 9 PICTURE SOUND FEATURES INSTALL TIMER ACTIVE CTRL AutoLock PIP CLOSED CAP TIMER ACTIVE CTRL AutoLock PIP...

Страница 36: ...eps 9 and 10 to turn the sub rat ings ON or OFF Press the STATUS EXIT button to remove the menu from the screen HOW TO BLOCK PROGRAMMING BASED ON TV RATINGS PIP ON OFF 2 1 3 5 4 6 8 7 9 0 TV SWAP PIP CH DN UP ACTIVE CONTROL FREEZE SOUND MUTE SURF A CH POWER PICTURE STATUS EXIT SURF ITR RECORD HOME VIDEO HOME MOVIES PERSONAL SLEEP REC PIP POSITION VCR ACC MENU SELECT VOL CH TV VCR CC SAP PROG LIST ...

Страница 37: ...NG RIGHT or LEFT to toggle BLOCKING ON or OFF Press the STATUS EXIT button to remove the menu from the screen OTHER AUTOLOCK BLOCKING OPTIONS BLOCKING CONTROL PIP ON OFF 2 1 3 5 4 6 8 7 9 0 TV SWAP PIP CH DN UP ACTIVE CONTROL FREEZE SOUND MUTE SURF A CH POWER PICTURE STATUS EXIT SURF ITR RECORD HOME VIDEO HOME MOVIES PERSONAL SLEEP REC PIP POSITION VCR ACC MENU SELECT VOL CH TV VCR CC SAP PROG LIS...

Страница 38: ...NG RIGHT or LEFT to toggle NO RATING ON or OFF Press the STATUS EXIT button to remove the menu from the screen OTHER AUTOLOCK BLOCKING OPTIONS NO RATING CONTROL PIP ON OFF 2 1 3 5 4 6 8 7 9 0 TV SWAP PIP CH DN UP ACTIVE CONTROL FREEZE SOUND MUTE SURF A CH POWER PICTURE STATUS EXIT SURF ITR RECORD HOME VIDEO HOME MOVIES PERSONAL SLEEP REC PIP POSITION VCR ACC MENU SELECT VOL CH TV VCR CC SAP PROG L...

Страница 39: ...TATUS EXIT button a third time to remove them from the screen HOW TO REVIEW THE AUTOLOCK STATUS SCREEN MOVIE RATING R NC17 X NO RATING TV RATING Y7 PG 14 MA ON PIP ON OFF 2 1 3 5 4 6 8 7 9 0 TV SWAP PIP CH DN UP ACTIVE CONTROL FREEZE SOUND MUTE SURF A CH POWER PICTURE STATUS EXIT SURF ITR RECORD HOME VIDEO HOME MOVIES PERSONAL SLEEP REC PIP POSITION VCR ACC MENU SELECT VOL CH TV VCR CC SAP PROG LI...

Страница 40: ...EATURES TIMER ACTIVE CTRL AutoLock PIP CLOSED CAP TIME START TIME STOP TIME CHANNEL ACTIVATE FEATURES TIMER ACTIVE CTRL AutoLock PIP CLOSED CAP CLOSED CAP CAPTION MODE CC DISPLAY FEATURES CAPTION MPDE CC DISPLAY CC1 CC2 CC3 CC4 CC MUTE CLOSED CAP CAPTION MODE CC DISPLAY FEATURES CC1 CC2 CC3 CC4 CC MUTE CC1 CC2 CC3 CC4 CC MUTE TXT1 TXT2 TXT3 TXT4 PIP ON OFF 2 1 3 5 4 6 8 7 9 0 TV SWAP PIP CH DN UP ...

Страница 41: ...the on screen menu 2 Press the CURSOR RING DOWN twice to highlight FEATURES 3 Press the CURSOR RING RIGHT and the menu will shift to the left 4 Press the CURSOR RING DOWN repeatedly until the FORMAT control is highlighted 5 Press the CURSOR RING RIGHT repeatedly to toggle among the three screen format sizes 4 3 ZOOM 14 9 ZOOM 16 9 SUBTITLE ZOOM SUPERWIDE or WIDE SCREEN 6 Press the STATUS EXIT butt...

Страница 42: ...OR RING RIGHT or LEFT to rotate the picture on the screen clockwise or counter clockwise Please note that the amount of rotation will be very minimal 6 Press the STATUS EXIT button to remove the menu from the screen HOW TO USE THE ROTATION CONTROL PICTURE SOUND FEATURES INSTALL TIMER ACTIVE CTRL AutoLock PIP CLOSED CAP FEATURES TIMER ACTIVE CTRL AutoLock PIP CLOSED CAP TIME START TIME STOP TIME CH...

Страница 43: ... RING RIGHT or LEFT to toggle the control ON or OFF 6 Press the STATUS EXIT button to remove the menu from the screen HOW TO SET THE BLUE MUTE CONTROL PICTURE SOUND FEATURES INSTALL TIMER ACTIVE CTRL AutoLock PIP CLOSED CAP FEATURES TIMER ACTIVE CTRL AutoLock PIP CLOSED CAP TIME START TIME STOP TIME CHANNEL ACTIVATE FEATURES PIP CLOSED CAP FORMAT ROTATION BLUE MUTE OFF PIP ON OFF 2 1 3 5 4 6 8 7 9...

Страница 44: ...en 30 minute increments up to 90 minutes then 60 minute increments up to 240 minutes 1 Press the SLEEP button on the remote control The SLEEP timer onscreen display will appear in the upper part of the screen 2 Within five seconds press the SLEEP button repeatedly to pick the amount of time 15 minute increments up to 60 minutes then 30 minute increments up to 90 minutes then 60 minute increments u...

Страница 45: ...he television screen simply press the FREEZE button on the remote control to stop the picture at any given moment The screen will read FREEZE ON momentarily and the picture frozen on the screen 2 Press the FREEZE button on the remote control again to resume normal viewing The screen will read FREEZE OFF momentarily while the television dis plays a normal moving picture again HOW TO USE THE FREEZE ...

Страница 46: ...in your home The Movies Sports Weak Signal and Multimedia AutoPicture controls have been preset at the factory to automatically adjust the TV s brightness color picture sharpness tint and color tem perature levels The Personal AutoPicture settings are the ones that you made through the PICTURE options within the onscreen menu 1 Press the PICTURE button on the remote control The current AutoPicture...

Страница 47: ...mote control The current AutoSoundTM setting will appear in the middle of the screen 2 Press the SOUND button repeatedly to toggle among the four settings PERSONAL VOICE MUSIC or THEATRE Remember only the PERSONAL control can be changed by the viewer This changes the settings in the main onscreen menu s SOUND controls HOW TO USE THE AUTOSOUND CONTROL AutoSoundTM works only with the programs coming...

Страница 48: ... LIST EMPTY The num ber of the current channel will be shown with ADD to the right 3 While the SURF list message or the SURF channel list appears on the screen press the CURSOR RIGHT button to add the present channel to the SURF list 4 If you want to delete the present channel from the SURF list press the CURSOR RIGHT button again Repeat steps 1 through 3 to add more chan nels up to 10 to the SURF...

Страница 49: ...d laser disc players 2 Point the TV remote toward the desired accessory device and press the POWER button Does the remote turn the accessory device on If yes then try other function buttons on the TV remote With a VCR for example try the Play Stop and Rewind buttons for example If they also work the accessory device then the remote is ready and no further steps are needed If not do the following L...

Страница 50: ... MENU SELECT button enter a four digit code for the accessory device see pages 52 and 53 If you make a mistake while attempt ing to enter the four digit code and want to start again press any button other than one with a number Then return to step 1 to begin again 3 Point the remote at the accessory device Then press the POWER button on the remote to turn the device on USING THE REMOTE WITH ACCESS...

Страница 51: ... remote toward the accessory device and continue holding the buttons down 2 Watch the Channel Indicator on your accessory device Channel num bers will scan up when the TV remote has identified the correct code for your accessory device This may take sever al minutes 3 Release the mode VCR or ACC and SURF buttons as soon as chan nel numbers start to scan up The scanning means that your TV remote ha...

Страница 52: ...7 0066 0176 MAGNIN 0267 MARANTZ 0108 0062 MARTA 0064 MATSUSHITA 0062 0189 0481 MEMOREX 0131 0074 0506 0027 0064 0075 0062 0073 0267 0334 0066 0189 0236 0481 0828 0829 MINOLTA 0132 0069 MITSUBISHI 0200 0088 0102 0241 0269 0070 0075 0094 0470 MOTOROLA 0062 0075 MULTITECH 0027 0099 NAD 0085 NEC 0065 0067 0068 0077 0094 0109 0131 NIKKO 0064 NIKON 0061 0280 NOBLEX 0267 OLYMPUS 0062 0253 OPTIMUS 0189 04...

Страница 53: ...SCAN 0028 TIMELESS 0445 TOCOM 0039 0040 TOSHIBA 0027 TUSA 0042 UNIKA 0180 0234 0049 UNITED ARTISTS 0034 UNIVERSAL 0234 0049 0066 0083 0180 0218 VIEWMASTER 0847 VIEWSTAR 0285 0054 0087 0090 ZENITH 0027 0552 0081 ZENTEK 0427 CODE NUMBER ADS 0880 AIWA 0855 CARVER 0853 0850 0858 DENON 0851 0849 0875 DISCO VISION 0848 FUNAI 0855 HARMAN KARDON 0853 HITACHI 0848 KENWOOD 0877 MAGNAVOX 0853 0857 0875 MARAN...

Страница 54: ...x o B e t i l l e t a S l a t i g i D r e v i e c e R n o i t c n u F S S D m e t s y S R E W O P R E W O P R E W O P R E W O P E S U A P E S U A P E S U A P D N I W E R D N I W E R E S R E V E R H C R A E S P O T S P O T S P O T S Y A L P Y A L P Y A L P D R A W R O F T S A F D R A W R O F T S A F D R A W R O F H C R A E S P U G N I R R O S R U C P U R O S R U C P U R O S R U C P U R O S R U C N ...

Страница 55: ... PIP ON OFF 1 Turn the TV and the external acces sory device if using one ON 2 Press the PIP button on the remote control The PIP window will appear in one of the screens four corners 3 Press the PIP button a second time to reduce the size of the PIP window 4 Press the PIP button a third time to display the Double Window PIP in a 4 3 aspect ratio 5 Press the PIP button a fourth time to display the...

Страница 56: ...o select signals coming from the audio video input jacks When using these buttons the channel changes will occur in the PIP window not the main screen NOTE The normal Channel and buttons will not change channels in the PIP window They are for use with the main screen picture only USING THE PIP PICTURE IN PICTURE FEATURE PIP ON OFF 2 1 3 5 4 6 8 7 9 0 TV SWAP PIP CH DN UP ACTIVE CONTROL FREEZE SOUN...

Страница 57: ...ear on one of the four corners of the TV screen The PIP button will also change the size and format of the PIP window Refer to the previous page for more details 2 Press the POSITION button on the remote under the flip up lid to move the PIP window to nay of the four cor ners of the TV screen 3 While the PIP window is visible press the FREEZE button to stop the action freezing the image in the PIP...

Страница 58: ...is not turn on 6 Press the CURSOR RING RIGHT or LEFT to adjust the TINT level for the PIP picture 7 Press the STATUS EXIT button when finished to remove the onscreen menu from the TV screen USING THE PIP PICTURE IN PICTURE FEATURE PICTURE SOUND FEATURES INSTALL TIMER ACTIVE CTRL AutoLock PIP CLOSED CAP FEATURES TIMER ACTIVE CTRL AutoLock PIP CLOSED CAP TIME START TIME STOP TIME CHANNEL ACTIVATE FE...

Страница 59: ...cabinet surfaces with a clean cloth or sponge dampened in a solution of cool clear water and a mild soap or detergent Use a clean dry cloth to dry the wiped surfaces Occasionally vacuum the ventilation holes or slots in the back cover of the set Never use thinners insecticide sprays or other chemicals on or near the cabinet as they might cause permanent marring of the cabinet finish No Power Check...

Страница 60: ...ure LED Light Emitting Diode used as the power on light Menu An onscreen list of feature controls available for you to adjust or set MPAA Motion Picture Association of America Onscreen Displays OSD The wording or messages generated by the television or VCR to help you with specific feature con trols color adjustment or programming for example Picture Freeze TV mode which allows you to freeze a cer...

Страница 61: ...ut Output Connections Audio Output Jacks 13 Audio Video Cables 6 AV1 Input Jacks 7 AV2 Input Jacks 8 AV3 Side with Headphone Input Jacks 9 Jack Panel Input Output Connections Continued AV4 Component with VGA Input Jacks 10 CVI Component Video Input Jacks 11 Jack Panel Descriptions 6 Monitor Output Jacks 13 S Video Input Jacks 12 Picture Control 14 PIP Channels 56 PIP Features 55 58 PIP Picture Sou...

Страница 62: ...nter une preuve d achat pour bénéficier d un service sans frais Pour les produits non couverts par la garantie con tactez le centre le plus près de chez vous NOTA Si Ud reside en una de nuestras zonas para sucursales Philips de servicio al de fábrica ver directorio más abajo Ud puede comunicarse con la sucursal de servicio más cercana para obtener una reparación oportuna y eficaz de su producto Si...

Страница 63: ...DE 600 SITIOS POR TODO EL PAIS PARA LA RECEPCION DE PRODUCTOS NECESITADOS DE REPARACIONES COMUNICARSE CON EL CENTRO DE SERVICIO DE FABRICA MAS CERCANO PARA ESTOS LUGARES DENTRO DE UN RADIO DE 80 A 120 KM 50 A 75 MILLAS DEL CENTRO DE SERVICIO LOCAL ATLANTA Philips Factory Service 550 Franklin Road Suite F Marietta GA 30067 800 273 1501 TAMPA Philips Factory Service 1911 US Highway 301 North Tampa F...

Страница 64: ...a product used for commercial or institutional purposes WHERE IS SERVICE AVAILABLE Warranty service is available in all countries where the product is offi cially distributed by Philips Consumer Electronics Company In coun tries where Philips Consumer Electronics Company does not distribute the product the local Philips service organization will attempt to pro vide service although there may be a ...

Отзывы: