


Operation
12
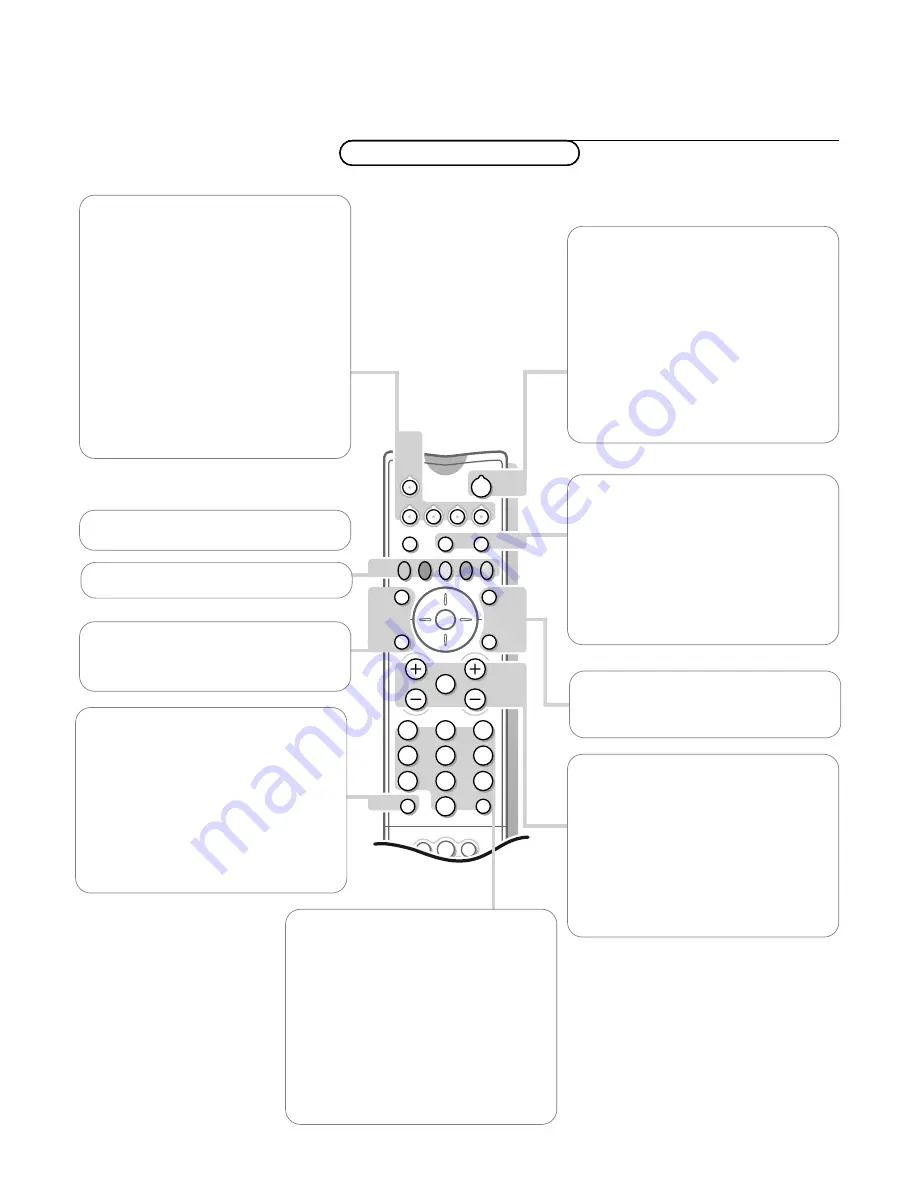
Use of the remote control
Use of the remote control
M
h
a
SMART
ACTIVE
CONTROL
SMART
PICTURE
SOUND
2
1
3
5
4
6
8
7
9
0
B
w
®
Ò
‡
π
†
æ
b
Ï
i
TV
VCR
DVD
SAT
TUNER
CD
TAPE
CDR
¬
V
P
0
◊
S
Q
MOVIE SPORT
CHILD
NEWS OTHER
OK
MENU
w
Select peripherals
Press this key repeatedly to select
EXT1
,
EXT2, EXT3, EXT4
or
FRONT
, according to
where you connected the peripherals (p. 33).
TV VCR DVD SAT TUNER CD TAPE CDR
Press one of these keys to use the remote
control directly in the TV, video recorder,
DVD or satellite mode. A green indicator
lights up. Press the same key again within 3
seconds to use the remote control in the
mode indicated below the key (tuner, CD,
tape or CD-recordable).
A red indicator lights up.
Press the key again to return to the function
mentioned above the key.
B
Standby
The set is switched off and the red indicator
(orange when acquiring
NEX
TV
IEW
information) lights up.When acquiring
NEX
TV
IEW
the TV is switched to full standby
after a period of max. 1 hour and the red
indicator lights up.
To switch the TV on again, press
- P +
or the
digit keys.
If your EasyLink video recorder has the
system standby function and you press the
standby key for 3 seconds, both the TV and
video recorder are switched to standby.
®Ò‡π†
Video recorder
see p. 33
O
no function
æ
NEX
TV
IEW
on/off see p. 22
OK
Press this key to activate your choice,
when in the menus.
S
Freeze
To activate/de-activate the frozen picture and
to hold a teletext page.
Q
Surround mode
Press this key repeatedly to select another
available surround mode: Dolby Pro Logic, 3D
Surround, Dolby 3 Stereo, Stereo, Hall or
Dolby Digital.
i
Screen information
Press for 5 seconds to activate/de-activate
the extended or reduced display of TV
channel and programme information on the
screen.
Press briefly to display information about the
selected TV channel and programme, the
sound reception, picture settings, the selected
DNR setting and the remaining time set with
the sleeptimer.
0/9
Digit keys
To select a TV channel.
For a two digit programme number, enter the
second digit within 2 seconds.
To switch immediately to a selected one digit
TV channel, keep the digit key pressed a bit
longer.
0
Previous programme
The previously selected TV channel is
displayed.
The
◊
indication is only for video
recorder/DVD.
Use of the remote control
b
Teletext
on/off see p. 27
Ï
Main menu
on/off see p. 15
V
Volume
Press + or - to adjust the volume.
¬
Mute
Temporarily interrupt the sound or restore
it.
P
Programme selection
To browse through the TV channels
activated in the Favourite Programme menu.
4934.3 gb /05 12-01-2000 14:37 Page 12


