


3
3
®Ò‡π†
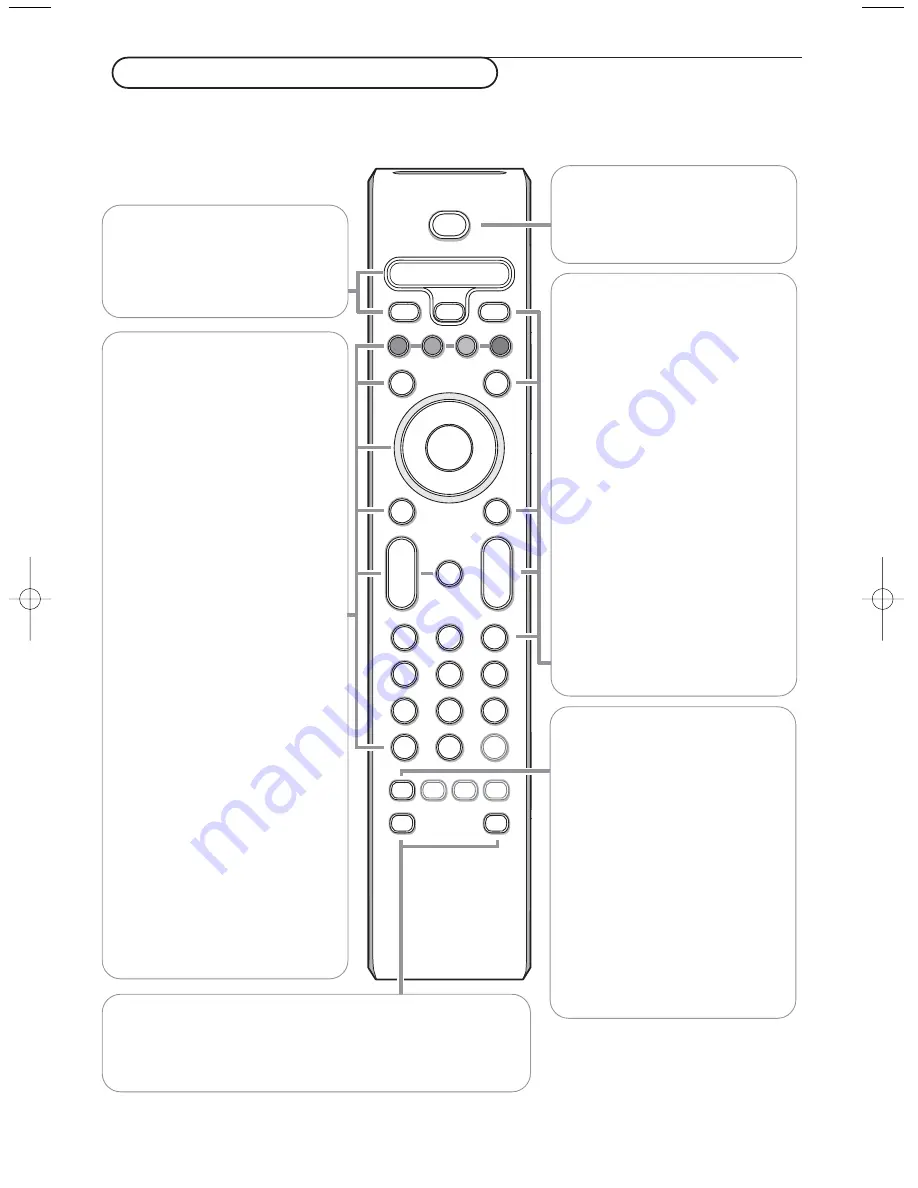
Audio- and Video equipment keys
(p. 17)
U
Time display
The time is displayed on the
screen.
æ
Teletext guide
on/off p. 12
Press the
b
key to show
Teletext guide on the right half of
the screen.
OK
Press this key
• to activate your choice, when in
the menus.
• to display the programme list.
S
Freeze
To freeze the picture.
V
To adjust the volume.
¬
Interrupt the sound or restore it.
i
On Screen information
Press to display information about
the selected TV channel and
programme.
Menu/Remote control info
When a menu is on screen, press
i
to display info on the
selected menu item. For
information on the remote
control functions, while the menu
info is displayed, press any key on
the remote control.
The normal function of the key is
not executed.
x
Pixel Plus demo
on/off
In the right part Pixel Plus and
Digital Natural Motion are
switched on.
b
Teletext
on/off p. 13
Press the
b
key to show
teletext on the right half of the
screen.
MENU
Main menu
on/off see p. 5
P Programme selection
To browse through the TV
channels and sources stored in
the favourite list.
0/9 Digit keys
To select a TV channel.
For a two digit programme
number, enter the second digit
within 2 seconds.To switch
immediately to a selected one
digit TV channel, keep the digit key
pressed a bit longer.
Use of the remote control RC4337
Note: For most keys pressing a key once will activate the function. Pressing a second time will de-activate it.
When a key enables multiple options, a small list will be shown. Press repeatedly to select the next item in the list.
The list will be removed automatically after 4 seconds or press
OK
to remove immediately.
Q
Surround mode
Incredible surround
With stereo transmission, and
when Incredible surround is
selected, it seems as though the
loudspeakers are spread further
apart from one another.
Virtual Dolby surround
Optimal with Dolby surround
signals. Enables you to experience
the effect of Dolby surround Pro
Logic, reproducing a rear sound
effect. See Sound menu, 3D effect,
p. 10.
Note:You can make the same
selection in the Sound menu,
surround mode, p. 10.
b
¬
+
-
V
+
-
P
v
i
0
VCR DVD TV SAT AMP
S
MENU
1
2
3
4
5
6
7
8
9
0
‡
π
x
†
®
®
®
®
q
b
h
Q
SMART
SMART
a
M
ACTIVE
CONTROL
B
OK
SELECT
Ò
U
®
æ
º
Ma
Smart keys
To select predefined picture and sound settings.
Personel refers to the personal preference settings selected in
the sound and picture menu.
VCR DVD TV SAT AMP
Audio- and Video equipment keys
(p. 17)
v
Select peripherals
(p. 16)
B
Standby
Press to switch the TV on or off.
When switched off, a red
indicator lights up.
2292.2 en 22-03-2004 15:35 Pagina 3
Содержание 28PW9309
Страница 1: ...tv ...
Страница 2: ......
Страница 4: ......
Страница 24: ...Printed in Belgium ...
Страница 25: ......
Страница 31: ......
Страница 32: ...Printed in Belgium ...


