background image

3

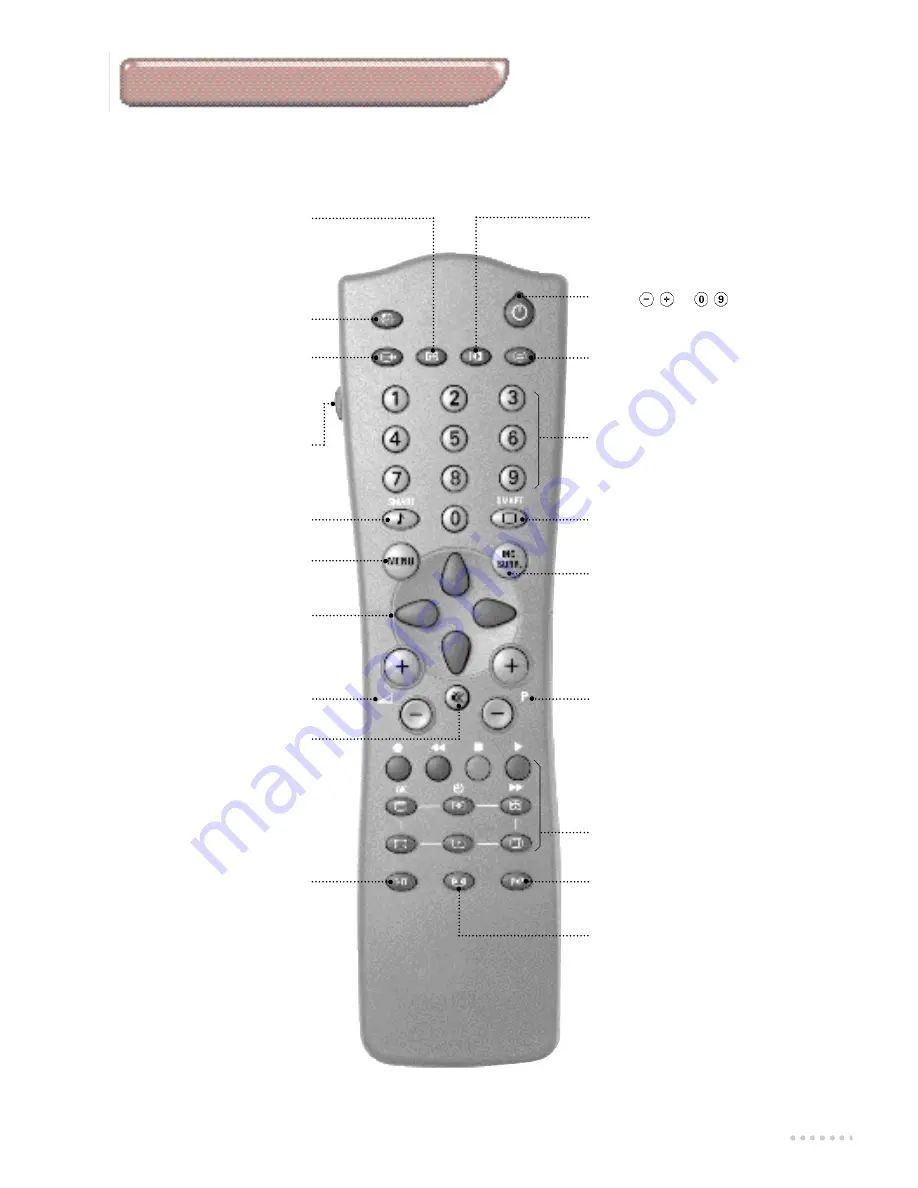
The remote control keys

Screen information

To display / re m ove the pro g r a m m e

nu m b e r, the name (if it exists), t h e

t i m e, the sound mode  and the

time remaining on the timer. H o l d

d own for 5 seconds to

p e r m a n e n t ly display the

p rogramme number on the scre e n .

Sleeptimer

To select the length of time befo re

the set  automatically switches to

s t a n d by (from 0 to 120 minu t e s ) .

Select EXT sockets

Press several times to select

EXT1, S-VHS2, EXT2 and on

certain models EXT3 and 

S-VHS3.

Video recorder (p. 8)

Smart sound controls

To access a series of settings:

VOICE, MUSIC,THEATRE and

return to PERSONAL.

Menu

To display or exit from the menu s .

Cursor

These 4 keys are used to move

within the menus.

Volume

To adjust the sound level

Mute

To disable or enable the sound.

Sound mode

To switch from STEREO to

MONO or to choose between

Dual I and Dual II for 

bilingual transmissions.

For TV sets fitted with NICAM

reception, depending on the

transmission, you can switch

from NICAM STEREO to

MONO or choose between

N I CAM DUAL I, N I CAM DUAL II

and MONO.

When the sound mode is switched

to MONO, the indication is

displayed in blue.

Picture adjustment 
To activate / deactivate the
picture adjustment controls.

NEX

TV

IEW

:

refer to the separate booklet
(only available on certain models).

Incredible Surround 
To activate / deactivate the
s u rround sound effe c t . In stere o,
this gives the impression that the
s p e a kers are further ap a rt . In mono,
a stereo spatial effect is simu l a t e d .

Numerical keys
For direct access to programmes.
For a 2 figure programme number,
the 2nd figure must be entered
before the dash disappears.

Standby
To set the TV to standby mode.
To switch the TV set on again,
press P 

or 

.

Smart picture controls
To access a series of settings:
RICH, NATURAL, SOFT and
return to PERSONAL.

Selecting TV programmes
To move up or down a
p ro g r a m m e.The nu m b e r, ( t h e
name) and the sound mode are
d i s p l ayed for a few seconds.

For some programmes equipped with
t e l e t ex t , the title of the progra m m e
a p p e a rs at the bottom of the screen.

Teletext features (p. 9)

Previous programme
To access the previously viewed
programme.

16:9 formats (p. 10)

Содержание 28PW6324/58R

Страница 1: ... store 4 Re numbering programmes 5 To exit the menus 5 Manual store 6 Naming programmes 6 Operation The keys on theTV set 2 The remote control keys 3 Displaying the programme number 3 Adjusting the current picture and sound settings 3 Sleeptimer 3 Using other menus picture sound features 7 Storing adjustments 7 Lock 7 Timer menu 8 Video recorder key 8 Teletext 9 16 9 formats 10 Peripherals Connect...

Страница 2: ... doubt consult your dealer Switching on Press the on off key to switch on the television A red indicator comes on and the screen lights up If the television remains in standby mode press the P on the remote control The indicator flashes when you use the remote control The television set has 4 keys which are located on the front or the top of the set depending on the model TheVOLUME keys are used t...

Страница 3: ...ch from NICAM STEREO to MONO or choose between NICAM DUAL I NICAM DUAL II and MONO When the sound mode is switched to MONO the indication is displayed in blue Picture adjustment To activate deactivate the picture adjustment controls NEXTVIEW refer to the separate booklet only available on certain models Incredible Surround To activate deactivate the surround sound effect In stereo this gives the i...

Страница 4: ... The search operation takes a few minutes When the search is complete the INSTALL menu reappears automatically If the transmitter or the cable network emits the automatic sort signal the programmes are correctly numbered If this is not the case the programmes found are numbered in descending order from number 99 98 97 etc Use the SORT menu to re number the programmes Certains broadcasters or cable...

Страница 5: ...programmes as you wish to re number Press Select INSTALL Press Select SORT and press The SORT menu appears Select FROM using the key Press to select TO Enter the new programme number using keys to In our example type Select OK and press The message STORED appears and the exchange is made In our example programme number 97 is re numbered as 5 and 5 as 97 To display the INSTALL menu To exit the menu...

Страница 6: ... required enter its number directly using the keys and go to chapter If no programme is found refer to theTips chapter on page 14 If reception is un satisfactory select FINE TUNE and hold down key or Select PROG NO programme number and use the or to keys to enter the desired number Select STORE and press The message STORED appears The programme is stored Repeat steps to for each programme to be st...

Страница 7: ...d or WARM red white You can adjust TREBLE BASS BALANCE AVL and HEADPHONE AVL automatic volume leveller used for automatic level control in order to avoid sudden increases in volume particularly when changing channels or during advertisements HEADPHONES this menu is used to access the separate headphone VOLUME control the BALANCE and the SOUND MODE you can choose between DUAL I and DUAL II for bili...

Страница 8: ...et theTV to standby It will automatically switch on at the time programmed If you leave the TV switched on it will only change programme at the time indicated The combination of the LOCK andTIMER functions may be used to limit the length of time your television is in use for example by your children The ONCE position allows you to programme the start time or the stop time but not the both Video re...

Страница 9: ...ss the items or their corresponding pages The coloured zones flash when the page or the subject is not yet available Stop the sequence of sub pages Certain pages have sub pages which follow on automatically Press the key to disable and enable the sequence of sub pages The message appears in the top left hand corner of the screen Index To return to the main index page generally page 100 Enlarging a...

Страница 10: ...ing the keys ZOOM 14 9 Mode The picture is enlarged to 14 9 format a thin black band remains on both sides of the picture The keys allow you to increase or decrease the section at the bottom of the picture where sub titles may be displayed ZOOM 16 9 Mode The picture is enlarged to 16 9 format This mode is recommended when displaying pictures which have black bands at the top and bottom letterbox f...

Страница 11: ... mode Different modes can be selected to suit different picture formats use the following diagrams as a guide to which mode to use 4 3 Picture There are 4 possible modes for this type of picture 4 3 Picture Letterbox 16 9 Picture x2 x5 ...

Страница 12: ...et EXT1 and EXT2 The EXT1 socket has audio and video inputs outputs and RGB inputs The EXT2 socket has audio and video inputs outputs and S VHS inputs To select connected equipment Press the key to select EXT1 S VHS2 S VHS signals from the EXT2 socket EXT2 and S VHS3 or EXT3 for connections on the front panel according to the model Most equipment decoder video recorder carries out the switching it...

Страница 13: ...sound output RGB Signals These are 3 Red Green and Blue video signals which directly drive the red green and blue emitters in the cathode ray tube Using these signals provides better picture quality S VHS Signals These are 2 separateY C video signals from the S VHS and Hi 8 recording standards The luminance signalsY black and white and chrominance signals C colour are recorded separately on the ta...

Страница 14: ...lected the right socket with the key S VHS2 or S VHS3 instead of EXT2 or EXT3 To play a video cassette check that it has been recorded under the same standard PAL SECAM NTSC which can be replayed by the video recorder No sound If on certain channels you receive a picture but no sound this means that you do not have the correctTV system Modify the SYSTEM setting p 6 Remote control TheTV set does no...

Отзывы: