Philips 28PT 7157 Скачать руководство пользователя страница 5

5

Manual installation

Give name

This menu is used to store the programmes
one at a time or to add a programme to the
existing list.
From the 

Installation

menu 

(to select press 

¢

and 

Ê

at the same time)

:

&

Select 

Manual installation

and press 

u

. Use

the up/down cursor to select and the left/right
one to adjust :

é

Selection mode

(only available in certain

countries) : permits selection of search mode
by

Frequency

or by 

Channel

.

System :

select 

Western Europe

(BG

standard),

Eastern Europe

(DK standard),

Great Britain

(I standard) or 

France

(LL’

standard).

Programme number :

enter the required

number using only the left/right keys.

(

Search :

press 

u

.The search starts. Once a

programme is found, the scanning stops and
the name of the programme is displayed
(when available). Go to the next step. If you
know the frequency of the required
programme, this can be entered directly using
the 

0

to 

9

keys.

If no picture is found, see Tips (p. 12). See also :
EasyLink Function page 7.

§

Fine Tune  :

if reception is poor, adjust using

the left/right cursor.

è

Store :

press 

u

.The programme is stored.

!

Repeat steps 

to 

è

for each programme to

store.

ç

To exit, press 

H

several times.

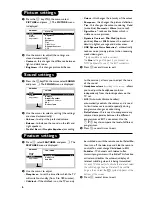
This menu allows you to change or give a
name to the programmes and external
connectors. From the 

Installation

menu 

(to select press 

¢

and 

Ê

at the same time)

:

&

Select 

Give name

and press 

u

.

é

Select the programme with the up/down
cursor and validate with 

u

.

Use the left/right cursor to move around the

name display area (5 characters).

Use the up/down cursor to select the
characters.

(

Press 

u

when the name has been entered.

The programme name is stored.

§

Repeat steps 

é

to 

(

for all programmes or

connectors to be named.

è

To exit, press 

H

several times.

Favourite Programmes

This menu allows you to select the
programmes to be accessed with the 

@

P

#

key. From the 

Installation

menu 

(to select 

press 

¢

and 

Ê

at the same time)

:

&

Select 

Favourite Programmes

and press 

u

.

The list of favourite programmes is displayed.
The programmes that were stored at
installation will automatically appear on this list.

é

Use the up/downcursor to select the required
programme.

Use the left/right cursor to add or remove a
programme from the list.

Run through steps 

é

and 

for each

programme to be added or removed from the
list.

(

To exit, press 

H

several times.

Setup Menu: see page 11
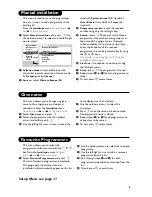
INSTALLATION  
Menu language
Country
Automatic installation

B

Manual installation

Give name
Reshuffle
Favourite programmes
SETUP

Manual installation

(Selection mode)

B

System

Æ

Programme no.
Search
Fine tune
Store

Содержание 28PT 7157

Страница 1: ...te Programmes 5 Operation Picture settings 6 Sound settings 6 Feature settings 6 List of programmes 7 EasyLink Function 7 NexTView Teletext Guide 7 Using NexTView 8 Teletext 9 Peripherals Video recorder 10 Other equipment 10 Side connections 10 Amplifier 10 Setup menu 11 Video recorder DVD or Satellite keys 11 Practical information Tips 12 Glossary 12 Recycling The materials used in your set are e...

Страница 2: ...nnections Insert the aerial plug into the connector at the rear of the set Insert the mains plug into the wall socket 220 240V 50 Hz To prevent damaging the mains AC cord which could cause of fire or electric shock do not place the TV on the cord Remote control Insert the 2 R6 type batteries supplied making sure that they are the right way round For environmental reasons the batteries supplied wit...

Страница 3: ... information when changing programmes Surround Sound To activate deactivate the surround sound effect In stereo this gives the impression that the speakers are further apart For models equipped withVirtual Dolby Surround you can experience Dolby Surround Pro Logic sound effects In mono a stereo spatial effect is simulated Time display To display or remove the time transmitted by the teletext of pr...

Страница 4: ...c signal ACI the programmes will be numbered correctly The installation is complete Without ACI broadcast the programmes are numbered according your language and country selection You can use Reshuffle to renumber them Some transmitters or cable networks broadcast their own selection menu region language In this case indicate your choice by using the cursor and validate with u To exit or pause a s...

Страница 5: ...llows you to change or give a name to the programmes and external connectors From the Installation menu to select press and Ê at the same time Select Give name and press u é Select the programme with the up down cursor and validate with u Use the left right cursor to move around the name display area 5 characters Use the up down cursor to select the characters Press u when the name has been entere...

Страница 6: ... volume independently from the loud speakers on the TV set AVL AutomaticVolume Leveller automatically controls the volume and is used to limit increases in sound especially during programme changes or advertising DeltaVolume this is used to compensate any volume discrepancies between the different programmes or EXT connectors Use the P keys to compare the level of different programmes Press H seve...

Страница 7: ...with the NexTViewLink function Important note The NexTView service is only available on certain programmes and in certain countries When no NexTView information is broadcast the teletext programme guide appears in its place This is based on teletext programme information if available and offers most functions of NexTView Display of a NexTView page The information is set by the channel that transmi...

Страница 8: ...reen or yellow keys to activate a NexTView function Press u to return to the selection zone Teletext Page The first time the teletext contents will appear Select the programme guide page if available With certain channels the programme guide is detected automatically In this case go straight to step Use the bottom cursor to activate the selection zone on the page é With the 0 to 9 or P keys enter ...

Страница 9: ...the items or corresponding pages Contents To return to the main index page usually page 100 Previous page To display last page viewed Selecting sub pages Stop sub page acquisition Hidden information Some pages have sub pages In this case the first line indicates the sub pages available for example page 120 contains sub pages 01 02 03 Use the left right keys to select the required sub page You may ...

Страница 10: ...tions shown opposite To optimise picture quality connect the equipment which produces the RGB signals digital decoder DVD players games etc to EXT1 and the equipment which produces the S VHS signals S VHS and Hi 8 video recorders to EXT2 For digital equipment or a decoder go to the SETUP menu settings see next page To select connected equipment Press to select EXT1 or EXT2 Most equipment decoder v...

Страница 11: ...ange of products can be operated with the remote control of the TV The remote control is compatible with all video recorders and satellite receivers using the RC5 standard and all DVDs using the RC6 standard To prepare for the first time the remote control for a DVD press u and 2 simultaneously Or to prepare for a satellite receiver press u and 1 simultaneously The setting is memorized for the AUX...

Страница 12: ...onger flashes when you use the remote control Replace the batteries Standby When you switch the TV set on it remains in standby mode and Locked is displayed when you use the keys on the TV set The Child Lock function is switched on p 6 If the set receives no signal for 15 minutes it automatically goes into standby mode To save power your television is fitted with components that give it a very low...

Отзывы: