background image

Rental Play  35

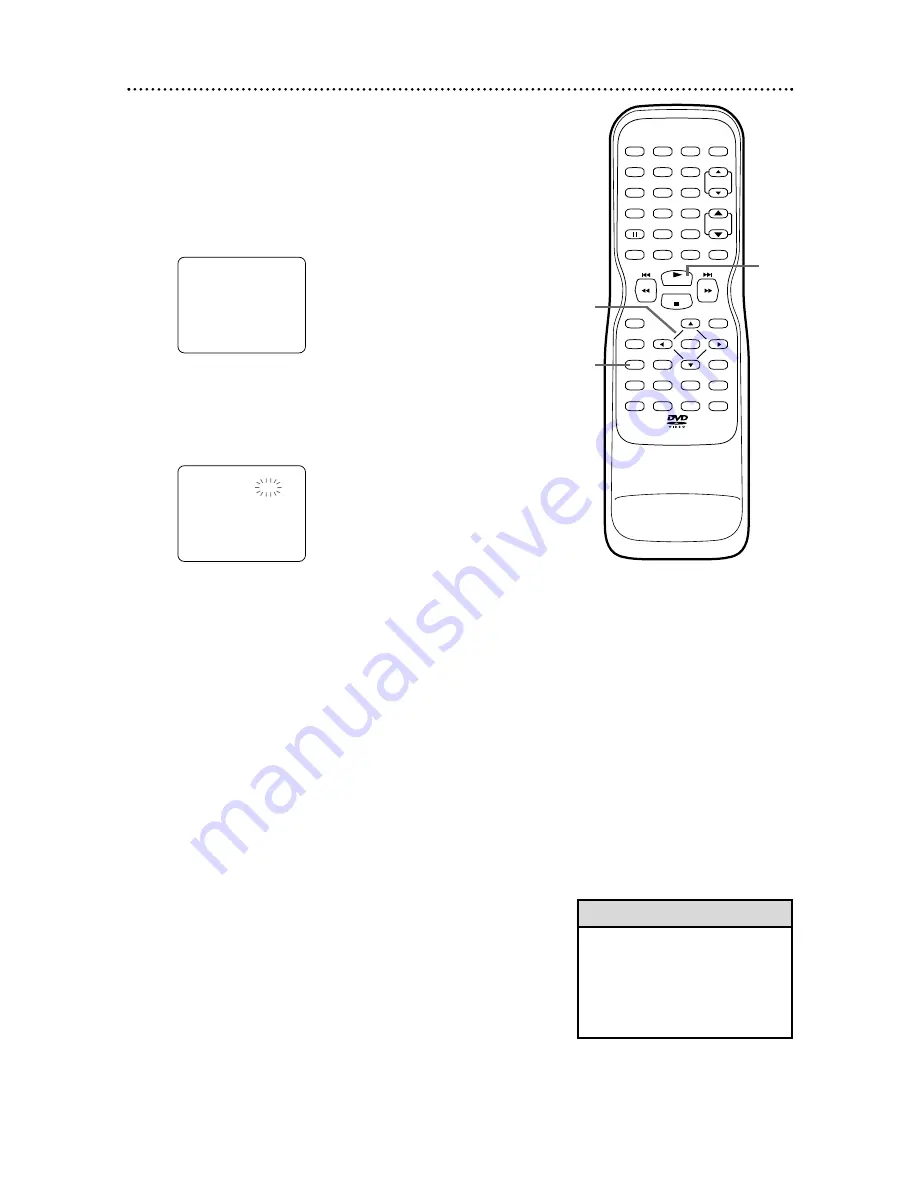
This function enables you to improve picture quality when
playing worn cassettes such as rented videotapes.

1

Press SETUP.  

2

Press 

or 

to select USER’S SET UP.

Then, press ENTER.

3

Press 

or 

to select RENTAL.

Press ENTER until ON appears beside
RENTAL.  

To turn off RENTAL, press ENTER to

choose OFF. 

4

Press SETUP to exit the menu.

5

Press PLAY 

B

to start videotape play. 

RENTAL

PLAY 

B

will appear briefly on the screen.

– USER'S SET UP –

RENTAL
REPEAT PLAY
AUTO RETURN
VCR AUDIO
TV AUDIO

[ON]
[OFF]
[OFF]
[HIFI]
[STEREO]

B

– TV/VCR SETUP –

TIMER PROGRAMMING
SETTING CLOCK
CHANNEL SET UP
USER'S SET UP
V-CHIP SET UP
LANGUAGE  [ENGLISH]
CAPTION  [OFF]
ZERO RETURN
TIME SEARCH
INDEX SEARCH

B

•  Once you select Rental Playback,

it stays in effect even after you
turn off the TV/VCR/DVD.

• The TV/VCR/DVD will retain the

Rental setting even if the power
fails.

Helpful Hints

PLAY

STOP

ENTER

RECORD

DISC

MENU

RETURN

TITLE

SETUP

A-B

REPEAT

SEARCH MODE

CLEAR

MODE

ANGLE

SUBTITLE

AUDIO

DISPLAY

SPEED

C.RESET

STANDBY-ON PICTURE

SELECT

SLEEP

CH.

VOL.

MUTE

ZOOM

1

2

3

4

5

6

7

8

9

0

+10

+100

REPEAT

PHILIPS

2-3

1,4

5

Содержание 27DVCR55S

Страница 1: ...CTIONS FIRST TIME SETUP AND ANY OF THE FEATURES WE WANT YOU TO START ENJOYING YOUR NEW PRODUCT RIGHT AWAY CALL US BEFORE YOU CONSIDER RETURNING THE PRODUCT 1 800 531 0039 OR VISIT US ON THE WEB AT WWW PHILIPS COM Color TV with Built in VCR and DVD Player Owner s Manual Important Return your Warranty Registration Card within 10 days See why inside ...

Страница 2: ...r to get the most from your PHILIPS prod uct you must return your Warranty Registration Card within 10 days So please mail it to us right now Know these safetysymbols This bolt of lightning indi cates uninsulated material within your unit may cause an electrical shock For the safety of everyone in your household please do not remove product covering The exclamation point calls attention to feature...

Страница 3: ...easures 1 Reorient or relocate the receiving antenna 2 Increase the separation between the equipment and the receiver 3 Connect the equipment into an outlet on a circuit different from that to which the receiver is connected 4 Consult the dealer or an experienced radio TV technician for help Copyright Protection Unauthorized copying broadcasting public performance and lending of Discs are prohibit...

Страница 4: ...otape Features Repeat Play 34 Rental Play 35 Zero Return Sleep Timer 36 Time Search 37 Index Search 38 Videotape Playback Features 39 Automatic Operation Features 40 Additional TV Features Closed Captions 41 Setting V Chip 42 47 Multi Channel Television Sound 48 50 Disc Features Disc Menus Title Menus 51 Fast Forward Reverse Search 52 Title Chapter Playback Time Playback 53 Track Play 54 Paused an...

Страница 5: ...ng the DISC MENU button on the remote control Details are on page 51 Setup Menus Some instructions explain how to use the setup menus of the TV VCR DVD There are two setup menus one for the TV VCR features while the unit is in TV VCR mode and one for the Disc features while the unit is in DVD mode Access the setup menus by pressing SETUP on the remote control While in TV VCR mode you can select on...

Страница 6: ...m of the DVD may be listed on the DVD or on the Disc case Videotapes Philips recommends you use only videotapes that have the mark Other video tapes may have poor picture quality and cause excessive deposits on the video heads The warranty may not cover such damage The VCR of this TV VCR DVD has a High Quality HQ system and is compatible with existing Video Home System VHS equipment Playable Discs...

Страница 7: ...he Remote Control Point the remote control at the remote sensor on the front of the TV VCR DVD Details are on page 16 Do not put objects between the remote control and the TV VCR DVD TV VCR DVD Maintenance Remove any light adhesive stick on notes from the video cassette before putting the cassette in the TV VCR DVD Removable labels can jam the TV VCR DVD The TV VCR DVD requires periodic maintenanc...

Страница 8: ...Up Your TV VCR DVD with a Cable Box Satellite Receiver To view any channel set the TV VCR DVD to the output channel channel 03 or 04 of the Cable Box Satellite Receiver Then select chan nels at the Cable Box Satellite Receiver Your Cable Box Satellite Receiver may have Audio and Video Out jacks instead of the single Antenna Out jack RF coaxial or 75 ohm shown here If so connect Audio and Video cab...

Страница 9: ... complete plug in the TV VCR DVD s power cord 3 Before you turn on the TV VCR DVD go to page 11 ANT L AUDIO OUT R COAXIAL ANT Indoor Antenna not supplied example only DHooking Up Your TV VCR DVD to Another Video Source VCR DVD Player Camcorder etc You may need this connection if you want to play Discs or tapes on other equipment but watch them on the TV VCR DVD Press SELECT on the remote to select...

Страница 10: ...IAL L AUDIO OUT R COAXIAL Digital Stereo Hookups You can connect the TV VCR DVD to a Stereo that has a Digital Coaxial In jack Use this hookup if you want to hear the TV VCR DVD sound through the Stereo instead Use these connections for a Dolby Digital compatible Stereo or for a Receiver that has a Mini Disc or Digital Audio Tape deck 1 Connect the antenna Cable TV signal Details are on pages eigh...

Страница 11: ...e Number but tons to select it This is a non memorized channel it may have weak reception in your area Remember if you are using a Cable Box Satellite Receiver set the TV VCR DVD to channel 3 4 or AUX Change channels at the Cable Box Satellite Receiver 5 Press VOL to adjust the volume VOLUME 20 SETUP LANGUAGE ENGLISH ESP FRA AUTO PRESET B SETUP LANGUAGE ENGLISH ESP FRA AUTO PRESET B If the power f...

Страница 12: ...R DVD during videotape playback Helpful Hints Follow these steps to simply play a videotape Videotape play back options are on pages 34 40 1 Insert a videotape in the cassette compartment of the TV VCR DVD The power will come on If the tape s record tab is missing play should start auto matically 2 If play does not start automatically press PLAY B to start play 3 Press STOP C to stop play 4 Press ...

Страница 13: ...V VCR mode The red VCR TV light will be on 2 Press SELECT to put the TV VCR DVD in DVD mode The green DVD light will appear on the front of the TV VCR DVD 3 Press OPEN CLOSE A on the front of the TV VCR DVD to open the Disc tray 4 Place a Disc into the tray Some DVDs are recorded on both sides Make sure the label of the side you want to play is facing up Or if the DVD is recorded on only one side ...

Страница 14: ...pages 39 and 55 RECORD Button Press once to start a recording on videotape Details are on page 26 DISPLAY Button TV VCR Mode Press to see the videotape counter channel or time on the screen Details are on page 25 DVD Mode Press to see the Disc status on the screen Details are on page 73 TITLE Button Press to see a DVD Title menu Details are on page 51 SLEEP Button Press to set the Sleep Timer Deta...

Страница 15: ... to access or remove the TV VCR DVD s Setup menu CLEAR Button Press to reset or erase a setting or wrong information MODE Button Press to play a Program or to start Random playback Details are on page 65 Press to select a Black Level or Virtual Surround setting Details are on page 74 SEARCH MODE Button Press to find a specific time Chapter Track or Title on a Disc Details are on pages 53 54 Press ...

Страница 16: ...rom a distance STANDBY ON Button Press to turn the TV VCR DVD on or off Turn off the TV VCR DVD for a timer recording PLAY B Button DVD Press to start Disc playback Details are on page 13 PREV H NEXTi Buttons DVD Press to go to a different Chapter or Track Details are on page 54 DVD light green Appears if the TV VCR DVD is in DVD mode OUTPUT Button Press to select AUX TV VCR or DVD mode If you swi...

Страница 17: ...ange Connect this jack to a Digital Stereo using a digital audio coaxial cable not supplied Use this connection if the Stereo has Dolby Digital compatibility and has a Digital Coaxial Audio In jack You may also use this connection when connecting the TV VCR DVD to a Mini Disc or Digital Audio Tape deck Details are on page 10 AUDIO OUT L R jacks Audio Out left and right white and red Connect these ...

Страница 18: ...emorizes available channels When scanning is complete the TV VCR DVD will go to the lowest available channel Use the CH buttons to scan memorized chan nels You can select non memorized channels with the Number buttons CHANNEL SET UP ADD DELETE CH TV AUTO PRESET B The TV VCR DVD cannot change channels at the Cable Box or Satellite Receiver Set the TV VCR DVD to 3 4 or AUX Change channels at the Cab...

Страница 19: ... indicates whether you connected an Antenna TV or a Cable TV signal CATV to the TV VCR DVD Then press ENTER The menu will disappear and a TV channel will appear The channel number will appear along with ADD DELETE 4 Press or until the channel you wish to add or delete appears You also can use the Number buttons or the CH buttons to choose a channel 5 Press ENTER to add or delete the channel To add...

Страница 20: ...r 1 Press SETUP 2 Press or to select SETTING CLOCK Then press ENTER 3 Press or to select MANUAL CLOCK SET Then press ENTER 4 While the MONTH space is flashing press or until the correct month appears Then press B MANUAL CLOCK SET MONTH DAY YEAR 05 HOUR MINUTE SETTING CLOCK AUTO CLOCK AUTO CLOCK CH SEARCH AUTO CLOCK CH MANUAL CLOCK SET D S T B ON 02 OFF TV VCR SETUP TIMER PROGRAMMING SETTING CLOCK ...

Страница 21: ...ile the MINUTE space is flashing press or until the correct minute appears 9 Press SETUP Although seconds are not displayed they begin counting from zero when you press SETUP Use this action to synchronize the clock exactly Press DISPLAY to see the current time on the screen Details are on page 25 5 40 PM MANUAL CLOCK SET MONTH DAY YEAR 05 07 WED 2003 HOUR MINUTE 05 40 PM MANUAL CLOCK SET MONTH DA...

Страница 22: ...lect SETTING CLOCK Press ENTER 3 With AUTO CLOCK selected press ENTER so ON appears beside AUTO CLOCK SETTING CLOCK AUTO CLOCK AUTO CLOCK CH SEARCH AUTO CLOCK CH MANUAL CLOCK SET D S T B ON 02 OFF TV VCR SETUP TIMER PROGRAMMING SETTING CLOCK CHANNEL SET UP USER S SET UP V CHIP SET UP LANGUAGE ENGLISH CAPTION OFF ZERO RETURN TIME SEARCH INDEX SEARCH B If the TV VCR DVD is connected to a Cable Box o...

Страница 23: ...O CLOCK CH then press ENTER 9 Press or B until the channel number of your PBS station appears Use the channel number you found at step 4 10Press SETUP to remove the menu 11Press STANDBY ON to turn off the TV VCR DVD and let the PBS channel update the clock SETTING CLOCK AUTO CLOCK AUTO CLOCK CH SEARCH AUTO CLOCK CH MANUAL CLOCK SET D S T B ON 08 OFF SETTING CLOCK AUTO CLOCK AUTO CLOCK CH SEARCH AU...

Страница 24: ... T Then press ENTER until ON appears beside D S T Or press ENTER so OFF appears beside D S T if you want to disable this feature 4 Press SETUP to remove the menu SETTING CLOCK AUTO CLOCK AUTO CLOCK CH SEARCH AUTO CLOCK CH MANUAL CLOCK SET D S T B ON 02 ON TV VCR SETUP TIMER PROGRAMMING SETTING CLOCK CHANNEL SET UP USER S SET UP V CHIP SET UP LANGUAGE ENGLISH CAPTION OFF ZERO RETURN TIME SEARCH IND...

Страница 25: ...lect the picture control you want to adjust You can select BRIGHT SHARPNESS TINT COLOR or CONTRAST 3 Within five seconds press s or B to adjust the picture control BRIGHT Degaussing Magnetism from nearby appliances and speakers might affect the color of the TV picture If this happens move the TV VCR DVD away from the appliance If the color is still not correct turn off the power for 30 minutes Aft...

Страница 26: ...ECORD once to start recording The REC OTR light will flash on the front of the TV VCR DVD If the tape does not have a record tab the tape will eject Insert another tape 5 To pause the recording press k To resume recording press kagain or press RECORD 6 To stop recording press STOP C Cassette type Playback Time Tape Speed T160 T120 T60 SP Standard Play 2 hrs 2 hrs 1 hr 40 mins LP Long Play 5 hrs 4 ...

Страница 27: ...ding will start immediately Each press of REC OTR will increase the recording time by 30 minutes The maximum recording length is eight hours 4 Press STOP C to stop a one touch recording before its designated end time Otherwise recording will stop at the time you designated The TV VCR DVD will turn off when the OTR ends OTR 2 30 SP You cannot do an OTR with the remote control To show the remaining ...

Страница 28: ...eceiver the TV VCR DVD must be on channel 3 4 or AUX Set CH as 03 04 or AUX in the Timer Programming menu Choose the channel you want to record at the Cable Box Satellite Receiver Leave the Cable Box Satellite Receiver on for the timer recording Leave the TV VCR DVD set to AUX Press SELECT on the remote to choose AUX at the TV VCR DVD Additional details are on page eight TIMER PROGRAMMING CH 61 DA...

Страница 29: ...ing to begin AM or PM will appear with the hour Then press B and press or to select the minute you want recording to start Press B TIMER PROGRAMMING CH 61 DATE FRI 7 04 BEGIN 7 30 END B P M TIMER PROGRAMMING CH 61 DATE BEGIN END B EVRY MON TIMER PROGRAMMING CH 61 DATE BEGIN END B EVRY DAY TIMER PROGRAMMING CH 61 DATE FRI 7 04 BEGIN END B Timer Recording cont d 29 PLAY STOP ENTER RECORD DISC MENU R...

Страница 30: ...E FRI 7 04 BEGIN 7 30 END 8 50 B SP P M P M TIMER PROGRAMMING CH 61 DATE FRI 7 04 BEGIN 7 30 END 8 50 B P M P M To correct information while set ting the Timer Recording press s to go back one step and select the incorrect information Press or to enter the cor rect information While a timer recording is in progress the red REC OTR light will flash If a timer recording is set for hours or days late...

Страница 31: ...SETUP Press or to select TIMER PRO GRAMMING Press ENTER 2 Press or to select a timer recording then press B 3 Press B or s to select the information you want to change Press or to enter the correct information 4 Press SETUP to remove the menu 5 Press STANDBY ON to turn off the TV VCR DVD to set the record ing Cancelling Timer Recordings To cancel a timer recording that is in progress 1 The red REC...

Страница 32: ... pro gram s USER S SET UP RENTAL REPEAT PLAY AUTO RETURN VCR AUDIO TV AUDIO OFF OFF ON HIFI STEREO B TV VCR SETUP TIMER PROGRAMMING SETTING CLOCK CHANNEL SET UP USER S SET UP V CHIP SET UP LANGUAGE ENGLISH CAPTION OFF ZERO RETURN TIME SEARCH INDEX SEARCH B If you press STANDBY ON while the tape is rewinding the rewinding will stop If there is a power failure the TV VCR DVD will retain its mem ory ...

Страница 33: ...amcorder will play your tape Insert a prerecorded tape in the source unit If play begins press STOP on the VCR or Camcorder 3 The TV VCR DVD will record your tape Insert a blank videotape in the cassette compartment of the TV VCR DVD Make sure the tape s record tab is intact and the TV VCR DVD power is on 4 Point the TV VCR DVD remote control at the TV VCR DVD Press SELECT or CH o p until AUX appe...

Страница 34: ...T UP Then press ENTER 3 Press or to select REPEAT PLAY 4 Press ENTER until ALL or BLANK appears beside REPEAT PLAY Or to cancel REPEAT PLAY press ENTER to select OFF 5 Press SETUP to remove the menu 6 Press PLAY B to play a videotape REPEAT PLAY B will appear on the screen briefly USER S SET UP RENTAL REPEAT PLAY AUTO RETURN VCR AUDIO TV AUDIO OFF ALL OFF HIFI STEREO B TV VCR SETUP TIMER PROGRAMMI...

Страница 35: ...P RENTAL REPEAT PLAY AUTO RETURN VCR AUDIO TV AUDIO ON OFF OFF HIFI STEREO B TV VCR SETUP TIMER PROGRAMMING SETTING CLOCK CHANNEL SET UP USER S SET UP V CHIP SET UP LANGUAGE ENGLISH CAPTION OFF ZERO RETURN TIME SEARCH INDEX SEARCH B Once you select Rental Playback it stays in effect even after you turn off the TV VCR DVD The TV VCR DVD will retain the Rental setting even if the power fails Helpful...

Страница 36: ...n a certain amount of time 1 Press SLEEP until the correct amount of time appears on the screen with SLEEP Each press of SLEEP will increase the time by 30 minutes You may set a Sleep Timer of 30 60 90 or 120 minutes After five seconds the Sleep Timer information will disappear from the screen The TV VCR DVD will turn itself off after the selected amount of time has passed To Cancel the Sleep Time...

Страница 37: ...time you chose The TV VCR DVD will rewind or fast forward the tape the specified amount of time The time counts down on the screen as the search progresses When 0 00 is reached the tape will start playing Or to cancel the time search before it finishes press STOP C TIME SEARCH 2 50 TV VCR SETUP TIMER PROGRAMMING SETTING CLOCK CHANNEL SET UP USER S SET UP V CHIP SET UP LANGUAGE ENGLISH CAPTION OFF ...

Страница 38: ...or fast forwarding the videotape to the beginning of the desired program 4 When the program is reached play will start INDEX SEARCH 0 3 TV VCR SETUP TIMER PROGRAMMING SETTING CLOCK CHANNEL SET UP USER S SET UP V CHIP SET UP LANGUAGE ENGLISH CAPTION OFF ZERO RETURN TIME SEARCH INDEX SEARCH B Every time an Index Mark or recording is passed the number beneath INDEX SEARCH on the screen decreases by o...

Страница 39: ...ill Picture 1 During tape play press k pause A still picture will appear on the screen The picture advances each time you press k pause After a tape is paused for five minutes play will stop automatically This prevents damage to the tape and TV VCR DVD 2 If the still picture vibrates vertically stabilize the picture by pressing CH or 3 To release the still picture and return to nor mal play press ...

Страница 40: ...o rewind a tape after timer recordings see Auto Return details on page 32 Automatic Tracking Adjustment The TV VCR DVD automatically adjusts the videotape track ing to give you the best possible picture quality With some recordings however you may get a better picture using the manual tracking controls see below Manual Tracking To adjust the tracking manually press the CHANNEL buttons on the front...

Страница 41: ...r is saying TEXT1 and TEXT2 display half screen text such as a channel guide schedule or announcement OFF turns off closed captions Captions will not appear on the screen 3 Press SETUP to exit the menu TV VCR SETUP TIMER PROGRAMMING SETTING CLOCK CHANNEL SET UP USER S SET UP V CHIP SET UP LANGUAGE ENGLISH CAPTION CAPTION 1 ZERO RETURN TIME SEARCH INDEX SEARCH B TV VCR SETUP TIMER PROGRAMMING SETTI...

Страница 42: ...or according to the Television Parental Guidelines To block any inappropriate programming set your limits in both MPAA RATING and TV RATING Before you begin make sure The TV VCR DVD is on The unit is in TV VCR mode Press SELECT on the remote until you see TV channels and see the red VCR TV light on the front of the TV VCR DVD 1 Press SETUP Press or to select V CHIP SET UP Then press ENTER 2 Press ...

Страница 43: ... all rat ings will turn to VIEW or BLOCK automatically 5 Press SETUP to save your settings and remove the menus TV Y TV Y7 TV G TV PG TV 14 TV MA VIEW VIEW BLOCK BLOCK BLOCK BLOCK B If you want to disable V Chip so you can view all TV programming set TV Y to VIEW The V CHIP settings will be retained after a power failure except the access code reverts to 0000 Helpful Hints PLAY STOP ENTER RECORD D...

Страница 44: ...ot set up your own code yet or if there has been a power failure 4 Press or to select TV RATING Press ENTER V CHIP SET UP TV RATING MPAA RATING CHANGE CODE B ACCESS CODE TV VCR SETUP TIMER PROGRAMMING SETTING CLOCK CHANNEL SET UP USER S SET UP V CHIP SET UP LANGUAGE ENGLISH CAPTION OFF ZERO RETURN TIME SEARCH INDEX SEARCH B PLAY STOP ENTER RECORD DISC MENU RETURN TITLE SETUP A B REPEAT SEARCHMODE ...

Страница 45: ... go to its subratings When you select TV Y7 Press or to select FV Fantasy Violence vio lence that seems realistic to young children Then press ENTER to select BLOCK or VIEW When you select TV PG TV 14 or TV MA Press or to select D Suggestive Dialog L Coarse Language S Sexual Situation or V Violence Then press ENTER repeatedly to select BLOCK or VIEW for each subrating To go to the previous menu pr...

Страница 46: ...e your settings and remove the menus G PG PG 13 R NC 17 X VIEW VIEW VIEW BLOCK BLOCK BLOCK B V CHIP SET UP TV RATING MPAA RATING CHANGE CODE B ACCESS CODE TV VCR SETUP TIMER PROGRAMMING SETTING CLOCK CHANNEL SET UP USER S SET UP V CHIP SET UP LANGUAGE ENGLISH CAPTION OFF ZERO RETURN TIME SEARCH INDEX SEARCH B MPAA Rating Explanations G General Audience PG Parental Guidance suggested PG 13 Unsuitab...

Страница 47: ...ime use 0000 Four Xs will appear instead of the code to pro tect its identity 4 Press or to select CHANGE CODE Then press ENTER 5 Press the Number buttons to enter your pre ferred access code in the NEW CODE space Then enter the same code in the CONFIRM CODE space Again Xs will appear instead of the code numbers The access code must have exactly four digits The V CHIP SET UP screen will reappear 6...

Страница 48: ...ord in both stereo and second audio at the same time During tape play HIFI will appear in the top left cor ner of the screen if VCR AUDIO is set to HIFI Details are on page 49 If you play non HiFi tapes while VCR AUDIO is set to HIFI HIFI will disappear from the screen The videotape will play in monaural sound You must set the TV VCR DVD to record in either STEREO or SAP Do this by changing the TV...

Страница 49: ...r to select VCR AUDIO 4 Press ENTER to select MONO or HIFI 5 Press SETUP to exit the menus USER S SET UP RENTAL REPEAT PLAY AUTO RETURN VCR AUDIO TV AUDIO ON OFF OFF HIFI STEREO B USER S SET UP RENTAL REPEAT PLAY AUTO RETURN VCR AUDIO TV AUDIO ON OFF OFF HIFI STEREO B TV VCR SETUP TIMER PROGRAMMING SETTING CLOCK CHANNEL SET UP USER S SET UP V CHIP SET UP LANGUAGE ENGLISH CAPTION OFF ZERO RETURN TI...

Страница 50: ...select USER S SET UP Then press ENTER 2 Press or to select TV AUDIO 3 Press ENTER to select STEREO SAP Second Audio Program or MONO 4 Press SETUP to exit the menus USER S SET UP RENTAL REPEAT PLAY AUTO RETURN VCR AUDIO TV AUDIO ON OFF OFF HIFI STEREO B TV VCR SETUP TIMER PROGRAMMING SETTING CLOCK CHANNEL SET UP USER S SET UP V CHIP SET UP LANGUAGE ENGLISH CAPTION OFF ZERO RETURN TIME SEARCH INDEX ...

Страница 51: ...c Menus Some DVDs contain menus that describe the contents of the Disc or allow you to customize Disc playback For example the menu may offer choices for subtitle languages special features or scene selection To use the DVD Disc menu and select playback features follow these steps Before you begin press SELECT to put the TV VCR DVD in DVD mode 1 Press DISC MENU The DVD s Disc menu will appear 2 Pr...

Страница 52: ...CD play you may search only at 16 times the normal playback speed An h 16 or g 16 will appear briefly on the TV screen Sound will be intermittent during searching on an Audio CD During MP3 play you can search at only eight times the normal speed An h 8 or g 8 will appear briefly on the TV Sound will be intermit tent during searching of MP3 Tracks 2 Press PLAY B to return to normal playback E 2 Exa...

Страница 53: ...thin a few seconds play will start at the specified time Example 1 hour 23 minutes and 30 seconds 1 2 3 3 0 Make sure the time you enter is within the total time of the current Title or Track If it is not the time space will clear and play will continue at its cur rent point The total time available in the current Track or Title will appear at the right of the display beside TOTAL If you make a mi...

Страница 54: ...e current Track will continue to play B Using SEARCH MODE Press SEARCH MODE so the Track Search display TR appears Within 30 seconds press the Number buttons to select the Track number Play will begin at the selected Track For a single digit Track 1 9 enter a zero first For example to play Track 5 press 0 5 You do not have to use the 100 10 button in Search Mode for Tracks 10 and above C Using i g...

Страница 55: ...ill start at the beginning the next time you play the Disc Or to cancel Resume and start playing the Disc from the beginning press STOP C a second time while play is stopped The Stop symbol C will appear briefly in the upper right corner of the TV screen Press PLAY B to start playing the Disc from the beginning Resume ON Press PLAY to play from here To play the beginning press STOP first and then ...

Страница 56: ... repeatedly Follow these steps to set up the section you want to play 1 During Disc play press REPEAT A B to set the starting point A If you make a mistake press CLEAR This will erase point A and let you start over OFF will appear briefly on the TV screen 2 Play the Disc to the point at which you want repeated play to end then press REPEAT A B again Within a few seconds the section will begin to p...

Страница 57: ...ar in about 30 sec onds or press SEARCH MODE again to remove the Marker display DVD example Audio CD example 4 To return to a Marker during play press SEARCH MODE until you see the Markers Press s or B to choose the Marker you want then press ENTER Disc play will continue from the marked point Opening the disc tray switching to TV VCR mode or turning off the TV VCR DVD will erase all the Markers T...

Страница 58: ... will appear Or press SUBTITLE repeatedly to turn off subtitles 1 ENG 6 Example English as first of six available subtitles With some DVDs you must select a subtitle language in the Disc menu If the desired language does not appear after pressing SUBTITLE several times the Disc does not have subtitles in that language Opening the disc tray or turning off the TV VCR DVD will cancel your subtitle se...

Страница 59: ...ormal size press ZOOM repeatedly The sound will be mute during slow motion play The gray box with an inner blue box that shows during Zoomed play is the position guide To remove it or show it press ENTER The position of the blue box inside the gray box indicates the position of the zoomed image within the overall picture 1 2 Example Playing a DVD forward at half the normal speed Zoom x2 Zoom x1 3 ...

Страница 60: ...to enter a four digit password The password will appear on the screen Write it down so you don t forget it Press ENTER You are finished Go to step 6 on the next page If you have set a password before this menu will appear Press the Number buttons to enter your cur rent four digit password Asterisks will appear instead of your password This protects its identity PARENTAL Enter current password O K ...

Страница 61: ...ttons 4 7 3 7 at step 3 You will be prompted to enter a new four digit pass word Use the Number buttons to enter a new four digit pass word then press ENTER PARENTAL LEVEL will reset to ALL Press SETUP to remove the menu See pages 62 63 to reset PARENTAL LEVEL as you desire A power failure will not erase your password Parental Password cont d 61 PLAY STOP ENTER RECORD DISC MENU RETURN TITLE SETUP ...

Страница 62: ...TER PARENTAL O K PARENTAL LEVEL ALL CHANGE PARENTAL Enter current password O K LANGUAGE AUDIO SUBTITLE DISC MENU ORIGINAL OFF ENGLISH O K QUICK SETUP TV MODE DOLBY DIGITAL 4 3 LETTER BOX ON O K ALL The Parental feature is inactive all discs can play 8 Adult material 7 NC 17 Not appropriate for children under 17 6 R Restricted parental approval required for viewers under 18 4 PG13 Unsuitable for ch...

Страница 63: ... play a DVD whose rating exceeds the level you set an on screen message will indicate the DVD cannot play Remove the DVD then set PARENTAL LEVEL to ALL Reload the DVD and begin playback Some DVDs may let you enter your four digit password to begin playback Follow the on screen messages as prompted You cannot use the default pass word 4737 to play a DVD Parental Levels cont d 63 PLAY STOP ENTER REC...

Страница 64: ...glish Or three dashes may appear instead of an abbreviation You can adjust Stereo Sound only when Virtual Surround is OFF Details are on page 74 Stereo Sound Adjust Stereo Sound to determine whether you will hear the left channel the right channel or both channels stereo dur ing Audio CD playback 1 Press AUDIO during Audio CD play to choose STEREO L CH or R CH The display will disap pear in about ...

Страница 65: ... a Program Press i g or j h to select other Tracks in the Program You cannot combine random play with programmed play You may play a Program or a Track within a Program repeated ly During programmed play press REPEAT so ALL all Tracks in the Program or TRACK appears You cannot alter a Program dur ing play Random Play Programmed Play 65 Random Play You may play the Tracks of an Audio CD in Random o...

Страница 66: ...Folder and press ENTER the Tracks or Files within that Folder will appear Press K or L to select the Track or File you want then press PLAY B or ENTER Choose FIRST PLAY to start play from the first individual File or Track listed Press TITLE to return to the first item on the first MP3 or JPEG screen You also can press to return to previous screens During JPEG playback press MODE until you see JPG...

Страница 67: ...in the current Folder Group will play repeatedly A All Tracks on the Disc will play repeatedly 2 Press DISPLAY again to remove the display 2 25 0 01 15 During MP3 playback the icon and the current Track name will appear when you first press DISPLAY During JPEG play the icon and the current File name will appear when you first press DISPLAY 3 PLAY STOP ENTER RECORD DISC MENU RETURN TITLE SETUP A B ...

Страница 68: ...TALIAN SWEDISH SUBTITLE Subtitles appear in the chosen language LANGUAGE O K DISC MENU ENGLISH FRENCH SPANISH GERMAN ITALIAN SWEDISH DUTCH DISC MENU A DVD s Disc menu appears in the chosen language LANGUAGE AUDIO SUBTITLE DISC MENU ORIGINAL OFF ENGLISH O K LANGUAGE AUDIO SUBTITLE DISC MENU ORIGINAL OFF ENGLISH O K QUICK SETUP TV MODE DOLBY DIGITAL 4 3 LETTER BOX ON O K If the DVD s default setting...

Страница 69: ...ausa 5447 Hebrew 5569 Hindi 5455 Hungarian 5467 I K Icelandic 5565 Indonesian 5560 Interlingua 5547 Interlingue 5551 Inupiak 5557 Irish 5347 Italian 5566 Japanese 5647 Javanese 5669 Kannada 5760 Kashmiri 5765 Kazakh 5757 Kinyarwanda 6469 Kirghiz 5771 Kirundi 6460 Korean 5761 Kurdish 5767 L N Laothian 5861 Latin 5847 Latvian 5868 Lettish 5868 Lingala 5860 Lithuanian 5866 Macedonian 5957 Malagasy 59...

Страница 70: ...ress SELECT to put the TV VCR DVD in DVD mode 1 When play is stopped press SETUP twice The QUICK SETUP screen will appear 2 Press B to select CUSTOM at the top of the menu then press ENTER 3 Press B to select DISPLAY then press ENTER DISPLAY TV MODE ANGLE ICON AUTO POWER OFF 4 3 LETTER BOX ON ON O K LANGUAGE AUDIO SUBTITLE DISC MENU ORIGINAL OFF ENGLISH O K QUICK SETUP TV MODE DOLBY DIGITAL 4 3 LE...

Страница 71: ...GLE ICON ON or OFF The default setting is ON Choose ON to see the Angle icon when multiple camera angles are available during DVD play Details are on page 58 Choose OFF to disable the Angle icon If you selected AUTO POWER OFF press ENTER repeatedly to set AUTO POWER OFF to ON or OFF The default setting is ON Choose ON if you want the TV VCR DVD to turn off when there is no activity in DVD mode for...

Страница 72: ...0 Otherwise choose OFF If you selected DOWN SAMPLING press ENTER repeatedly to choose ON or OFF Choose ON to set downsampling to 48 kHz Choose OFF to set down sampling to 96 kHz 6 Press SETUP to exit the menu AUDIO DRC OFF DOLBY DIGITAL ON DOWN SAMPLING ON O K AUDIO DRC OFF DOLBY DIGITAL ON DOWN SAMPLING ON O K AUDIO DRC OFF DOLBY DIGITAL ON DOWN SAMPLING ON O K DRC Dolby Digital Down Sampling LAN...

Страница 73: ...maining playing time of the current Audio CD T Current Repeat setting if active T Track repeat A All Tracks repeat A B A B repeat DVD Display 1 Press DISPLAY repeatedly to see the following displays during DVD play CH 7 49 0 01 46 0 03 27 CH Chapter Current Chapter number total Chapters Elapsed playing time of the current Chapter remaining playing time of the current Chapter TT 1 2 0 00 00 1 23 45...

Страница 74: ... the Virtual Surround icon appears in the top left corner of the TV screen 2 While the Virtual Surround icon appears press ENTER to choose 1 2 or OFF The default setting is OFF The icon will disappear after about 10 seconds OFF Virtual Surround is available only if you set Stereo Sound to Stereo Details are on page 64 PLAY STOP ENTER RECORD DISC MENU RETURN TITLE SETUP A B REPEAT SEARCHMODE CLEAR ...

Страница 75: ...hat provides 5 1 channel sound as used in movie theaters Sound is heard through multiple channels not just the right and left as with standard stereo Dubbing copying a videotape from a separate VCR or camcorder HQ high quality a feature in the VCR circuitry which provides enhanced videotape picture detail through the TV VCR DVD OTR One Touch Recording a timed recording that starts immediately and ...

Страница 76: ...arm place after heat ing a cold room or when the humidity is high There is no warning that moisture is in your TV VCR DVD Playing a tape when moisture has accumulated could damage the tape and the TV VCR DVD If you suspect moisture inside the TV VCR DVD keep the power on but do not play a tape for at least two hours This will allow the TV VCR DVD to dry TV VCR DVD will not perform a timer recordin...

Страница 77: ...Use the Rental feature Details are on page 35 If moisture has accumulated in the unit keep the power on for at least two hours but do not play a tape TV VCR DVD does not display closed captions for TV programs Make sure closed captioning is available for the program Refer to the TV listings in your local newspaper Remote control does not operate the TV VCR DVD Aim the remote control directly at th...

Страница 78: ...IAJ Dynamic range DVD linear sound 85 dB Audio CD 84 dB EIAJ Total distortion factor Audio CD 0 07 EIAJ Wow and flutter Below the measurement limitation 0 001 W PEAK EIAJ Electrical Specifications Sound output Two speakers 1W 8 ohm Other Specifications Terminals Antenna In VHF UHF Cable TV 75 ohm unbalanced F type Video In One RCA connector Audio L R In Two RCA connectors Headphone 1 8 stereo 3 5 ...

Страница 79: ...ly distributed by Philips In countries where Philips does not distribute the product the local Philips service organization will attempt to pro vide service although there may be a delay if the appropriate spare parts and technical manual s are not readily available MAKE SURE YOU KEEP Please keep your sales receipt or other document showing proof of purchase Attach it to this owner s manual and ke...

Страница 80: ...pause k button 14 39 55 59 picture controls 25 picture button 14 25 play B button 12 14 16 playing discs 13 playing videotapes 12 power cord 9 17 programs 65 random playback 65 ratings mpaa 46 tv 42 45 real time tape counter 36 rear panel 17 record button 14 26 recording basic 26 one touch 27 timer 28 31 rec otr button 16 27 rec otr light 16 remote control buttons 14 15 using 7 remote sensor 16 re...

Отзывы: