background image

12 EN-GB

• 

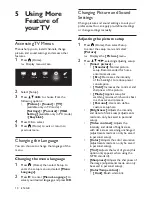
[Auto Sleep]

: Sets the duration the 

TV may be idle before it automatically 

switches off.

• 

[Sleep Timer]

: (Sleep Timer): 

Sets the duration before the TV 

automatically enters standby mode. 

Options: Off/10/20/30/60/90/180 

minutes.

• 

[Power On Status]

: Sets the TV’s 

status when it is connected to an AC 

power supply.

• 

[Time Setup]:

 Sets the system time.

• 

[Color System]

: Sets the AV color 

system. (Only displayed in AV mode) 

[HDMI]

: Sets the HDMI mode. (Only 

displayed in 480p/576p/720p/1080p 

HDMI modes.)

• 

[Reset]:

 Restores the default setup. 

(Excluding password setup and channel 

information)

• 

[Soft blue]: 

Philips SoftBlue is a 

revolutionary technology reducing the 

intensity of the harmful spectrum of 

the blue light from TV screens. (Note: 

To adjust picture mode will cause 

Softblue automatically set to “Off”.)

• 

[Reinstall TV]

: Restore default setup 

and go back to installation wizard 

menu.

Changes the Picture Format

1

 Press   (Home), then select Setup 

to enter the setup menu and select 

[Settings]

.

2

 Press        to select

 [Picture 

Format]

.

3

  Select a picture format.

4

  Press OK to confirm.

Summary of Picture Formats

The following picture settings can be configured.

Note


Depending on the format of the picture source, 

some picture settings are not available.

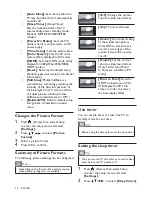
[16:9]: 

Change the normal 

ratio to widescreen format.

[4:3]: 

The normal format.

[Zoom1]

: Horizontal scaling 

of the widescreen picture 

format. When this format is 

used, the two edges of the 

picture frame will be partly 

cut off.

[Zoom2]

: Set the normal 

ratio to widescreen format. 

(Only 16:9, 4:3, and Point 

to Point are available in PC 

mode)

[Point to Point]

: Used for 

HDMI connections on PCs. 

Will display the PC’s full 

screen in order to achieve 

the best display effect.

Use timer

You can set the timer to switch the TV to 

standby mode at a set time.

Tip


Before using the timer, please set the sleep timer.

Setting the sleep timer

Tip


You can turn the TV off earlier, or reset the sleep 

timer before the TV switches off.

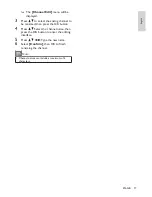
1

 Press   (Home), then select Setup 

to enter the setup menu and select 

[Settings].

2

 Press         to select 

[Sleep Timer]

.

Содержание 24PFD4501/30

Страница 1: ...24PFD4501 30 24PFD4511 30 Register your product and get support at www philips com welcome EN User Manual ...

Страница 2: ......
Страница 3: ...estoring the factory setup 15 6 Installing Channels 16 Setting up channels automatically 16 Updating channels 16 Setting channels manually 16 Renaming channels 16 7 Connecting Devices 18 Bottom Connectors 18 Side Connectors 19 Connecting a Computer 20 Using Philips EasyLink 21 Using a Kensington Security Lock 21 8 Product Information 22 Supported Input Signal Formats 22 Multimedia 22 Tuner Recepti...

Страница 4: ...ystem If the product or its individual modules or procedures are used for purposes other than those specified herein confirmation of their validity and suitability must be obtained TP Vision Europe B V warrants that the material itself does not infringe any United States patents No further warranty is expressed or implied TPVision Europe B V will not be responsible for any errors in the content of...

Страница 5: ...nted on the back of the TV Never connect the TV to the power outlet if the voltage is different If you need to store the TV disassemble the stand from the TV Never lay the TV on its back with the stand installed 2 Important Read and understand all instructions before you use your TV If damage is caused by failure to follow instructions the warranty does not apply Safety Risk of electric shock or f...

Страница 6: ...cts on the power cord To easily disconnect the TV power cord from the power outlet ensure that you have full access to the power cord at all times When you disconnect the power cord always pull the plug never the cable Disconnect the TV from the power outlet and antenna before lightning storms During lightning storms never touch any part of the TV power cord or antenna cable Risk of hearing damage...

Страница 7: ...ase do not dispose the products with other household waste Proper disposal of the product can help reduce the negative impacts on the environment and mankind health Your product contains the batteries that are compliance to Eurioean Directive 2006 66 EC and may not be disposed together with other household waste Please note the local regulations related to batteries separate collection as proper d...

Страница 8: ...ntrol Panel 1 2 3 4 5 a Volume Without the key menu the volume down function is available b Volume Without the key menu the volume up function is available c Channel When there is no keyboard menu switch to the next channel function when the keyboard menu appears move up and down the appropriate options d Channel When there is no keyboard menu switch to the prior channel function when the keyboard...

Страница 9: ...ack o VOLUME Adjust volume p BACK Return to the previous menu or exit from a certain function and switch to the previous channel or signal source q INFO Display information about current activity r Color buttons To choose the tasks or options s SOURCES Select connected devices t SETUP Accesses TV setup menu u TV GUIDE Accesses or exits the TV guide v Red The red key has no function Use Remote Cont...

Страница 10: ... using the channel list Press CH on the remote control or the lower right part of the TV Use the number buttons on the remote control to enter the channel number Press the on the remote controler to switch back to the previous channel 4 UsingTV This section introduces the basic operations of the TV Turn on the TV or switch to standby Use power switch Standby Indicator To switch on Please plug the ...

Страница 11: ...ist You can use the channel list to view all the received channels LIST 1 Press LIST To display the channel grid 2 Press to select a channel and browse the channel list 3 Press OK to view the selected channel 4 Press to switch to and resume the last watched channel To view the connected device s Note Before selecting the external signal source please turn on the external device To use the signal s...

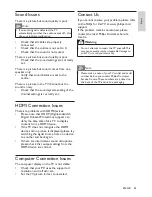
Страница 12: ...ting the picture setup 1 Press Home then select Setup to enter the setup menu and select Picture Displays the Picture menu 2 Press selecting adjusting setup Smart picture Standard Normal picture setup Recommended for home entertainment use Eco Decreases the intensity of the backlight to reduce power consumption Vivid Increases the contrast and sharpness of the picture Movie Applies setup for watch...

Страница 13: ...mance of sound ranges involved in the voice spectrum Suitable for watching news or arts programs Flat Enhance the smoothness of audio output for softer sound Personal Provides user customization functions in order to optimize all sound effect parameters and achieve the best experience Balance Adjusts the balance of the left and right speakers Bass Adjusts the bass level adjustments made can only b...

Страница 14: ... Setup to enter the setup menu and select Settings 2 Press to select Picture Format 3 Select a picture format 4 Press OK to confirm Summary of Picture Formats The following picture settings can be configured Note Depending on the format of the picture source some picture settings are not available 16 9 Change the normal ratio to widescreen format 4 3 The normal format Zoom1 Horizontal scaling of t...

Страница 15: ...r the four digit password to enter the channel blocking menu You need to enter the four digit password to watch locked channels You need to enter the four digit password to enter the parental menu Clear All This function will clear all the locked channels and signal sources that you have previously saved The default password is 0000 Users may change or set the password themselves Note If you visit...

Страница 16: ...lide shows 1 Select a photo or folder then press OK The photo will be enlarged to fill the screen Displays the option list of the slides The slide show starts playing from the selected photo 2 Press the following buttons to control photo playback or Play or pause CH or CH See the last photo or the next photo Changing slide show playback setup When you want to start playing a slide show press Home ...

Страница 17: ...minutes before removing the USB storage device Updating the TV software Philips constantly strives to improve its products so we recommend that you update your TV software whenever an update becomes available Please visit the website at www philips com support to find out whether there are updates available Restoring the factory setup You can restore your TV s default picture and sound setup Saved...

Страница 18: ... manually find and save analog TV channels Finding and saving newTV channels 1 Press Home and select Setup to enter the setup menu 2 Press to Select TV Channels Manual Search Analog Manual Search Show Manual Search menu 3 Select Start frequency MHz End Frequency MHz and use the number keys to enter the three digit channel frequencies 4 Select Start Search and press OK 5 Press Home Exit Swapping ch...

Страница 19: ...analog channel to be renamed then press the OK button 4 Press Select the channel name then press the OK button to enter the editing interface 5 Press Type the new name 6 Select Confirm then OK to finish renaming the channel Note Channel names can include a maximum of 6 characters ...

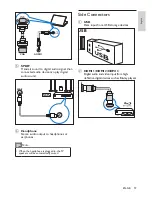
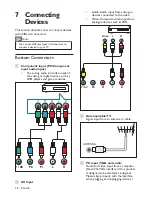
Страница 20: ...l devices such as DVD players and game consoles Y AV Pb Pr L R b AV Input Audio Audio input from analogue devices connected to the video Video Composite video input from analogue devices such asVCR Video L R Y AV Pb Pr L R c Antenna cableTV Signal input from an antenna or cable ANTENNA d PC input VGA and audio Audio and video input from a computer Note TheVGA interface of this product is designed ...

Страница 21: ...ound SPDIF f Headphone Stereo audio output to headphones or earphones Note When the headphone is plugged in the TV speakers will be automatically muted Side Connectors a USB Data input from USB storage devices USB b HDMI 1 HDMI 2 HDMI 3 Digital audio and video input from high definition digital devices such as Blu ray players ...

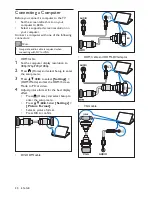
Страница 22: ...ith DVI orVGA HDMI cable 1 Set the computer display resolution to 480p 576p 720p 1080p 2 Press Home and select Setup to enter the setup menu 3 Press to select Settings HDMI Mode and set the HDMI Screen Mode to PC or video 4 Adjust picture format for the best display effect Press Home and select Setup to enter the setup menu Press Select Settings Picture Format Select a picture format Press OK to c...

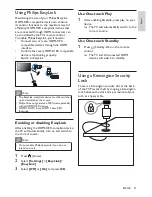
Страница 23: ...roperability with all HDMI CEC devices HDMI 1 HDMI 2 and HDMI 3 have CEC functions Enabling or disabling EasyLink After enabling the HDMI CEC compliant device the TV will automatically turn on and switch to the correct source Note Do not enable Philips EasyLink if you do not intend to use it 1 Press Home 2 Select Settings EasyLink EasyLink 3 Select Off or On and press OK Use One touch Play 1 After...

Страница 24: ...attery 2 AAA R03 Type Power Mains power 110 240V 50 60 Hz Standby power 0 5 W Ambient temperature 5 to 40 degrees Celsius For power consumption see the product specifications at www philips com support Dimensions and Weights 24PFD4501 30 Without TV stand W H D 559 6mm 335 8mm 54 3mm Weight 3 06kg With TV stand W H D 559 6mm 345 5mm 112mm Weight 3 08kg 24PFD4511 30 Without TV stand W H D 559 6mm 33...

Страница 25: ...23 EN GB English 3 Make sure that your mounting bolts follow these specifications Model No Required Pitch mm Required Mounting Screws 24PFD4501 30 75 75 3 x M4 10 mm 24PFD4511 30 75 75 3 x M4 10 mm ...

Страница 26: ...o big or too small Try using a different picture format The picture position is incorrect Picture signals from some devices may not fit the screen correctly Please check the signal output of the device 9 Trouble Shoot ing This section describes the commonly encountered issues and accompanying solutions General TV Issues The TV does not switch on Disconnect the power cable from the power outlet Wai...

Страница 27: ...aken for a TV to display content from a HDMI device If the TV does not recognise the HDMI device and no picture is displayed please try switching the signal source from one device to another and back again If there are intermittent sound disruptions please check that output settings from the HDMI device are correct Computer Connection Issues The computer display on the TV is not stable Check that ...

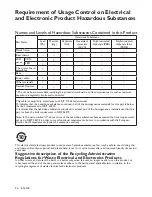
Страница 28: ... part is above the limit requirement in GB T 26572 Note In the parts marked X above some of the hazardous substances have exceeded the limit requirements set out in GB T 26572 in order to meet functional requirements but are in compliance with the European Union s RoHS requirements under the exemption section This electrical and electronic product contains some hazardous substances You may be safe...

Страница 29: ...onesia Jaminan Κазакша Қепілдік Latviešu Garantija Lietuvių Garantija Magyar Garancia Nederlands Garantie Norsk Garanti Polski Gwarancja Português Garantia Română Garanţie Русский Гарантия Slovenščina Garancija Slovenský Záruka Srpski Garancija Suomi Takuu Svenska Garanti ไทย การรับประกัน TiếngViệt Bảo hành Türkçe Garanti Українська Гарантія 简体中文 保修 繁體中文 保養 ﺍﻟﻌﺭﺑﻳﺔ ﺍﻟﻀﻤﺎﻥ Malay Waranti Brazilian P...

Страница 30: ...cheté ce produit Philips Pour connaître les conditions de garantie Philips applicables à ce produit reportez vous à la page www philips com guarantee Si vous ne possédez pas de connexion Internet contactez votre Service Consommateurs Philips local Vous trouverez les coordonnées de tous les Services Consommateurs dans la liste ci après Ces informations étaient correctes à la date d impression Pour ...

Страница 31: ...t prezentaciji na lokaciji www philips com guarantee Ukoliko ne posedujete vezu sa Internetom molimo Vas da se obratite najbližem centru kompanije Philips za brigu o potrošačima Detaljni podaci o kontaktu dati su u spisku centara za brigu o potrošačima Suomi Takuu Hyvä asiakas Kiitos että ostit tämän Philips tuotteen Tuotetta koskevaan Philipsin takuuseen voit tutustua Philipsin sivustossa osoitte...

Страница 32: ...atan anda Butiran kenalan diberikan dalam senarai Pusat Layanan Pelanggan selepas ini Caro cliente Obrigado por ter adquirido este produto Philips Para obter a garantia Philips aplicável a este produto consulte o site da Philips www philips com guar antee Caso você não tenha uma conexão de Internet entre em contato com a Central de Atendimento ao Cliente Philips Os detalhes de contato estão dispon...

Страница 33: ...Klientų palaikymo tarnyba 8 521 402 93 Vietinais tarifais Luxembourg Service Consommateurs 2487 11 00 Appel national Nationale Ruf Magyarország Ügyfélszolgálat 061 700 81 51 Belföldi hívás Nederland Klantenservice 0900 202 08 71 0 10 min Norge Forbrukerstøtte 22 97 19 14 Österreich Kundendienst 0150 284 21 40 0 145 Min 8 800 220 00 04 Polska Wsparcie Klienta 22 397 15 04 Połączenie lokalne Portuga...

Отзывы: