background image

6

How to Use the On Screen Display (OSD)

F

F

ull Size

ull Size

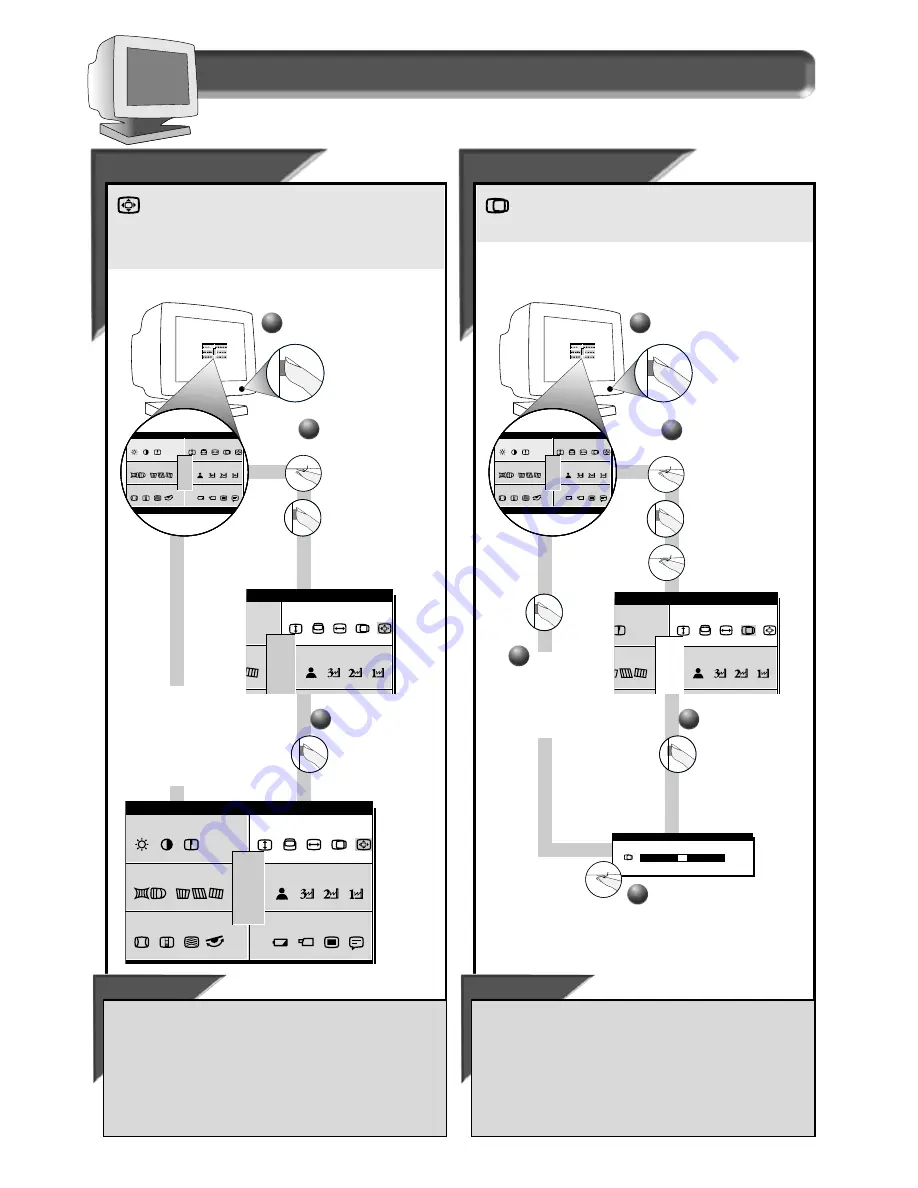
Full Size allows you to adjust the image on your screen to its
maximum height and width. If nothing happens when you use

this feature, the image is already at full size. You can use Full Size to
both enable and disable this feature.

Note: Full Size only works with

the monitor’s factory presets.

Smart Help

After returning to S

CREEN

S

IZE

& P

OSITION

. . .

. . . to continue to H

ORIZONTAL

P

OSITION

, turn the R

OTARY

knob until

H

ORIZONTAL

P

OSITION

is highlighted. Next, follow steps 3 - 5 under

H

ORIZONTAL

P

OSITION

.

. . . to exit completely, press the OSD button and hold for 1.5
seconds. (See page 15 for other exit options.)

F U  L

L

r e e n

s c

o l o r

c

c i a l

s p e

S I Z E

RESET

EXIT

F U  L

L

ma i n

r e e n

s c

e t r y

g e om

o l o r

c

n c e d

a d v a

c i a l

s p e

S I Z E

1 2 00

1

1 6 0 0

0 6 3 K / 8 5HZ

RESET

EXIT

A I N   C

M

ma i n

r e e n

s c

e t r y

g e om

o l o r

c

n c e d

a d v a

c i a l

s p e

ONT RO L S

1 2 00 

1

1 6 0 0 x

0 6 . 3 K / 8 5HZ

RESET

EXIT

A I N   C

M

ma i n

r e e n

s c

e t r y

g e om

o l o r

c

n c e d

a d v a

c i a l

s p e

ONT RO L S

1 2 00 

1

1 6 0 0 x

0 6 . 3 K / 8 5HZ

RESET

EXIT

2

2

Press the O

N

S

CREEN

D

ISPLAY

button.

3

3

Press the O

N

S

CREEN

D

ISPLAY

button.

Turn the R

OTARY

knob until the
S

CREEN

S

IZE

&

P

OSITION

window

is highlighted.
Next, press the
O

N

S

CREEN

D

ISPLAY

button. The F

ULL

S

IZE

icon is

highlighted.

1

1

Horizont

Horizont

al 

al 

Posit

Posit

ion

ion

Horizontal Position shifts the image on your screen either to
the left or right. Use this feature if your image does not appear

centered.

Smart Help

After returning to S

CREEN

S

IZE

& P

OSITION

. . .

. . . to continue to H

ORIZONTAL

S

IZE

, turn the R

OTARY

knob until

H

ORIZONTAL

S

IZE

is highlighted. Next, follow steps 3 - 5 under

H

ORIZONTAL

S

IZE

(on the next page).

. . . to exit completely, press the OSD button and hold for 1.5
seconds. (See page 15 for other exit options.)

r e e n

s c

r y

o l o r

c

e d

c i a l

s p e

RESET

EXIT

R I Z O N T A L   P O S I T I O N

H O R I Z O N T A L   P O S I T I O N

5 0 %

A I N   C

M

ma i n

r e e n

s c

e t r y

g e om

o l o r

c

n c e d

a d v a

c i a l

s p e

ONT RO L S

1 2 00 

1

1 6 0 0 x

0 6 . 3 K / 8 5HZ

RESET

EXIT

A I N   C

M

ma i n

r e e n

s c

e t r y

g e om

o l o r

c

n c e d

a d v a

c i a l

s p e

ONT RO L S

1 2 00 

1

1 6 0 0 x

0 6 . 3 K / 8 5HZ

RESET

EXIT

Press the O

N

S

CREEN

D

ISPLAY

button.

3

3

Press the O

N

S

CREEN

D

ISPLAY

button to bring
up H

ORIZONTAL

P

OSITION

screen.

4

4

Turn the R

OTARY

(at the

lower right-hand corner
of the monitor) knob until
the image is horizontally
balanced.

Press the 

O

N

S

CREEN

D

ISPLAY

button to

return to S

CREEN

S

IZE

& P

OSITION

.

5

5

1

1

2

2

Turn the R

OTARY

knob

until the S

CREEN

S

IZE

& P

OSITION

window is

highlighted. Next,
press the O

N

S

CREEN

D

ISPLAY

button. Then,

turn the R

OTARY

knob

until H

ORIZONTAL

P

OSITION

is

highlighted.

S c r e e n   S i z e   &   P o s i t i o n   w i n d o w

The image will
automatically
adjust to full size.
You can now go
on to your next
adjustment.

Содержание 21A582BH

Страница 1: ...Default 12 Moire 12 Vertical Linearity 13 Corner Correction 13 GEOMETRY CONTROLS WINDOW Pincushion 14 Balanced Pincushion 14 Trapezoid 14 Parallelogram 14 Rotation 14 EXIT RESET 15 ADDITIONAL INFORMATION BNC USB Set Ups 16 Power Saving Feature 17 Pin Assignment 18 Specifications 18 Index 18 Glossary 18 Troubleshooting 19 Warranty Appendix 60 FRENCH FRANCAIS 20 SPANISH ESPAÑOL 40 Other language ver...

Страница 2: ...utions The monitor automatically scans horizontal frequencies from 30KHz to 115KHz 201P 107KHz 201B and vertical frequencies from 50Hz to 160Hz With microprocessor based digital controlled circuitry and On Screen Display OSD controls the monitor can automatically adjust itself to the video card s scanning frequency and displays an image with the precise parameters you desire Features An anti glare...

Страница 3: ...itor See page 16 for details D SUB BNC Switch This switch should be in the D Sub position when using the monitor cable included with the monitor See page 16 and the foldout for details D SUB Plug Connect one end of the monitor cable here See foldout for details POWER Plug Plug the power cord in here See foldout for details USB Bay Slot for plugging in USB Hub Optional hardware that allows true Plu...

Страница 4: ...ter the OSD has been selected It has four features CAD CAM DTP PHOTO RETOUCH and USER PRESETS To adjust these features turn to pages 8 9 ON SCREEN DISPLAY Your monitor is preset at the factory However you can adjust it using the ON SCREEN DISPLAY button and the ROTARY knob described on page 2 The way to do so is through the On Screen Display OSD Below is a brief description of the six On Screen Di...

Страница 5: ...or to adjust the brightness Press the ON SCREEN DISPLAY button to return to MAIN CONTROLS window 5 5 Contr Contrast ast To adjust your screen s contrast follow the steps below Contrast is the difference between the light and dark areas on the screen A 100 contrast level is recommended Smart Help After returning to MAIN CONTROLS to continue to DEGAUSS turn the ROTARY knob until DEGAUSS icon is high...

Страница 6: ...rn the ROTARY knob until the DEGAUSS icon is highlighted 1 1 After returning to MAIN CONTROLS to continue to the SCREEN SIZE POSITION window turn the ROTARY knob until EXIT is highlighted Next press the OSD button Turn to the next page and follow steps 2 5 under FULL SIZE to exit completely press the OSD button and hold for 1 5 seconds See page 15 for other exit options ma i n e t r y g e om n c e...

Страница 7: ...L SIZE icon is highlighted 1 1 Horizont Horizontal al Posit Position ion Horizontal Position shifts the image on your screen either to the left or right Use this feature if your image does not appear centered Smart Help After returning to SCREEN SIZE POSITION to continue to HORIZONTAL SIZE turn the ROTARY knob until HORIZONTAL SIZE is highlighted Next follow steps 3 5 under HORIZONTAL SIZE on the ...

Страница 8: ... ertic tical Position al Position V Ver ertic tical Size al Size Vertical Position adjusts the image on your screen either up or down Use this feature if your image does not appear centered Vertical Size expands or contracts the image on your screen pushing it out toward the top and bottom sides or pulling it in toward the center Smart Help r e en s c r y o l o r c RESET EXIT E R T I C A L P O S I...

Страница 9: ...ess the ON SCREEN DISPLAY button 4 4 After each preset setting is saved the on screen display automatically returns to the COLOR TEMPERATURE window To save the next preset setting simply repeat the steps listed here 1 1 2 2 Turn the ROTARY knob until the COLOR TEMPERATURE window is highlighted Then press the ON SCREEN DISPLAY button Press the ON SCREEN DISPLAY button to bring up and save the prese...

Страница 10: ...EEN DISPLAY button 1 1 2 2 Turn the ROTARY knob until the COLOR window is highlighted Next press the ON SCREEN DISPLAY button Then turn the ROTARY knob until USER PRESETS icon is highlighted Press the ON SCREEN DISPLAY button to bring up the USER PRESETS window Color Temperature window r e en s c o l o r c RESET EXIT S E R P R E S E T S 78 78 78 USER PRESET 1 GREEN BLUE RED 78 78 78 USER PRESET 1 ...

Страница 11: ...firm your selection and return to SPECIAL CONTROLS 5 5 LANGUAGE ESPANOL ENGLISH ITALIANO DEUTSCH Special Controls window n r e en s c e t r y om o l o r c n c ed v a c i a l s pe RESET EXIT P O W E R S A V I N G 2 2 Press the ON SCREEN DISPLAY button 1 1 A I N C M ma i n r e en s c e t r y g eom o l o r c n c ed adv a c i a l s pe ONTROL S 1200 1 1600x 06 3K 85HZ RESET EXIT A I N C M ma i n r e en...

Страница 12: ...tton Then turn the ROTARY knob until the VIDEO INPUT icon is highlighted Next follow steps 3 6 under VIDEO INPUT to exit completely press the OSD button and hold for 1 5 seconds See page 15 for other exit options Video Inp Video Input ut VIDEO INPUT helps determine what you see on the screen It is set at 0 7V olts but if the video input signal is different than the output signal you may want to ch...

Страница 13: ... MOIRE is a fringe pattern arising from the interference between two superimposed line patterns To adjust your MOIRE follow the steps below Note Use only if necessary By activating MOIRE sharpness can be affected Smart Help to select VERTICAL MOIRE or to turn MOIRE off follow the steps above selecting VERTICAL MOIRE or MOIRE OFF IN STEP 4 After returning to ADVANCED CONTROLS to continue to VERTICA...

Страница 14: ... the vertical linearity VERTICAL LINEARITY 5 0 Press the ON SCREEN DISPLAY button to add your adjustment and to bring up ADVANCED CONTROLS screen CORNER CORRECTION CORNER CORRECTION CORNER CORRECTION squares up the corners of an image on the screen To adjust your CORNER CORRECTION follow the steps below Smart Help After returning to ADVANCED CONTROLS to continue to GEOMETRY WINDOW turn the ROTARY ...

Страница 15: ...Z RESET EXIT Press the ON SCREEN DISPLAY button 2b 2b 1 1 2a 2a Turn the ROTARY knob until the GEOMETRY CONTROLS window is highlighted Next press the ON SCREEN DISPLAY button Then if necessary turn the ROTARY knob until PINCUSHION icon is highlighted Press the ON SCREEN DISPLAY button Then turn the ROTARY knob to adjust the pincushion ma i n s e t r y g eom n c ed adv a s p RESET EXIT P I N C U S ...

Страница 16: ...n r e en s c e t r y g eom o l o r c n c ed adv a c i a l s pe 1200 1 1600x 06 3K 85HZ RESET EXIT M A I N C O N T R O L S Make sure you have exited from all icons in a window See To EXIT FROM AN INDIVIDUAL WINDOW For example MAIN CONTROLS will be highlighted 1 1 ma i n r e en s c e t r y g eom o l o r c n c ed adv a c i a l s pe 1200 1 1600x 06 3K 85HZ RESET EXIT R E S E T A L L S E T T I N G S Tu...

Страница 17: ...G B ISD SUB USB USB BNC D SUB USB USB USB D Sub BNC Switch For an IBM compatible computer 1 Turn off the computer 2 Connect the optional BNC monitor cable and set D SUB BNC switch to BNC 3 Connect the shielded power cable 4 Turn on the monitor Then turn on the computer 5 If you have Windows 95 follow the If you have Windows 95 steps on the Setting Up foldout sheet For a Macintosh type computer 1 C...

Страница 18: ...05 5 75 Factory Preset Resolution Modes AS AN ENERGY STAR PARTNER PHILIPS HAS DETERMINED THAT THIS PRODUCT MEETS THE ENERGY STAR GUIDELINES FOR ENERGY EFFICIENCY The proper operation of the function requires a computer with VESA DPMS power management capabilities When used with a computer equipped with VESA DPMS the monitor is Energy Star compliant MODE RESOLUTION H FREQ V FREQ STANDARD KHZ HZ 1 6...

Страница 19: ... jacks 2 BNC set up 16 Brightness 4 Cable Cover 2 CAD CAM 8 9 Color Temperature 3 8 9 Contrast 4 Corner Correction 13 Degauss 5 Description of controls 2 3 D Sub BNC switch 2 16 DTP 8 9 End of life disposal 1 Exit 15 Features 1 Full Size 6 Geometry Controls 3 14 Glossary 18 Hook Ups Set Up Guide 16 Horizontal Position 6 Horizontal Size 7 Language 10 Main Controls 3 4 5 Maintenance 1 Moire 12 Monit...

Страница 20: ...computer See Setting Up foldout Check to see if the monitor cable has bent pins Make sure the computer is turned on when you turn on the monitor No Color If you are using a non VESA DDC standard video card consult your local Philips dealer or service organization to obtain an adapter Color appears blotchy The picture may need degaussing See page 5 for details Remove any nearby magnetic objects Fac...

Отзывы: