background image

S

ETTING

U

P AN

A

CCESS

C

ODE

19

O

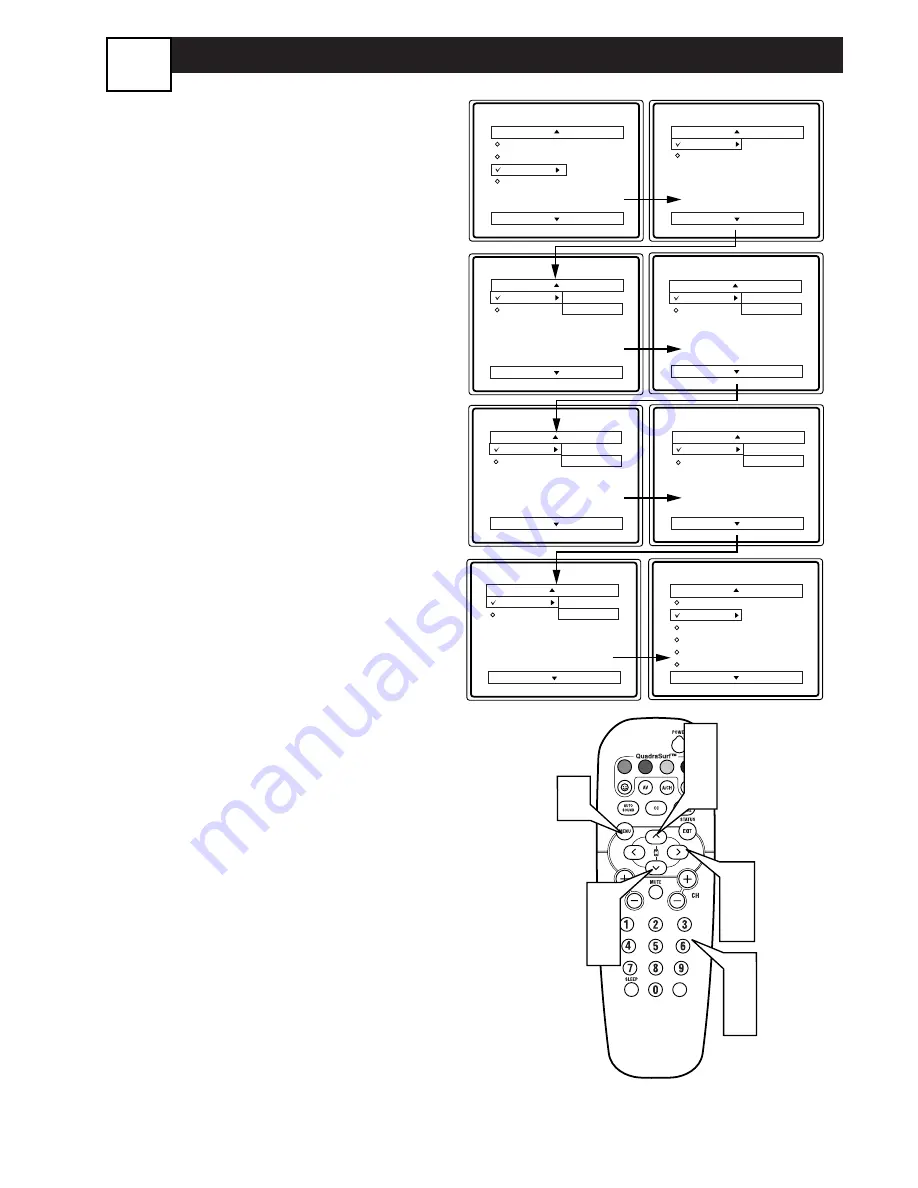
ver the next few panels you’ll learn how
to block channels and get a better

nderstanding of the rating terms for certain

rogramming. 

irst, let’s start by learning how to set a per-

onal access code:

1

Press the MENU button 

on the

remote to display the on-screen
menu.

2

Press the CURSOR UP 

3

or

DOWN

4

buttons

until the

word 

FEATURES

is highlighted.

3

Press the CURSOR RIGHT 

2

button 

to display the FEATURES

menu options.

4

Press the CURSOR UP 

3

or

DOWN

buttons

until the

words AUTOLOCK™ are highlight-
ed.

5

Press the CURSOR RIGHT 

2

button.

The screen will read,

“ACCESS CODE - - - - .”

6

Using the NUMBERED buttons,
enter 0, 7, 1, 1. “XXXX”

appears

on the Access Code screen as you
press the numbered buttons.

“INCORRECT CODE”

will

appear on the screen, and 

you will

need to enter 0, 7, 1, 1 again.

7

The screen will ask you to enter a
“New Code.” 

Enter a “new” 4

digit code using the NUM-
BERED buttons. 

The screen will

then ask you to CONFIRM the code
you just entered.

Enter your new

code again. “XXXX” 

will appear

when you enter your new code and
then display the AutoLock™ menu
options.

roceed to the next panel to learn more...

Main

Picture

Sound

Features

Install

AutoLock

Format

Features

AutoLock

Format

Timer

Start Time

Stop Time

Channel

Activate

Display

Features

AutoLock

Format

Access Code

  - - - -

AutoLock

Block Channel

Setup Code

Clear All

Block All

Movie Rating

TV Rating

OffStop Time

Channel

Activate

Display

Features

AutoLock

Format

Access Code

 XXXX

Features

AutoLock

Format

Access Code

 XXXX

Incorrect

Features

AutoLock

Format

New Code

  - - - -

Features

AutoLock

Format

Confirm Code

 XXXX

VOL

1

3
5

2
4

6
7

2
4

Содержание 20PT5441/37

Страница 1: ...lp fast Read your Quick Use Guide and or Owner s Manual first for quick tips that make using your Philips product more enjoyable If you have read your instructions and still need assistance you may access our online help at www usasupport philips com or call 1 888 PHILIPS 744 5477 while with your product and Model Serial number ARRÊT ALTO STOP ...

Страница 2: ...Input Jacks 5 Headphone Jack 5 AV Output Jacks 8 S Video Input Jacks 6 AutoLock Controls Access Code 19 Block All Channels 21 Block Channels 20 Clear All Blocked Channels 21 Movie Ratings 22 Other Blocking Options 24 TV Ratings 23 Understanding AutoLock 18 Automcatically Programming TV 13 Subject Panel No AutoPicture Control 25 AutoSound Control 25 Basic Remote Operation 3 Basic Television Operati...

Страница 3: ...VENT FIRE OR SHOCK HAZARD DO NOT EXPOSE THIS EQUIPMENT TO RAIN OR MOISTURE CAUTION To prevent electric shock match wide blade of plug to wide slot and fully insert ATTENTION Pour éviter les chocs électriques introduire la lame la plus large de la fiche dans la borne correspondante de la prise et pousser jusqu au fond CAUT ION RISK OF ELECTRIC SHOCK DO NOT OPEN CAUTION TO REDUCE THE RISK OF ELECTRI...

Страница 4: ...n dropped or the enclosure damaged 17 Tilt Stability All televisions must comply with recommended international global safety standards for tilt and stability properties of its cabinet design Do not compromise these design standards by applying excessive pull force to the front or top of the cabinet which could ultimately overturn the product Also do not endanger yourself or children by placing el...

Страница 5: ... on the Converter 2Connect the Cable TV cable or Antenna cable or 300 to 75 ohm adapter to the 75Ω plug on the TV If you have a Cable Converter Box Connect the OUT put plug from the Converter to the 75Ω plug on the TV After using the AutoProgram Control press the CH and but tons to scroll through all the channels stored in the television s memory HELPFUL HINT 75 75 L R S VIDEO VIDEO AUDIO CVI AV o...

Страница 6: ...e ppears Cable Box w Audio Video Outputs his connection will supply Stereo sound 4Connect the Cable Company supplied cable to the cable signal IN put plug on the back of the Cable Box 5Using a RCA type Video Cable con nect one end of the cable to the Video or ANT your cable box may be labeled differently Out jack on the cable box and the other end to the AV1 Video Input on the TV 6Connect one end ...

Страница 7: ...r win dow on the TV when operating the TV with the remote REMOTE CONTROL To load the supplied batteries into the remote 1 Remove the battery com partment lid on the back of the emote 2 Place the batteries 2 AA in he remote Be sure the and ends of the batteries line up cor ectly inside of case is marked 3 Reattach the battery lid Battery Compartment 2 AA Batteries Battery Lid Back of Remote 20PT544...

Страница 8: ...ed and white cables to the AUDIO left and right OUT jacks on the rear of the VCR 5Turn the VCR accessory device and the TV ON 6Press the AV button on the remote control to select the AV channel AV will appear in the upper left corner on the TV screen 7With the VCR or accessory device ON and a prerecorded tape CD DVD etc inserted press the PLAY button to view the tape on the television All the AV c...

Страница 9: ...to the Audio In white jack on the SIDE or FRONT of the television 3Turn the TV and the accessory device ON 4Press the AV button on the remote control to tune the TV to the side or front input jacks AV will appear on the TV screen 5Press the PLAY button on the accessory device to view play back or to access the accessory device camera gaming unit etc VIDEO AUDIO L R Front S VIDEO VIDEO AUDIO LEFT R...

Страница 10: ...he VCR Then connect the other ends of the AUDIO red and white CABLES to the AUDIO left and right OUT jacks on the rear of the VCR 3Turn the VCR and the TV ON 4Press the AV button or the CH or CH buttons on the remote to scroll the channels until SVHS appears in the upper left cor ner of the TV screen 5Now your ready to place a prere corded video tape in the VCR and press the PLAY button 75 L R S V...

Страница 11: ...ilable channels until CVI appears in the upper left corner of the TV screen 5Insert a DVD disc into the DVD player and press the PLAY button on the DVD Player The description for the component video con nectors may differ depending on the DVD player or accessory digital source equipment used for example Y Pb Pr Y B Y R Y Y Cr Cb Although abbreviations and terms may vary the letters b and r stand f...

Страница 12: ...teps allow you to onnect a second VCR to record the rogram while your watching it 1Connect one end of the yellow Video Cable to the AV Out VIDEO plug Connect the other end to the VIDEO IN plug on the second VCR 2Connect one end of the red and white Audio cable from the AV Out AUDIO L and R plugs on the TV to the AUDIO IN plugs on the VCR 3Turn the Second VCR ON insert a VHS tape and it s ready to ...

Страница 13: ...en watching movies MENU Button ress to display the on screen menu Also can e used to back out of the on screen menu ntil it disappears from the TV s screen CC Button ress to activate the Closed Captioning ptions Repeatedly pressing the CC button will scroll the available options on the TV creen VOL ume or Buttons ress the VOL button to increase the TV s ound level Press the VOL button to ecrease t...

Страница 14: ...isplay the current channel number If the on screen menu is displayed press the Status Exit button of remove it from the TV s screen 3 4 1 and 2 Buttons Press to navigate select and adjust controls within the on screen menu Also use the CURSOR 3 or CURSOR 4 to activate or deactivate the EXPAND 4 3 screen formatting control CH annel or CH annel Buttons Press to select channels in ascending or descen...

Страница 15: ...on on the remote control to show the on screen menu 2Press the CURSOR UP 3 or DOWN 4 buttons to scroll though the on screen menu until the word INSTALL is highlighted 3Press the CURSOR RIGHT 2 button to display the INSTALL menu features 4Press the CURSOR UP 3 or DOWN 4 buttons to scroll through the Install features until the word LANGUAGE is high lighted 5Press the CURSOR RIGHT 2 button repeatedly...

Страница 16: ...NER MODE is highlighted 5Press the CURSOR RIGHT button to select either ANTEN NA CABLE or AUTO mode 6When finished press the STA TUS EXIT button to remove the on screen menu from the TV s screen Main Picture Sound Features Install Brightness Color Picture Sharpness Tint More Main Picture Sound Features Install Language Tuner Mode Auto Program Channel Edit Install Language Tuner Mode Auto Program C...

Страница 17: ...n menu 2Press the CURSOR UP 3 or DOWN 4 buttons to scroll through the on screen menu until the word INSTALL is highlighted 3Press the CURSOR RIGHT 2 button to display the INSTALL menu features 4Press CURSOR UP 3 or DOWN 4 buttons to scroll the Install features until the words AUTO PROGRAM are highlight ed 5Press the CURSOR RIGHT 2 button to start the Auto Program scanning of channels Auto Programm...

Страница 18: ...OR RIGHT 2 button to display the CHANNEL EDIT options 6With the CHANNEL EDIT options displayed and CHANNEL NO highlighted you can use the cur sor buttons to scroll through all avail able channels that you wish to add skipped OFF or delete Skipped ON from the TV s memory You can also use the NUMBERED buttons to go directly to a specific numbered chan nel that you want to add or skip Or you can also...

Страница 19: ...he CURSOR RIGHT 2 or LEFT 1 buttons until lightest parts of the picture show good detail 4SHARPNESS CONTROL CURSOR RIGHT 2 or LEFT 1 buttons to improve detail in the pic ture 5TINT CONTROL Press the CURSOR RIGHT 2 or LEFT 1 buttons to obtain natural skin tones 6COLOR TEMP CONTROL Press the CURSOR RIGHT 2 or LEFT 1 buttons to select NOR MAL COOL or WARM picture preferences NORMAL will keep the whit...

Страница 20: ...anges in volume occur during com mercial breaks or channel changes 5INCR SURROUND Press the CURSOR RIGHT 2 or LEFT 1 buttons to select between Incr Surround or Stereo settings If Stereo or select Spatial or Mono If Mono 6ULTRA BASS Press the CUR SOR RIGHT 2 or LEFT 1 but tons to turn Ultra Bass On or Off Ultra Bass will enhance the low fre quency sound 7SOUND Press the CURSOR RIGHT 2 or LEFT 1 but...

Страница 21: ...Press the CURSOR RIGHT 2 button to display the Features menu options AutoLock or Format 4Press the CURSOR DOWN 4 button until the word Format is highlighted 5Press the CURSOR RIGHT 2 or LEFT 1 buttons to select one of the two options 4 3 or Expand 4 3 4 3 Standard format for the TV Expand 4 3 Enlarges the picture to fill out the entire screen area eliminating the letter box effect 6When finished p...

Страница 22: ...hat parents may find unsuitable for children under the age f 13 MOVIE RATINGS Continued R Restricted This is programming is specifi cally designed for adults Anyone under the age of 17 should only view this programming with an accompanying parent or adult guardian NC 17 No one under the age of 17 will be admitted This type of programming should be viewed by adults only X Adults Only This type of p...

Страница 23: ... numbered buttons INCORRECT CODE will appear on the screen and you will need to enter 0 7 1 1 again 7The screen will ask you to enter a New Code Enter a new 4 digit code using the NUM BERED buttons The screen will then ask you to CONFIRM the code you just entered Enter your new code again XXXX will appear when you enter your new code and then display the AutoLock menu options roceed to the next pa...

Страница 24: ... selected the channel will be blocked 3Press the CH or CH button to select other channels you wish to block Repeat step 9 to block the new channel 4When finished press the STA TUS EXIT button to remove the menu from the screen NOTE If you ever forget your code he 0 7 1 1 code is the factory default nd can be used to enter and create a ew access code AutoLock Block Channel Setup Code ClearAll Block...

Страница 25: ... channels will be viewable If BLOCK ALL is selected press the CURSOR RIGHT 2 button to turn the control ON or OFF When ON is selected ALL available channels will be blocked from viewing 3When finished press the STA TUS EXIT button to remove the menu from the screen NOTE If you ever forget your code he 0 7 1 1 code is the factory default nd can be used to enter and create a ew access code AutoLock ...

Страница 26: ... highlighted all these options can be turned ON which will allow blocking or OFF which will allow viewing 4Use the CURSOR RIGHT 2 but ton on the remote to turn the rat ing option ON or OFF When a rating level is chosen to be locked any higher level rating will also e blocked from viewing i e If R is elected to be blocked NC 17 and X will automatically be blocked NOTE If you ever forget your code h...

Страница 27: ...ptions also ave sub ratings The ratings of TV Y7 TV G TV 14 TV MA can be customized to ock V violence FV fantasy violence S exual situations L coarse language or D uggestive dialogue 4Press the CURSOR RIGHT 2 button on the remote to turn the TV Y or TV G rating ON or OFF Or press the CURSOR RIGHT 2 but ton to enter the sub menus for the TV Y7 TV PG TV 14 or TV MA rat ings 5If the TV Y7 TV PG TV 14...

Страница 28: ... ON ALL blocking censoring will take place When OFF ALL blocking is disabled UNRATED ALL unrated programs ased on the Movie Ratings or Parental TV Guidelines can be blocked if this fea ure is set to ON and the BLOCKING eature is set to OFF NO RATING ALL programming with NO content advisory data can be locked if set to ON and the BLOCK NG feature is set to OFF 3Press the CURSOR UP 3 or DOWN 4 butto...

Страница 29: ...move the menu from the TV s screen CC Mute CC Off CC1 CC2 CC Off VOL 1 2 3 Your TV can be set to automatically turn itself off at a given amount of time 1Press the SLEEP button on the remote control and the SLEEP timer display will appear on the screen 2Press the SLEEP button repeat edly to pick the amount of time 15 30 45 60 90 120 180 or 240 minutes before the TV will turn itself off NOTE An on ...

Страница 30: ... for watching sporting events WEAK SIGNAL Preset pic ture options for watching pro grams where the reception is not at its best MULTIMEDIA Preset picture options for use with video gaming The Auto Sound feature allows the listen er to select between four different facto set sound options 1Press the AUTO SOUND but ton on the remote control The cur rent Auto Sound setting will appear in the middle o...

Страница 31: ...o ten channels per button can be stored epeat steps 1 through 3 to add addi onal channels up to 10 to each of the he SURF lists o remove a channel from one of he SURF lists 4Press the COLORED Quadra Surf button until the desired chan nel appears The screen will display the channel number with a colored Smiley face to indicate the Colored button it relates to 5While the Smiley face chan nel indicat...

Страница 32: ...en press the same COLORED button on the remote to tune the second chan nel programmed for that specific surf list 3Repeatedly pressing the same COLORED button while the smi ley face appears will tune all the pro grammed channels Pressing the COL ORED button again will return you to the first channel in the list the smiley face disappears from the reen and the same COLORED button is ressed the surf...

Страница 33: ...ote control If you re attempting to hook up auxiliary equipment check the audio jack connec tions located on the front of the TV Remote Does Not Work Check the batteries If necessary replace them with AA Heavy Duty Zinc Chloride or Alkaline batteries Clean the remote control and the remote control sensor window on the TV Check the TV power cord Unplug the TV wait 10 seconds then reinsert the plug ...

Страница 34: ...cident unautho rized repair or other cause not within the control of Philips A product that requires modification or adaptation to enable it to operate in any country other than the country for which it was designed manufac tured approved and or authorized or repair of products damaged by these modifications Damage occurring to product during shipping when improperly packaged or cost associated wi...

Отзывы: