background image

EN-15

EN

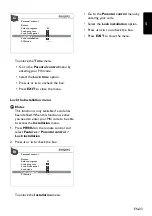
Note


D

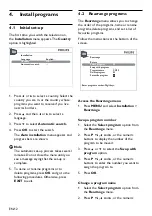
For cable networks, to search for missing 

• 

programs, select the 

Other 

option instead 

of a country from the country list. Then 

select 

Automatic update

 in the 

Auto 

installation

 menu. 

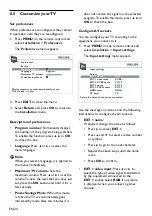
For subsequent set-up: 

• 

The 

• 

Automatic update

 function 

allows you to set up programs just 

launched or any programs that are 

missing or wrongly set up. 
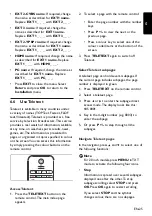
The 

• 

Automatic search

 function is 

used for setting up programs after the 

initial set-up (e.g. after moving house). 

This process deletes all programs 

previously stored. To set up a new 

program, it is better to use 

Automatic 

update

 or 

Manual installation

.

Содержание 20PFL3403

Страница 1: ...duct and get support at www philips com welcome EN USER MANUAL DE BENUTZERHANDBUCH FR MANUEL DE L UTILISATEUR NL GEBRUIKERSHANDLEIDING IT MANUALE D USO ES MANUAL DEL USUARIO PT MANUAL DO UTILIZADOR EL ΕΓΧΕΙΡΙΔΙΟ ΧΡΗΣΗΣ ...

Страница 2: ...embourg 40 6661 5644 local Netherlands 0900 8407 0 10 min Norway 2270 8111 local Poland 0223491504 local Portugal 2 1359 1442 local Romania 1 203 2060 local Russia 495 961 1111 local Serbia 381 114 440 841 local Slovakia 0800 004537 free Slovenia 01 280 95 22 local Spain 902 888 784 0 10 min Sweden 08 5792 9100 local Switzerland 0844 800 544 local Turkey 0800 261 3302 local UK 0870 900 9070 local ...

Страница 3: ...tandby 11 Install programs 4 12 Initial set up 12 Rearrange programs 12 Auto install programs 13 Manually install programs 14 Use your TV 5 16 Switch programs 16 Access your favourite programs 16 Access AV programs 16 Adjust volume 16 Display status information 16 Display a list of programs 16 Use more of your TV 6 17 Adjust sound settings 17 Adjust picture settings 18 Set the clock and timers 20 ...

Страница 4: ...er a registered trademark or trademark of Microsoft Corporation in the United States and or other countries Kensington and Micro Saver are registered US trademarks of ACCO World Corporation with issued registrations and pending applications in other countries throughout the world All other registered and unregistered trademarks are the property of their respective owners in general have the abilit...

Страница 5: ... lead to damage of the TV If the TV is mounted on a swivel base or swivel arm ensure no strain is placed on the power cord when the TV is swivelled Strain on the power cord can loosen connections and cause arcing or fire To avoid risk of fire or electric shock do not place the TV remote control or remote control batteries near naked flame sources e g lighted candles and other heat sources includin...

Страница 6: ...ations or colour fading wipe off water droplets as soon as possible Do not touch push rub or strike the screen with hard objects as this may damage the screen permanently Where possible avoid stationary images that remain on screen for extended periods of time Examples include screen menus teletext pages black bars or stock market tickers If you must use stationary images reduce the screen contras...

Страница 7: ...ed batteries do not contain mercury or cadmium Dispose supplied and all other used batteries according to your local regulations Power consumption The TV consumes minimal energy in standby mode to minimise environmental impact Active power consumption is displayed at the back of the TV For more product specifications see the product leaflet at www philips com support ...

Страница 8: ...uality than the regular video socket The S Video cable carries only picture signals not sound Connect the left and right audio cables to the AUDIO L and R sockets 4 EXT 2 CVBS YPbPr component sockets input For DVD players Remember to connect the left and right audio cables to the AUDIO L and R sockets because the component cables carry only the picture signal not the sound 5 EXT 1 SCART input outp...

Страница 9: ...this selection is done automatically 7 HDMI input HDMI input connectors for Blu ray Disc players digital receivers game consoles and other high definition devices Notes D D Do not connect a device supplying analogue RGB signals to this socket The HDMI socket is compatible with HDCP format HDMI the HDMI logo and High Definition Multimedia Interface are trademarks or registered trademarks of HDMI Li...

Страница 10: ...pages 6 INFO Displays program information if available 7 OK Accesses the All programs menu or activates a setting 8 Î ï Í Æ Cursor keys to navigate the menu 9 EXIT Exit a menu 10 PROGRAM P Switches to the next or previous program 11 NUMBER KEYS Selects a program page or setting 12 PREVIOUS PROGRAM Returns to the previously viewed program 13 PROGRAM LIST Displays the list of programs 14 MUTE Mutes ...

Страница 11: ...tep 1 Purchase aVESA compatible wall bracket Depending on the size of your TV screen purchase one of the following wall brackets TV screen size inches cm VESA compatible wall bracket type millimeters Special instructions 19 48cm 20 51cm 22 56cm 26 66cm Adjustable 100 x 100 None Step 2 Connect cables Connect the antenna cable mains cord and all other devices to the back of the TV as described in th...

Страница 12: ...upply If the plug is detached from the cable do not under any circumstances connect it to a mains socket because there is a risk of electric shock Note D D The picture is for illustration only The location of the mains connector varies according to TV model Insert remote control 3 5 batteries Slide the battery cover off the back of the 1 remote control Insert the two supplied batteries Size AAA 2 ...

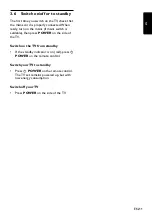
Страница 13: ...he mains if mains switch is available then press POWER on the side of the TV Switch on theTV from standby If the standby indicator is on red press POWER on the remote control Switch yourTV to standby Press POWER on the remote control The TV set remains powered up but with low energy consumption Switch off yourTV Press POWER on the side of the TV ...

Страница 14: ...go to the following procedures Otherwise press EXIT to exit Rearrange programs 4 2 The Rearrange menu allows you to change the order of the programs name or rename programs delete programs and set a list of favourite programs Follow the instructions at the bottom of the screen Enter program number Digit keys Swap with program Program name Delete program Favourite program Select progarm Return Rear...

Страница 15: ...uttons to display the number of the program whose name you want to change Press Í or Æ to select a character space Press Î and ï to select a letter number or symbol Press Æ to go to the next character A name can have a maximum of six characters Press OK to confirm Delete a program Select 1 the Select program option from the Rearrange menu Press 2 P Í and Æ or the numeric buttons to display the num...

Страница 16: ...ot clear adjust the setting 5 Select Fine tuning and press Í or Æ to adjust the tuning Select 6 Program name and edit the name as follows Press Í or Æ to select a character space Press Î and ï to select a letter number or symbol Press Æ to go to the next character Press OK to confirm If the program is encoded you can connect 7 a decoder to the EXT 1 socket Select the Decoder option and press OK or...

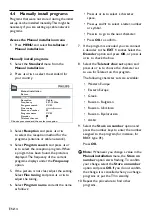
Страница 17: ...u For subsequent set up The Automatic update function allows you to set up programs just launched or any programs that are missing or wrongly set up The Automatic search function is used for setting up programs after the initial set up e g after moving house This process deletes all programs previously stored To set up a new program it is better to use Automatic update or Manual installation ...

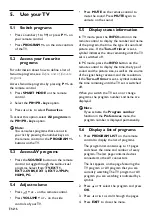
Страница 18: ...he INFO button on the remote control to display the number and name of the program the time the type of sound and picture size If the Turn off timer is set a symbol indicates the time remaining until the TV set is switched off In PC mode press the INFO button on the remote control to display the time the type of sound and the picture size as well as the source of the signal being received and the ...

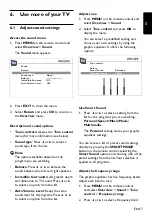
Страница 19: ... bands Adjust each band in turn Press 1 MENU on the remote control and select Overview Sound Tone control Frequency range Press 2 Í or Æ to select a frequency band 6 Use more of yourTV Adjust sound settings 6 1 Access the sound menu Press 1 MENU on the remote control and select Overview Sound The Sound menu appears Return Sound type Balance Incredible Surround Mono AutoVolume Level Off Off Tone co...

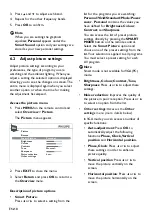
Страница 20: ...etting from the list for the programs you are watching Personal Vivid Standard Movie Power saver Personal contains the values you have defined for Brightness Colour Contrast and Sharpness You can access the list of preset picture settings directly by pressing the SMART MODE button on the remote control Select the Smart Picture option and choose one of the preset settings from the list Your selecti...

Страница 21: ...when films are being broadcast and enhances picture quality for films Press Í or Æ to select an option from the list Note D D The Automatic option is selected by default This function is only available for certain audio visual sources Dynamic Contrast Press Í or Æ to select On or Off Note D D This function is not available forVGA PC mode NTSC tint Press Í or Æ to adjust the picture tint Note D D T...

Страница 22: ...red manually You need to enter it again Consult a program which has this information to check that it is correct Program a turn off timer You can set a time at which the TV goes into standby mode or a delay after which the TV goes into standby mode Set delay after which theTV goes into standby mode Press 1 MENU on the remote control and select Overview Features Time Sleep timer The Sleep timer men...

Страница 23: ...his case the Wake up timer function is disabled for the relevant day if the program selected from the menu is locked you need to enter your code to access it Use parental control 6 4 You can set a PIN code and restrict access to the TV in the following way Prevent access to TV programs and or AV programs Prevent modification of turn off and wake up timers Prevent access to the installation menu to...

Страница 24: ...he Parental control menu by entering your code Select the Lock program option Press Í or Æ to uncheck the box Press EXIT to close the menu Lock the buttons on theTV Note D D This function is only available if a PIN code has been defined You need the remote control to be able to use the television Return Lock program Lock time Lock installation PIN code Select program 02 Lock front panel Parental c...

Страница 25: ...ilable if a code has been defined When this function is active you need to enter your PIN code to be able to access the Installation menu Press 1 MENU on the remote control and select Features Parental control Lock installation P 2 ress Í or Æ to check the box Return Lock program PIN code Select program 02 Lock front panel Lock time Lock installation Parental control To unlock the Installation men...

Страница 26: ...ower Savings Mode When this mode is active the TV set automatically goes into standby mode after ten minutes if it does not receive any signal on the selected program To enable the mode press Í Æ or OK to check the box Configure AV sockets You can configure your TV according to the equipment you connect to it Press 1 MENU on the remote control and select Installation Input settings The Input setti...

Страница 27: ...g the colour buttons on the remote control SMART TELETEXT SOURCE DUAL I II AccessTeletext Press the 1 TELETEXT button on the remote control The main index page appears To select a page with the remote control 2 Enter the page number with the number keys Press P to view the next or the previous page Press a colour key to select one of the colour coded items at the bottom of the screen 3 Press TELET...

Страница 28: ...is found subtitles appear in the TV picture The navigator disappears after a couple of seconds To display it again press TELETEXT Alarm page In some countries Spain Benelux etc you can set a time to display certain Teletext alarm pages To do this display the relevant alarm page and enter subpage mode Enter the time instead of the subpage number e g 1705 for 17 05 and press EXIT The page disappears...

Страница 29: ...ations of this product go to www philips com support T 7 echnical specifications Supported display resolutions Computer formats Resolution Refresh rate 640 x 480 60Hz 800 x 600 60Hz 1024 x 768 60Hz Note D D Model 20PFL3403 supports the format 640x480 60Hz only Video formats Resolution Refresh rate 480i 60Hz 480p 60Hz 576i 50Hz 576p 50Hz 720p 50Hz 60Hz 1080i 50Hz 60Hz Note D D Model 20PFL3403 suppo...

Страница 30: ...ne is the direct path the other is reflected from tall buildings hills or other objects Changing the direction or position of the antenna may improve the reception Radio frequency interference This interference produces moving ripples or diagonal streaks and in some case loss of contrast in the picture Find out and remove the radio interference source Troubleshooting 8 Some problems you encounter ...

Страница 31: ......

Страница 32: ... 2008 Koninklijke Philips Electronics N V All rights reserved 72 E340MS X401H ...

Отзывы: