background image

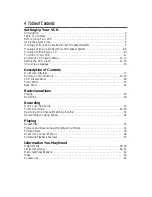
4  Table of Contents

Setting Up Your VCR

Introduction  . . . . . . . . . . . . . . . . . . . . . . . . . . . . . . . . . . . . . . . . . . . . . . . . . . . . . . . . . .3
Table of Contents  . . . . . . . . . . . . . . . . . . . . . . . . . . . . . . . . . . . . . . . . . . . . . . . . . . . . . .4
Before Using Your VCR  . . . . . . . . . . . . . . . . . . . . . . . . . . . . . . . . . . . . . . . . . . . . . . . . .5
Using the Alarm Clock  . . . . . . . . . . . . . . . . . . . . . . . . . . . . . . . . . . . . . . . . . . . . . . . . . .6
Hookups Without a Cable Box/Direct Broadcast System  . . . . . . . . . . . . . . . . . . . . . . . .7
Hookups With a Cable Box/Direct Broadcast System  . . . . . . . . . . . . . . . . . . . . . . . . .8-9
Hookups With a Stereo TV  . . . . . . . . . . . . . . . . . . . . . . . . . . . . . . . . . . . . . . . . . . . . .10
Turning on Your VCR . . . . . . . . . . . . . . . . . . . . . . . . . . . . . . . . . . . . . . . . . . . . . . . . . .11
Automatic TV Channel Setup . . . . . . . . . . . . . . . . . . . . . . . . . . . . . . . . . . . . . . . . . .12-13
Setting the VCR Clock  . . . . . . . . . . . . . . . . . . . . . . . . . . . . . . . . . . . . . . . . . . . . . . .14-15
Choosing a Language   . . . . . . . . . . . . . . . . . . . . . . . . . . . . . . . . . . . . . . . . . . . . . . . . . .16

Description of Controls

On-Screen Displays . . . . . . . . . . . . . . . . . . . . . . . . . . . . . . . . . . . . . . . . . . . . . . . . . . . .17
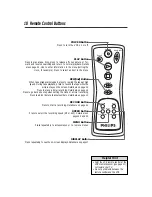
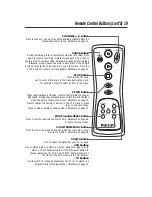
Remote Control Buttons  . . . . . . . . . . . . . . . . . . . . . . . . . . . . . . . . . . . . . . . . . . . . .18-19
VCR Display Panel  . . . . . . . . . . . . . . . . . . . . . . . . . . . . . . . . . . . . . . . . . . . . . . . . . . . .20
Front Panel  . . . . . . . . . . . . . . . . . . . . . . . . . . . . . . . . . . . . . . . . . . . . . . . . . . . . . . . . . .21
Back Panel . . . . . . . . . . . . . . . . . . . . . . . . . . . . . . . . . . . . . . . . . . . . . . . . . . . . . . . . . . .22

Basic Operations

Playing  . . . . . . . . . . . . . . . . . . . . . . . . . . . . . . . . . . . . . . . . . . . . . . . . . . . . . . . . . . . . . .23
Recording  . . . . . . . . . . . . . . . . . . . . . . . . . . . . . . . . . . . . . . . . . . . . . . . . . . . . . . . . . . .24

Recording

One-Touch Recording  . . . . . . . . . . . . . . . . . . . . . . . . . . . . . . . . . . . . . . . . . . . . . . . . .25
Timer Recording  . . . . . . . . . . . . . . . . . . . . . . . . . . . . . . . . . . . . . . . . . . . . . . . . . . .26-30
Recording One Channel/Watching Another  . . . . . . . . . . . . . . . . . . . . . . . . . . . . . . . . .31
Rerecording (Copying Tapes)  . . . . . . . . . . . . . . . . . . . . . . . . . . . . . . . . . . . . . . . . . . . .32

Playing

Repeat Play  . . . . . . . . . . . . . . . . . . . . . . . . . . . . . . . . . . . . . . . . . . . . . . . . . . . . . . . . . .33
Forward and Reverse Searching/Pausing a Picture . . . . . . . . . . . . . . . . . . . . . . . . . . . . .34
Picture Select  . . . . . . . . . . . . . . . . . . . . . . . . . . . . . . . . . . . . . . . . . . . . . . . . . . . . . . . .35
Real-Time Counter Memory  . . . . . . . . . . . . . . . . . . . . . . . . . . . . . . . . . . . . . . . . . . . . .36
Automatic Playback Features . . . . . . . . . . . . . . . . . . . . . . . . . . . . . . . . . . . . . . . . . . . . .37

Information You May Need

Helpful Hints  . . . . . . . . . . . . . . . . . . . . . . . . . . . . . . . . . . . . . . . . . . . . . . . . . . . . . .38-39
Limited Warranty . . . . . . . . . . . . . . . . . . . . . . . . . . . . . . . . . . . . . . . . . . . . . . . . . . .40-41
Dictionary/Specifications  . . . . . . . . . . . . . . . . . . . . . . . . . . . . . . . . . . . . . . . . . . . . . . . .42
Index . . . . . . . . . . . . . . . . . . . . . . . . . . . . . . . . . . . . . . . . . . . . . . . . . . . . . . . . . . . . . . .43
Accessories  . . . . . . . . . . . . . . . . . . . . . . . . . . . . . . . . . . . . . . . . . . . . . . . . . . . . . . . . . .44

Содержание 2 VRKD11YL99

Страница 1: ...Instruction Book Important Return your Warranty Registration Card within 10 days See why inside Video Cassette Recorder VRKD11YL VRKD12BL ...

Страница 2: ... to get the most from your PHILIPS product you must return your Warranty Registration Card within 10 days So please mail it to us right now Know these safetysymbols This bolt of lightning indi cates uninsulated material within your unit may cause an electrical shock For the safety of everyone in your household please do not remove product covering The exclamation point calls attention to features ...

Страница 3: ...Declaration of Conformity Model Number VRKD11YL VRKD12BL Trade Name Philips Responsible Party Philips Consumer Electronics P O Box 14810 Knoxville TN 37914 1810 865 521 4316 As an ENERGY STAR Partner Philips Consumer Electronics has determined that this product meets the ENERGY STAR guidelines for energy efficiency ENERGY STAR is a U S registered mark Using products with the ENERGY STAR label can ...

Страница 4: ...6 Description of Controls On Screen Displays 17 Remote Control Buttons 18 19 VCR Display Panel 20 Front Panel 21 Back Panel 22 Basic Operations Playing 23 Recording 24 Recording One Touch Recording 25 Timer Recording 26 30 Recording One Channel Watching Another 31 Rerecording Copying Tapes 32 Playing Repeat Play 33 Forward and Reverse Searching Pausing a Picture 34 Picture Select 35 Real Time Coun...

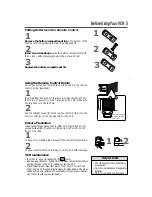
Страница 5: ...ment lid Video cassette tapes have tabs to make sure recordings are not erased accidentally The tab is in the bottom left corner on the front of the tape 1 To keep from erasing a tape break off the tab with a screwdriver 2 To allow new recording on the tape cover the hole with clear tape Erasure Prevention VCR maintenance The remote control and its batteries are supplied Do not mix alkaline and ma...

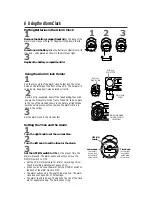
Страница 6: ... to set the time for the alarm 3 Set the OFF ON switch to ON At the proper time the alarm will sound The alarm will sound until you move the OFF ON switch to OFF Set the VCR s internal clock for a timer recording or One Touch Recording Details are on pages 14 15 When you do not use the alarm set the OFF ON switch on the back of the alarm clock to OFF The alarm will sound in the next 12 hour period...

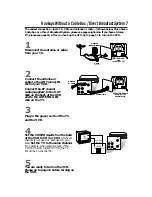
Страница 7: ...to the ANTENNA IN Jack on the TV VIDEO IN OUT CH3 CH4 AUDIO OUT IN ANT CH 4 or CH 3 VIDEO IN OUT CH3 CH4 AUDIO OUT IN ANT CH3 CH4 Switch CH3 CH4 VIDEO IN OUT CH3 CH4 AUDIO OUT IN ANT 75V ANT CABLE VIDEO IN OUT CH3 CH4 AUDIO OUT IN ANT 75 ANT CABLE RF coaxial cable Antenna or Cable 4 Set the CH3 CH4 switch on the back of the VCR to CH3 or CH4 whichever channel is not used or least used in your area...

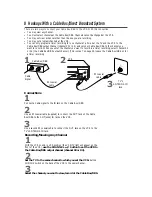
Страница 8: ...e 28 Leave the Cable Box DBS on for a timer recording VIDEO IN OUT CH3 CH4 AUDIO OUT IN ANT OUT IN 75V ANT CABLE TV s ANTENNA IN Jack Cable Box DBS VCR Recording Viewing Any Channel Connections 1 With the VCR on and in VCR position the VCR TV light will appear on the front of the VCR use the CHANNEL o p button to set the VCR to the Cable Box DBS output channel channel 03 or 04 2 Set the TV to the ...

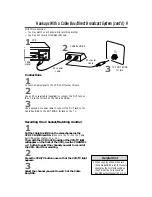
Страница 9: ...hannel you want to record at the VCR Start the recording 2 Press the VCR TV button once so that the VCR TV light appears 3 Select the channel you want to watch at the Cable Box DBS TV s ANTENNA IN Jack Cable Box DBS VCR When you play a tape make sure the Cable Box DBS is set to the same channel as the CH3 CH4 switch on the VCR Set the TV to the Cable Box DBS output channel 03 or 04 Helpful Hint 1 ...

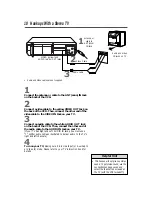
Страница 10: ...EO IN Jack on your TV 3 Connect an audio cable to the white AUDIO OUT Jack on the back of the VCR Then connect the other end of the audio cable to the AUDIO IN Jack on your TV If your TV has Right and Left AUDIO IN Jacks you must use a Y splitter audio cable as illustrated to deliver audio to the TV s right and left channels 4 Turn on your TV making sure it is in Line Input or Auxiliary In or Vide...

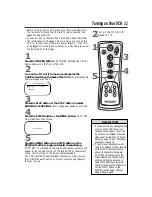
Страница 11: ...es follow the steps under Automatic TV Channel Setup on page 12 and Choosing a Language on page 16 If you try to set up channels when there is no antenna or cable connect ed to the VCR channel setup will appear to take place Eventually AUTO SET UP will appear on the screen steadily and channel setup will stop Connect an antenna or cable to the ANT enna IN jack of the VCR then press the MENU but to...

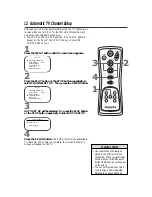
Страница 12: ...on 3 AUTO SET UP will be selected Or press the PLAY button or the STOP button repeatedly to select AUTO SET UP 4 Press the F FWD button The VCR will memorize all available TV channels When setup is complete the lowest channel you receive will appear on the TV Line Input mode will always be stored in the VCR s memory as channel 00 When you select chan nel 00 with the CHANNEL o p button LineIn Rear ...

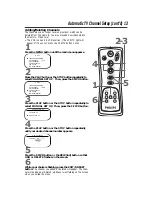
Страница 13: ...leted whichever was flashing on the screen when you exited the menu 2 3 Adding Deleting Channels The channels you no longer receive or seldom watch can be deleted from the memory You also may add new channels into the memory Make sure The VCR is on and in VCR position The VCR TV light will appear If it does not press the VCR TV button once 1 Press the MENU button until the main menu appears 1 6 PO...

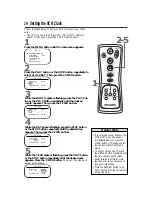
Страница 14: ...the week will appear automatically If the clock has never been set the CLOCK SET menu may appear immediately when you press the MENU button If this happens fol low the instructions from step 3 above To see the time on the TV press the DISPLAY button repeatedly until the time appears on the screen Power failures that last for more than one minute can cause you to lose your clock setting Press the R...

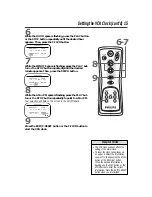
Страница 15: ... Then press the F FWD button 9 Press the EXIT C RESET button or the F FWD button to start the VCR clock 6 7 The VCR clock does not affect the setting of the alarm clock To reset the clock follow steps 1 2 on page 14 Select the information you want to change using the F FWD button or the REW ind button When the desired information is flashing use the PLAY button or the STOP button to enter the corr...

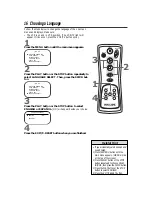
Страница 16: ...eside your choice 4 Press the EXIT C RESET button when you are finished 1 Press the MENU button until the main menu appears 1 2 3 If you accidentally select Spanish and need English 1 Press the MENU button until the main menu appears MENU will be at the top of the screen 2 Press the PLAY button or the STOP button repeatedly to choose SELEC IDIOMA then press the F FWD button 3 Press the PLAY button...

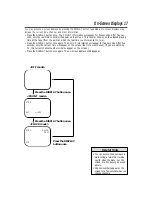
Страница 17: ... The CLOCK information will appear for five seconds After five seconds only the current time will appear on the screen the clock must be set If you are watching TV the current channel number will also appear on the screen Press the DISPLAY button once again The on screen displays will disappear OFF mode COUNT mode STOP SLP 0 12 34 CLOCK mode STOP 5 40 PM CH 02 SLP Press the DISPLAY button once You...

Страница 18: ...e menu REW ind Button When tape playback is stopped press to rewind the tape at high speed During tape playback press to rewind the tape while the picture stays on the screen Details are on page 34 Press to erase a timer recording Details are on page 29 Press to go back one step when setting the clock or a timer recording Press to add or delete channel numbers Details are on page 13 RECORD Button ...

Страница 19: ...the picture stays on the screen Details are on page 34 Press to change the setting of an item in the VCR menu or press to go to the next menu Press to add or delete channel numbers Details are on page 13 CHANNEL o p Button Press to scan up or down through the available channels after the channels have been set up Details are on page 12 EXIT C ounter RESET Button Press to set the real time counter ...

Страница 20: ...hen the VCR is in VCR position Details are on page 19 REC ord Light This light appears during a recording It flashes when a recording is paused CST IN Light This light appears when a tape is in the VCR POWER Light This light appears when the VCR power is on TIMER Light This light glows when the VCR is turned off to set a timer recording or during a One Touch Recording It flashes if the power is of...

Страница 21: ...n to normal playback Details are on page 34 Press to select an item in the VCR menu STOP EJECT Button Press once to stop the tape When tape playback is stopped press to eject the tape Press to select an item in the VCR menu PAUSE Button While recording press to temporarily stop the recording Press a second time to resume normal recording Details are on page 24 You can not pause a One Touch Recordi...

Страница 22: ... Set your TV to the same chan nel Details are on page seven OUT Jack Use the supplied RF coax ial cable to connect this jack to the Antenna In Jack on your TV or Cable Box DBS Details are on pages seven nine VIDEO OUT Jack Connect a video cable going to the video in jack of a TV camcorder another VCR or an audio visual sys tem laser disc player video disc player etc here Details are on pages 10 an...

Страница 23: ...start automatically press the PLAY button Turn on the TV Insert a tape 3 1 2 If the tape you want to play is already in the VCR make sure the VCR power is on and the VCR is in VCR position Press the VCR TV button so that the VCR TV light appears Then press the PLAY but ton Other playback options and fea tures are on pages 33 37 If AUTO REPEAT is set to ON play back will begin automatically even wh...

Страница 24: ...h mark equals one minute remaining During the last minute of paused recording the mark will flash If a menu is on the TV screen the RECORD button on the remote con trol will not work Press the EXIT C RESET button to remove the menu Then press the RECORD button Helpful Hints 4 Press the SPEED button until the desired tape speed SP or SLP appears on the screen The tape speed will disappear after abo...

Страница 25: ...ve The VCR is in VCR position The VCR TV light will appear If it does not press the VCR TV button once Stopping an OTR To stop an OTR before recording is finished press the STOP but ton on the remote control To cancel the OTR but continue recording press the RECORD button on the VCR repeatedly until REC appears in the upper left corner of the screen OTR 0 30 To change the recording length while an...

Страница 26: ...r the STOP button repeatedly to select a program number Then press the F FWD button If you select a program number that already has a timer recording stored information about that program will appear Press the PLAY button or the STOP button to select another program number 3 Press the PLAY button or the STOP button repeatedly to select a ONCE DAILY or WEEKLY recording When the arrow is beside your...

Страница 27: ...the desired month appears Then press the F FWD button Next press the PLAY button or the STOP button repeat edly until the desired day appears Then press the F FWD button The day of the week will appear automatically You can not pro gram the VCR to record more than one year in advance Timer Recording cont d 27 6 Repeat the procedure in step 5 to set the recording s end time Instructions continue on...

Страница 28: ...3 0 P M END TIME 0 8 3 0 P M CHANNEL 16 REC SPEED ONE TIME PROGRAM PROGRAM NUMBER 1 DATE 0 5 0 4 FRI START TIME 0 7 3 0 P M END TIME 0 8 3 0 P M CHANNEL 1 6 REC SPEED S P B SP SLP 8 Press the PLAY button or the STOP button repeatedly to select a tape speed The arrow will appear beside your choice The selected tape speed will flash beside REC SPEED 9 Press the EXIT C RESET button 10 Press the POWER...

Страница 29: ...nd button to cancel the timer recording 5 Press the EXIT C RESET button when you are finished Timer Recording cont d 29 POWER CHANNEL PAUSE PLAY STOP F FWD REW RECORD VCR TV SPEED MENU DISPLAY EXIT C RESET COUNTER MEMORY 5 4 1 2 TIMER PROGRAMMING DATE STA END CH B1 05 04 07 30 PM 16 FRI 08 30 PM SP 3 05 11 10 00 PM 125 W FRI 10 54 PM SLP 5 05 21 11 00 PM 40 DAILY 11 30 PM SLP 3 Press the F FWD but...

Страница 30: ...finished setting the program follow these steps Make sure the VCR is on and is in VCR position The VCR TV light will appear If it does not press the VCR TV button once 2 Press the PLAY button or the STOP button to select the timer recording you want to correct POWER CHANNEL PAUSE PLAY STOP F FWD REW RECORD VCR TV SPEED MENU DISPLAY EXIT C RESET COUNTER MEMORY 1 6 3 2 5 1 Press the MENU button so t...

Страница 31: ... TV 4 To return to the channel being recorded use the TV remote control to select channel 3 or 4 whichever chan nel the CH3 CH4 switch on the back of the VCR is set to 5 Press the VCR TV button on the VCR remote control to put the VCR in VCR position The VCR TV light will appear The channel being recorded will appear on the screen 6 To stop recording press the STOP button If you use a Cable Box DB...

Страница 32: ... or SLP 6 Press the PLAY button on VCR 1 and the RECORD but ton on VCR 2 at the same time 7 To stop recording press the STOP EJECT button on VCR 2 once then stop the tape on VCR 1 Unauthorized recording of copy righted television programs video tapes or other materials may infringe on the rights of copyright owners and violate copyright laws If a program has copyright protec tion it may not record...

Страница 33: ... or rewinding the tape you must first press the EXIT C RESET button then press the PLAY button to begin tape playback The VCR will play the tape to the end rewind it then play it again TV programming will appear on the screen while the tape is rewinding 1 3 2 To cancel AUTO REPEAT follow steps 1 2 above At step 3 press the F FWD button so that OFF appears beside AUTO REPEAT Press the EXIT C RESET ...

Страница 34: ...r on the screen NOTE Only tapes recorded in SLP Super Long Play speed will show a clear picture Each time you press the PAUSE button the noise lines will change position on the screen 2 To release the paused picture and return to normal play back press the PLAY button Pausing a Picture A paused picture will automatically switch to Stop mode after five min utes to protect the VCR and the tape from ...

Страница 35: ... appear If it does not press the VCR TV button once There is a tape in the VCR 1 During tape playback press the MENU button until the main menu appears 2 Press the PLAY button or the STOP button repeatedly to select PICTURE SELECT Then press the F FWD button You may only change the Picture Select setting during tape playback Helpful Hint 2 1 M E N U B TIMER PROGRAMMING AUTO REPEAT OFF PICTURE SELE...

Страница 36: ... tape location where the real time counter was reset to zero press the REW ind button or the F FWD button when playback is stopped When the tape reaches the point at which the real time counter was reset to zero the tape will stop Press the PLAY button to watch the tape 0 00 00 You may only set the real time counter memory at one location at a time If you set the real time counter to zero at a sec...

Страница 37: ...Eject A tape can be ejected with the VCR power on or off but the VCR must be plugged in If a Timer Recording is programmed a tape can only be ejected with the power on Be sure to insert a tape for the Timer Recording then turn off the VCR power Automatic Tracking Adjustment The VCR automatically adjusts tracking to give you the best possi ble picture quality With some recordings however you may ge...

Страница 38: ...cylinder will rotate for about five minutes This is normal The quick play mechanism switches the tape mechanism from Stop to Play in just one second A TV program cannot be recorded Check the connections between the VCR TV antenna cable and Cable Box DBS if applicable Details are on pages seven 10 Make sure the tape has a record tab Details are on page five The VCR will not perform a timer recordin...

Страница 39: ...n TV position The VCR TV light will disappear Check the connections between the VCR TV antenna cable and Cable Box DBS if applicable Details are on pages seven 10 The reception on all channels is poor You may need to tune your TV again Line Input If you accidentally enter Line Input mode LineIn Rear L1 will appear on your TV screen briefly press the CHANNEL o p buttons to select another channel Th...

Страница 40: ...LABLE Warranty exchange is available in all countries where the product is officially distributed by Philips Consumer Electronics In countries where Philips Consumer Electronics does not distribute the product the local Philips service organization will attempt to exchange the product although there may be a delay if the appropriate product is not readily available MAKE SURE YOU KEEP Please keep y...

Страница 41: ... 3 Put the completed Exchange Form a copy of the original sales receipt and the proper payment in an envelope Do not staple or clip these items together Label the envelope Return Documents Enclosed Place this enve lope in the box with the product 4 Seal the box with packing tape and return the product via United Parcel Service UPS insured and freight pre paid to Philips Consumer Electronics El Pas...

Страница 42: ...opying a tape using a second VCR Frame a single paused picture HQ high quality a feature in the VCR that provides a better pic ture Line Input The channel to which you set your VCR during dub bing The line input channel is always channel 00 If you accidentally enter Line Input mode LineIn Rear L1 will appear on your TV screen briefly press the CHANNEL o p button to select another channel Mode a VC...

Страница 43: ...election 11 16 line input mode 32 42 long play 42 lp 42 menu button 18 on screen displays 17 one touch recording 25 out jack 7 9 22 32 pause button 19 21 24 34 paused picture 34 picture select 35 play button 18 21 23 34 playing 23 power button 18 21 cord 7 22 light 20 rec ord light 20 record button 18 21 record tab 5 recording basic 24 one channel watching another 31 prevention 5 timer 26 30 remot...

Страница 44: ...ENERGY STAR is a U S registered mark OPTIONAL ACCESSORIES The following additional items are not provided with your VCR but they are designed for use with your new VCR To order these optional accessories contact us at Philips Parts Accessories Marketing Department 401 East Old Andrew Johnson Highway P O Box 555 Jefferson City TN 37760 1 800 851 8885 VHS Cassette Rewinder M61117 Three Cassette Stor...

Отзывы: