background image

8

c

  Not used.

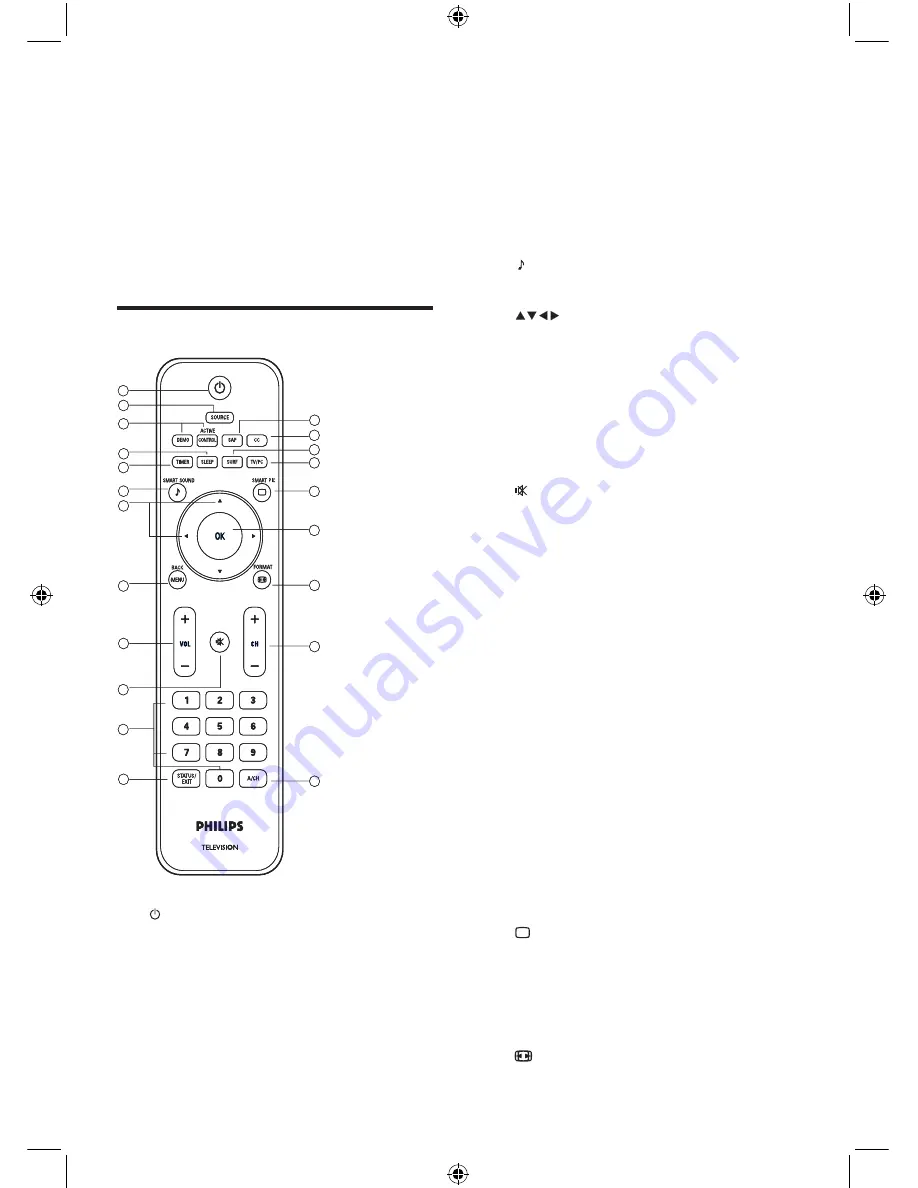
d

  SLEEP

Sets a delay after which the TV switches 

to standby.

e

  TIMER

Sets the clock and timers.

f

  SMART SOUND

Selects pre-defined sound settings.

g


 Navigation keys

Navigates through the menus.

h

  MENU/BACK

Toggles the menu on or off or returns to 

a previous screen.

i

  VOL + / -

Increases or decreases volume.

j

   Mute

Mutes or unmutes audio.

k

  Number buttons

Selects a channel, page or setting.

l

  STATUS/EXIT

Displays status information or exits the 

menu.

m

  SAP

Selects Secondary Audio Program (SAP), 

stereo or mono.

n

  CC

Displays closed captions settings.

o

  SURF

Displays a list of all channels marked as 

favorite.

p

  TV/PC

Toggles between PC mode and the last 

accessed mode.

q

   SMART PIC

Selects pre-defined picture settings.

r

  OK

Activates a selection or accesses the 

menu.

s


 FORMAT

S-Video (side) to be used with Audio L/R 

connectors for camcorder, game console, 

etc. When you use the S-Video (side) for 

video signals, do not use the Composite 

video (side) input for video signals.

j

  Headphones

Headphone stereo mini jack.

For software update.

Remote control


a

   Power

Switches the TV on from standby or 

back to standby. The TV is not powered 

off completely unless it is physically 

unplugged.

b

  SOURCE

Selects connected devices.

1
2
3

4
5

6
7

8

 9

10

11

12

13
14
15
16

17

18

19

20

21

1
2
3

4
5

6
7

8

 9

10

11

12

13
14
15
16

17

18

19

20

21

EN

Содержание 19PFL3403/55

Страница 1: ...Register your product and get support at 19PFL3403 77 EN User manual 3 ...

Страница 2: ......

Страница 3: ... the power cord 11 Insert the remote control batteries 11 5 Use your TV 13 Switch yourTV on off or to standby 13 Switch channels 13 Adjust volume 13 6 Use more of your TV 14 Adjust picture and sound settings 14 Use timers 16 Create and use lists of favorite channels 17 View closed captions subtitles 18 Use child control and rating locks 19 7 Use your TV as a PC monitor 23 Configure yourTV in PC mo...

Страница 4: ...r their respective owners Philips reserves the right to change products at any time without being obliged to adjust earlier supplies accordingly The material in this manual is believed adequate for the intended use of the system If the product or its individual modules or procedures are used for purposes other than those specified herein confirmation of their validity and suitability must be obtai...

Страница 5: ... high volumes Though high volume may sound 2 Important Read this user manual before you start to use this product Pay close attention to this section and follow the safety and screen care instructions The product warranty does not apply if damage is caused by failing to follow these instructions The model and serial number of yourTV can be found on the back of theTV as well as on the packaging Saf...

Страница 6: ... the amount of time you use earphones or headphones at high volume Screen care Turn off and unplug the mains cord before cleaning the screen Clean the screen with a soft dry cloth Do not use substances such as household cleaning agents as these may damage the screen To avoid deformations or colour fading wipe off water droplets as soon as possible Do not touch push rub or strike the screen with ha...

Страница 7: ... console etc i S VIDEO 1 2 3 4 5 6 7 8 9 10 1 2 3 4 5 6 7 8 9 10 3 Your TV Congratulations on your purchase and welcome to Philips To fully benefit from the support that Philips offers register your product at www philips com welcome TV overview This section gives you an overview of commonly usedTV controls and functions Side controls and indicators a Standby indicator remote control sensor b POWE...

Страница 8: ...isplays a list of all channels marked as favorite p TV PC Toggles between PC mode and the last accessed mode q SMART PIC Selects pre defined picture settings r OK Activates a selection or accesses the menu s FORMAT S Video side to be used with Audio L R connectors for camcorder game console etc When you use the S Video side for video signals do not use the Composite video side input for video sign...

Страница 9: ... Selects a picture format t CH Switches to the next or previous channel u A CH Toggles between the current channel and the last viewed channel Englis h EN ...

Страница 10: ...Warning Do not insert the power plug into the wall socket before all the connections are made Large screenTVs are heavy Two people are required to carry and handle a large screenTV Before you move theTV disconnect the cables to prevent breakage In addition to reading and understanding the safety instructions see Safety on page 5 consider the following before positioning your TV Ensure that you alw...

Страница 11: ...atteries AAA Be sure the and ends of the batteries line up with the markings inside the case 3 Slide the cover back into position To connect the power cord Warning Verify that your mains voltage corresponds with the voltage printed at the back of theTV Do not insert the mains cord if the voltage is different 1 Locate the power connector at the back of theTV The location of the power connector vari...

Страница 12: ...12 Note Remove the batteries if you are not going to use the remote control for an extended period of time EN ...

Страница 13: ...mote control or press VOLUME on the side of theTV When headphones are plugged into theTV the loud speakers are automatically muted CHANNEL CHANNEL 5 Use your TV This section helps you perform basicTV operations Switch your TV on off or to standby To switch on If the standby indicator 2 is off press POWER 1 at the side of theTV If the standby indicator 2 is red press on the remote control To switch...

Страница 14: ...rmats 6 Use more of your TV Adjust picture and sound settings This section describes how to adjust picture and sound settings Adjust picture settings 1 Press MENU BACK and select Picture 2 Press OK 3 Press or to highlight Picture 4 Press or to adjust the settings 5 Press MENU BACK to return to the previous menu or press STATUS EXIT to exit The following smart picture settings can be configured Dep...

Страница 15: ...onment Movie Music Voice Personal Use Back Light Adjust the brightness of theTV backlight to suit your surrounding ambient lighting 1 Press MENU BACK and select Features Back Light 2 Press or to adjust the level Tip Toggle FORMAT on the remote control to access the formats 4 3 Shows the classic 4 3 format Widescreen Stretches the classic 4 3 format to 16 9 Adjust sound settings This section descri...

Страница 16: ...top Time Source Channel No Picture Sound Features Install Off 09 30 Off TV 2 SEL MENU ADJ EXIT Timer Sleep Current Time Activate Start Time Stop Time Source Channel No Picture Sound Features Install Off 09 30 Off TV 2 SEL MENU ADJ EXIT 3 Press MENU BACK to return to the previous menu or press STATUS EXIT to exit Use Contrast Optimizes the contrast settings for overall picture quality 1 Press MENU ...

Страница 17: ...ivate Start Time Stop Time Source Channel No Off 09 30 On 10 00 11 00 TV 5 Activate the timer 1 Press MENU BACK and select Features Timer 2 Press OK 3 Press and select Activate On Set the TV timer 1 Press MENU BACK and select Features Timer 2 Press OK 3 Press to highlight Start Time 4 Press to select the hour field then press or to adjust the hours 5 Press to select the minute field then press or ...

Страница 18: ... the previous menu or press STATUS EXIT to exit Closed Caption CC Setting CC Mode Picture Sound Features Install On CC1 SEL MENU ADJ EXIT Closed Caption CC Setting CC Mode Picture Sound Features Install On CC1 SEL MENU ADJ EXIT Create and use your favorite list 1 Press MENU BACK and select Install Fav Channel 2 Press OK 3 Press or to highlight the favorite channel number 4 Use the number keys to k...

Страница 19: ...res Install Off Off Off SEL MENU ADJ EXIT Parental Control Change Password Parental Control TV Rating Movie Rating Unrated Block No Rating Block Picture Sound Features Install Off Off Off SEL MENU ADJ EXIT Summary of caption services Service Description CC 1 and CC 2 Dialog and descriptions for the action on the captionedTV program show on screen Usually CC1 is the most used CC 2 can be used for a...

Страница 20: ...ntense sexual situations suggestive dialog and strong language D Dialog L Language S Sex V Violence TV MA Programs are designed to be viewed by adults and may be unsuitable for children under the age of 17 These programs may contain graphical violence explicit sexual activity and or crude or indecent language L Language S Sex V Violence Use movie ratings lock This section describes how to control ...

Страница 21: ... Block unrated or no rating programs Block unrated programs such as director s cut edition or programs with no advisory data 1 Access the Parental Control menu 2 Press to highlight Unrated Block or No Rating Block 3 Press OK 4 Press or to select On 5 Press MENU BACK to return to the previous menu or press STATUS EXIT to exit 1 Access the Parental Control menu 2 Press and select Movie Rating 3 Pres...

Страница 22: ...arental Control and press or to turn off Parental Control 3 Press MENU BACK to return to the previous menu or press STATUS EXIT to exit Parental Control Change Password Parental Control TV Rating Movie Rating Unrated Block No Rating Block Picture Sound Features Install Off On On SEL MENU ADJ EXIT Parental Control Change Password Parental Control TV Rating Movie Rating Unrated Block No Rating Block...

Страница 23: ...ings of the PC Geometry Auto Adjust Horizontal Shift Vertical Shift Clock Phase 50 50 100 100 Picture Sound Features Install SEL MENU ADJ EXIT Geometry Auto Adjust Horizontal Shift Vertical Shift Clock Phase 50 50 100 100 Picture Sound Features Install SEL MENU ADJ EXIT 7 Use your TV as a PC monitor For information about how to connect a PC to theTV see the Quick Start Caution Before you connect y...

Страница 24: ... can be configured in high definition HD mode For information about your set see the specification When you connect an HD device to yourTV configure the display format of yourTV You might also have to configure the display format of your HD device For information about configuring your device see the documentation of the device Configure your TV in HD mode 1 Connect your HD device to theTV Refer t...

Страница 25: ...to return to the previous menu or press STATUS EXIT to exit The following display settings can be configured when an HD device is connected to theTV Horizontal Shift and Vertical Shift Adjusts the horizontal and vertical position of the picture Englis h EN ...

Страница 26: ...nstall Antenna NTSC 195 30Mhz SEL MENU ADJ EXIT Ch Setup Tuner Mode System Auto Program Fine Tune Picture Sound Features Install Antenna NTSC 195 30Mhz SEL MENU ADJ EXIT 9 Install channels The first time you setup yourTV you are prompted to select a menu language and to installTV and digital radio channels if available This chapter provides instructions on how to reinstall and fine tune channels S...

Страница 27: ... from your list of channels Excluded channels are not accessed when you press CH on the remote control or CHANNEL on the side of theTV Excluded channels can be accessed however by pressing the number keys on the remote control It can be useful to exclude channels with weak signals 1 Press MENU BACK and select Install List 2 Press OK 3 Press or to select a channel number 4 Press to highlight In Lis...

Страница 28: ... accompanying solutions Some problems you encounter with yourTV can be corrected by consulting the following list No picture no sound 1 Check if the fuse or circuit breaker works 2 Plug another electrical device into the outlet to make sure it works or is turned on 3 Power plug is in a bad contact with the outlet 4 Check the signal source No color 1 Change the color system 2 Adjust the saturation ...

Страница 29: ...philips com support Weight TV weight 4 2 kg 19PFL3403 7 7 kg 26PFL3403 TV weight with stand 4 9 kg 19PFL3403 9 1 kg 26PFL3403 Dimensions TV dimensions Height 35 3 cm 19PFL3403 45 8 cm 26PFL3403 11 Product information Note Product information is subject to change without prior notice Supported display resolutions Computer formats see Supported screen resolutions on page 23 Video formats see Support...

Страница 30: ...6PFL3403 TV dimensions with stand Height 39 4 cm 19PFL3403 50 3 cm 26PFL3403 Width 47 3 cm 19PFL3403 67 1 cm 26PFL3403 Depth 16 0 cm 19PFL3403 21 5 cm 26PFL3403 This information is correct at the time of press For updated contact information refer to www philips com support EN ...

Страница 31: ...31 ...

Страница 32: ... 2008 Koninklijke Philips Electronics N V All rights reserved Document order number ...

Отзывы: