background image

FlexAdaptor Getting Started

1 2

For Phase One H 20, H 25 use the color dots:
Red

One-capture Mode

Yellow

Two-capture mode (Large overlap)

Green

Two-capture mode (small overlap)

Start by setting the position selector in two-shot mode
(i.e. yellow dot for LightPhase and green and yellow
dots for Phase One H 20). Then slide the adaptor to the
left by means of the handle. Please note that in order to
slide the adaptor, the blue button on the handle must
be pushed down. Smoothly, the adaptor moves for-
ward until a position is reached. Once reached, the
adaptor physically falls into place with a "click", in this
case at the first yellow respectively green dot. Now
you are ready to capture your first image, provided of
course that you already focused the camera. After cap-
turing, you slide the adaptor to the next position.

Select three-shot mode by turning the position selector
to the white dot and slide the adaptor to the next posi-
tion and so forth until all three captures are carried out.
In order to work in one-shot mode please select the red
dot on the position selector.

The sliding is very accurate, since the Phase One sin-
gle-shot camera back is displaced parallel to the focal
plane of the 4" x 5" view camera. The mechanical con-
struction ensures that the distance between the posi-
tions and the available image area at each position are
exactly alike. The FlexAdaptor slides smoothly and ac-
curately and the masked areas on the focusing screen
provide you with full control over each single capture.

Содержание FlexAdaptor

Страница 1: ...ARTED PostScript Picture black logo Phase One A S Roskildevej 39 DK 2000 Frederiksberg Denmark Tel 45 36 46 01 11 Fax 45 36 46 02 22 Phase One U S 24 Woodbine Ave Northport NY 11768 USA Tel 1 631 757 0400 Fax 1 631 757 2217 ...

Страница 2: ...es All specifications are subject to change without notice Phase One takes no responsibility for any loss or damage sustained while using their products This manual 2003 Phase One A S Denmark All rights reserved No part of this manual may be reproduced or copied in any way without prior written permission of Phase One Printed in Denmark Part 86023004 ...

Страница 3: ...view camera 7 Mounting the camera back in Portrait or Landscape mode 8 Phase One One Shot cable 9 3 Capturing images for stitching The color markings on the FlexAdaptor 11 Capturing image 13 4 Stitching images in Capture One for Macintosh Capture One Stitch developer 14 The command buttons 16 5 Stitching images in Capture One for Windows Capture One Stitch developer 5 The command buttons 20 6 Trou...

Страница 4: ...sily be made This allows for larger prints and more detail in the images 3 It lets you take advantage of the view cameras movements even in one shot mode The FlexAdaptor does not need to be reomoved in order to work in one shot mode Just select one shot mode and shoot like you would with your Phase One single shot camera back The focusing screen consists of masked areas that indicate the available...

Страница 5: ... Which 4 x 5 View Cameras Does the FlexAdaptor Support This very flexible sliding adaptor can be mounted on 4 x 5 view cameras from Sinar and Horseman Linhof Toyo Arca Swiss and Cambo On certain models of view camera the buttons and the rear standard can limit the tilt and swing movement Which Phase One digital backs can be used The FlexAdaptor is designed for the all Phase One One Shot backs Ligh...

Страница 6: ...rt plates are for Hasselblad Contax Maniya 645 and hasselblad H1 Please note If ordering a FlexAdaptor for use with the Light Phase and Phase One H 5 H 10 H 20 for Mamiya RZ 67 Pro II camera the Hasselblad insert is required NOTE The FlexAdaptor DOES NOT support the Phase One H 20 for Rollei cameras Insert Plate for Hasselblad Insert Plate for Contax Insert Plate for Mamiya 645 Insert Plate for Ha...

Страница 7: ...rol of the capturing process The ground glass has printed lines to show the position and orientation of the different Phase One camera backs Phase One LightPhase H 5 H 10 H 101 Phase One H 20 Phase One H 25 The FlexAdaptor Viewfinder The viewfinder that comes with the FlexAdaptor is equipped with a built in magnifying glass Mount the viewfinder on top of the FlexAdaptor s focusing screen by placin...

Страница 8: ...ou can choose to focus your camera by using the magnifying glass or you can flip the viewfinder to the left and only use the focusing screen You simply release the viewfinder s right side and turn it to the left Now you will have direct access to the focusing screen The magnifier can be removed from the focusing screen by flipping it The magnifier returns to its original position in front of the f...

Страница 9: ...ase One does not cover any physical damage caused by dropping the FlexAdaptor Mounting the FlexAdaptor on a view camera 1 Remove the focusing screen on your view camera 2 Mount the FlexAdaptor onto the view camera In order to facilitate mounting the FlexAdaptor matches both the mounting of the focusing screen of the view camera as well as its closing mechanisms 3 Remove the FlexAdaptor once your w...

Страница 10: ...n use all available camera settings Also you may use all types of lighting and you may even use wide angle lenses Mounting the digital back in Portrait or Landscape Mode As mentioned above the FlexAdaptor allows image capturing in both portrait and landscape mode In order to switch from portrait mode to landscape mode and vice versa the interchangeable insert onto which the digital back is mounted...

Страница 11: ... 20 cannot be rotated The Phase One One Shot sync cable Phase One s backs works in the way that the camera wakes up the camera back prior to the exposure The camera body does this electronically or mechanically This feature does not work on a view camera In this case the lens shutter must be fired twice to get an image The first shot is to wake up the back and the next shot will capture an image T...

Страница 12: ...ontact the back receives the wake up signal and prepares for taking a capture and the back will remain active until it times out In the instance of a time out a Dialog box will be displayed on the computer This cable reduces the work of firing and cranking the shutter twice and reduces the risk of moving the camera due to the cranking of the lens shutter ...

Страница 13: ...s on the small po sition selector dial on the left right of the FlexAdaptor Each color identifies the position of the stops used for stitching For the Phase One LightPhase H 5 H 10 use the color dots Red One capture mode Yellow Two capture mode White Tree capture mode Colored selector dots Position Selector dial FlexAdaptor Slide Release ...

Страница 14: ...ow you are ready to capture your first image provided of course that you already focused the camera After cap turing you slide the adaptor to the next position Select three shot mode by turning the position selector to the white dot and slide the adaptor to the next posi tion and so forth until all three captures are carried out In order to work in one shot mode please select the red dot on the po...

Страница 15: ... into the desired capture position for the first capture It does not matter is you shoot the left or right image first The order can be changed in the Capture One stitch developer later 3 Capture the first image and slide the FlexAdaptor into the second position and capture the second image and third image Keep in mind that even small vibra tions can change the tilt and swing of the camera and mak...

Страница 16: ...mple process Keep in mind that the Curve Histogram Unsharp Mask Color Management and other image settings in Capture One will be similar for all the images stitched together 1 Now select the images to be stitched in the capture collection of Capture One Selecting multiple images can be done by Shift Clicking on images ...

Страница 17: ...e Collection 3 In the FlexAdaptor Stitch Developer arrange the im ages if the order is not right and give the stitched im age a filename and start the stitching process by click ing the stitch images button The stitching process will now start and stitch the im ages and make it a tiff file FlexAdaptor Getting Started ...

Страница 18: ...button in the capture Collection This will bring the selected captures into the FlexAdaptor Stitch Developer Capture One Stitch Developer Resize window The resize window toggles between a large and a small stitching window FlexAdaptor Getting Started ...

Страница 19: ...e overlap of the stitching Select Narrow wide or Landscape depending on the capture overlap used when capturing the images Swap images The swap images button s is used to set the order of the images If the stitched preview has the leftmost image in the right side click the Swap Images button to get the order right FlexAdaptor Getting Started ...

Страница 20: ...process Keep in mind that the Curve Histogram Unsharp Mask Color Management and other image settings in Capture One will be similar for all the images stitched together 1 In the Capture Collection of Capture One for windows select two or tree images by shift clicking FlexAdaptor Getting Started ...

Страница 21: ...llection of Capture One In the FlexAdaptor Stitch Developer give the stitched image a filename and start the stitching process by clicking the stitch images button If the capture files needs to be re arranged the stitch order can easily be set right here to The stitching process will now start and stitch the images and make it a tiff file FlexAdaptor Getting Started ...

Страница 22: ...ptures This adds the selected Captures in the Capture Collec tion to the Stitch Developer window Identify stitch Order Identify Stitch Order lets the operator select the image that should be at the left in the final developed stitched image file Clear capture selections Clears the Stitch Developer window FlexAdaptor Getting Started ...

Страница 23: ...tch preview area Gives a larger preview area of the Stitch Developer window Image title Sets the image title for the procesed tiff file Overlap Sets the overlap of the stitching Select narrow wide or landscape depending on the capture overlap used when capturing the images FlexAdaptor Getting Started ...

Страница 24: ...acks and generator strobes may vary with up to 1 3 f stop from one strobe pop to another This is due to the fact that the capacitors may leak power and are there fore not always fully charged when the strobe pops Also most strobe systems are optimized for the so called Near Daylight light However the color temperature of the Near Daylight light will change if the effect of the strobe system change...

Страница 25: ...s Most lenses have an image circle that by far exceeds the cap ture area of the FlexAdaptor However most lenses will lack light in the corners This might not be seen when shooting film but can bee seen using a digital camera Especially older lens designs and vide angle lenses has this flaw My final stitched image is not sharp in the corners Most lenses have the highest optical resolution in the ce...

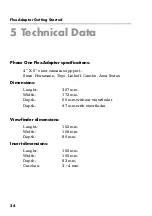
Страница 26: ...rsmann Toyo Linhoff Cambo Arca Swiss Dimensions Lenght 307 mm Width 172 mm Depth 50 mm without viewfinder Depth 97 mm with viewfinder Viewfinder dimensions Lenght 102 mm Width 108 mm Depth 86 mm Insert dimensions Lenght 106 mm Width 106 mm Depth 83 mm Catches 3 4 mm FlexAdaptor Getting Started ...

Страница 27: ...25 FlexAdaptor Getting Started ...

Отзывы: