Phase 3 J-3 CUB 370 RTF Скачать руководство пользователя страница 16

6

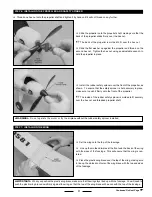
STeP 4:  RANGe TeSTING THe RADIO CONTROL SYSTeM

After getting out to your flying field, but before you fly for the first time, you must range test the radio control system.  This will ensure 
that the transmitter is "talking" correctly to the airplane.  You should follow this procedure before every first flight of the day and after 

you have a hard landing, crash, or after a repair.

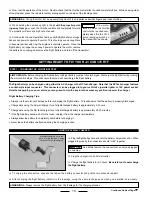
  Turn on the transmitter, then plug in the flight battery and install it into the fuselage.

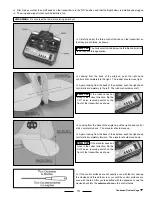
  Set the airplane on the ground and extend the transmitter's antenna completely.  Move the right-hand control stick on the transmit

-

ter several times to check the controls.  They should operate smoothly.

  Walk approximately 75ft. (25m) from the airplane and move the right-hand control stick on the transmitter once more.  Check to 

make sure that the controls are operating smoothly at this distance.  You may need a friend to help you with this step.

WARNING


If the airplane does not range check, don't fly!  Please refer to the troubleshooting guide on page # 22.

  The flying field you choose should be a large, open field with grass.  There should not be any vehicles, buildings, power lines, 

trees, large rocks or anything else that your airplane can crash into.

STeP 3:  CHOOSING YOuR FLYING FIeLD

YOuR FIRST FLIGHT

After all this, we bet you're ready to actually go flying!  If you've skipped anything prior to this section, we suggest going back through 

the instructions.  Doing so will help ensure your success.

Some Things to Remember:

  With the flight battery fully charged, you can expect anywhere from 4-6 minutes of flight time, so plan your landing accordingly.

  Make sure that your flying field has no obstructions you can fly into. 


  The flying field should be large enough that you can land anywhere if you get into trouble.  Until you are proficient at flying the 

airplane, you don't want to have to worry about landing in a small, localized area.

  There should be no wind during your first few flights; also try to orientate yourself so you're not looking directly into the sun while 

flying.

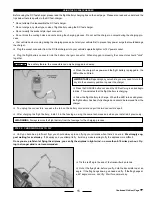
  Fully charge the flight battery just before coming to the flying field.  Do not charge the flight battery the night before, then go flying 

the next day.  The flight battery will have lost some charge and it won't produce full power.

  Double-check that the elevator and rudder control surfaces are moving in the correct direction.  If they aren't, flip the servo reversing 

switches as described on page # 3.

  Double-check that the elevator and rudder control surfaces are centered and that the trim tabs on the transmitter are centered, too.  

If not, center them as described on page # 3.

***WARNING***WARNING***WARNING***WARNING***WARNING***WARNING***

If at any time during your flight, the airplane gets stuck up in a tree, in power lines or on a roof top, 

DO NOT attempt to retrieve the 

airplane yourself.

  The airplane is not worth the risk.  We strongly suggest contacting a professional for assistance.  Attempting to 

retrieve the airplane yourself in any of these cases could potentially result in extreme harm or even death.

Continued On Next Page


Содержание J-3 CUB 370 RTF

Страница 1: ...gr Wing Loading 13 Ounces Per Square Foot 39 5gr dm2 Molded from Durable Plastic and Foam Preinstalled 4Ch FM 27MHz USA Radio Control System 35MHz EU Three Channel Control Elevator Rudder and Throttle...

Страница 2: ...the flight battery may occur To prevent the flight battery from overheating during the charging process allow the flight battery to completely cool before recharging it Always completely discharge th...

Страница 3: ...Assembly Fuselage Assembly Not Shown SmalL wood ScrewS 12 Landing Gear Wing Struts and Clips 4 Propeller and Spinner Phase 3 is proud to present the J 3 Cub This trainer aircraft is modeled after air...

Страница 4: ...rsing Switches These switches allow you to electronically change the direction the servos move Throttle Control Stick This stick can move both right and left and up and down at the same time and is us...

Страница 5: ...e airplane forward Vertical Tail Provides stability for the airplane during turns Wing The wing has a special airfoil shape and provides the main source of lift for the airplane The flight battery inc...

Страница 6: ...CUB 370 RTF Step 1 Installing the Transmitter Batteries Continued On Next Page Step 2 Installing the horizontal tail Carefully slide the horizontal tail into the slot in the back of the fuselage When...

Страница 7: ...nt portion of the vertical tail down into the mounting slot in the fuselage Push the vertical tail down in position When aligned properly the tab in the base of the vertical tail should fit into the n...

Страница 8: ...the radio system later PRO TIP Carefully snap the plastic clevis on the pushrod wire into the outermost hole in the rudder control horn We suggest installing the clevis into the outermost hole in the...

Страница 9: ...it firmly onto the front of the propeller The inside of the rubber safety spinner is molded to fit securely over the hex nut and threaded propeller shaft Step 7 Installing the wing Set the wing onto t...

Страница 10: ...are four plastic wing struts included There are two longer ones for the front and two shorter ones for the rear When installing them in the next few procedures make sure to install the two front wing...

Страница 11: ...ll need to make sure that the transmitter is turned on Turn on the transmitter The needle in the voltage meter should move into the silver safe area If it doesn t replace the batteries with a fresh se...

Страница 12: ...he flight battery into the connector that is inside the fuselage When plugged in properly the connectors should click together IMPORTANT As a safety feature the connectors can only be plugged in one w...

Страница 13: ...to the left The rudder should move left If the rudder does not move in the correct direction flip the CH 1 servo reversing switch on the front of the transmitter as shown PRO TIP Looking from the back...

Страница 14: ...ips Always run the motor until it stops before recharging the flight battery This will ensure that the battery is properly discharged Charge time using the AC wall charger for a fully discharged batte...

Страница 15: ...you become a proficient flyer you should always plan on flying your airplane when there s no wind We strongly sug gest waiting for a calm day If it s windy and you attempt to fly it will only make lea...

Страница 16: ...will help ensure your success Some Things to Remember With the flight battery fully charged you can expect anywhere from 4 6 minutes of flight time so plan your landing accordingly Make sure that your...

Страница 17: ...e ground making sure that the airplane is pointing directly into the wind Slowly push the throttle control stick forward until the motor is running at full power The airplane will quickly begin to acc...

Страница 18: ...direction you want move the control stick gently in the opposite direction to level the wing then allow the control stick to return to center The longer you hold the control stick over the tighter th...

Страница 19: ...ottle Hold the parts together and in alignment until the glue fully cures Apply a strip of clear Scotch tape over the seams to strengthen the joint even more It is very important that you use no solve...

Страница 20: ...ally the transmitter charger and flight battery Do not allow any of the electrical components to get wet or damage may occur Periodically double check that the propeller nut is tight Check the propell...

Страница 21: ...rystal Set Ch 3 PH109024 27MHz FM Crystal Set Ch 4 PH109025 27MHz FM Crystal Set Ch 5 PH109026 27MHz FM Crystal Set Ch 6 PH109028 Motor Controller Sorry No Photo Available PH109030 Receiver w o Crysta...

Страница 22: ...ter trim tab as control input described on page 19 5 Airplane constantly climbs or A You are flying in too much wind A Fly when there is no wind descends without any B The airplane is out of trim adju...

Отзывы: