background image

20

Prepar

ations

G

H

I

B

C

D

E

F

Needles

The sewing machine needle plays an important 

role in successful sewing. Use only quality needles. 

We recommend needles of system 130/705H. 

The needle package included with your machine 

contains needles of the most frequently used sizes.

Universal needle (B)

Universal needles have a slightly rounded point 

and come in a variety of sizes. For general sewing 

in a variety of fabric types and weights.

Stretch needle (C)

Stretch needles have a special scarf to eliminate 

VNLSSHGVWLWFKHVZKHQWKHUHLVDÁH[LQWKHIDEULF
)RUNQLWVVZLPZHDUÁHHFHV\QWKHWLFVXHGHVDQG

leathers. Marked with a yellow band.

Embroidery needle (D)

Embroidery needles have a special scarf, a slightly 

rounded point and a slightly larger eye to avoid 

damage to thread and materials. Use with metallic 

and other specialty threads for embroidery and 

decorative sewing. Marked with a red band.

Denim needle (E)

Denim needles have a sharp point to penetrate 

WLJKWO\ZRYHQIDEULFVZLWKRXWGHÁHFWLQJWKHQHHGOH
)RUFDQYDVGHQLPPLFURÀEHUV0DUNHGZLWKDEOXH

band.

Wing needles (F)

The Wing needle has wide wings on the side of 

the needle to poke holes in the fabric when sewing 

HQWUHGHX[DQGRWKHUKHPVWLWFKHVRQQDWXUDOÀEHU

fabrics. Decrease the stitch width for best results.

Note: Change the needle often. Always use a straight 

needle with a sharp point (G).
A damaged needle (H) can cause skipped stitches, 

breakage or snapping of the thread. A damaged needle 

can also damage the stitch plate.
Do not use asymmetrical twin needles (I), since it may 

damage your sewing machine.

Содержание quilt ambition 2.0

Страница 1: ...Owner s manual ...

Страница 2: ... machine by a person responsible for their safety Children should be supervised to ensure that they do not play with the sewing machine Use this sewing machine only for its intended use as described in this manual Use only attachments recommended by the manufacturer as contained in this manual Never operate this sewing machine if it has a damaged cord or plug if it is not working properly if it ha...

Страница 3: ...sulation Use only identical replacement parts 6HH LQVWUXFWLRQV IRU 6HUYLFLQJ RI RXEOH QVXODWHG SSOLDQFHV SAVE THESE INSTRUCTIONS SERVICING OF DOUBLE INSULATED PRODUCTS In a double insulated product two systems of insulation are provided instead of grounding No ground means is provided on a double insulated product nor should a means for grounding EH DGGHG WR WKH SURGXFW 6HUYLFLQJ RI D GRXEOH LQVXO...

Страница 4: ......

Страница 5: ...g machine in sewing cabinet 14 Thread cutter 14 Spool pins 14 Threading the machine 15 Needle threader 16 Threading for twin needle 16 Bobbin winding 17 Inserting the bobbin 18 IDT system integrated dual feed 18 Presser foot pressure 19 Thread tension 19 Needles 20 Changing the needle 21 Lowering feed dogs 21 Presser foot lift 21 Changing the presser foot 21 Buttons 22 Touch screen 23 Settings 24 ...

Страница 6: ... Stitch plate 10 Bobbin cover 11 Lower thread guide 12 Presser foot lift 13 Needle screw 14 Needle thread guide 15 Presser foot bar and presser foot holder 16 Presser foot 17 Free arm 18 Buttons and touch screen 19 Handwheel Rear side 20 Main switch connectors for power cord and foot control 21 Handle 22 IDT system 23 Slide for lowering the feed dogs 1 2 3 4 5 17 5 18 19 6 7 8 9 10 12 11 13 14 16 ...

Страница 7: ...plus space for needles and other accessories Store the accessories in the tray so they are easily accessible 35 Space for accessories 36 Removable tray for presser feet 37 Removable bobbin holder Accessories Included accessories 38 Bobbins 5 416475801 39 Felt pad 40 Screwdriver for needle plate 41 Multi purpose tool 42 Spool cap large 2 43 Spool cap small 44 Seam ripper brush as one 45 Stylus 46 E...

Страница 8: ... of the hem edge Zipper foot 4 with IDT system This foot can be snapped on either the right or the left of the needle making it easy to sew close to both sides of the zipper teeth Move the needle position to the right or left to sew closer to zipper teeth One step Buttonhole foot 5B This foot has a space in the back to set the size of the buttonhole The machine ZLOO VHZ D EXWWRQKROH WR ÀW WKDW EXW...

Страница 9: ...10 Elastic stitch Sewing elastic darning patching 11 Triple stretch stitch Sewing elastic darning patching and decorative sewing 12 Honeycomb stitch Decorative stitch for stretch fabrics and hems Also used with elastic thread in the bobbin 13 Bridging stitch Joining fabrics and quilt batting decorative stitch for quilting hemstitching 14 Foundation elastic stitch Joining stitch for undergarments t...

Страница 10: ... shirts and linen 33 Standard buttonhole Basic buttonhole for blouses shirts and jackets Also for pillowcases 34 Rounded buttonhole with lengthwise tack Buttonhole for garments 35 Eyelet buttonhole with pointed tack Tailors buttonhole or decorative buttonhole 36 Eyelet buttonhole with lengthwise tack Tailors buttonhole for jackets and trousers 37 Rounded buttonhole Buttonhole for light garments or...

Страница 11: ...82 183 184 185 186 187 Stitch Number 188 189 190 191 192 193 194 195 Sewing techniques stitches 196 Beading stitch 5mm For sewing on pearls beads etc Requires optional Beading Foot Part number 820605 096 197 Beading stitch 3mm For sewing on pearls beads etc Requires optional Beading Foot Part number 820604 096 198 Candlewicking Create the look of hand embroidered French knots Requires optional Can...

Страница 12: ...12 Introduction Alphabets Block letters Outline letters Script letters Cyrillic letters ...

Страница 13: ...socket on the bottom right side of the machine A 2 Connect the power cord to the rear socket on the bottom right side of the machine B Plug the cord into the wall socket 3 Press the ON OFF switch to ON to turn on power and light C Pack away after sewing 1 Switch the main switch off 2 Unplug the cord from the wall socket and then from the machine 3 Unplug the foot control cord from the machine Wind...

Страница 14: ...front as shown B Spool pins Your machine has two spool pins a main spool pin and an auxiliary spool pin The spool pins are designed for many types of thread The main spool pin is adjustable and can be used both in a horizontal position the thread reels off the spool and a vertical position the thread spool rotates The horizontal position can be used for most sewing and embroidery threads and the v...

Страница 15: ...the machine A Slide on a large spool cap and place a felt pad under the thread spool Threading the machine Make sure that the presser foot is raised and the needle is in its highest position 3ODFH WKH WKUHDG RQ WKH VSRRO SLQ DQG ÀW WKH appropriately sized spool cap 2 Pull the thread into the thread guides B from back to front Pull the thread between the tension discs C 3 Thread down through the ri...

Страница 16: ...al threading of the needle When threading the needle manually make sure that the needle is threaded from front to back Threading for twin needle Replace the sewing needle with a twin needle Make sure that the presser foot is raised and the needle is in its highest position 3ODFH WKH WKUHDG RQ WKH VSRRO SLQ DQG ÀW WKH appropriately sized spool cap Insert the auxiliary spool pin Slide on a large spo...

Страница 17: ...hrough the hole in the bobbin C from the inside to the outside 4 Place an empty bobbin on the bobbin spindle 5 Push the bobbin lever to the right to wind A pop up appears on the screen to inform you that bobbin winding is on Press the foot control or the start stop button to start winding the bobbin When the bobbin is full the bobbin winding will slow down and stop automatically The pop up closes ...

Страница 18: ... For sewing any fabric precisely PFAFF quilt ambition 2 0 sewing machine provides the ideal solution the integrated dual feed IDT system As on industrial machines the IDT system feeds the fabric from the top and bottom at the same time The fabrics are fed precisely On light fabrics such as silk or rayon the dual feed prevents puckering of the seam The even feeding action also ensures perfect match...

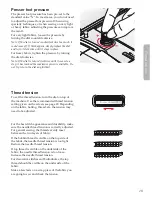
Страница 19: ...Do not try to turn the dial any further Thread tension To set the thread tension turn the dial on top of the machine Use the recommended thread tension setting given on the screen see page 29 Depending on the fabric batting thread etc the tension may need to be adjusted For the best stitch appearance and durability make sure the needle thread tension is correctly adjusted For general sewing the th...

Страница 20: ...a special scarf a slightly rounded point and a slightly larger eye to avoid damage to thread and materials Use with metallic and other specialty threads for embroidery and decorative sewing Marked with a red band Denim needle E Denim needles have a sharp point to penetrate WLJKWO ZRYHQ IDEULFV ZLWKRXW GHÁHFWLQJ WKH QHHGOH RU FDQYDV GHQLP PLFURÀEHUV 0DUNHG ZLWK D EOXH band Wing needles F The Wing n...

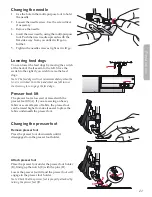
Страница 21: ... when the lever is switched Turn the handwheel one full turn or start sewing to re engage the feed dogs Presser foot lift The presser foot is lowered or raised with the presser foot lift A If you are sewing on heavy fabric or several layers of fabric the presser foot can be raised higher to make it easier to place the fabric underneath the presser foot Changing the presser foot Remove presser foot...

Страница 22: ...t stop 5 Press this button to start or stop the machine without using the foot control Press the button once to start and press it again to stop Reverse 6 with indicator 7 For permanent reverse press the button before starting to sew The reverse indicator 7 will be lit and the machine sews in reverse until you press the button again to cancel If you press the reverse button while sewing the machin...

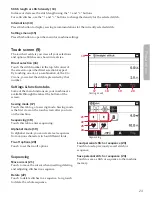
Страница 23: ...by that number Settings functions tabs Some of the main functions on your machine are available through the tabs at the bottom of the screen Sewing mode 17 Touch this tab to go to sewing mode Sewing mode LV WKH ÀUVW YLHZ RQ WKH WRXFK VFUHHQ DIWHU RX WXUQ on the machine Sequencing 18 Touch this tab to enter sequencing Alphabet mode 19 In alphabet mode you can create text sequences from various char...

Страница 24: ...win needle when such a stitch is selected When activated the twin needle icon will be shown in sewing mode The setting is kept until you deactivate it Note Twin needle and stitch width safety cannot be used at the same time A warning sound will be heard when trying to activate both settings Stitch width safety Select this function when using a straight stitch needle plate or a straight stitch pres...

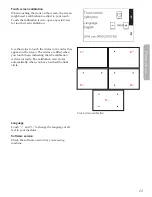
Страница 25: ... Use the stylus to touch the circles in the order they DSSHDU RQ WKH VFUHHQ 7KH FLUFOHV DUH ÀOOHG ZKHQ you touch them indicating that the calibration is done correctly The calibration view closes DXWRPDWLFDOO ZKHQ RX KDYH WRXFKHG WKH ÀQDO circle Language Touch and to change the language of all text in your machine Software version Check the software version for your sewing machine Touch screen cal...

Страница 26: ...26 Preparations ...

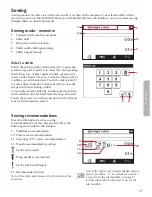
Страница 27: ...e to select it Sewing 6HZLQJ PRGH LV WKH ÀUVW YLHZ RQ WKH VFUHHQ DIWHU RX WXUQ RQ WKH PDFKLQH RXU VHOHFWHG VWLWFK ZLOO EH VKRZQ LQ UHDO VL H LQ WKH VWLWFK ÀHOG HUH RX ZLOO ÀQG DOO WKH EDVLF LQIRUPDWLRQ RX QHHG WR VWDUW VHZLQJ Straight stitch is selected by default Sewing recommendations Press the info button to show sewing recommendations for the current stitch Press the button again to hide the i...

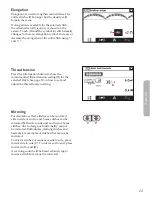
Страница 28: ...he setting is changed Stitch width stitch positioning 1 Use and to increase or decrease the stitch width For straight stitches use and to move the stitch position left or right When a straight stitch is selected the icon A changes to show that stitch positioning is active instead of stitch width Stitch length stitch density 2 Use and to increase or decrease the stitch length For satin stitches the...

Страница 29: ...how the recommended thread tension setting B for the selected stitch See page 19 on how to set and adjust the thread tension setting Mirroring For decorative effect stitches can be mirrored side to side or end to end Some stitches can be mirrored both side to side and end to end Some stitches due to design or functionality cannot be mirrored Buttonholes darning stitches and bartacks are examples o...

Страница 30: ...ng A will be performed as soon as you start to sew 2 Press the reverse button E to activate tie off end B The programmed tie off indicator F ZLOO EH OLW 7KH PDFKLQH ZLOO ÀQLVK WKH VWLWFK and do a tie off 3 To deactivate the tie off options go to tie off options as described above and deselect the functions Reverse button functions in tie off options Stop sewing and press the reverse button E twice...

Страница 31: ...ike saving a sequence See page 41 Adjustments in stitch length width density and mirroring will be saved Note Some special stitches such as buttonholes cannot be saved A pop up will inform you of this when you try to save such a stitch Load personal stitch Loading a stitch works just like loading a sequence Open the load sequence menu by touching the load icon B Select the stitch you want to load ...

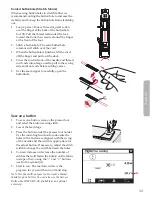
Страница 32: ...ttonhole on your garment 2 Attach buttonhole foot 5B and pull out the button holder plate Insert the button The button will determine the length of the buttonhole 3 Make sure that the thread is pulled though the hole in the presser foot and placed under the foot 4 Select the buttonhole you want to sew and adjust the width and density as desired Note Always sew a test buttonhole on a scrap piece of...

Страница 33: ...nds before cutting excess 5 Use the seam ripper to carefully open the buttonhole Sew on a button 1 To sew on a button remove the presser foot and select the button sewing stitch 2 Lower the feed dogs 3 Place the button under the presser foot holder Use the mirroring function to make sure the holes in the button are aligned with the swing of the needle and the width is appropriate for the actual bu...

Страница 34: ...t to repeat the same size darning square just continue sewing To set a different length of the darning stitch select the stitch again and continue with steps 3 and 4 above Note Darning stitches can also be sewn using the buttonhole foot 5B Set the length of the darning stitch by pulling out the button holder plate and lower the buttonhole lever to sew the stitch Sewing hems in heavy fabric When se...

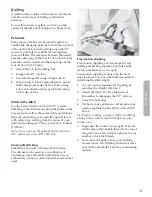
Страница 35: ... and working out Place a pin every 6 8 inches 15 20 cm Note You can also use the optional Stitch in Ditch w IDT system presser foot 820 925 096 Crazy quilt stitching Embellish your quilt with decorative stitches The stitches can be sewn in a coordinating or contrasting color Decorative threads like rayon embroidery or heavy cotton threads are sometimes used Free motion stippling Free motion stippl...

Страница 36: ...m stitch number 17 is especially suitable for stretchy fabrics because the zigzag in WKH VWLWFK OHWV WKH VWLWFK VWUHWFK 7KH KHP LV ÀQLVKHG and sewn at the same time There is no need to ÀQLVK WKH UDZ HGJH ÀUVW RQ PRVW NQLWV Sewing in zippers There are different ways to sew in zippers Follow the directions included with your pattern for best results For all types of zippers it is important to sew cl...

Страница 37: ...ears on the screen Replace the empty bobbin with a full one DQG SUHVV 2 WR FRQÀUP Main motor overload If you are sewing on very heavy fabric or if the machine is blocked when sewing the main motor can get overloaded and the machine will stop sewing The pop up message will close when the main motor and power supply are secure ...

Страница 38: ...tch Move cursor 4 7KH FXUUHQW SRVLWLRQ LQ WKH VWLWFK ÀHOG LV PDUNHG E a cursor 2 Inserted stitches will be placed to the right of the cursor position Move the cursor through the sequence using the left and right arrows Sequencing The sequencing function on your machine makes it possible to combine stitches and letters into sequences You can add up to 20 stitches and letters in the same sequence Yo...

Страница 39: ...list of available fonts Select desired font by touching it The drop down list closes Touch the letters and characters on the keyboard 5 to create your sequence Each letter will be placed to the right of the cursor SRVLWLRQ LQ WKH VWLWFK ÀHOG To move the cursor through the sequence touch the arrows to the left and right of the keyboard on the screen 7 Select character set To change character set be...

Страница 40: ...ffect the entire sequence and will not be saved Delete stitches or letters in a sequence To delete a stitch use the left and right arrows on the screen to highlight that stitch and press delete 8 7R GHOHWH WKH HQWLUH VHTXHQFH IURP WKH VWLWFK ÀHOG long press delete A pop up message will appear asking if you wish to delete all stitches Select OK The pop up message closes and all stitches are GHOHWHG...

Страница 41: ...uence menu Select the sequence you want to load Selected memory number is surrounded by a frame RQÀUP RXU VHOHFWLRQ E SUHVVLQJ 2 The sequence will appear in sequencing mode to the right of the cursor position To exit the load sequence menu without loading touch cancel D Sewing a sequence To sew the sequence return to sewing mode by pressing the sewing mode tab A or step on the foot control Your se...

Страница 42: ...lean the feed dogs and the bobbin area with the brush found with the accessories Cleaning under the bobbin area Clean the area under the bobbin case after sewing several projects or any time you notice an accumulation of lint in the bobbin case area Remove the bobbin case by lifting it up and to the right Clean the area with the brush or with a dry cloth Put the bobbin case back into the hook race...

Страница 43: ...uched Calibrate the screen Calibrate is found in the settings menu The machine skips stitches Did you insert the needle properly Insert needle correctly see page 21 Did you insert a wrong needle Use needle system 130 750 H Is the needle bent or blunt Insert a new needle Did you thread the machine properly Check how the machine is threaded Is the correct presser foot used Attach correct presser foo...

Страница 44: ...machine does not feed or feeds irregularly Did you thread the machine properly Check how the machine is threaded Has sewing lint collected between the feed dogs Remove the stitch plate and clean the feed dogs with a brush Have your sewing machine serviced regularly by your local authorized PFAFF dealer If you have followed this trouble shooting information and still have problems take your sewing ...

Страница 45: ...45 Maintenance ...

Страница 46: ......

Страница 47: ... ODQGÀOOV RU GXPSV hazardous substances can leak into the groundwater and get into the food chain damaging your health and well being We reserve the right to change the machine equipment and the assortment of DFFHVVRULHV ZLWKRXW SULRU QRWLFH RU PDNH PRGLÀFDWLRQV WR WKH SHUIRUPDQFH RU GHVLJQ 6XFK PRGLÀFDWLRQV KRZHYHU ZLOO DOZD V EH WR WKH EHQHÀW RI WKH XVHU DQG WKH SURGXFW Intellectual property PFA...

Страница 48: ...www pfaff com 413 39 70 26A English InHouse 2014 KSIN Luxembourg II S ar l All rights reserved Printed in Germany on environmentally friendly paper ...

Отзывы: