background image

 2

016-

04

14

FieldConnex® Basic Segment Coupler

Installation

3.2

Mounting and Dismounting

The following chapter describes how to mount or dismount the device.

3.2.1

Mounting

Mounting the Device

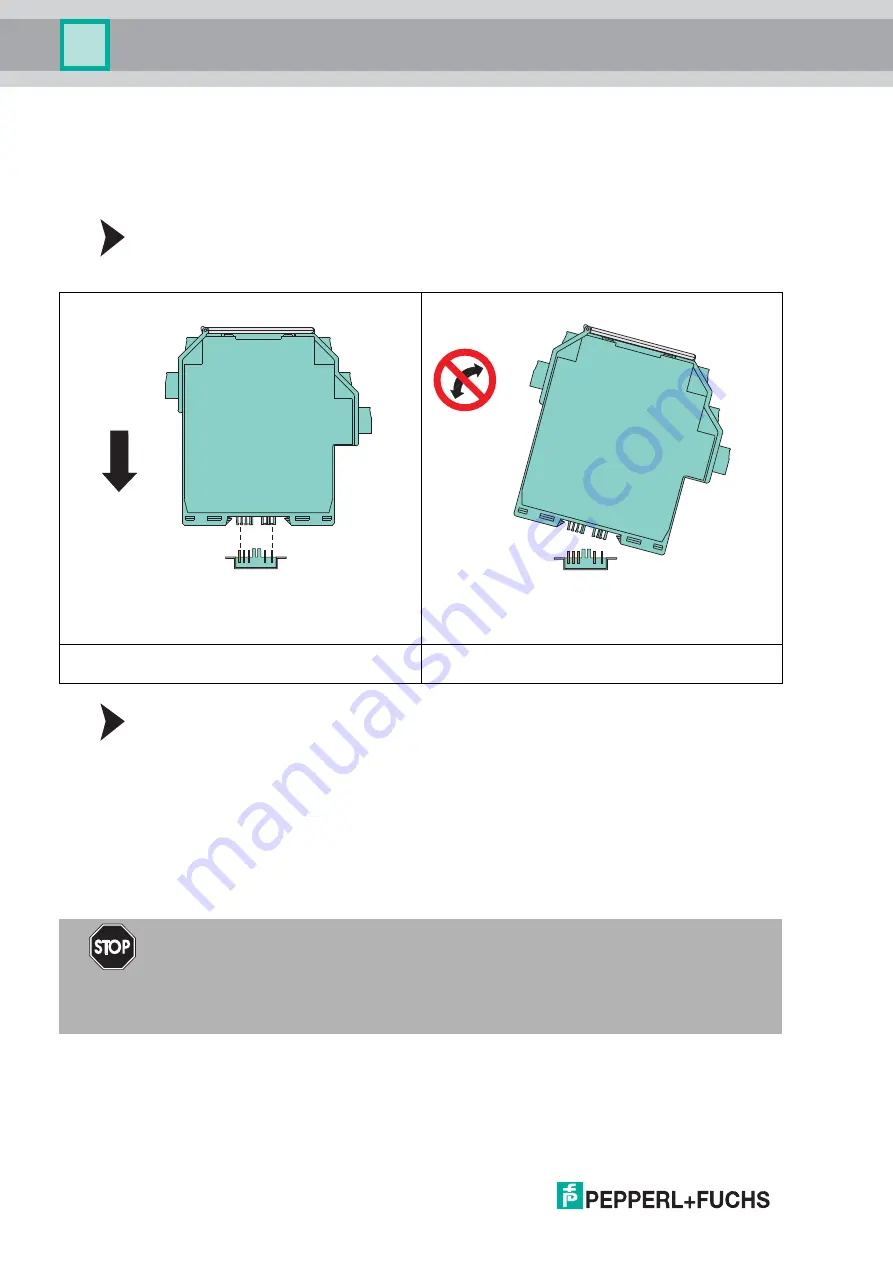
Snap the device onto the DIN mounting rail in a 

vertical downward

 movement. See figure 

below.

Mounting the Terminal Blocks

The insulation of the removable terminal blocks protect against direct contact. If you replace the 

terminal blocks, observe the rated insulation voltage. If the rated voltage is higher than 50 V AC, 

proceed as follows:
1. Switch off the voltage.
2. Connect the terminal blocks or disconnect the terminal blocks.

3.3

Connection Layout and Connection

The following section describes the connection details of the Segment Coupler with special 

focus on the torques required for a safe installation.

CORRECT: Device snapped on vertically.

INCORRECT: Device snapped on from the side.

Can damage the contacts and cause the device to fail.

Danger!

Explosion hazard from exposed conductors
Exposed conductors of inadequately attached cables can cause sparks that can ignite the 

surrounding potentially explosive atmosphere.
When installing the device ensure that the cables are adequately attached.

Содержание FieldConnex KFD2-BR-1.PA.1500

Страница 1: ... R FieldConnex Basic Segment Coupler KFD2 BR 1 PA 1500 PROCESS AUTOMATION MANUAL ...

Страница 2: ...elivery for Products and Services of the Electrical Indus try published by the Central Association of the Electrical Industry Zentralverband Elektrotechnik und Elektroindustrie ZVEI e V in its most recent version as well as the supplementary clause Expanded reservation of proprietorship FieldConnex Basic Segment Coupler ...

Страница 3: ...ptions 11 3 1 1 DIN Mounting Rail 12 3 1 2 Power Rail 12 3 2 Mounting and Dismounting 14 3 2 1 Mounting 14 3 3 Connection Layout and Connection 14 3 3 1 Power Supply without Power Rail 16 3 3 2 Power Supply with Power Rail 16 3 4 Shielding and Grounding 19 3 5 Bus Termination 20 3 6 Accessories 20 4 Commissioning 21 4 1 Cyclic Data Exchange 21 4 1 1 Information on GSD File Conversion 21 4 1 2 Info...

Страница 4: ...4 FieldConnex Basic Segment Coupler 6 Appendix 26 6 1 Ordering Information 26 6 2 Electromagnetic Compatibility Verification 26 6 3 Referenced Documents 27 ...

Страница 5: ... conformity Certificates Control drawings Additional documents 1 2 Target Group Personnel Responsibility for planning assembly commissioning operation maintenance and dismounting lies with the plant operator Only appropriately trained and qualified personnel may carry out mounting installation commissioning operation maintenance and dismounting of the product The personnel must have read and under...

Страница 6: ...bols Action This symbol indicates a paragraph with instructions You are prompted to perform an action or a sequence of actions Danger This symbol indicates an imminent danger Non observance will result in personal injury or death Warning This symbol indicates a possible fault or danger Non observance may cause personal injury or serious property damage Caution This symbol indicates a possible faul...

Страница 7: ...ocol timing of the master The pinout of the connectors is identical The power consumption of the KFD2 BR 1 PA 1500 is lower compared to its predecessor Functional Description The basic Segment Coupler is a compact DIN mounting rail mounted device supporting 1 powered PROFIBUS PA segment for up to 31 PROFIBUS PA devices The Segment Coupler simultaneously performs the following tasks Transparent cou...

Страница 8: ... mm without tolerance indication 2 3 Technical Data Component Overview and Dimensions 1 Extendable lugs 2 Switch Terminator for PROFIBUS DP 3 LED PA Status of PROFIBUS PA 4 LED DP Status of PROFIBUS DP and hardware 5 LED PWR Status of power supply 6 Removable terminal with test plug sockets KFD2 BR 1 PA 1500 PA DP PWR ON Terminator OFF 1 3 4 6 2 5 7 11 8 12 9 10 Segment Coupler 20 115 111 5 93 1 2...

Страница 9: ...C PROFIBUS DP Supply basic insulation according to IEC EN 61010 rated insulation voltage 253 V AC 357 V DC PROFIBUS PA Supply basic insulation according to IEC EN 61010 rated insulation voltage 253 V AC 357 V DC Directive conformity Electromagnetic compatibility Directive 2014 30 EU EN 61326 1 2013 Standard conformity Electromagnetic compatibility NAMUR NE 21 Degree of protection IEC EN 60529 Fiel...

Страница 10: ...N rail mounting Data for application in connection with Ex areas Statement of conformity TÜV 16 ATEX 7831 X Group category type of protection temperature class II 3G Ex ec IIC T4 Gc Directive conformity Directive 2014 34 EU EN 60079 0 2012 EN 60079 7 2015 International approvals CSA approval pending IECEx approval IECEx TUR 16 0006X Technical Data ...

Страница 11: ...irective for at least equipment category 3G Danger Explosion hazard from exposure to potentially explosive dust atmosphere If the device is installed in Zone 22 without mounting it in a sufficiently suitable enclosure dust water or other external interferences can cause the live device to spark The sparks can ignite the surrounding potentially explosive atmosphere Only mount the device in a suitab...

Страница 12: ...wer Rail is the optimum solution The Power Rail is a DIN mounting rail with plastic insert that delivers power to the devices 24 V DC and transfers bus signals and a collective error message The Power Rail is factory equipped with cover and end caps These parts cover empty and open segments of the Power Rail Thus the Power Rail is protected from contamination Additionally the cover and end caps pr...

Страница 13: ...wer Rail UPR 03 The Power Rail UPR 03 comprises 3 leads 2 conductors for power 1 conductor for collective error messaging Figure 3 2 Example Power Rail UPR 03 1 Cover UPR COVER 2 Insert UPR INS 03 3 DIN mounting rail UPR MR 35 mm x 15 mm 4 End cap UPR E 1 2 3 4 ...

Страница 14: ...er than 50 V AC proceed as follows 1 Switch off the voltage 2 Connect the terminal blocks or disconnect the terminal blocks 3 3 Connection Layout and Connection The following section describes the connection details of the Segment Coupler with special focus on the torques required for a safe installation CORRECT Device snapped on vertically INCORRECT Device snapped on from the side Can damage the ...

Страница 15: ... an unwanted failure of the connection This could result in an increased explosion hazard in potentially explosive atmospheres Only manipulate connections in the specified ambient temperature range Temperature range 5 C 70 C Segment Coupler Connection Layout Terminal no Function 1 PA shield 2 PA 3 PA 4 PA shield 5 PA 6 PA 7 DP RxD TxD P 8 DP RxD TxD N 9 DP shield 10 FE 11 24 V 12 24 V KFD2 BR 1 PA...

Страница 16: ...al installation 3 3 2 Power Supply with Power Rail For devices with a 24 V DC supply voltage use of the Power Rail reduces wiring and installation costs The Power Rail almost completely eliminates the risk of wiring faults and facilitates expansion Power is supplied to the Power Rail via a power feed module which provides a voltage of 24 V DC max 4 A The power feed module features a replaceable 5 ...

Страница 17: ...nd reliable distribution of power to all connected isolators This method eliminates the wiring loops daisy chain necessary on a conventional installation without Power Rail Figure 3 4 Power Rail installation 1 Replaceable fuse 2 Power feed module 3 Power Rail 1 3 4 6 2 5 1 3 4 6 2 5 1 3 4 6 2 5 1 3 4 6 2 5 13 12 9 10 7 14 15 11 8 13 12 9 10 7 14 15 11 8 13 12 9 10 7 14 15 11 8 13 12 9 10 7 14 15 1...

Страница 18: ...supply or the fuse in a power feed module fails the redundant supply continues to energize the isolators through their Power Rail connection Figure 3 5 Redundant power connections 1 Replaceable fuse 2 Power feed module 1 3 Power feed module 2 4 Power Rail 1 3 4 6 2 5 13 15 12 9 10 7 14 11 8 1 3 4 6 2 5 13 15 12 9 10 7 14 11 8 1 3 4 6 2 5 1 3 4 6 2 5 13 12 9 10 7 14 15 11 8 13 12 9 10 7 14 15 11 8 ...

Страница 19: ... DP and PROFIBUS PA cables to earth both at the Segment Coupler and at the field devices If a cable leads into the explosion hazardous area ensure to route an equipotential bonding between each grounding point If the PROFIBUS PA field devices used comply with your specific industry requirements without the need to ground the cable shield at the device leave the cable shield open and ensure that it...

Страница 20: ...segments are terminated on both segments in order to avoid reflection 3 6 Accessories For more information on KFD2 EB2 power feed module or KFD2 EB2 R4A B redundant power feed module refer to the manual System Description K System on the Internet at pepperl fuchs com KFD2 BR 1 PA 1500 PA DP PWR ON Terminator OFF 1 3 4 6 2 5 7 11 8 12 9 10 Segment Coupler FE PROFIBUS DP Terminator Switch 1 KFD2 BR ...

Страница 21: ...e GSD file or a manufacturer specific GSD file Is the GSD file designed to communicate via an RS 485 interface DP GSD file or an interface according to IEC 61158 2 PA GSD file If a profile GSD file is being used the file name indicates whether it is a DP GSD file or a PA GSD file Example 1 PA039733 gsd is a profile GSD file for 4 binary outputs The name resolves as follows PA PROFIBUS PA slave 0 D...

Страница 22: ...nctions are used with PROFIBUS DP to synchronize sensors actuators It is possible that these functions do no longer work correctly because operations at the PROFIBUS DP end host end run at data transfer rates of up to 12 MB s and operations at the PROFIBUS PA end field end run at a data transfer rate of 31 25 KB s At present many PROFIBUS functions are not supported yet In case a field device does...

Страница 23: ...on on the finished conversion process 4 1 2 Information on Watchdog Time TWD PROFIBUS devices can activate a mechanism that monitors each time interval in the cyclic data exchange process or user data exchange to ensure that the PROFIBUS master is still active This socalled watchdog time TWD is measured in the PROFIBUS slave If the response monitor is active and the TWD since the last cyclic polli...

Страница 24: ... not exchange data In order to ensure that the DP PA gateway operates reliably it is recommended that you set the following bus parameters Program only one TWD for the entire PROFIBUS system Determine the longest delay period in order to define the TWD Program one TWD for each individual slave The preset programmed time TWD must be greater than the maximum occurring delay period TV_max This is det...

Страница 25: ...flashes at 2 Hz If the Segment Coupler has a defect the LED DP is lit up 4 Configure your PROFIBUS PA devices in your system Check that the GSD files of the PROFIBUS PA devices in use contain the baud rate you intend to configure in your PROFIBUS DP master If this is not the case run the Pepperl Fuchs GSD converter pro gram LED Indicators on the Power Supply Module LED Status Error Remedy LED is l...

Страница 26: ...fter the test The device shows temporary degradation or loss of function of performance during the test but self recovers from that state when the exposures are ceased A class C device has loss of function The device may need manual restoration During the test a temporary loss of function is allowed as long as an operator can restore the device back to operation The requirements of the association...

Страница 27: ...EN 61000 4 2 Electrostatic discharge direct contact 6 kV A Electrostatic discharge indirect air 8 kV A EN 61000 4 3 Electromagnetic field radiated radio frequency 10 V m A EN 61000 4 4 Fast transients burst on signal lines 1 kV A Fast transients burst on power lines 2 kV A EN 61000 4 5 Slow transient surge on signal lines 1 kV B Slow transient surge on shielded lines 2 kV B EN 61000 4 6 Conducted ...

Страница 28: ...erl fuchs com Worldwide Headquarters Pepperl Fuchs GmbH 68307 Mannheim Germany Tel 49 621 776 0 E mail info de pepperl fuchs com For the Pepperl Fuchs representative closest to you check www pepperl fuchs com contact PROCESS AUTOMATION PROTECTING YOUR PROCESS DOCT 4892 04 2016 ...

Отзывы: