background image

20

21

20

21

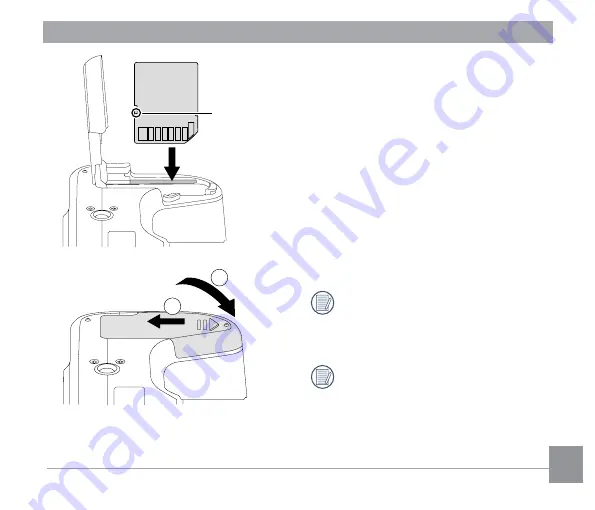
3.  Insert the SD

 memory card into the 

memory card slot as shown in the 

diagram below.

4.  Close the battery cover.

The memory card (SD/SDHC) is 

optional and not included in all camera 

packaging. Purchase a commercially 

available one.

To remove your 

SD

 memory card, 

open the battery cover, gently press 

the memory card to eject it and remove 

it.

Write-protect 

switch

1

2

Содержание Pentax XG-1

Страница 1: ...To ensure the best performance from your camera please read the Operating Manual before using the camera Operating Manual Digital Camera...

Страница 2: ...on display Images taken with the purpose of obtaining copyrights also cannot be used outside the scope of use of the copyright as laid out in the Copyright Act and care should be taken here also Regar...

Страница 3: ...to provide AVC video No license is granted or shall be implied for any other use Additional information may be obtained from MPEG LA LLC See http www mpegla com All other trademarks are the property o...

Страница 4: ...e display is manufactured using extremely high precision technology Although the level of functioning pixels is 99 99 or better you should be aware that 0 01 or fewer of the pixels may not illuminate...

Страница 5: ...he camera should become exposed as a result of for example the camera being dropped please do not under any circumstances touch such exposed portions as there is a danger of receiving an electric shoc...

Страница 6: ...oduct or using the exclusive power adapter with an unspecified power or voltage can cause a fire electric shock or camera breakdown The specified voltage is 100 240V AC Do not disassemble or modify th...

Страница 7: ...thium ion battery LB 060 This can cause overheating explosion or power adapter failure To reduce the risk of hazards use only a CSA UL certified power supply cord set cord is Type SPT 2 or heavier min...

Страница 8: ...ation to the skin Wash the affected areas thoroughly with water Precautions for LB 060 Battery Usage This battery may present a fire or chemical burn hazard if mistreated WARNING Risk of fire burns an...

Страница 9: ...c The lens on this camera is not interchangeable The lens is not removable About the Battery and Power Adapter Storing the battery fully charged may decrease the battery performance Avoid storing it e...

Страница 10: ...slow at low temperatures This is due to the properties of the liquid crystal and is not a malfunction If the camera is subjected to rapid temperature changes condensation may form on the inside and ou...

Страница 11: ...cations where it may be exposed to rapid changes in temperature or to condensation Periodic checks are recommended every 1 to 2 years in order to maintain high performance Others The SD Memory Card is...

Страница 12: ...cal interference 3 when the SD Memory Card has not been used for a long time 4 when the SD Memory Card is ejected or the batteries are removed while the card is being accessed If it is not used for a...

Страница 13: ...guage Date Time 25 Set your Language Date Time after the first power on 25 Resetting your Language 25 Resetting Date Time 26 MODE OVERVIEW 27 LCD Screen Display 27 Overview of the Screen Icons in Phot...

Страница 14: ...ation 48 ISO 49 Shutter Adjustment 49 Aperture Adjustment 50 Using Quick Recording 50 i Button Function Menu 51 PLAYBACK 52 Overview of the Screen Icons in Playback Mode 52 Viewing Photos and Videos 5...

Страница 15: ...Movie Menu 67 Expo Metering Exposure Metering 67 Video Quality 68 OIS 69 Movie Setting Menu 69 Custom Settings 70 Digital Zoom 70 Playback Menu 71 Playback 71 HDR 72 Touch up 73 Rotate 74 Resize 75 i...

Страница 16: ...86 CONNECTIONS 87 Connecting to a Computer 87 Transferring files to your computer 87 Video System 88 Set Eye Fi Card Connection Mode 89 Supported HDMI Connections 90 Connecting to an HDMI Ready TV 90...

Страница 17: ...ST152 Power adapter GAC 03 Rechargeable lithium ion battery LB 060 Lens cap O LC152 Quick Start Guide Quick start guide The plug shape of the power adapter may vary depending on the country or region...

Страница 18: ...17 17 Install lens cap and neck strap...

Страница 19: ...7 9 8 10 4 3 2 1 11 1 HDMI Port 2 USB AV Port 3 Zoom Lever 4 Shutter Button 5 Strap Eyelet 6 Exposure Compensation Button 7 Continuous Capture Button 8 Power Button 9 AF Assist Beam Self timer Lamp 1...

Страница 20: ...Mode Dial 17 Fast Video Recording Button 18 Menu Button 19 AF Button Arrow Button Up 20 Flash Button Arrow Button Right 21 Delete Button Self timer Button Arrow Button Down 22 Display Button 23 Playba...

Страница 21: ...20 20 1 Open the battery cover 2 Insert the battery into the battery slot in the correct position as shown in the following diagram Installing Battery and Memory Card Battery lock knob 1 2...

Страница 22: ...m below 4 Close the battery cover The memory card SD SDHC is optional and not included in all camera packaging Purchase a commercially available one To remove your SD memory card open the battery cove...

Страница 23: ...ff 1 Connect the camera and the power adapter using the supplied USB cable 2 Insert the plug of the power adapter into the wall outlet to charge the battery After the battery is stored for a long peri...

Страница 24: ...automatically To have maximum battery life charge the battery for at least 4 hours at the first time The time required to fully charge the battery is about 360 minutes max The charging time may vary...

Страница 25: ...d the playback button to power on and enter playback mode How to take pictures 1 Hold the camera firmly 2 Make the lens focus on the object and then frame with the LCD screen Use the zoom lever to zoo...

Страница 26: ...creen appears Set your Language Date Time Set your Language Date Time after the first power on 1 When you turn the camera on for the first time the language selection screen appears 2 Press the arrow...

Страница 27: ...row button to select and press the button or right arrow button to enter the menu 4 Press the up down arrow button to select Date Time and press the button or right arrow button to enter the menu 5 Pr...

Страница 28: ...56 44 00 56 44 1234 x3 6 x3 6 F3 2 F3 2 1 50 22 21 24 23 25 1 Shooting Mode Icons Auto Mode Face Beautifier Program AE Handheld Night Shutter priority Scene Mode Aperture priority Custom Settings Man...

Страница 29: ...abilization 18 Focus Frame 19 Expo Metering AiAE Spot Center 20 AF Mode Single AF Multi AF Object Tracking 21 Self Timer Self timer Off Self timer 2sec Self timer 10sec Self timer Smile 22 Flash Mode...

Страница 30: ...om Lever 5 SD Memory Card Built in Memory 6 Battery Status 7 Color Effect 8 Video Quality 9 Remaining Recording time 10 Exposure Compensation EV value 11 Image stabilization 12 Focus Frame 13 Eye Fi O...

Страница 31: ...ws you to choose a specific shutter speed so the camera will adjust the aperture automatically to ensure correct exposure Aperture priority Allows you to choose a specific aperture and the camera will...

Страница 32: ...ble results Follow these steps 1 Turn the Mode Dial to 2 Hold the camera steadily and aim at the subject The optimum scene mode will be selected automatically 3 Press the shutter button half way down...

Страница 33: ...onditions will automatically adjust the exposure for people and night scenes Backlit Portrait When the sun or any other light source is behind the subject will automatically adjust the foreground expo...

Страница 34: ...s the left right arrow button to select an adjustment item 3 Press the up down button to adjust the parameters 4 Press the button to confirm the settings and enter the shooting screen When Program AE...

Страница 35: ...perture Priority When selecting Aperture Priority mode you can adjust the aperture value EV value and ISO value Selecting a large aperture opening will emphasize the point of focus and show a blurry b...

Страница 36: ...ess the button and press the up down button to select 3 Press the left right arrow button to select Face Beautifier and press the button to confirm and return to photo shooting mode 0 3 EV 400 ISO 00...

Страница 37: ...e Scene Mode You can select an appropriate mode from the 11 scene modes according to the type of environment you are shooting The camera then configures the most appropriate settings automatically Tur...

Страница 38: ...night scenery Landscape For landscapes and outdoor shots Vivid reproduction of green and blue Portrait Most suitable for capturing people with focus on their face Snow For snow scenes Reproduces natu...

Страница 39: ...scene and press the button to enter the shooting screen 3 As shown in the following example press the button and choose whether to continue the mode setting Or Go to setting CS mode Rotate the mode di...

Страница 40: ...the mode is used for the first time there is no preset parameter stored in the mode Under the mode if you need to retain or modify the set parameters except the parameters in in restart or all modes...

Страница 41: ...ng EVF Electronic View Finder EVF functions as the LCD screen which can be used to observe the scene and objects and for playback preview and menu operations EVF has the following advantages It will n...

Страница 42: ...3 modes Single AF The focus frame appears on the center of the LCD screen to focus on the subject Multi AF The camera automatically focuses the subject in a wide area to find the focus point Object Tr...

Страница 43: ...he left arrow button to enter the Marco Menu Macro Off 2 Press left right to select any one of the following 2 modes Macro Off Select this option to disable Macro Macro On Select this option to make f...

Страница 44: ...fter the Shutter Button is pressed Self timer 10 sec A single picture is shot 10 seconds after the Shutter Button is pressed Self timer Smile Press the Shutter Button and a picture will be taken immed...

Страница 45: ...existing light conditions Force Flash The flash will engage with each shot even if there is enough available light to take the photo without flash Slow Sync This allows you to take pictures of people...

Страница 46: ...left right to select any one of the following 8 modes AWB Daylight Cloudy Fluorescent Neutral white Fluorescent CWF White light Incandescent Manual WB Fully press the shutter button to detect the whit...

Страница 47: ...00 56 44 1234 x3 6 x3 6 F3 2 F3 2 1 50 Full Camera parameters with Grid and Histogram 0 3 EV 400 ISO 00 56 44 00 56 44 1234 x3 6 x3 6 F3 2 F3 2 1 50 Off Does not display any additional icons on scree...

Страница 48: ...ously shoots up to 9 pictures per second Cont Shot High Speed VGA Continuously shoots up to 60 pictures per second Cont Shot Fast 4M Continuously shoots up to 30 pictures per second Time Lapse Take pi...

Страница 49: ...ion 1 50 100 ISO 1 50 100 ISO F3 2 F3 2 2 0 EV 2 0 EV 3 Press the up down button to adjust the option values 4 Press the button to complete the setting and enter shooting mode Exposure Compensation Se...

Страница 50: ...EV 0 7 EV F3 2 F3 2 400 ISO 400 ISO The camera s ISO settings include automatic 100 200 400 800 1600 and 3200 Shutter Adjustment For shutter speed the camera may automatically set the aperture value c...

Страница 51: ...ure opening will keep both the background and main object in clear focus Adjustable in Mode 100 ISO 1 0 EV 1 0 EV 100 ISO 1 50 1 50 F3 2 F3 2 Using Quick Recording In shooting mode press the Fast Vide...

Страница 52: ...elect the Image Color Setting option represents optional in the recording mode There are 20 Image Color options in photo shooting mode Options Options Options Normal Sepia Vignetting Vivid Partial Col...

Страница 53: ...rotection 10 Film length 3 Memory Space indicating the current number of photos and total number of photos 11 Continuous Capture Group Playback 4 Memory Card Built in Memory 12 Eye Fi ON 5 Battery Sta...

Страница 54: ...ry or on the memory card 3 To play a selected video press the button to enter the Movie Playback Mode An operation guide appears on the screen when playing back a video Press the appropriate buttons t...

Страница 55: ...the screen The picture is displayed in horizontal position W Zoom Out T Zoom In 1 Slide the Zoom Lever to switch between 3x3 and 4x4 thumbnails 2 Press the arrow buttons to select a picture or video c...

Страница 56: ...e 2 Press the left right Button to select a picture to be zoomed in 3 Rotate the Zoom Lever clockwise to to zoom in 4 The screen will display the number of times and area of the photo zooming operatio...

Страница 57: ...ode 2 Press the left right arrow button to select the photos and videos to be deleted 3 Press the down arrow button and the deletion screen is displayed 4 Press the up down arrow button to select Dele...

Страница 58: ...utton to select slideshow playing or Cancel to return to the playback screen interval 1sec slowly fade out interval 1sec disappear from the center interval 1sec dissolve Slideshow 4 Press the button t...

Страница 59: ...Shot Fast 4M images can be played back 1 Press the button to enter the playback screen 2 Press the left right arrow button to select Cont Group 3 Press the to start playback 25 1 45 25 25 0000 00 00...

Страница 60: ...e following pages for more details about each setting Expo Metering Exposure Metering Use this setting to select the target size of the camera s field of view to be metered There are 3 options AiAE Ar...

Страница 61: ...t degrading the image quality 16M High quality printing 14M Full size printing 12M 16 9 display 10M Poster printing 5M A3 printing 3M A4 printing 2M 4 x 6 printing VGA E Mail The bigger the number of...

Страница 62: ...w light Use this image stabilization mode in dark environments Shooting in a windy or unstable environment such as a moving vehicle may cause blurred images Cont AF Enable the continuous AF to be able...

Страница 63: ...ect 3 Skin Soften Eye Brightening Eye Enlargement HDR Photos with extreme contrast of bright and dark areas will still maintain distinguishable detail and depth Use of tripod is recommended There are...

Страница 64: ...63 Scene Select the scene mode under the SCN mode Night Portrait Press OK To Select Scene Shooting menu in the shooting mode Optional Not optional Options Shooting Modes...

Страница 65: ...p down arrow button to select an item to be set and press the button or right arrow button to enter the menu 5 Press the up down arrow buttons to select an option and press the button to confirm Photo...

Страница 66: ...Assist Beam In a darker environment AF Assist Beam can be turned on for better focus Digital Zoom Turn on or off the digital zoom Date Imprint Include a Date Time stamp on the photo image Off Date Da...

Страница 67: ...aken Each photo is displayed on the LCD screen based on the selected time There are 4 options Off 1 sec 2 sec 3 sec Custom Settings Custom Settings stores the current mode and its parameters The store...

Страница 68: ...confirm Expo Metering Exposure Metering Use this setting to select the target size of the camera s field of view to be metered Expo Metering AiAE There are 3 options AiAE Artificial Intelligence AE Au...

Страница 69: ...in higher pixel resolutions for extended periods of time this can cause the camera to generate heat This is not a camera malfunction When the video format is set as shooting time is maximum 30 seconds...

Страница 70: ...ode 1 Turn the Mode Dial and select to enter the video recording screen 2 Press the button press the up down arrow button to select and press the button to enter the menu A Press OK To Enter Menu 3 Pr...

Страница 71: ...r off the digital zoom There are 2 options Off On Custom Settings Custom Settings stores the current mode and its parameters The stored mode and parameters are directly invoked in Custom Settings mode...

Страница 72: ...lect an option and press the button to confirm Normal Mode Press OK To Confirm Refer to the following pages for more details about each setting Playback 1 Press the button select the settings and pres...

Страница 73: ...osed may be corrected to optimize the highlights and lowlights captured to more accurately represent the actual scene 1 In Playback Mode press the left right arrow button to select the photo to be edi...

Страница 74: ...gs screen 3 Press the left right button to select Touch up options or Cancel to return to the playback screen Red Eye Reduction Skin Soften Eye Brightening Eye Enlargement Cancel 4 Press the button to...

Страница 75: ...edited 2 Press the button select the settings and press the button to display the settings screen 3 Press the left right button to select the rotation direction or Cancel to return to the playback scr...

Страница 76: ...o a particular resolution and saves it as a new picture 1 In Playback Mode press the left right arrow button to select the photo to be edited 2 Press the button select the settings and press the butto...

Страница 77: ...Image Color Setting Menu 3 Press the left right button to select the corresponding menu or Cancel to return to the playback screen Cancel 4 Press the button to confirm the setting i Button Playback Fu...

Страница 78: ...w buttons to select an option and press the button to confirm Refer to the following pages for more details about each setting Mode 1 Press the button to show the playback screen press the button and...

Страница 79: ...arrow button to select the submenu and press the button or right arrow button to show the settings screen There are 5 sub menus available One Lock the selected photo or video if it is unprotected unlo...

Страница 80: ...tings screen There are 4 sub menus available One Delete one photo or video Date Folder Delete all photos in the Date Folder Cont Group Delete all photos in the Cont Group All Delete all photos or vide...

Страница 81: ...e cannot be clipped trimmed again once it has been clipped to 640X480 Trim The Trim Setting allows you to crop photos and save them as new pictures 1 Press the up down arrow button to select Trim and...

Страница 82: ...to select and press the button or right arrow button to enter the menu 4 Press the up down arrow button to select an item to be set and press the button or right arrow button to enter the menu 5 Press...

Страница 83: ...s setting allows you to save power and get the maximum possible running time for your camera s battery Follow the steps below to turn the LCD screen and camera off automatically after a consecutive pe...

Страница 84: ...place and destination fields 3 Press the left right arrow button to select a city located in the same time zone as that of the field Press the button to confirm settings Date Time Refer to the Resett...

Страница 85: ...y card and built in memory including protected photos and movie files To use this setting 1 Press the button press the up down arrow button to select and press the button to enter the menu 2 Press up...

Страница 86: ...press the button to confirm If there is no card available in the camera this function will not be displayed File Numbering After you take a picture or video clip the camera will save it with a sequent...

Страница 87: ...ess the button or right arrow button to display the current version Reset Use this setting to restore the camera to its original default settings 1 Press the button press the up down arrow button to s...

Страница 88: ...to connect the camera to a computer 1 Make sure the computer is turned on 2 Connect one end of the supplied USB cable to the USB AV port on your camera 3 Connect the other end of the USB cable to an...

Страница 89: ...Press the button press the up down arrow button to select and press the button to enter the menu 2 Press up down arrow button to select and press the button or right arrow button to enter the menu 3...

Страница 90: ...tton press the up down arrow button to select and press the button to enter the menu 2 Press up down arrow button to select and press the button or right arrow button to enter the menu 3 Press the up...

Страница 91: ...ut terminal which should be purchased separately to connect the camera to the television which meets HDMI standard 2 The camera will be automatically detected by the TV 3 After connecting via HDMI the...

Страница 92: ...0x1080 VGA 640x480 Fixed at VGA 640x480 in Cont Shot High Speed mode Fixed at 4M in Cont Shot Fast mode Movie 1920 1920x1080 30fps 1280 1280x720 60 30fps 640 640x480 30fps High Speed Movie 640x480 120...

Страница 93: ...4 8 pictures 13 pictures 15 pictures 1170 pictures 1692 pictures 1988 pictures 3M 2048x1536 13 pictures 19 pictures 22 pictures 1726 pictures 2412 pictures 2780 pictures 2M 1920x1080 19 pictures 26 pi...

Страница 94: ...223 6 mm approx 24mm 1248mm in 35 mm format equivalent Maximum Aperture F2 8 W F5 6 T Lens Construction 15 elements in 13 groups 6 aspherical elements Zoom Type Electrically driven Optical zoom 52x D...

Страница 95: ...g the shutter release button Exposure control AE Metering AiAE Spot metering Center metering Face AE EV Compensation 3 EV can be set in 1 3 EV steps Face detection Detection of up to 12 people s faces...

Страница 96: ...mode only Movie Continuous Recording Time Approx 1 second 25 minutes however 30 seconds at 640x480 120fps Shutter speed 1 2000 sec 4 sec max 30 sec Manual Mode Built in flash Modes Force Off Flash Aut...

Страница 97: ...Time Approx 95 min According to the results of in house testing Interfaces USB 2 0 USB AV port HDMI port Type D Video output format NTSC PAL Dimensions Approx 119 W 89 H 97 5 D mm excluding operating...

Страница 98: ...from functioning properly Turn off the camera and restart it to reset the lens Suggest using tripod The message will appear when shooting in low light illuminated scenes Use of a tripod or other supp...

Страница 99: ...ormatted Insert a new SD memory card or format the card with this camera Card is not formatted The inserted SD memory card is unformatted or has been formatted on a computer or other device and is not...

Страница 100: ...ves or file folders in the memory card have reached the maximum 9999 for archives 999 for file folder Copy the images to your PC and format the SD memory card with this camera Too many pictures for qu...

Страница 101: ...er to return to the photo shooting screen No continuous group file When you play back the images in continuous photo mode there is no continuous group file The message disappears after 2 seconds and t...

Страница 102: ...picture is blurred Camera shakes while taking a picture Turn on the OIS feature Please use tripod for high magnification above 15X optical zoom Images and video files cannot be saved The SD memory ca...

Страница 103: ...emory card has been locked Release the write lock of the SD memory card or replace with another card Too many images to process The number of pictures or folders in the memory card exceeds the specifi...

Страница 104: ...g instructions or modification by an unauthorized repair shop The manufacturer or its authorized representatives shall not be liable for any repair or alterations except those made with its written co...

Страница 105: ...ntry Notwithstanding this your camera returned to the manufacturer will be serviced free of charge according to this procedure and warranty policy In any case however shipping charges and customs clea...

Страница 106: ...rference to radio communications However there is no guarantee that interference will not occur in a particular installation If this equipment does cause harmful interference to radio or television re...

Страница 107: ...th the standards Records maintained continue to reflect the equipment being produced can be expected to be within the variation accepted due to quantity production and testing on the statistical basis...

Страница 108: ...propriate waste handling If a chemical symbol is added beneath the symbol shown above in accordance with the Battery Directive this indicates that a heavy metal Hg Mercury Cd Cadmium Pb Lead is presen...

Страница 109: ...L3 8PN U K http www ricoh imaging co uk 633 17th Street Suite 2600 Denver Colorado 80202 U S A http www us ricoh imaging com 5520 Explorer Drive Suite 300 Mississauga Ontario L4W 5L1 CANADA http www r...

Отзывы: