background image

156

6

Editin

g an

d Printi

ng Im

age

s

1

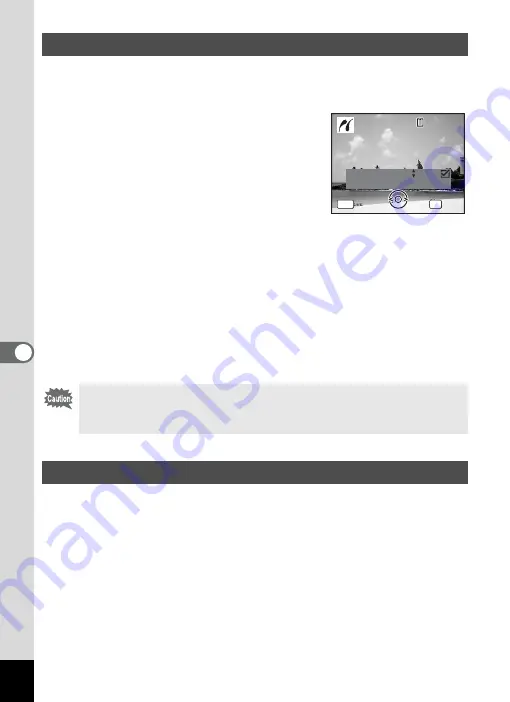
In the printing mode selection screen, use the four-way 
controller (

23

) to select [DPOF AUTOPRINT].

2

Press the 

4

 button.

The DPOF settings you have made appear.
Use the four-way controller (

45

) to check 

the number of copies for each picture, 
whether to insert the date or not, and the 
total number of copies. Refer to p.149 for 
instructions on how to make the DPOF 
settings.

3

Press the 

4

 button.

A confirmation dialog appears.
Refer to Steps 7 to 11 of “Printing Single Images” (p.153 and p.154) for 
details of changing print settings.

4

Press the 

4

 button.

The images are printed according to the settings.
Press the 

3

 button to cancel printing.

Disconnect the USB cable from the camera and printer when you have 
finished printing.

1

Turn off the camera.

2

Disconnect the USB cable from the camera and printer.

Printing Using the DPOF Settings

If the picture already has the date imprinted on it (p.105), do not set 
Date 

O

 (On) in DPOF settings. Otherwise, the date could be 

imprinted twice on your printed picture.

Disconnecting the Cable from the Printer

C o p i e s

T o t a l

Print

Print

D a t e

0 1

P r i n t   w i t h   DPOF  s e t t i n g

P r i n t   w i t h   DPOF  s e t t i n g

OK

1 0

MENU

1 0 0

1 0 0 - 0 0 1 7

0 0 1 7

1 0 0 - 0 0 1 7

C a n c e l

C a n c e l

C a n c e l

Содержание 17103 - Optio M50 Digital Camera

Страница 1: ...S A S 112 Quai de Bezons B P 204 95106 Argenteuil Cedex France http www pentax fr PENTAX Schweiz AG Widenholzstrasse 1 8304 Wallisellen Postfach 367 8305 Dietlikon SWITZERLAND http www pentax ch PENTAX Italia S r l Via Dione Cassio 15 20138 Milano ITALY http www pentaxitalia it PENTAX Scandinavia AB P O Box 650 75127 Uppsala SWEDEN http www pentax se PENTAX Imaging Company A Division of PENTAX of ...

Страница 2: ...y should not However this has no effect on the recorded image There is a possibility that the illustrations and the display screen of the display in this manual are different form the actual product In this manual both an SD Memory Card and an SDHC Memory Card are referred to as SD Memory Cards hereafter Regarding trademarks PENTAX and Optio are trademarks of PENTAX Corporation SDHC logo is tradem...

Страница 3: ...mmediately if a card is accidentally swallowed Wrapping the strap of the camera around your neck is also dangerous Please take care that small children do not hang the strap around their necks Use an AC adapter that is of the power and voltage specified for exclusive use with this product The use of an AC adapter other than that specified exclusively for use with this product may cause fire or ele...

Страница 4: ...MP 140 F 60 C Remove the battery from the camera immediately if it becomes hot or begins to smoke Be careful not to burn yourself during removal Some portions of the camera heat up during use so please take care as there is a risk of low temperature burns if such portions are held for long periods of time Should the LCD be damaged be careful of glass fragments Also be careful not to allow the liqu...

Страница 5: ...vy objects to drop onto it or allow the AC plug cord to become damaged due to excessive bending If the AC plug cord becomes damaged consult a PENTAX Service Center Do not short or touch the output terminals of the product while it is still plugged in Do not plug in the AC plug cord with wet hands This can cause an electrical shock Do not subject the product to strong impacts or allow it to drop on...

Страница 6: ...ain water or any other liquid Storing the camera where pesticides and chemicals are handled should be avoided Remove the camera from its case and store in a well ventilated place to prevent the camera from becoming moldy during storage Ensure that the camera is not subjected to substantial vibrations shocks or pressure as this may cause damage or malfunction Place the camera on a cushion for prote...

Страница 7: ...s forcefully on the display This could cause breakage or malfunction Be careful not to sit down with the camera in your back pocket as this may damage the exterior of the camera or the display When using a tripod with the camera be careful not to overtighten the screw in the tripod socket on the camera The AC plug cord supplied with the camera is for exclusive use with the battery charger D BC78 D...

Страница 8: ...Card 28 Recorded Pixels and Quality Level of Still Pictures 31 Recorded Pixels Quality Level and Frame Rate of Movies 32 Turning the Camera On and Off 34 Playback Mode 35 Initial Settings 36 Setting the Display Language 36 Setting the Date and Time 38 Quick Start 40 Taking Still Pictures 40 Playing Back Still Pictures 42 Playing Back Images 42 Playing Back the Previous or Next Image 42 Rotating th...

Страница 9: ...Using the Digital Wide Function Digital Wide Mode 81 Setting the Exposure EV Compensation 84 Displaying Shooting Information in Capture Mode 85 Setting the Shooting Functions 87 Selecting the Focus Mode 87 Selecting the Flash Mode 89 Selecting the Recorded Pixels 91 Selecting the Quality Level 93 Adjusting the White Balance 94 Setting the AE Metering 96 Setting the Sensitivity 98 Setting the Autof...

Страница 10: ...le Image Sound File 128 Deleting Selected Images and Sound Files from Nine Image Display 130 Deleting All Images and Sound Files 132 Recovering Deleted Images 133 Protecting Images and Sound Files from Deletion Protect 134 Editing and Printing Images 136 Editing Images 136 Changing the Image Size and Quality Resize 136 Cropping Images 138 Copying Images and Sound Files 139 Using the Digital Filter...

Страница 11: ...ay Language 169 Changing the Image Folder Name 170 Changing the USB Connection Mode 171 Changing the Video Output Format 172 Adjusting the Brightness of the Display 173 Using the Power Saving Function 174 Setting Auto Power Off 175 Setting the Quick Zoom Function 176 Setting the Guide Display 177 Resetting to Default Settings Reset 178 Changing the Start up Screen 179 Appendix 180 List of World Ti...

Страница 12: ...at is useful to know indicates precautions to be taken when operating the camera A mode This is the mode for capturing still pictures and recording movies and sound files In this manual the mode for taking still pictures is referred to as the Still Picture Capture Mode the mode for recording movies is referred to as the C mode and the mode for recording sound files is referred to as the O mode Q m...

Страница 13: ...images and how to set the relevant functions 5 Playing Back and Deleting Images This chapter explains how to view still pictures and movies on the camera or on a TV and how to delete images from the camera 6 Editing and Printing Images This chapter explains the various ways of printing still pictures and how to edit images with the camera For information on transferring images to a PC and installi...

Страница 14: ...ding p 114 With the Optio M50 you can add a fun frame when taking a picture of a child or a pet for example p 66 You can also add frames to pictures you have taken Adjust the position of the subject in the picture or reduce or enlarge the picture size to match the frame shape and size Now you no longer have to worry about the subject not being aligned in the frame p 145 Advanced Movie Recording an...

Страница 15: ...able in each mode and how to use them p 53 p 59 With the Optio M50 you can display recorded images and sound files by date in calendar format p 117 This lets you quickly find the image or sound file you want to play back Easy to Navigate Capture and Playback Functions Display Images and Sound Files in Calendar Format A shooting mode guide is displayed in the Capture Mode Palette and a playback mod...

Страница 16: ...ovies p 136 And no more worries about accidentally deleting images because now with the Optio M50 you can recover them again p 133 Enjoy Playback and Editing Functions Without a Computer Resize p 136 Cropping p 138 and Red eye Compensation p 144 can be used while the image is displayed in Playback mode You can divide a movie into two or select a frame from a movie to save it as a still picture p 1...

Страница 17: ...Charger Kit K BC78 For other optional accessories refer to Optional Accessories p 188 Checking the Contents of the Package Camera Optio M50 Strap O ST51 Software CD ROM S SW77 USB cable I USB7 AV cable I AVC7 Rechargeable lithium ion battery D LI78 Battery charger D BC78 AC plug cord PC Connection Manual Operating Manual this manual Quick Guide ...

Страница 18: ...16 Front Back Names of Parts Self timer lamp Microphone Lens Speaker Flash Battery Card cover Tripod socket Display Terminal cover PC AV terminal Power switch Shutter release button ...

Страница 19: ...efer to Understanding the Button Functions p 44 p 47 for an explanation of the function of each button Shutter release button 4 W button Four way controller Q button Zoom w x f y button Green i button 3 button Power switch I button ...

Страница 20: ...sh mode p 89 10 Battery level indicator p 25 4 Drive mode p 76 p 77 11 Focus frame p 40 5 Camera shake warning p 85 12 EV compensation p 84 6 Focus mode p 87 13 Date and time p 38 7 Digital zoom icon p 78 14 World time setting p 167 Intelligent zoom icon p 78 15 Date Imprint icon p 105 8 Memory status p 34 16 Shutter speed Built in memory without card 17 Aperture a SD Memory Card r Card is write p...

Страница 21: ...right it appears white the indicated area blinks red as a warning Similarly when there is an area that is so dark it appears black the indicated area blinks yellow as a warning 1 Bright portion blinks red 6 Quality p 93 2 Dark portion blinks yellow 7 White balance p 94 3 Shutter speed 8 AE Metering p 96 4 Aperture 9 Sensitivity p 98 5 Recorded pixels p 91 10 Histogram p 86 F3 5 F3 5 1 250 1 250 F3...

Страница 22: ... p 122 A12 Face Priority icon p 56 A2 Folder number p 170 B1 Bright portion blinks red p 19 A3 File number B2 Recorded pixels p 91 A4 Protect icon p 134 B3 Quality p 93 A5 Voice memo icon p 161 B4 White balance p 94 A6 Battery level indicator p 25 B5 AE Metering p 96 A7 Volume icon p 161 B6 Sensitivity p 98 A8 Memory status p 34 B7 Dark portion blinks yellow p 19 Built in memory without card B8 Sh...

Страница 23: ...arted Getting Started Attaching the Strap Attach the strap O ST51 supplied with the camera 1 Pass the narrow end of the strap through the strap lug 2 Pass the other end of the strap through the loop and pull tight 2 1 ...

Страница 24: ... when charging is finished Charging the Battery The time required to fully charge the battery is about 150 minutes max The appropriate ambient temperature for charging the battery is 0 C to 40 C 32 F to 104 F The charging time may vary depending on the ambient temperature and charging conditions The battery has reached the end of its service life when it starts to run down soon after being charged...

Страница 25: ...ttery card cover lock lever in the direction of 3 insert the battery with the PENTAX logo pointing toward the lens Push the battery in until it is locked in place 3 Close the battery card cover Close the battery card cover and move the battery card cover lock lever to the LOCK position Installing the Battery Make sure that the battery is inserted with the PENTAX logo pointing toward the lens If th...

Страница 26: ... other type of battery may damage the camera and cause malfunction Insert the battery correctly If the battery is incorrectly oriented malfunction may result Do not remove the battery while the camera is turned on When storing the battery for more than 6 months charge the battery for 30 minutes using the battery charger and store the battery separately Be sure to recharge the battery every 6 to 12...

Страница 27: ...s the temperature decreases Be sure to take a spare battery with you when traveling abroad or to a cold region or if you intend to take a lot of pictures Screen Display Battery Status green Adequate power remains green Battery is running low yellow Battery is running very low red Battery is exhausted Battery depleted The camera will turn off after this message appears ...

Страница 28: ...ide of the DC coupler to press the battery card cover lock lever insert the DC coupler Confirm the DC coupler is locked in place 4 Extract the DC coupler cord Pull out the tab at the joint of the camera and the battery card cover so that the DC coupler cord extracts from there 5 Close the battery card cover 6 Connect the DC terminal of the AC adapter to the DC terminal of the DC coupler 7 Connect ...

Страница 29: ...attery Charger and the AC Adapter p 2 before using the AC adapter Be sure to read the operation manual accompanying the AC adapter kit K AC78 before using the adapter The battery cannot be charged inside the camera even when the AC adapter is connected When connecting the AC adapter you cannot set the camera upright on the table because the cord from the DC coupler is extracted from the bottom sid...

Страница 30: ...ilt in Memory p 162 for instructions on formatting Make sure that the camera is turned off before inserting or removing the SD Memory Card The still picture storage capacity varies depending on the capacity of the SD Memory Card and the selected number of recorded pixels and quality level p 31 The self timer lamp blinks while the SD Memory Card is being accessed data is being recorded or read Back...

Страница 31: ...ing toward the front of the camera the side with the lens Push the card in all the way Images and sound may not be recorded correctly if the card is not inserted all the way 3 Close the battery card cover Close the battery card cover and move the battery card cover lock lever to the LOCK position 1 Open the battery card cover 2 Push the card into the SD Memory Card socket to eject it Pull the card...

Страница 32: ...cted or the battery is removed while the data on the card is being recorded or accessed If it is not used for a long time the data on the card may become unreadable Be sure to regularly make a backup of important data on a computer Avoid using or storing the card where it may be exposed to static electricity or electrical interference Avoid using or storing the card in direct sunlight or where it ...

Страница 33: ...guide i 1600 1200 is adequate for making postcard size prints Refer to the table below for the appropriate settings according to use Appropriate Number of Recorded Pixels According to Use The default setting is E 3264 2448 Appropriate Quality Level According to Use The default setting is D Better Recorded Pixels and Quality Level of Still Pictures Recorded Pixels Use E 3264 2448 For printing high ...

Страница 34: ... Rec Mode menu Selecting the Recorded Pixels 1p 91 Selecting the Quality Level 1p 93 C Best D Better E Good Built in Memory 512 MB Built in Memory 512 MB Built in Memory 512 MB E 3264 2448 13 pictures 121 pictures 25 pictures 232 pictures 38 pictures 351 pictures f 2592 1944 20 pictures 188 pictures 38 pictures 355 pictures 54 pictures 503 pictures g 2304 1728 25 pictures 236 pictures 49 pictures ...

Страница 35: ...2 GB start recording again to continue to record the rest of the movie in blocks of 2 GB m 640 480 Suitable for viewing on a TV or computer screen D 320 240 Suitable for posting on a website or attaching to e mail C Best Clearer images D Better E Good Grainier images 30fps Produces high quality movies but reduces the total recording time 15fps Increases the total recording time because the file si...

Страница 36: ...gain The display turns off the lens closes and the camera turns off The memory card is checked automatically when the camera turns on appears on the display when there is no SD Memory Card inserted in the camera In this case images and sound files will be saved in the built in memory r appears instead of a when the write protect switch on the SD Memory Card is in the locked position Images and sou...

Страница 37: ...y more pictures 1 Press the power switch while holding down the Q button The display turns on with the lens retracted and the camera turns on in Playback Mode Playback Mode To switch from Playback Mode to A mode press the Q button or press the shutter release button halfway Playing Back Still Pictures 1p 42 Q button ...

Страница 38: ...nd Time p 38 to set the current date and time 1 Use the four way controller 2345 to choose the display language Language Date and Time can be changed later Refer to the pages below for instructions To change the language follow the steps in Changing the Display Language 1p 169 To change the date and time follow the steps in Changing the Date and Time 1p 165 Setting the Display Language Four way co...

Страница 39: ... the 4 button The Initial Setting screen appears in the selected language When the Screen After Step 2 Appears in Another Language 1 Press the 4 button 2 Press the 3 button 3 Press the four way controller 5 4 Use the four way controller 32 to select Language 5 Press the four way controller 5 The Language screen appears 6 Use the four way controller 2345 to select the language 7 Press the 4 button ...

Страница 40: ...current date and time and the display style 1 Press the four way controller 5 The frame moves to mm dd yy 2 Use the four way controller 23 to choose the date and time display style 3 Press the four way controller 5 The frame moves to 24h 4 Use the four way controller 23 to select 24h 24 hour display or 12h 12 hour display 5 Press the four way controller 5 The frame returns to Date Style Setting Ho...

Страница 41: ...ow the steps in Setting the World Time 1p 167 When the Initial Setting or Date Adjust screen is displayed you can cancel the setting operation and switch to Capture mode by pressing the 3 button In this case the Initial Setting screen will appear next time you turn the camera on If you press the 4 button in Step 9 the camera clock is reset to 00 seconds To set the exact time press the 4 button whe...

Страница 42: ...e Zoom w x button to the left or right x enlarges the subject w widens the area that is captured by the camera 3 Press the shutter release button halfway The focus frame on the display turns green if the subject is in focus 4 Press the shutter release button fully The picture is taken The image appears on the display for one second Instant Review and is saved to the SD Memory Card or built in memo...

Страница 43: ...ile the message appears press the Green button and choose Delete from the menu to delete the taken image Even when Instant Review is set shorter than 3sec the message appears for 3 seconds When the Face Recognition function does not work Blinking Detection also does not function Even if the subject s faces are recognized Blinking Detection does not function when the recognized faces are too small ...

Страница 44: ...e image display Press the Q button again in Q mode or press the shutter release button halfway to switch to A mode 1 Press the Q button after taking a picture The image appears on the display 2 Press the four way controller 45 The previous or next image appears Playing Back Images Playing Back the Previous or Next Image Shutter release button Q button Four way controller 14 25 14 25 14 25 100 100 ...

Страница 45: ...tion direction and press the 4 button The rotated image appears Press the i button while the image is displayed to display the Delete screen Use the four way controller 2 to select Delete and press the 4 button p 128 Rotating the Displayed Image Movies cannot be rotated Protected images can be rotated but they cannot be saved in a rotated state Deleting the Displayed Image Four way controller Q bu...

Страница 46: ... Takes the still picture when pressed down fully p 40 Starts and stops movie recording in C mode p 108 Starts and stops sound file recording in O mode p 157 3 I button Switches the Face Recognition function p 56 The Face Recognition function is switched as follows each time the I button is pressed Smile Capture On Face Priority Off Face Priority On 4 Zoom w xbutton Changes the captured area p 78 5...

Страница 47: ...e Capture Mode Palette p 53 4 Changes the flash mode p 89 5 Changes the focus mode p 87 23 Adjusts in mode p 88 7 4 W button Changes the information on the display p 85 8 Green button Switches to the 9 Green mode p 63 Calls up the assigned menu p 57 9 3 button Displays the A Rec Mode menu p 48 ...

Страница 48: ...splay Returns to the previous display when y is pressed p 116 Enlarges the image when y is pressed during single image display Returns to the previous display when f is pressed p 118 Press f during nine image display to change to folder or calendar display p 117 Press y during folder display to change to nine image display of the selected folder p 117 Press y during calendar display to change to n...

Страница 49: ...hanges the information on the display p 121 Returns zoom display or nine image display to single image display p 116 p 118 Changes to nine image display of the selected folder during folder display p 117 Changes to single image display of the selected date during calendar display p 117 8 Green i button Switches from single image display to the Delete screen p 128 Switches from nine image display t...

Страница 50: ... 0038 100 0038 38 38 38 02 02 2008 02 02 2008 14 25 14 25 14 25 02 02 2008 02 02 2008 14 25 14 25 14 25 100 100 0038 0038 100 0038 Rec Mode MENU Exit MENU Exit 1 3 Rec Mode 1 3 Setting 1 3 Setting MENU Exit 1 3 or 02 02 2008 02 02 2008 02 02 2008 02 02 2008 8M AWB Auto Recorded Pixels Quality Level White Balance Sensitivity AE Metering Focusing Area 8M AWB Auto Recorded Pixels Quality Level White ...

Страница 51: ...s 5 Use the four way controller 23 to change the setting The quality level changes each time the four way controller 23 is pressed A guide to available button operations appears on the display during menu operation Refer to the following page for instructions on saving settings and canceling changes Rec Mode MENU 1 3 Recorded Pixels Quality Level White Balance AE Metering Sensitivity AWB Auto Focu...

Страница 52: ...The changes are canceled and the screen returns to Step 3 The 3 button function differs depending on the screen Refer to the guide indications Exit Exits the menu and returns to the original screen Returns to the previous screen with the current setting Cancel Cancels the current selection exits the menu and returns to the previous screen To Save the Setting and Start Taking Pictures When the W Se...

Страница 53: ...the sensitivity p 98 EV Compensation For adjusting the overall brightness of the picture p 84 Movie Recorded Pixels For choosing the number of recorded pixels of movies p 110 Quality Level For choosing the quality level of movies p 111 Frame Rate For setting the frame rate number of frames per second p 112 Color Mode For choosing a color mode for movies p 113 Movie SR For choosing whether to use t...

Страница 54: ... which menus and messages appear p 169 Folder Name For choosing how names are assigned to folders for storing images and sound files p 170 USB Connection For setting the USB cable connection to PC or printer p 171 Video Out For setting the output format to the AV equipment p 172 Brightness Level For changing the brightness of the display p 173 Power Saving For setting the time until the camera ent...

Страница 55: ...ontroller 2345 to choose a shooting mode A shooting mode guide appears about 2 seconds after the shooting mode is chosen You can turn off the shooting mode guide by operating the menu Refer to Setting the Guide Display p 177 for details of how to operate the menu 3 Press the 4 button The shooting mode is selected and the camera returns to capture status Setting the Shooting Mode Four way controlle...

Страница 56: ...ing movies Sound is also recorded p 108 O Voice Recording For recording sound only Be careful not to cover the microphone with your hands p 157 q Landscape For capturing landscape views The camera focuses on a wide range Flower For capturing brightly colored flowers Reproduces the outline of the flower softly z Natural Skin Tone Adjusts color and brightness to reproduce skin more beautifully than ...

Страница 57: ...ppetizing F Digital Panorama Stitches images taken with the camera to create a panoramic photograph p 74 S Digital Wide Composites two images resulting in wider field of view p 81 S Digital Wide mode cannot be chosen from the Capture Mode Palette Refer to p 81 on how to choose this mode Item Description Page ...

Страница 58: ...captured automatically because the Smile Capture function will not work By default the Face Recognition function is set to Face Priority On The Face Recognition function is switched as follows each time the I button is pressed Smile Capture On Face Priority Off Face Priority On An icon indicating either Face Priority On or Smile Capture On appears on the display The icon does not appear when the F...

Страница 59: ...ovie mode When switching to another mode from one of these modes the Face Recognition setting returns to the previous setting Refer to p 68 and p 72 on how to shoot with the Face Recognition function Calling Up a Specific Menu The following functions can be assigned to the Green button Green Mode Recorded Pixels Quality Level White Balance Focusing Area AE Metering Sensitivity EV Compensation Shar...

Страница 60: ...ode menu is called up 2 Use the four way controller 45 to change the settings and press the 4 button The camera returns to capture status Assigning a Function to the Green Button Using the Green Button If a function other than the 9 Green mode has been assigned to the Green button the camera returns to the original screen if no operation is performed for 5 seconds after the Green button is pressed...

Страница 61: ... 2 seconds You can turn off the guide for each function on the Playback Mode Palette p 177 SHUTTER OK MENU 02 02 2008 02 02 2008 14 25 14 25 14 25 100 100 0038 0038 100 0038 38 38 38 14 25 14 25 14 25 02 02 2008 02 02 2008 02 02 2008 02 02 2008 OK OK OK OK MENU Cancel Cancel Cancel Digital SR Digital SR Digital SR Resize Resize Resize OK OK OK OK MENU Cancel Cancel Cancel OK OK OK OK Cancel Cancel...

Страница 62: ...3 D Digital Filter For processing still pictures as you desire p 141 Movie Edit Save as Still image For saving one frame from a movie as a still picture p 147 Divide Movies For dividing a movie into two p 148 Y Frame Composite For adding a decorative frame to a still picture p 145 Z Red eye Compensation For correcting still pictures where the flash has caused the subject to appear with red eyes p ...

Страница 63: ...rs 2 Use the four way controller 2345 to select b Auto Picture 3 Press the 4 button 4 Press the shutter release button halfway The focus frame on the display turns green when the sublect is in focus and the icon for selected shooting mode will appear on the top left of the display 5 Press the shutter release button fully The picture is taken Taking Pictures Automatically Auto Picture Mode In b mod...

Страница 64: ...5 to select R Program 3 Press the 4 button 4 Set the functions you want to use Refer to Setting the Shooting Functions p 87 p 105 for details of how to set the functions 5 Press the shutter release button halfway The focus frame on the display turns green if the subject is in focus 6 Press the shutter release button fully The picture is taken Setting The Functions Program Mode Taking Still Picture...

Страница 65: ... mode The camera switches to 9 mode Press the Green button again to return to the status before 9 mode was selected 2 Press the shutter release button halfway The focus frame on the display turns green if the subject is in focus 3 Press the shutter release button fully The picture is taken Taking Pictures in the Basic Mode Green Mode Shutter release button Green button 38 38 38 ...

Страница 66: ... 3 button If you try to display the W Setting menu key lock icon appears When the camera is turned off in 9 mode it turns on in 9 mode next time the power switch is pressed Flash Mode Auto Drive Mode 9 Standard Focus Mode Standard Information Display Normal Recorded Pixels E Quality Level D Better White Balance F Auto Focusing Area J Multiple AE Metering L Multi segment metering Sensitivity Auto E...

Страница 67: ... on the display turns green if the subject is in focus 5 Press the shutter release button fully The picture is taken Taking Pictures of Dark Scenes Night Scene Digital SR Blur Reduction Mode A Use this mode when taking pictures of night views 4 Use this mode to take pictures indoors or in low light conditions The shutter speed tends to be slower when taking pictures of a dark scenes To prevent cam...

Страница 68: ...to use 4 Press y on the Zoom f y button The selected frame appears in single image display You can choose another frame using either of the following operations Use the four way controller 45 to choose a different frame Press f on the Zoom f y button to return to the 9 frame display of the frame selection screen and then perform Step 4 to choose a different frame 5 Press the 4 button The frame app...

Страница 69: ...me on the display turns green if the subject is in focus 7 Press the shutter release button fully The picture is taken In Y mode recorded pixels is fixed at h 2048 1536 In b Auto Picture C Movie O Voice Recording F Digital Panorama or S Digital Wide mode Y mode is not available ...

Страница 70: ...on The shooting mode is selected and the camera returns to capture status When the subject s face is recognized a yellow focus frame appears on the display at the location of the face when multiple faces are recognized the main face is indicated in yellow As the subject moves the size and location of the focus frame change to match the location of the subject s face Taking Pictures of People Natur...

Страница 71: ...s taken If the camera cannot recognize the subject s face the camera focuses using the Focusing Area currently selected When Smile Capture is activated the shutter will be released automatically when the camera recognizes the subject s smile However if the face detected by the camera is too small an image may not be captured automatically because the Smile Capture function will not work ...

Страница 72: ...e two types of icons a cat and dog icon Choosing either the cat or dog icon does not affect the resulting picture Choose whichever you prefer Choose an icon white gray or black whose tone best matches your pet s coat or fur 5 Press the 4 button The Pet mode is selected and the camera returns to capture status 6 Press the shutter release button halfway The focus frame on the display turns green if ...

Страница 73: ...71 4 Taking Pictures 7 Press the shutter release button fully The picture is taken ...

Страница 74: ...n the subject s face is recognized a yellow focus frame appears on the display at the location of the face when multiple faces are recognized the main face is indicated in yellow As the subject moves the size and location of the focus frame change to match the location of the subject s face 4 Press the shutter release button halfway The focus frame on the display turns green if the subject is in f...

Страница 75: ... If the camera cannot recognize the subject s face the camera focuses using the Focusing Area currently selected When Smile Capture is activated the shutter will be released automatically when the camera recognizes the subject s smile However if the face detected by the camera is too small an image may not be captured automatically because the Smile Capture function will not work ...

Страница 76: ...ler 2345 to select F Digital Panorama 3 Press the 4 button 4 Use the four way controller 45 to choose the direction in which the images will be joined 5 Take the first frame Press the shutter release button fully to take the first frame The right or left edge of the first frame appears in semi transparent form on the left or right of the display The position where the edge of the first frame appea...

Страница 77: ...e third frame is taken and the stitched image appears The stitched image does not appear when the Instant Review p 41 p 101 is off When the Face Recognition is activated p 56 it works only when taking the first image If you press the 4 button after shooting the first or second frame you can save the captured image s If you press the OK button after shooting the second frame you can save the first ...

Страница 78: ...luded in a group picture The picture is taken approximately ten seconds after the shutter release button is pressed Z Use this mode to avoid camera shake The picture is taken approximately two seconds after the shutter release button is pressed Focusing may be compromised if you move the camera while the self timer lamp is blinking when taking still pictures In C Movie mode recording will start af...

Страница 79: ...ken The higher the image quality the longer the interval between shots The flash does not discharge in Continuous Shooting 1 Continuous Shooting can not be chosen in b Auto Picture A Night C Movie O Voice Recording F Digital Panorama or S Digital Wide mode You can continue shooting until the memory capacity of the SD Memory Card or built in memory is full The interval of Continuous Shooting varies...

Страница 80: ...n is released and pressed again the camera switches to Digital Zoom The zoom bar is displayed as follow 1 You can zoom in to a maximum of 5x optically 2 The Intelligent Zoom range differs depending on the recorded pixels See the following table Using the Zoom Zoom w x button Four way controller 4 button 3 button 38 38 38 25 5 x 25 5 x 25 5 x Zoom bar Zoom ratio Zoom in with high image quality Zoom...

Страница 81: ...en taking pictures at a high magnification rate Pictures taken in the digital zoom range appear grainier than pictures taken in the optical zoom range Intelligent Zoom is not available under the following conditions When Digital Zoom is set to Off When the recorded pixels is set to E 5x optical zoom available In C Movie mode In 4 Digital SR mode When the sensitivity is set to 3200 or 6400 The imag...

Страница 82: ...ears 2 Use the four way controller 23 to select Digital Zoom 3 Use the four way controller 45 to select O On or P Off The selected setting is saved 4 Press the 3 button The setting is complete and the camera returns to capture status Setting the Digital Zoom Saving the Digital Zoom Function Setting 1p 106 Rec Mode 1sec Digital Wide Instant Review Memory MENU 2 3 EV Compensation 0 0 Movie Digital Z...

Страница 83: ...troller 2 3 Press the 4 button The camera enters the S mode and an explanation is displayed in the center of the screen After 5 seconds or when you press the Green button the camera returns to capture status Turn the camera 90º counterclockwise and align your first picture Using the Digital Wide Function Digital Wide Mode Zoom w x button Four way controller Green button 4 button 3 button OK OK OK ...

Страница 84: ...e appear on the display for one second Instant Review and then saved to the built in memory or SD Memory Card For less distortion when taking the second picture turn the camera to overlap the background and the preview guide on the left of the screen Some distortion may result from moving objects repeating patterns or if nothing exists when overlapping the first and second picture on the preview g...

Страница 85: ... is pressed 1 Press the 3 button in A mode A Rec Mode appears 2 Press the four way controller 23 to select Digital Wide 3 Use the four way controller 45 to select O On or P Off The selected setting is saved 4 Press the 3 button The setting is complete and the camera returns to capture status Setting the Digital Wide Function OK OK OK OK Exit Cancel Exit the Digital Wide mode Rec Mode 1sec Digital ...

Страница 86: ... 3 button The setting is complete and the camera returns to capture status Setting the Exposure EV Compensation If you use the EV compensation function frequently you can save time by assigning it to the Green button p 58 When the histogram is displayed bright portions and dark portions are indicated on the display enabling you to check the exposure p 86 The EV compensation function cannot be used...

Страница 87: ...tter release button halfway when camera shake is likely to occur To prevent camera shake use a tripod and or the self timer function p 76 In 9 Green mode you cannot change the information on the display by pressing the 4 W button 02 02 2008 02 02 2008 14 25 14 25 14 25 1 0 1 0 38 38 38 OK OK OK F3 5 F3 5 1 250 1 250 F3 5 1 250 1 0 1 0 38 38 38 8M 200 200 200 38 02 02 2008 1 0 1 0 F3 5 F3 5 1 250 1...

Страница 88: ...right the peak is on the right side When the image is too dark the part to the left is cut off dark portions and when the image is too bright the part to the right is cut off bright portions Bright portions blink red on the display and dark portions blink yellow Understanding Contrast The graph peaks gradually for images in which contrast is balanced The graph peaks on both sides but sinks in the ...

Страница 89: ... is used when the distance to the subject is approx 10 cm to 50 cm 4 in to 24 in The camera is focused on the subject in the autofocus area when the shutter release button is pressed halfway 3 Pan Focus This mode is used when you ask someone to take pictures for you or when taking pictures of the scenery through the window of a car or train The entire picture from the front to the back is focused ...

Страница 90: ...r finger from the four way controller 5 After the focus is fixed you can press the four way controller 5 again to display the bar and readjust the focus In 9 Green mode you can only select q or 3 When shooting with selected if the subject is closer than 40 cm the camera automatically focuses from 10 cm When shooting with q selected if the subject is further than 50 cm away the camera automatically...

Страница 91: ... eyes caused by the light from the flash being reflected in the subject s eyes The flash discharges regardless of the light conditions b Soft Flash This mode reduces the intensity of the flash so that the flash is not too bright even when fired at close range The flash discharges regardless of the light conditions The flash does not discharge a Flash Off in C Movie or F Digital Panorama mode or wh...

Страница 92: ...Cancel About the red eye phenomenon Taking pictures using the flash may cause the subject s eyes to appear red in the resulting picture This phenomenon occurs when the light from the flash is reflected in the subject s eyes It can be reduced by illuminating the area around the subject or moving closer to the subject and zooming out to a wider angle Setting the flash mode to c Auto Red eye or d Fla...

Страница 93: ...and the bigger the file size The data volume also varies depending on the quality level setting p 93 Recorded Pixels 1 Press the 3 button in A mode The A Rec Mode menu appears 2 Use the four way controller 23 to select Recorded Pixels Selecting the Recorded Pixels Recorded Pixels Use E 3264 2448 For printing high quality photos or A4 size pictures or larger or editing images on a PC For making pos...

Страница 94: ... images captured in S Digital Wide or 4 Digital SR mode is fixed at f However the number of recorded pixels will be h if you exit the Digital Wide mode without taking second picture If you take and save only the first frame in F Digital Panorama mode the number of recorded pixels fixed at i If you use the Recorded Pixels function frequently you can save time by assigning it to the Green button p 5...

Страница 95: ... The camera returns to capture status with the current setting Selecting the Quality Level C Best Lowest compression rate Suitable for photo prints D Better Standard compression rate Suitable for viewing the image on a computer screen E Good Highest compression rate Suitable for posting on a website or attaching to e mail If you use the Quality Level function frequently you can save time by assign...

Страница 96: ...se this mode when taking pictures outside in sunlight H Shade Use this mode when taking pictures outside in the shade I Tungsten Light Use this mode when taking pictures under electric or other tungsten light J Fluores Light Use this mode when taking pictures under fluorescent light K Manual Use this mode when adjusting the white balance manually Set another white balance if you are not satisfied ...

Страница 97: ...anual 2 Point the camera at the blank sheet of paper or other material so that it fills the frame displayed in the center of the screen 3 Press the shutter release button fully The white balance is automatically adjusted 4 Press the 4 button The setting is saved and the screen returns to the A Rec Mode 5 Press the 3 button The camera returns to capture status If you use the White Balance function ...

Страница 98: ...g the AE Metering L Multi segment metering The camera divides the image into 256 areas meters the brightness and determines the exposure M Center weighted metering The camera takes a reading of the overall brightness of the picture with the center of the image having more influence on the exposure N Spot AE metering The camera determines the exposure by metering the brightness only at the center o...

Страница 99: ...he focusing area and you want to use spot AE metering aim the camera at the subject and press the shutter release button halfway to lock the exposure then compose your picture again and press the shutter release button fully If you use the AE Metering function frequently you can save time by assigning it to the Green button p 58 Saving the AE Metering 1p 106 ...

Страница 100: ... Sensitivity Auto The sensitivity is automatically adjusted by the camera sensitivity 64 800 64 The lower the sensitivity the less noise that affects the image The shutter speed will be slower in low light conditions Higher sensitivity settings use faster shutter speeds in low light conditions to reduce camera shake but the image may be affected by noise 100 200 400 800 1600 3200 6400 Rec Mode MEN...

Страница 101: ...en the shooting mode is set to C Movie only Auto sensitivity 64 800 is available When the shooting mode is set to 4 Digital SR only Auto sensitivity 64 6400 is available If you use the Sensitivity function frequently you can save time by assigning it to the Green button p 58 Saving the sensitivity 1p 106 ...

Страница 102: ...tofocus Conditions Setting the Focusing Area J Multiple Normal autofocus area K Spot The autofocus area becomes smaller W Automatic Tracking AF Keeps moving subjects in focus In Y Frame Composite mode Focusing Area can only be set to J Multiple or K Spot In b Auto Picture mode Focusing Area is fixed at J Multiple If you use the Focusing Area function frequently you can save time by assigning it to...

Страница 103: ...me 5 Press the 4 button The Instant Review setting is saved 6 Press the 3 button The camera returns to capture status with the current setting Setting the Instant Review Time Instant Review Instant Review 1p 41 If the Face Recognition function worked when shooting Blinking Detection will operate during Instant Review p 41 Rec Mode MENU 1 3 Recorded Pixels Quality Level White Balance AE Metering Se...

Страница 104: ... G Normal H Hard 4 Press the 3 button The Sharpness setting is saved and the camera returns to capture status Setting the Image Sharpness Sharpness If you use the Sharpness function frequently you can save time by assigning it to the Green button p 58 Rec Mode MENU 1 3 Recorded Pixels Quality Level White Balance AE Metering Sensitivity AWB Auto Focusing Area 8M Exit MENU Four way controller 3 butt...

Страница 105: ...l H High 4 Press the 3 button The Saturation setting is saved and the camera returns to capture status Setting the Color Saturation Saturation If you use the Saturation function frequently you can save time by assigning it to the Green button p 58 Rec Mode MENU 1 3 Recorded Pixels Quality Level White Balance AE Metering Sensitivity AWB Auto Focusing Area 8M Exit MENU Four way controller 3 button R...

Страница 106: ...ormal H High 4 Press the 3 button The Contrast setting is saved and the camera returns to capture status Setting the Image Contrast Contrast If you use the Contrast function frequently you can save time by assigning it to the Green button p 58 Rec Mode MENU 1 3 Recorded Pixels Quality Level White Balance AE Metering Sensitivity AWB Auto Focusing Area 8M Exit MENU Four way controller 3 button Rec M...

Страница 107: ...r way controller 45 to select O On or P Off The selected setting is saved 4 Press the 3 button Setting the Date Imprint Function The date imprinted with this function cannot be deleted Rec Mode MENU 1 3 Recorded Pixels Quality Level White Balance AE Metering Sensitivity AWB Auto Focusing Area 8M Exit MENU Four way controller 3 button Rec Mode Saturation Date Imprint MENU 3 3 Sharpness Contrast Gre...

Страница 108: ...ault setting for each item is on or off Item Description Default Setting Face Priority A Face Recognition mode set by using the I button P Flash Mode The flash mode set with the four way controller 4 p 89 O Drive Mode The drive mode set with the four way controller 2 p 76 p 77 P Focus Mode The focus mode set with the four way controller 5 p 87 P Zoom Position The zoom position set with the Zoom w ...

Страница 109: ...Use the four way controller 45 to select O On or P Off 6 Press the 4 button The Memory setting is saved 7 Press the 3 button The camera returns to capture status with the current setting Rec Mode MENU 1 3 Recorded Pixels Quality Level White Balance AE Metering Sensitivity AWB Auto Focusing Area 8M Exit MENU Four way controller 4 button 3 button Memory MENU Cancel Face Priority Flash Mode Drive Mod...

Страница 110: ... Movie mode icon 2 Recording indicator blinks during recording 3 Remaining recordable time 4 Focus frame does not appear during recording 5 Movie shake reduction function icon You can change the captured area by pressing the Zoom w x button to the left or right x enlarges the subject w widens the area that is captured by the camera Recording a Movie Shutter release button Zoom w xbutton Four way c...

Страница 111: ...u can adjust the focus before recording starts You can use the optical zoom only before recording while the digital zoom is available both before and during recording Changing the display mode by pressing the 4 W button while recording a movie will not display the histogram When the shooting mode is set to C Face Priority is automatically set to on You can select Smile Capture On or Face Priority ...

Страница 112: ...u appears 6 Use the four way controller 23 to change the number of recorded pixels 7 Press the 4 button The Recorded Pixels setting is saved 8 Press the 3 button twice The camera returns to capture status with the current setting Selecting the Recorded Pixels for Movies m 640 480 Suitable for viewing on a TV or computer screen D 320 240 Suitable for posting on a website or attaching to e mail Reco...

Страница 113: ...ay controller 23 to change the quality level 7 Press the 4 button The Quality Level setting is saved 8 Press the 3 button twice The camera returns to capture status with the current setting Selecting the Quality Level of Movies C Best Clearer images with larger file size D Better E Good Grainier images with smaller file size Recorded Pixels Quality Level and Frame Rate of Movies 1p 32 Rec Mode MEN...

Страница 114: ... Rate 5 Press the four way controller 5 A pull down menu appears 6 Use the four way controller 23 to select 30fps or 15fps 7 Press the 4 button The Frame Rate setting is saved 8 Press the 3 button twice The camera returns to capture status with the current setting Selecting the Frame Rate Recorded Pixels Quality Level and Frame Rate of Movies 1p 32 Rec Mode MENU 1 3 Recorded Pixels Quality Level W...

Страница 115: ...four way controller 23 to choose a color 7 Press the 4 button The Color Mode setting is saved 8 Press the 3 button twice The camera returns to capture status with the current setting Recording Movies in Black and White or Sepia Tones Color Mode The color mode setting cannot be changed after a movie is recorded Rec Mode MENU 1 3 Recorded Pixels Quality Level White Balance AE Metering Sensitivity AW...

Страница 116: ...our way controller 23 to select Movie SR 5 Use the four way controller 45 to select O On or P Off The Movie SR Movie Shake Reduction setting is saved 6 Press the 3 button twice The camera returns to capture status with the current setting Setting the Movie SR Movie Shake Reduction Function MENU Rec Mode MENU 1 3 Recorded Pixels Quality Level White Balance AE Metering Sensitivity AWB Auto Focusing ...

Страница 117: ...y Card is inserted in the camera images movies and sounds in the SD Memory Card are displayed If you want to display images movies and sounds in the built in memory remove the SD Memory Card Viewing images in the built in memory while the SD Memory Card is inserted built in memory display When switching from A mode to Q mode you can display images movies and sounds in the built in memory while the...

Страница 118: ...u choose image 2 and press the four way controller 35 the next page appears The icons that appear on the images indicate the following No icon Still picture without sound P Still picture that can have camera shake corrected O with image Still picture with sound C Movie first frame appears O without image Sound file only Press the 4 button 3 button or y on the Zoom f y button to switch to single im...

Страница 119: ...rmat The first image recorded on a date is displayed for that date on the calendar O appears for dates on which a sound file was the first recorded file Use the four way controller 2345 to move the frame Press y on the Zoom f y button to display the images for a date in nine image display Select a date and press the 4 button to switch to single image display of the first image recorded on that dat...

Страница 120: ...is set to O you can magnify the image at a maximum of 8 simply by pressing y once You can use the guide at the bottom left of the screen to check which portion of the image is magnified The following operations can be performed while the magnified image is displayed Four way controller 2345 Moves the position to be magnified Zoom f y button y Makes the image bigger max 8 Zoom f y button f Makes th...

Страница 121: ...he I icon is displayed in the image and press the I button The image is magnified around the face first recognized when the image was taken If multiple faces were recognized when the image was taken the subject s faces are zoomed up on each time the I button is pressed in order of the recognition during shooting 3 Press the 4 button The image returns to single image display Zoom Up On the Subject ...

Страница 122: ...ze of the face recognized when shooting Press y on the Zoom f y button during Face close up playback to switch to the zoom playback the image is displayed at an equal or slightly larger magnification ratio Press f on the Zoom f y button to switch to the zoom playback the image is displayed at an equal or slightly smaller magnification ratio ...

Страница 123: ...ach display mode Displaying Shooting Information in Playback Mode Displaying Shooting Information in Capture Mode 1p 85 OK OK OK 02 02 2008 02 02 2008 02 02 2008 14 25 14 25 14 25 100 100 0026 0026 100 0026 F3 5 F3 5 1 250 1 250 F3 5 1 250 02 02 2008 02 02 2008 02 02 2008 14 25 14 25 14 25 200 200 200 8M 100 100 0026 0026 100 0026 Movie Movie Normal Display Histogram Info No Info ...

Страница 124: ...with Digital SR If you overwrite the image the shake information is lost and you cannot perform shake correction again P appears on the upper left of the display only when playing back images for which camera shake can be corrected However camera shake may not be corrected when the camera shake is too extreme In such cases the error message will appear in step 5 Digital SR Digital SR Digital SR OK...

Страница 125: ...utton during the slideshow pauses the slideshow To resume the slideshow press the 4 button while the slideshow is paused 5 Press any button other than the 4 button The slideshow stops You can set the playback interval and also a screen effect and sound effect for when one image changes to the next 1 Press the four way controller 3 in Q mode The Playback Mode Palette appears 2 Use the four way cont...

Страница 126: ... next 10 Press the 4 button The slideshow starts using the selected interval and effect Wipe The next image slides over the previous one from left to right Checker The next image appears in small square mosaic blocks Fade The current image gradually fades out and the next image fades in Off No effect The slideshow will continue until you press any button other than the 4 button Movies or pictures ...

Страница 127: ...y controller 4 Plays back in reverse Four way controller 2 Pauses playback Zoom f y button y Increases the volume Zoom f y button f Reduces the volume The following operations can be performed while playback is paused Four way controller 4 Reverses the frame Four way controller 5 Forwards the frame Four way controller 2 Releases the Pause function Play 3 Press the four way controller 3 Playback st...

Страница 128: ...other ends of the AV cable yellow video white audio to the video input terminal and audio input terminal of the AV device When using stereo sound equipment insert the sound terminal into the L white terminal 3 Turn the AV device on When the device that the camera is connected to and the device that plays back images are different turn both devices on When viewing images on AV equipment with multip...

Страница 129: ... country or region images and sound files may fail to be played back if the video output format is set different from the one in use there If this happens change the video output format setting p 172 The camera display turns off while the camera is connected to AV equipment Volume cannot be adjusted with the zoom button while the camera is connected to AV equipment ...

Страница 130: ...ounds can be recovered even if the camera has been turned off after deletion as long as the SD Memory Card has not been removed However deleted images and sounds cannot be recovered after operations to write data such as taking pictures recording movies protecting images saving DPOF settings resizing images or cropping images have been performed Deleting a Single Image Sound File Protected images ...

Страница 131: ...d 2 Press the i button A confirmation screen appears 3 Use the four way controller 23 to select Delete Sound 4 Press the 4 button The sound file is deleted Deleting a Sound File Select Delete in Step 3 above to delete both the image and sound file Delete Delete Sound Cancel 100 100 0017 0017 100 0017 OK OK OK OK All Images Sounds All Images Sounds All Images Sounds All Images Sounds All Images Sou...

Страница 132: ...ted images and sound files If you select an image and press y on the Zoom f y button the selected image appears in single image display as long as the button is pressed enabling you to check whether you really want to delete it or not The display returns to the nine image display when you release the button However protected images cannot be displayed in single image display Deleting Selected Imag...

Страница 133: ...pears 5 Use the four way controller 23 to select Select Delete 6 Press the 4 button The selected images and sound files are deleted Select Delete Cancel Cancel Cancel OK OK OK OK MENU Delete all selected Delete all selected images sounds images sounds Delete all selected images sounds ...

Страница 134: ...e the four way controller 23 to select Delete All 4 Press the 4 button All the images and sound files are deleted Deleting All Images and Sound Files Protected images and sound files cannot be deleted p 134 Recovering Deleted Images 1p 133 Four way controller Q button i button 4 button Delete all images sounds Delete all images sounds Delete all images sounds Delete All Cancel Cancel Cancel OK OK ...

Страница 135: ...ting an image once operations to write data such as taking pictures recording movies protecting images saving DPOF settings resizing images or cropping images have been performed or the SD Memory Card has been removed the message No image to be processed appears in Step 3 and the deleted images and sound files cannot be recovered Recovered images and sound files have the same file name as before t...

Страница 136: ...3 to select Protect 7 Press the 4 button The selected image or sound file is protected Protecting Images and Sound Files from Deletion Protect To cancel the Protect setting select Unprotect in Step 6 Y appears below the file number on protected images and sound files during playback You can protect another image or sound file by further performing the above 5 6 and 7 Steps However the maximum numb...

Страница 137: ...troller 23 to select Protect 7 Press the 4 button All the images and sound files are protected Protecting All Images and Sound Files Protected images and sound files will be deleted when the SD Memory Card or built in memory is formatted To cancel the Protect setting on all your images and sound files select Unprotect in Step 6 Protect Protect Protect OK OK OK OK MENU Cancel Cancel Cancel Four way...

Страница 138: ...er 3 The Playback Mode Palette appears 3 Use the four way controller 2345 to select n Resize 4 Press the 4 button The screen for choosing the size and quality appears 5 Select Recorded Pixels and Quality Level Use the four way controller 45 to choose the size and quality Use the four way controller 23 to switch between Recorded Pixels and Quality Level Changing the Image Size and Quality Resize Mo...

Страница 139: ...e image appears Save as is the only available option for protected images 7 Use the four way controller 23 to select Overwrite or Save as 8 Press the 4 button The resized image is saved OK OK OK OK Overwrite Save as Cancel Overwrite original image Overwrite original image Overwrite original image ...

Страница 140: ...tions Zoom f y button Changes the size of the cropped section Four way controller 2345 Moves the cropping position up down left and right Green button Rotates the cropping frame 6 Press the 4 button The cropped image is saved with a new file name The cropped image is saved in the same quality as the original image The number of recorded pixels is selected automatically according to the size of the...

Страница 141: ...the images and sound files in the built in memory are copied to the SD Memory Card at once Before copying the images make sure that there is enough space in the SD Memory Card 4 Use the four way controller 23 to select 2 5 Press the 4 button All the images and sound files are copied Copying Images and Sound Files Make sure that the camera is turned off before inserting or removing the SD Memory Ca...

Страница 142: ...le you want to copy 7 Press the 4 button The selected image sound file is copied To Copy Files from the SD Memory Card to the Built in Memory If sound has been recorded with the image the sound file is copied with the image When a file is copied from the SD Memory Card to the built in memory it is assigned a new file name OK OK OK OK Cancel Cancel Cancel MENU Copy this image sound Copy this image ...

Страница 143: ...ilter Using the Digital Filters B W sepia filter Processes the image using the selected filter You can choose from two filters B W and sepia Color filter Processes the image using the selected color filter You can choose from six filters red pink purple blue green and yellow Color extraction filter Processes the image using the selected color extraction filter You can choose from three filters Red...

Страница 144: ...The color extraction filter changes in the following sequence each time you press the four way controller 5 Green Blue Red 7 Press the 4 button A confirmation dialog for overwriting the image appears 8 Use the four way controller 23 to select Overwrite or Save as Save as is the only available option for protected images 9 Press the 4 button Images processed with a color filter or the color extract...

Страница 145: ...firmation dialog for overwriting the image appears 8 Use the four way controller 23 to select Overwrite or Save as Save as is the only available option for protected images 9 Press the 4 button The edited image is saved with the same number of recorded pixels and quality level as the original To Select the Brightness Filter Movies or images taken with another camera cannot be edited using Digital ...

Страница 146: ...e as is the only available option for protected images 6 Press the 4 button The edited image is saved with the same number of recorded pixels and quality level as the original Red eye Compensation The red eye compensation function cannot be used on movies or on images where red eyes cannot be detected on the camera An error message appears in Step 4 The red eye compensation function can only be us...

Страница 147: ...rame selection screen appears 5 Use the four way controller 2345 to choose a frame 6 Press y on the Zoom f y button The selected frame appears in single image display You can choose another frame using either of the following operations Use the four way controller 45 to choose a different frame Press f on the Zoom f y button to return to the 9 frame display of the frame selection screen and then p...

Страница 148: ...pictures To display the frames available in the built in memory or the SD Memory Card in Step 3 select Y Frame Composite and press the 4 button The Frame Composite function cannot be used on movies or images of size i or smaller An error message appears in Step 4 Using a New Frame The three frames stored in the internal memory cannot be deleted Up to 96 downloaded frames can be displayed Including...

Страница 149: ...ress the 4 button The movie edit selection screen appears Go to the following pages Saving a Frame from a Movie as a Still Picture Dividing a Movie p 148 5 Select Save as Still image on the movie edit selection screen Editing Movies Protected movies cannot be divided Saving a Frame from a Movie as a Still Picture How to display the Movie Edit menu OK OK OK OK MENU Cancel Cancel Cancel Movie Edit M...

Страница 150: ...movie and returns to the first frame 4 Reverses the movie frame by frame 5 Advances the movie frame by frame 8 Press the 4 button A confirmation dialog appears 9 Use the four way controller 23 to select Divide 10 Press the 4 button The movie is divided at the specified position the two portions are saved as new files and the original one is deleted Dividing a Movie Select image to save Select imag...

Страница 151: ...the following items for each image 1 In Q mode press the four way controller 3 The Playback Mode Palette appears 2 Use the four way controller 2345 to select r DPOF 3 Press the 4 button The screen for selecting Single Image or All Images appears 4 Use the four way controller 23 to select Single Image Printing Single Images Copies Choose the number of copies up to 99 Date Specify whether you want t...

Страница 152: ... the four way controller 45 to choose another image and repeat Steps 6 and 7 8 Press the 4 button The DPOF settings are saved and the screen returns to the DPOF menu Depending on the printer or printing equipment at the photo processing lab the date may not be imprinted on the pictures even if O On was selected in the DPOF settings To cancel DPOF settings set the number of copies to 00 in Step 6 a...

Страница 153: ...7 in Printing Single Images p 150 for details of how to make the settings 5 Press the 4 button The DPOF settings for all the images are saved and the camera returns to the DPOF setting screen Printing All Images The number of copies specified in the DPOF settings applies to all the images Before printing check that the number is correct Settings for single images are canceled when settings are mad...

Страница 154: ...ection screen appears You are recommended to use the AC adapter kit K AC78 when the camera is connected to the printer The printer may not work properly or the image data may be lost if the battery runs out of power while the camera is connected to the printer Do not disconnect the USB cable during data transfer Depending on the model of printer not all the settings made on the camera such as prin...

Страница 155: ...tings on the printer press the 4 button To change the print settings go to Step 7 7 Press the Green button The screen for changing the print settings appears 8 Select Paper Size and press the four way controller 5 The Paper Size screen appears Printing Single Images All Images Select printing mode Select printing mode Single Image DPOF AUTOPRINT OK OK OK OK Copies Print this image Print this image...

Страница 156: ...ed according to the settings made on the printer Paper Type with more E supports higher quality paper Quality with more E indicates higher print quality A confirmation dialog appears after each item has been set 13 Press the 3 button The screen returns to the confirmation dialog 14 Press the 4 button The image is printed according to the settings Press the 3 button to cancel printing The self time...

Страница 157: ...s of how to make the settings 4 Press the 4 button A confirmation dialog appears Refer to Steps 7 to 11 of Printing Single Images p 153 and p 154 for details of changing print settings 5 Press the 4 button on the print settings confirmation screen All the images are printed according to the settings Press the 3 button to cancel printing Printing All Images All Images Select printing mode Select pr...

Страница 158: ... 153 and p 154 for details of changing print settings 4 Press the 4 button The images are printed according to the settings Press the 3 button to cancel printing Disconnect the USB cable from the camera and printer when you have finished printing 1 Turn off the camera 2 Disconnect the USB cable from the camera and printer Printing Using the DPOF Settings If the picture already has the date imprint...

Страница 159: ...ront of the camera When recording sound aim the camera to obtain the best conditions 1 Press the four way controller 3 in A mode The Capture Mode Palette appears 2 Use the four way controller 2345 to select O Voice Recording Speaker Microphone Voice Recording Voice Recording Voice Recording OK OK OK OK MENU Cancel Cancel Cancel Four way controller 4 button Shutter release button ...

Страница 160: ...ding an index is added to the current sound file 5 Press the shutter release button fully Recording stops If you press and hold down the shutter release button for more than one second in Step 4 recording continues until you take your finger off the button This is useful for making short sound recordings Sound is saved in WAVE monaural files 01 31 44 01 31 44 Start Start 00 00 00 00 00 00 00 00 00...

Страница 161: ...no recorded indexes Four way controller 4 Reverses playback Four way controller 5 Fast forwards playback If there are recorded indexes Four way controller 4 Plays back starting from the previous index Four way controller 5 Plays back starting from the next index The following operations can be performed while playback is paused Four way controller 2 Resumes playback Four way controller 4 Rewinds a...

Страница 162: ...roller 2345 to select Voice Memo 4 Press the 4 button Recording starts You can record a voice memo continuously for up to 24 hours 5 Press the 4 button Recording stops Recording a Voice Memo A voice memo cannot be added to an image that already has a voice memo Delete the old voice memo and record a new one p 129 A voice memo cannot be added to protected Z images p 134 OK OK OK OK MENU Cancel Canc...

Страница 163: ... display 2 Press the four way controller 2 Playback starts The following operations can be performed during playback Zoom w xbutton x Increases the volume Zoom w xbutton w Reduces the volume 3 Press the four way controller 3 Playback stops Playing Back a Voice Memo Deleting a Sound File 1p 129 Zoom w x button Q button Four way controller 14 25 14 25 14 25 100 100 0038 0038 100 0038 02 02 2008 02 0...

Страница 164: ...ns to Capture mode or Playback mode Formatting an SD Memory Card or the Built in Memory Do not remove the SD Memory Card during formatting as this may damage the card and render it unusable Formatting will delete protected images and any data recorded on the card with a camera other than this camera SD Memory Cards formatted on a PC or device other than the camera cannot be used Be sure to format ...

Страница 165: ...lected volume is saved Set the volume to 0 to mute the start up sound shutter sound operation sound and self timer sound 5 Change Playback Volume in the same way as in Steps 3 to 4 Changing the Sound Settings Changing the Operation Volume Playback Volume Setting Format Sound 02 02 2008 Date Adjust World Time MENU Exit Exit Exit 1 3 Folder Name Date MENU How to display the W Setting menu Four way c...

Страница 166: ...appears 8 Use the four way controller 23 to select 1 2 3 or Off and press the 4 button The selected sound type is saved 9 Set Shutter Sound Operation Sound and Self timer Sound in the same way as in Steps 6 to 8 10 Press the 3 button The setting is changed and the screen returns to the W Setting menu Changing the Sound Type ...

Страница 167: ...r 23 to choose the date and time display style Choose mm dd yy dd mm yy or yy mm dd 5 Press the four way controller 5 The frame moves to 24h 6 Use the four way controller 23 to select 24h 24 hour display or 12h 12 hour display Changing the Date and Time Setting Format Sound 02 02 2008 Date Adjust World Time MENU Exit Exit Exit 1 3 Folder Name Date MENU How to display the W Setting menu Four way co...

Страница 168: ...th 11 Press the four way controller 5 The frame moves to the day field Use the four way controller 23 to change the day After changing the day change the year in the same manner 12 Change the time in the same way as in Steps 7 to 10 If you selected 12h in Step 6 the setting switches between am and pm corresponding to the time 13 Press the 4 button The date and time settings are saved When you fini...

Страница 169: ...creen appears The city that is currently selected blinks on the map 5 Use the four way controller 45 to change the Destination city The current time location and time difference of the selected city appear 6 Use the four way controller 23 to select DST 7 Use the four way controller 45 to select O On or P Off Select O On if the Destination city uses daylight saving time Setting the World Time Setti...

Страница 170: ...ed as the Destination city W Displays the time in the city selected as the Hometown city 6 Press the 4 button The Select time setting is saved 7 Press the 3 button twice The camera returns to A mode or Q mode X Destination appears on the display when the camera returns to A mode and World Time is selected Select W Hometown in Step 3 of p 167 to set the city and DST setting for the Hometown city Di...

Страница 171: ...four way controller 23 to select Language on the W Setting menu 2 Press the four way controller 5 The Language screen appears 3 Use the four way controller 2345 to select the language 4 Press the 4 button The selected language is set to be displayed Changing the Display Language Setting Format Sound 02 02 2008 Date Adjust World Time MENU Exit Exit Exit 1 3 Folder Name Date MENU How to display the ...

Страница 172: ...tandard xxxPENTX where xxx is the 3 digit folder number Date xxx_mmdd 3 digit folder number_month day xxx_ddmm 3 digit folder number_day month when the date style is set to dd mm yy Setting Format Sound 02 02 2008 Date Adjust World Time MENU Exit Exit Exit 1 3 Folder Name Date MENU How to display the W Setting menu Four way controller 3 button 4 button DCIM 100PENTX 101_0925 102_1001 DCIM 100PENTX...

Страница 173: ...ridge compatible printer 4 Press the 4 button The USB Connection setting is saved Changing the USB Connection Mode Refer to the PC Connection Manual for instructions on connecting the camera to a computer Do not connect the camera to your PC while PictBridge is selected for the USB Connection mode And do not connect the camera to your printer while PC is selected Setting Format Sound 02 02 2008 Da...

Страница 174: ... Video Out setting is saved Changing the Video Output Format Depending on the country or region images and sound files may fail to be played back if the video output format is set different from the one in use there If this happens change the video output format setting Connecting the Camera to AV Equipment 1p 126 Setting Format Sound 02 02 2008 Date Adjust World Time MENU Exit Exit Exit 1 3 Folde...

Страница 175: ...to Capture mode or Playback mode The display is displayed with the set brightness To change the brightness setting perform the above steps again Adjusting the Brightness of the Display Setting Format Sound 02 02 2008 Date Adjust World Time MENU Exit Exit Exit 1 3 Folder Name Date MENU How to display the W Setting menu Four way controller 3 button Setting Power Saving Auto Power Off 3min 5sec USB C...

Страница 176: ...Saving Function Power Saving does not function in the following situations while taking pictures in Continuous Shooting mode in Playback mode while the camera is connected to a PC or printer when using the AC adapter while recording a movie while the menu is being displayed When no operation is performed after the camera is turned on Power Saving is activated only after 15 seconds elapse even if 5...

Страница 177: ...f does not function in the following situations while recording sound in O Voice Recording mode while taking pictures in Continuous Shooting mode while recording a movie while playing back sound during a slideshow or movie playback while the camera is connected to a PC or printer Setting Format Sound 02 02 2008 Date Adjust World Time MENU Exit Exit Exit 1 3 Folder Name Date MENU How to display the...

Страница 178: ...n The Quick Zoom is available P Off The Quick Zoom is not available 3 Press the 3 button The camera returns to A mode or Q mode Repeat the above steps to change the setting Setting the Quick Zoom Function Setting Format Sound 02 02 2008 Date Adjust World Time MENU Exit Exit Exit 1 3 Folder Name Date MENU How to display the W Setting menu Four way controller 3 button 4 button Setting Power Saving A...

Страница 179: ...ontroller 45 to select O On or P Off O ON The mode guide is displayed P OFF The mode guide is not displayed 3 Press the 3 button The camera returns to A mode or Q mode Repeat the above steps to change the setting Setting the Guide Display Setting Format Sound 02 02 2008 Date Adjust World Time MENU Exit Exit Exit 1 3 Folder Name Date MENU How to display the W Setting menu Four way controller 3 butt...

Страница 180: ...oller 23 to select Reset 4 Press the 4 button The settings return to the defaults Resetting to Default Settings Reset The following settings are not affected by resetting Date Adjust Language World Time Video Out Setting Format Sound 02 02 2008 Date Adjust World Time MENU Exit Exit Exit 1 3 Folder Name Date MENU How to display the W Setting menu Four way controller 3 button 4 button Setting Reset ...

Страница 181: ...troller 45 to choose an image for the start up screen 6 Press the 4 button The Start up Screen setting is saved Changing the Start up Screen Once the start up screen has been set it will not be deleted even if the original image is deleted or the SD Memory Card or built in memory is formatted Select Off to hide the start up screen Four way controller 4 button Start up Screen Start up Screen Start ...

Страница 182: ...L Toronto NTSC Male PAL New York NTSC Delhi PAL Halifax NTSC Colombo PAL Central and South America Mexico City NTSC Kathmandu PAL Lima NTSC Dacca PAL Santiago NTSC East Asia Yangon NTSC Caracas NTSC Bangkok PAL Buenos Aires PAL Kuala Lumpur PAL Sao Paulo PAL Vientiane PAL Rio de Janeiro NTSC Singapore PAL Europe Lisbon PAL Phnom Penh PAL Madrid PAL Ho Chi Minh PAL London PAL Jakarta PAL Paris PAL ...

Страница 183: ...the Reset function p 178 No The setting is saved even after reset A Rec Mode Menu Items Item Default Setting Last Memory Setting Reset Setting Page Recorded Pixels E 3264 2448 Yes Yes p 91 Quality Level D Better Yes Yes p 93 White Balance F Auto Yes p 94 Focusing Area J Multiple Yes Yes p 100 AE Metering L Multi segment Yes p 96 Sensitivity Auto Yes p 98 EV Compensation 0 0 Yes p 84 Movie Recorded...

Страница 184: ...P Off Yes Yes p 94 Sensitivity P Off Yes Yes p 98 EV Compensation P Off Yes Yes p 84 AE Metering P Off Yes Yes p 96 Digital Zoom O On Yes Yes p 80 DISPLAY P Off Yes Yes p 85 p 121 File No O On Yes Yes Green Button Green Mode Yes Yes p 57 Sharpness G Normal Yes Yes p 102 Saturation G Normal Yes Yes p 103 Contrast G Normal Yes Yes p 104 Date Imprint P Off Yes Yes p 105 Item Default Setting Last Memo...

Страница 185: ...cording to initial setting Yes No World Time World time Same as W hometown Yes Yes p 167 Destination City According to initial setting Yes No Destination DST P Off Yes No Hometown City According to initial setting Yes No Hometown DST P Off Yes No Language According to initial setting Yes No p 36 Folder Name Date Yes Yes p 170 USB Connection PC Yes Yes p 171 Video Out According to initial setting Y...

Страница 186: ...36 Quality Level Depending on the picture taken Cropping Depending on the picture taken p 138 Image Sound Copy p 139 Image Rotation Normal p 43 Digital Filter B W No p 141 Movie Edit Save as Still image p 145 Divide Movies Frame Composite Default1 Yes Yes p 147 Red eye Compensation p 144 Voice Memo p 160 Protect Single image sound p 134 All Images Sounds DPOF Single image Copies 0 p 149 All Images...

Страница 187: ...wide angle No p 78 Four way controller 2 Drive Mode 9 Standard Yes p 76 p 77 3 Shooting Mode b Auto Picture Yes Yes p 53 4 Flash Mode Auto Yes p 89 5 Focus Mode Standard Yes p 87 3 button Menu Display Capture mode A Rec Mode menu Playback mode W Setting menu p 48 4 W button Information Display Normal Yes p 85 p 121 I button Operation Mode Face Priority On Yes p 56 ...

Страница 188: ...Yes No Yes Yes 3 Pan Focus Yes Yes Yes Yes Yes No Yes Yes Manual Focus Yes No Yes Yes Yes No Yes Yes Recorded Pixels Yes No Yes Yes 5 Yes Yes Quality Level Yes No Yes Yes 5 Yes Yes White Balance No 10 No 10 Yes Yes Yes 8 No 10 No 10 Focusing Area No 11 No 11 Yes Yes Yes 12 Yes Yes AE Metering No 2 3 No 2 3 Yes 3 Yes 3 No 2 3 No 2 3 No 2 3 Sensitivity Yes No 15 Yes Yes No 15 Yes Yes EV Compensation...

Страница 189: ... Yes Yes q Macro Yes Yes Yes Yes s Infinity Yes Yes Yes Yes 3 Pan Focus Yes Yes Yes Yes Manual Focus Yes No 17 No 16 No 13 Recorded Pixels Yes Yes Yes Yes Quality Level No 10 Yes Yes Yes White Balance Yes Yes Yes Yes Focusing Area No 2 3 Yes 3 Yes 3 Yes 3 AE Metering Yes No 9 Yes Yes Sensitivity Yes Yes Yes Yes EV Compensation Yes No Yes No Digital Zoom Yes Yes Yes Yes Instant Review Yes Yes Yes Y...

Страница 190: ...upply Rechargeable lithium ion battery D LI78 Battery charger kit K BC78 Battery charger D BC78 AC plug cord AC adapter kit K AC78 AC adapter D AC64 DC coupler D DC78 AC plug cord The battery charger and AC plug cord are only sold as a set Cable USB cable I USB7 AV cable I AVC7 Strap O ST51 O ST24 Genuine leather strap O ST8 Silver chain strap O ST30 Waterproof strap Camera case O CC78 ...

Страница 191: ... p 162 Card locked The SD Memory Card is write protected p 30 Compression error This message occurs when the camera fails to compress an image Change the quality level or recorded pixels of the image and try shooting or saving it again No image sound There are no image sound files on the SD Memory Card Movie recording stopped This message appears when the internal temperature of the camera has exc...

Страница 192: ...inserted The built in memory is not enough to copy images sounds Displayed when there is insufficient built in memory to perform copying Cannot process correctly Displayed when Red eye Compensation processing fails Display image sound from built in memory Displayed when the camera enters built in memory display Green mode must be canceled to use this function Displayed when you try to use a functi...

Страница 193: ...rinting Displayed when printing completes Print Canceled Displayed when printing is canceled No image to be processed Displayed when there are no images to print Wrong DPOF setting Displayed when DPOF printing cannot be performed Message Description ...

Страница 194: ...tness level in Brightness Level in the W Setting menu p 173 Power Saving function is on When the Power Saving function is on the display automatically darkens after a certain amount of time Press a button to return to the normal brightness level Select Off in Power Saving in the W Setting menu to turn the Power Saving function off p 174 The shutter will not release The flash is charging Pictures c...

Страница 195: ...frame focusing area in the center of the display If it is difficult to do so first lock the focus on the desired subject focus lock and then move the camera to recompose The subject is too close Set the focus mode to q p 87 The focus mode is set to q Normal pictures will be out of focus if taken with the focus mode set to q The flash does not discharge The flash mode is set to a flash off Set to A...

Страница 196: ...NT Image Matching III Movie AVI Motion JPEG approx 30fps 15fps PCM system monaural sound full color sepia black and white Movie SR Movie Shake Reduction Sound Voice memo voice recording WAVE PCM system monaural Quality Level Still C Best D Better E Good Movie C Best D Better E Good Storage Media Built in memory approx 51 1 MB SD Memory Card SDHC Memory Card C Best D Better E Good Built in Memory 5...

Страница 197: ...T Lens Composition 8 elements in 6 groups 4 aspherical elements Zoom Type Electrically driven Optical Zoom 5 Intelligent Zoom Approx 6 3 at f 2592 1944 Approx 25 5 at m 640 480 when combined with 5 optical zoom Digital Zoom Max 5 1 combines with 5 optical zoom to give zoom magnification equivalent to 25 5 Motion Blur Reduction Still Hi sensitivity shake reduction mode Digital SR Movie Movie shake ...

Страница 198: ...ction Surf Snow Sport Pet Kids Food Digital Panorama Digital Wide Face Recognition AE is available only while the camera recognizes the subject s face Digital Filters B W Sepia Red Pink Purple Blue Green Yellow Soft Color extraction Red Green Blue Brightness Movie Continuous Recording Time Approx 1 second until built in memory or SD Memory Card is full however maximum size is limited to 2 GB Shutt...

Страница 199: ...SB 2 0 high speed compatible PC AV terminal Video Output NTSC PAL monaural PictBridge Printer PictBridge compatible printer Print Modes Print One Print All DPOF AUTOPRINT Paper Size Card L 2L Postcard 100 mm 150 mm 4 6 8 10 Letter 11 17 A4 A3 printer setting Paper Type C D E printer setting Quality C D E printer setting Border Status With without printer setting Dimensions Approx 95 W 55 H 23 5 D ...

Страница 200: ...ufacturer If there is no representative of the manufacturer in your country send the equipment to the manufacturer with postage prepaid In this case it will take a considerable length of time before the equipment can be returned to you owing to the complicated customs procedures required If the equipment is covered by warranty repairs will be made and parts replaced free of charge and the equipmen...

Страница 201: ...ors in some countries can supersede this warranty policy Therefore we recommend that you review the warranty card supplied with your product at the time of purchase or contact the PENTAX distributor in your country for more information and to receive a copy of the warranty policy The CE Mark is a Directive conformity mark of the European Union ...

Страница 202: ...nterference to radio communications However there is no guarantee that interference will not occur in a particular installation If this equipment does cause harmful interference to radio or television reception which can be determined by turning the equipment off and on the user is encouraged to try to correct the interference by one or more of the following measures Reorient or relocate the recei...

Страница 203: ...mpliant with the standards Records maintained continue to reflect the equipment being produced can be expected to be within the variation accepted due to quantity production and testing on the statistical basis as required by 47CFR 2 909 Operation is subject to the following two conditions 1 This device may not cause harmful interference and 2 This device must accept any interference received incl...

Страница 204: ... In some countries your local retailer may also take back your old product free of charge if you purchase a similar new one Please contact your local authority for further details By disposing of this product correctly you will help ensure that the waste undergoes the necessary treatment recovery and recycling and thus prevent potential negative effects on the environment and human health which co...

Страница 205: ...Memo ...

Страница 206: ...uction 54 65 P Digital SR Camera Shake Reduction 122 H Kids 54 D Food 55 z Natural Skin Tone 54 F Digital Panorama 74 S Digital Wide 81 A AC adapter 26 Adding sound Voice Memo 160 AE metering 96 Auto Red eye c 89 Auto F 94 Auto Power Off 175 Auto 89 Autofocus conditions 100 AV equipment 126 B B W 113 Basic mode 63 Battery level indicator 25 Bright portions 19 Brightness Filter 143 Built in memory ...

Страница 207: ...tion AF 56 File 106 Flash Off a 89 Flash On Red eye d 89 Flash On b 89 Fluores Light J 94 Focus Mode 87 Focusing 87 Focusing Area 100 Folder display 117 Format 162 Four way controller 45 47 Frame Composite 66 145 Frame Rate 32 112 G Green Button X 45 47 57 Green Mode 9 63 Guide display 177 H Histogram 86 Hometown 38 I Infinity s 87 Installing a battery 23 Instant Review 41 101 L Language 36 169 M ...

Страница 208: ...g sounds 157 Recovering images 133 Red eye Compensation 144 Red eye reduction cd 89 90 Resetting settings 178 Resize 136 Rotating 43 S Saturation 103 Saving as still picture movie 147 Saving settings 106 SD Memory Card 28 Select time 168 Self timer g 76 Sensitivity 98 Sepia 113 Setting the exposure 84 Shade H 94 Sharpness 102 Shooting information 85 121 Shooting Mode 53 Shutter release button 41 4...

Страница 209: ...207 9 Appendix Z Zoom button 44 46 Zoom xw 78 ...

Страница 210: ...Memo ...

Страница 211: ...Memo ...

Страница 212: ...S A S 112 Quai de Bezons B P 204 95106 Argenteuil Cedex France http www pentax fr PENTAX Schweiz AG Widenholzstrasse 1 8304 Wallisellen Postfach 367 8305 Dietlikon SWITZERLAND http www pentax ch PENTAX Italia S r l Via Dione Cassio 15 20138 Milano ITALY http www pentaxitalia it PENTAX Scandinavia AB P O Box 650 75127 Uppsala SWEDEN http www pentax se PENTAX Imaging Company A Division of PENTAX of ...

Отзывы: