Pentair S40093 Скачать руководство пользователя страница 7

Pump Storage

Drain pump to prevent freezing.
Keep motor dry and loosely covered. Do not wrap with 
plastic sheeting; trapped moisture could cause corrosion 
or insulation deterioration.
NOTICE: A good rust inhibitor in the liquid end of 
cast iron pumps is recommended to prevent excessive 
corrosion.

Pump Start-Up After Storage

Replace all drain plugs and close all drain valves in 
the system.
Be sure all connections are tightly sealed.
After initial check is made, fill pump according to 
Priming the Pump.

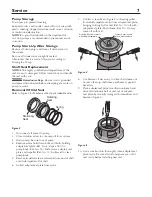
Shaft Seal Replacement

NOTICE: The highly polished and lapped faces of the 
seal are easily damaged. Follow instructions and handle 
the seal with care.

 Hazardous voltage. Be sure unit is grounded 

and power disconnected before attempting any work on 
pump or motor.

Removal Of Old Seal

Refer to Figure 3 for Mechanical Seal parts indentification.

1.  Disconnect all power to pump.
2.  Close isolation valves to cut pump off from  system.
3.  Drain pump; be sure to vent pump.
4.  Remove motor hold down bolts and bolts holding 

adapter/seal plate (Ref. No. 6, Repair Parts) to 
pump body (Ref. No. 20). Slide motor, adapter/ seal 
plate and impeller (Ref. No. 12) backward to clear 
pump body.

5.  Remove impeller screw and washer from end of shaft 

and slide impeller off of shaft.

6.  Unbolt adapter/seal plate from motor.

7.  Use two screwdrivers (Figure 4) or bearing puller 

to carefully separate motor from adapter/seal plate, 
bringing rotating half of seal (Ref. No. 10) off with 
adapter/seal plate. Shaft sleeve (Ref. No. 2A) may 
come off with seal.

8.  Use hammer, if necessary, to drive shaft sleeve out 

of seal. Clean up shaft sleeve with emery paper if 
necessary.

9.  Place adapter/seal plate face down on bench and 

drive old stationary half of seal out of adapter/
seal plate by carefully taping with screwdriver and 
hammer (Figure 5).

10. Use a wire brush to thoroughly clean adapter/seal 

plate cavity. Be sure all dust and grime are out of 
seal cavity before installing new seal.

Stationary

Seat

Rotating

Seal

Spring

1419 1294

Figure 3

1421 1294

Figure 5

If Gear Puller is used,

place jackscrew here.

Rotating Seat will come off

with adapter/sealplate.

1420 1294

Figure 4

Service 7

Содержание S40093

Страница 1: ...COM PH 888 782 7483 owner s Manual Self Priming Centrifugal Pumps 2013 Pentair Ltd All Rights Reserved BE976 Rev 02 22 13 1362 1111 LT Series Installation Operation Parts For further operating instal...

Страница 2: ...s when servicing pump allow it to cool for 20 minutes after shut down before handling Do not allow pump or any system component to freeze To do so will void warranty Pump water only with this pump Per...

Страница 3: ...single phase power through a phase converter will void the warranty Note also that three phase motors must be protected by three leg ambient compensated extra quick trip overload relays of the recomme...

Страница 4: ...fficient size Pipe submerged less than 4 x D will cause vortexing Long suction run Valve Unsupported Pipe Misaligned pipe causes air leaks high spots along the suction line result in air pockets Offse...

Страница 5: ...pliances on it Wiring 1 Install ground wire and maintain this pump in ac cordance with your local electrical code and all other codes and ordinances that apply Consult your local building inspector fo...

Страница 6: ...cement of shaft seal after a reasonable period of operation see Page 8 Lubricate motor according to motor manufacturer s in structions Periodic greasing is required for most motors TABLE I Recommended...

Страница 7: ...Remove motor hold down bolts and bolts holding adapter seal plate Ref No 6 Repair Parts to pump body Ref No 20 Slide motor adapter seal plate and impeller Ref No 12 backward to clear pump body 5 Remov...

Страница 8: ...revent shaft and sleeve from freezing together when pump is in service 9 Remount adapter seal plate to motor being careful not to scratch seal face 10 Apply liquid soap to inside diameter and outside...

Страница 9: ...ter Slinger 230 460V Three Phase 1 C69 16 C69 15 C69 16 C69 15 5 Capscrew 3 8 16 x 7 8 Lg 8 6 Adapter 1 C2 66 7 Gasket Adapter 1 C20 46 8 Lockwasher 3 8 4 9 Capscrew 3 8 16 x 1 Lg 4 10 Shaft Seal 1 U9...

Страница 10: ...e Washer 1 C43 15SS 4 Machine Screw 1 4 20 x 1 2 1 5 Pipe Plug 1 4 NPT Sq Hd 1 6 Suction Flange 2 NPT 1 C3 22A Suction Flange 2 1 2 NPT 1 C3 74 Suction Flange 3 NPT 1 C3 74B Nut 1 4 20 Hex 1 35407 007...

Страница 11: ...This page intentionally left blank...

Страница 12: ......

Отзывы: