background image

23

8.3.

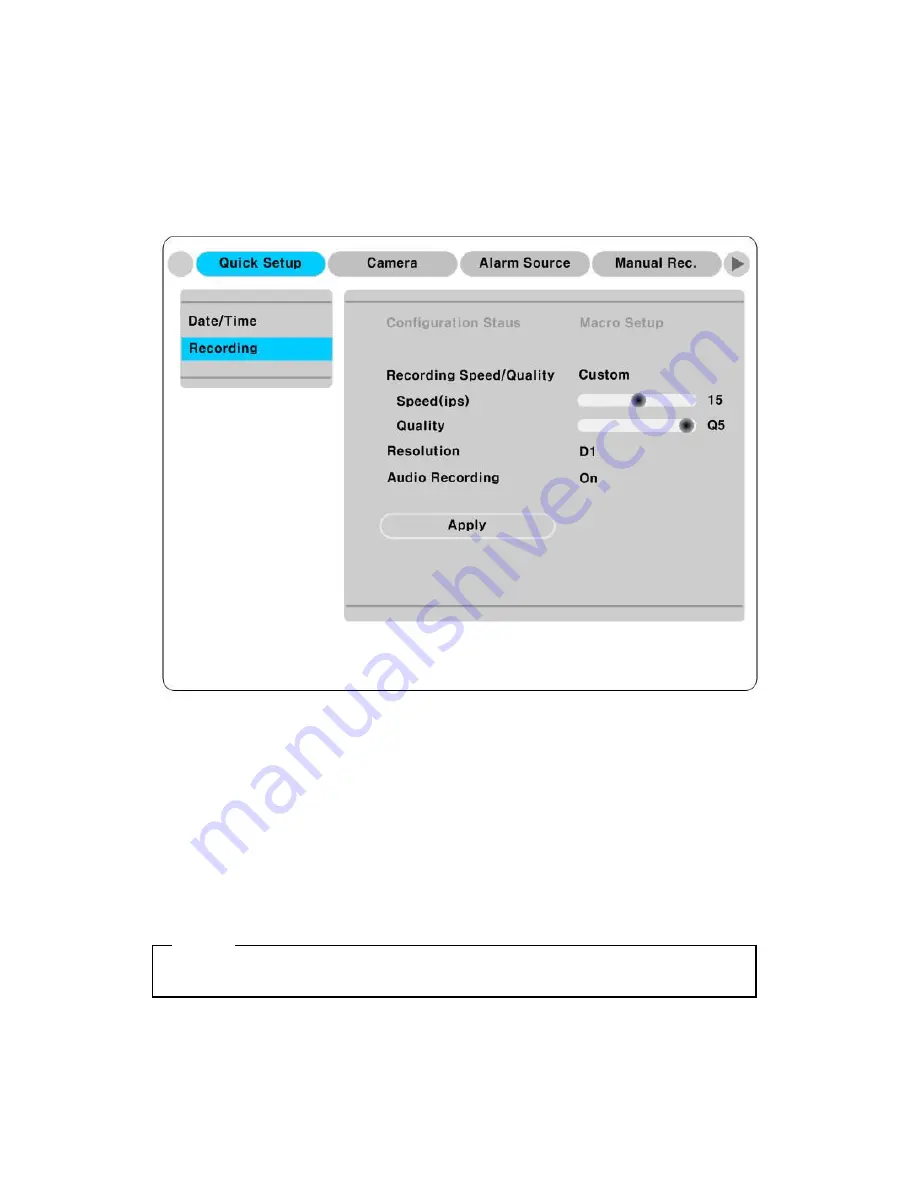
Setting recording condition

Recording conditions under the “Quick Setup” menu tab apply the same values to all analog channels

1~16. All settings are applied for 24 hours/ day regardless of the value set for “Time Schedule” or “Alarm

Rec.”

(1) Press [MENU] button and select “Quick Setup” when OSD menu is shown.

(2) Move to sub-menu by pressing [

] or

 [▼ ] 

button.

(3) Select “Recording”

 using the [▲ /▼ ] buttons and press

[

].

8.3.1. Configuration Status

Displays the recording configuration status. When setting through the “Quick Setup” menu, “Quick

Setup” will be shown. When setting up thorugh “Normal Rec,” or “Alarm Rec,” “Custom Setup” will be

shown.

<Note>

Only when normal recording of all channels are same, it is marked as ‘Macro Setup’.

Содержание MD3200M

Страница 1: ...eDVR Installation Guide MD3200M v 1 0 ...

Страница 2: ...nt This equipment generates uses and can radiate radio frequency energy and if not installed and used in accordance with the instruction manual may cause harmful interference to radio communications Operation of this equipment in a residential area is likely to cause harmful interference in which case the user will be required to correct the interference at his own expense Warning This is a class ...

Страница 3: ...n 5 eDVR is made of metal Therefore you can hurt human beings if you throw it to them or hit on them When eDVR is installed be cautious to locate on safe places where children are unreachable 6 If eDVR does not operate properly please contact the closest WEBGATE distributor for after sales service Tempering or disassembling the product will void warranty 7 Security surveillance laws may differ for...

Страница 4: ...remote controller 16 6 1 Setting ID of MD3200M 16 6 2 Selecting MD3200M 17 6 3 Operable range of remote controller 17 6 4 Loading the batteries into remote controller 17 7 MD3200M configuration 18 7 1 Basic configuration 18 7 2 Advanced configuration 18 7 3 External storage Back up configuration 19 7 4 Internet Intranet configuration 19 8 eDVR MD3200M basic setting 20 8 1 Viewing Image 20 8 2 Sett...

Страница 5: ...iguring relay out as OSD menu 30 9 3 Connecting serial port 31 9 3 1 Configuring serial ports for Pan Tilt Zoom 31 9 3 2 Diagram of serial ports 32 9 3 3 Configuring Serial 33 9 4 Connecting external device with serial port 34 9 4 1 Connecting text inout device ATM POS Access Control 34 9 4 2 Configuring serial setup COM1 at OSD menu 35 9 4 3 Configuring text 36 9 5 Connecting USB device 37 9 6 Co...

Страница 6: ...g Control Center Lite 42 12 2 Installing Control Center Lite 42 12 3 Log In 43 12 4 Configuration Tool 44 12 5 Monitor 44 12 6 Playback 45 APPENDIX 46 1 HDD 47 1 1 Fundamental notions terms 47 1 2 Installing HDD 50 2 Using CD ROM 58 3 How to recognize manufacturing date 59 4 Specification 60 ...

Страница 7: ...ding and search with corresponding video 16 sensor inputs and 4 relay outputs Built in hardware motion detection with search function 22x18 or 22x15 Various efficient back up methods PTZ control via RS 232 and RS485 User friendly Color Graphic OSD Static IP DHCP Dynamic IP support for xDSL Cable Modem user IR Remote Controller User controls PTZ with remote controller Remote Management Software Con...

Страница 8: ...tware 1EA 4 Remote Controller 1EA 5 RACK FIXING KIT 1SET 6 R HDD screw 8EA Note Attention for the system without HDD installed In case of system without HDD HDD only can only be installed in R HDD Removable Hard disk rack For the internal installation of HDD additionally For the details please contact to local distributor ...

Страница 9: ...9 3 Description Function MD3200M front 1 Power switch 2 Function buttons 3 LED 4 USB port 5 Remote controller receiver 6 CD DVD RW ROM 7 8 Built in Hard Disk Rack ...

Страница 10: ...ut 11 Terminal block for sensor relay and serial input output 12 RS232 connector 13 VGA connector 14 IEEE1394 connector 15 eSATA connector 16 Network Storage connector RJ45 17 GND 18 Ethernet connector 19 Audio input output connector 20 BNC connector for monitor output ...

Страница 11: ...s impedance 75Ω automatically 75 Ohm termination register is always connected on video input and can t be removed So MD3200M s video input must be a terminal of the connection 3 Video Type NTSC PAL should be changed after opeting MD3200M The order of camera recognition follows Ch1 camera through Ch32 camera and 1st recognized camera type leads other camera type 4 2 Connecting monitor 1 Connect CCT...

Страница 12: ...mal and B Spot Connect to Monitor A if only one Monitor is used Monitor output is fixed depend on channel Video Out 1 3 is output channel 1 to 16 and Video 2 4 is output channel 17 32 4 3 Connecting Audio 1 Connect auto signal to MD3200M with using RCA cable ...

Страница 13: ... below Note 1 When supplying power MD3200M starts booting automatically 2 In order to cut off power press the power switch on MD3200M front during 4 seconds and enter admin password after appearing a pop window 3 For supplying again push the power switch ...

Страница 14: ...se the arrow buttons to move within the sub menu list To move to the setting page press button To exit the setting page press the EXIT button 3 Setting Page The selected sub menu is shown as a circle on the left side of the name and gray color for setting value To move within each page use the or arrow butons Press the button to change the value of a setting When setting value is a word a dialogue...

Страница 15: ...ord until the word is looking for is shown using arrow buttons In case of spacing words press to move one space and enter the word To exit the Dialogue box press the arrow button 2 Available words range to use 1 2 3 4 5 6 7 8 9 0 A B C D E F G H I J K L M N O P Q R S T U V W X Y Z a b c d e f g h i j k l m n o p q r s t u v w x y z ...

Страница 16: ...r button 3 Select Miscelleaneous from the sub menu list using the button and press button 4 Select Remote Control ID and press the 5 Select a value using the buttons and press the EXIT button 6 Press the EXIT button to exit the Settings Page and return to Monitor mode Note Remote Control ID Up to 16 eDVRs can be controlled with a single remote controller When not using remote controller set the Re...

Страница 17: ...ds during 2 seconds Note Because remote controller ID is sixteen eDVR will correspond until pressing ID button sixteen times 6 3 Operable range of remote controller 6 4 Loading the batteries into remote controller Remote Controller requires two AAA type batteries 1 Remove the battery cover 2 Taking care that the poles Are correctly positioned 3 Replace the battery cover Note Batteries are not incl...

Страница 18: ...18 7 MD3200M configuration 7 1 Basic configuration 7 2 Advanced configuration ...

Страница 19: ...19 7 3 External storage Back up configuration 7 4 Internet Intranet configuration ...

Страница 20: ...00M starts automatically and images are displayed in basic 16ch split screen after the booting Note If user password is set a prompt for entering the password will appear Facotry default is reserved as not responding key pad on eDVR front It is not set from factory default ...

Страница 21: ...n and press EXIT 8 2 2 Daylight Saving 1 Daylight Saving Time is only activated for Time Zone that uses Daylight Savings 2 Select Daylight Saving using the or button and press button 3 Select On Off using the and press EXIT 8 2 3 Sync with NTP In order to synchronize time with NTP Network Time Protocol server select on 1 Select Sync with NTP using the or button and press button 2 Select On Off usi...

Страница 22: ...or buttons and press 2 Select HH MM using the buttons and select the value using the button 3 Press the EXIT button when setting is finished 8 2 7 Apply Date Time Most setting values are applied automatically when exiting from the related menu page But Date Time setting are not applied automatically because they may critically affect the file system of the recorded HDD To apply Date Time settings ...

Страница 23: ...s MENU button and select Quick Setup when OSD menu is shown 2 Move to sub menu by pressing or button 3 Select Recording using the buttons and press 8 3 1 Configuration Status Displays the recording configuration status When setting through the Quick Setup menu Quick Setup will be shown When setting up thorugh Normal Rec or Alarm Rec Custom Setup will be shown Note Only when normal recording of all...

Страница 24: ... using the button and press 2 Select a value using the button Press the EXIT button when it is finished 8 3 4 Quality When Recording Speed Quality is set as Custom values can be set normally 1 Select Quality using the button and press 2 Select a value using the button Press EXIT button when it is finished 8 3 5 Audio Recording 1 Select Audio Recording using the buttons and press 2 Select a value u...

Страница 25: ...gage should be AWG 20 26 Inserting removing wire To insert remove wirte in TERMINAL BLOCK use a screwdriver in the diagram to the right 9 1 Connecting and configuring sensor 9 1 1 Specification In order to run sensor input of eDVR MD3200 Series normally the following conditions are required Input Ch 16Ch Photo coupler inputs Input type N C Normal Close N O Normal Open type Supported sensor Dry con...

Страница 26: ... S1 S16 with referring to the followings It shows to connect a dry contact Please refer to Note Wire Handling on page 27 When connecting a non dry contact type of sensor e g Open collector output please contact WEBGATE s customer Support team ...

Страница 27: ...cting all 16 sensors simultaneously which can be selected as Do not use Off Normal Open N O and Normal Close N C 1 Select a Global and set a type as Off N O or N C 2 Press Apply to save a configuration 9 1 3 2 Configuration Use when selecting each 16 sensor individually 1 Select a Confiugration and press 2 Select a sensor S1 S16 and set a type 3 Press Exit to out from OSD Menu ...

Страница 28: ...2 Connecting configuring relay out 9 2 1 Specifications In order to run relay output of eDVR MD3200M normally the following conditions are required Output Ch 4Ch relay differential outptus Output type Dry Contact Spec Connecting type Connect the trimmed wire to terminal block 24V DC 1 25A 30W DC 125V DC 0 24A 30W 125V AC 0 5A 62 5VA 정격 AC 250V AC 0 25A 62 5VA ...

Страница 29: ...29 9 2 2 Connecting relay out Connect R1 R4 with referring to the followings It shows to connect a warming light Please refer to Note Wire Handling on page 27 ...

Страница 30: ...sor or MD and its condition can be set differently according to schedule When using the Relay button Number button on the front panel or Control Center Lite D S W relay can be operated from remote site Note Please refer to the eDVR User s Guide for more information ...

Страница 31: ...odels not supported can still be controlled using the Transparent Protocol For a list of supported protocols refer to the list on the OSD Configuration menu The following figure shows how to connect PTZ camera to RS485 COM2 When using another serial port connect it with referring to each connection diagram below Please refer to the Note Wire Handling on page 27 ...

Страница 32: ...32 9 3 2 Diagram of serial ports 9 3 2 1 Diagram of COM1 RS232 9 3 2 2 Diagram of COM2 COM4 9 3 2 3 Diagram of COM3 ...

Страница 33: ...nd available models at System Serial Setup in MD3200 Series After completing serial setup configure base address or port for each channel at Camera menu tab When connecting PTZ devices to several cameras be sure base address matches address for the camera ...

Страница 34: ...TM POS Access Control The MD3200 Series can record text data received from POS ATM through the COM RS232 serial port Connect to COM1 RS232 9Pin D Sub of MD3200M and configure the Serial Setup sub menu under the System tab and Text sub menu under the Alarm Source tab shown as above figure ...

Страница 35: ...rial setup COM1 at OSD menu 1 Set the System in OSD menu and move to Serial Setup menu 2 Select COM in Serial Setup set Devices as Text 3 Set Baud Rate Parity Stop bit with referring to manual of the connected external device ...

Страница 36: ...1 Select the Alarm Source menu among OSD menus 2 Select the Text and set each value Note Before installing any external device consult with the local WEBGATE distributor Some external devices may not be compatible with the eDVR ...

Страница 37: ...utput Voltage Current Max 200mA per DC 5V Port Note The disk should be formatted with FAT32 type If properly connected the disk is recornized automatically as in the following pricutre To copy images the process is as follows Set copy range up to 1minute Select drive Copy Note 1 USB Flash products that required a Windows program to operate may not be recognized by the eDVR 2 For more information a...

Страница 38: ...e purchasing consult the local WEBGATE s local distributor 10 2 Connecting IEEE1394 Device When using FireWire supported external HDD hard drive bays can be connected to 2 ports in the rear panel The MD3200 series do not supply power to the hard drive bay therefore only bays that use external power can be used Note MD3200 Series detect external HDD even though MD3200 series run If not it is recomm...

Страница 39: ...tically run on start up make sure the HDD is properly installed 1 Press button marked at Select Disk 2 Select new added HDD indicated as F using button and press EXIT 3 Select Action using button and press 4 Select Add using button and press EXIT 5 Select Apply using button and press The HDD status is changed to 6 Select Action using button and press 7 Select Format using button and press EXIT but...

Страница 40: ...ay as local access for controlling monitoring features 11 1 Connecting Ethernet 1 Turn off power switch of MD3200M 2 Connect MD3200M to hub with Ethernet cable 3 Turn on power switch of MD3200M Note 1 Supply power to MD3200M after connecting Ethernet cable to protect against electrical damage to MD3200M 2 Check cable connection status 3 Check LED on rear panel of MD3200M after supplying power ...

Страница 41: ...ttons and press the button 4 Select IP Addr using the and press the button 5 Press EXIT button after entering IP address in the dialogue box 6 Select Net Mask using the buttons and press the button 7 Press EXIT button after entering Net Mask in the dialogue box 8 Select Gateway using the and press the button 9 Press EXIT button after entering Gateway in the dialogue box 10 Select DNS using the but...

Страница 42: ...ntorl Center Lite on the PC 12 1 1 PC system requirements for running Control Center Lite Mininum Requirements Recommended Requirements CPU Intel Pentium4 3Ghz Hyper Thread Intel Core 2 Duo Processor Memory 512MB 2GB Video Card 128MB 128MB Resolution 1280ⅹ1024 1280ⅹ1024 HDD recording space 1GB or higher 1GB or higher OS Windows XP SP2 Windows XP SP2 Etc DirectX 8 1 or higher DirectX 8 1 or higher ...

Страница 43: ...l and press Next button WESP SDK must be installed 4 Click the Install button after selecting a directory to be insatalled 12 3 Log In Enter User Name Password and press Ok button The factory default value User Name Administrator Password admin ...

Страница 44: ...l Click the icon on the desk top to run Control Center Lite Configuration Tool 12 5 Monitor Max 5 users could be connected simultaneously in one unit of MD3200M Click the icon on the desk top to run Control Center Lite Monitor ...

Страница 45: ...45 12 6 Playback Max 2 user could be connected for playback in one unit of MD3200M Click the icon on the desk top to run Control Center Lite Playback ...

Страница 46: ...46 APPENDIX APPENDIX APPENDIX ...

Страница 47: ...ed HDDs are recognized as one virtual disk and eDVR supports upto 8TB Note Log Partition To store the information of recorded data Normal Partition To store the data as normal recording schedule Backup 1 Backup is possible only through IEEE1394 port eSATA Storage Network and HDD for backup should be formatted as FAT32 type Its type is indicated as F in Disk Manager Disk Manager 1 When HDD is added...

Страница 48: ...48 ...

Страница 49: ...ed by the order of recognition 3 HDD Managing Command Add Add a HDD for recording In case of adding a disk Alarm Partition menu is activated as an available status Alarm Partition means that one HDD divides a partion as Normal Recording Alarm Recording part Add Used Add a HDD that has been used and formatted There is no need to reformat It is possble only when HDD is added as Primary Disk Remove R...

Страница 50: ...l not guarantee the warranty Installation and extension of internal HDD RACK HDD In case of installation adding or exchange HDD follow the procedure as followings 1 Cut off the power to eDVR 2 Release the Locking system using HDD RACK KEY 3 Lift up the hand at front 90 degrees and pull Bracket to remove 4 Fix HDD into HDD BRACKET using Screws included ...

Страница 51: ...assemble HDD the base of HDD should be HDD below 5 After insertion of BRAKET that HDD installed to RACK take the handle down to fix 6 Rock HDD RACK using KEY to complete installation When installing one primary disk ...

Страница 52: ...set MD3200M will start recording Expending External HDD When using internal HDD as primary disk MD3200M use IEEE1394 eSATA NVS04 as external storage device interface and has two ports Front 1port Rear 1port of IEEE1394 eSATA NVS04 MD3200M supports upto 8TB storage Note 1 Some IEEE1394 eSATA ports may not be recognized by the MD3200M Before purchasing consult the local WEBGATE distributor 2 Externa...

Страница 53: ...ger 2 Select a second HDD of F Ext Press the Apply button after selecting action as Add Then F is changed to R Note If connecting the device that is used in MD3200M type will be indicated as V 3 Select a third HDD of F Ext Press the Apply button after selecting action as Add Then F is changed to R 4 Select a fourth HDD of F Ext Press the Apply button after selecting action as Add Then F is changed...

Страница 54: ... refer to the manual of related device 1 When external HDD RAID is connected to IEEE1394 port Disk Manager runs automatically If not run it manually in Menu Utility Disk Manager 2 Select a second HDD of F Ext and configure a size of alarm partition Press the Apply button after selecting action as Add Then F is changed to R Note If connecting the device that is used in MD3200M type will be indicate...

Страница 55: ... writing a disk comes from physical error or occuring a bad sector at the beginning of a disk it is decided as a disk error In case of being other disk inside eDVR or able to storage a data it is recorded at the next disk Simultaneously it notifies bad disk marked as X to a user popping up eDVR disk manager Keeping Data To keep the stored data by the fixed time or semi permanently you should back ...

Страница 56: ...trol Center Lite D or MiniPlayer 3 Backup data is made as re4 file and recognized as CD R 700MB DVD R 4G per each file 4 Support CD R backup and should be over CD R 700MB DVD R 4G media 5 In course of backup Auto Delete function doesn t run If HDD is full recording may be stopped instantly 6 For more detailed information of Control Center Lite D s backup please refer to the eDVR User s Guide ...

Страница 57: ...ionally For the details please contact to local distributor Note It supports only DVD backup CD backup will be supported later For the details please contact to local distributor Note Attention for the system HDD Rack It is essentially required to use locking the RACK KEY after HDD rack installation It is not allowed to add HDD in Disk Manager without locking the RACK KEY HDD in HDD Rack could be ...

Страница 58: ...e D Remote Management Program Acrobat Reader Version 7 0 Preparation To read manual of CD ROM disc Adobe Acrobat 7 0 should be installed in client s PC Note If Adobe Acrobat Reader is not installed within client s PC use the Acrobat Reader program of CD ROM Reading manual of CD ROM Follow the steps to read User s Guide 1 Insert the supplied CD ROM into CD ROM drive of PC 2 Open the User s Guide wi...

Страница 59: ...d system info of Configuration Tool Serial Number Format Year Month Webgate No Webgate No Model Name No 1 1 2 digits Identify Model name of product 2 3 8 8 12 digits Webgate internal number 3 5 6 digits Manufacturing year 4 7 digits Manufacturing month Please see the below table for manufacturing month Jan Feb Mar Apr May Jun Jul Aug Sep Oct Nov Dec 1 2 3 4 5 6 7 8 9 A B C The example of verifying...

Страница 60: ...r failure under development Image compression and Recording Technology MPEG 4 JPEG Remote monitoring only Image quality level 5 Level Q1 Q5 Recording speed Max 480ips NTSC 400ips PAL D1 Resolution Playback speed Total 60ips NTSC 50ips PAL monitor Performance 1 4 9 16ch 1x 2x 4x 8x 16x 32x 64x Forward Reverse playback Resolution CIF 352 x 240 352 x 288 Half D1 704 x 240 704 x 288 D1 704 x 480 704 x...

Страница 61: ...nter series CMS S W and WESP SDK Protocol TCP IP ARP ICMP DHCP PPPoE Connection 1 10 100Mbps Ethernet RJ 45 Connection 2 10 100 1000 Gigabit Ethernet for storage expension S W upgrade Firmware upgrade via Network and USB Simultaneous users Monitoring Max 5 users Playback Max 2 users Security Password User or Administrator authentication Monitor Output Monitor 1 Max 960 field sec 1ch 4ch 9ch 16ch A...

Страница 62: ...trolled 1 internal buzzer Digital output Software controlled 4 relay outputs Max 125VAC 60VDC Digital output schedule Daily Day Night Four segment time frame Weekly Weekdays Weekends Conditions MD Sensor Text inputs Sensor input Software controlled 16 sensor inputs Support dry contact Serial port RS232 2 RS485 2 PTZ control Control method local Front panel button IR remote controller Control metho...

Страница 63: ...63 Mechanical Dimension WⅹDⅹH 430 0 x 362 0 x 88 0 mm Weight 5 5 kg with one HDD ...

Страница 64: ...4 672 0333 Fax 714 672 0360 sales pelikancam com www pelikancam com The contents of this manual can be modified in accordance with Firmware or Software upgrade In the interest of continually improving products approval outlook can be modified without prior notice ...

Отзывы: