background image

FR 13

INSTALLATION

Montage

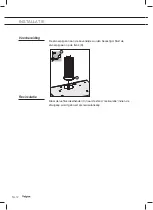
Contre le mur 

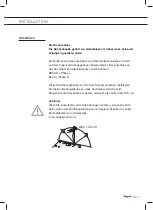
•  Enlevez les filtres de la hotte.

•  Maintenez la hotte contre le mur. 

•  Dessinez  – à travers la hotte –  les trous de fixation (A) ).

•  Percez les trous. 

•  Enfoncez les bouchons filetés dans les trous.

•  Vissez les vis dans les 2 trous de fixation (A).

Attention : vissez les vis de manière à ce qu’elles sortent encore 

d’un cm du mur.

•  Accrochez la hotte en utilisant les 2 vis de serrage. 

•  Vissez correctement les vis de fixation.

•  Raccordez le tuyau d’évacuation à la bouche d’évacuation.

A

A

Содержание WA300

Страница 1: ...700004881000 Gebruiksaanwijzing afzuigkappen Mode d emploi hotte cheminée Bedienungsanleitung Dunstabzugshaube Instructions for use cooker hood WA300RVS ...

Страница 2: ...sation FR 3 FR 14 DE Anleitung DE 3 DE 14 EN Manual EN 3 EN 14 Gebruikte pictogrammen Pictogrammes utilisés Benutzte Piktogramme Pictograms used Belangrijk om te weten Important à savoir Wissenswertes Important information Tip Conseil Tipp Tip ...

Страница 3: ... Let op 5 Afvoersystemen 6 Gebruik Bediening 7 Onderhoud Reinigen 8 Vetfilters verwijderen 9 Het koolstoffilter vervangen 9 Lampen vervangen 9 Installatie Algemeen 10 Elektrische aansluiting 11 Montage van de schouwkap 12 Bijlage Verpakking en toestel afvoeren 14 ...

Страница 4: ...anwijzing doorleest bent u snel op de hoogte van alle mogelijkheden die dit toestel u biedt U vindt informatie voor uw veiligheid en over het onderhoud van het toestel Bewaar de gebruiksaanwijzing en het installatievoorschrift Een eventueel volgende gebruiker van dit toestel kan daar zijn voordeel mee doen UW AFZUIGKAP A 0 1 2 3 B C D E ...

Страница 5: ...filter niet of niet goed gemonteerd is Gebruik de afzuigkap niet om tegenaan te leunen Gebruik de afzuigkap nooit als afzetvlak tenzij dit uitdrukkelijk is aangegeven Zorg voor voldoende ventilatie wanneer u de afzuigkap samen gebruikt met een gaskookplaat De afvoer mag niet worden aangesloten op een rookkanaal dat voor andere toestellen in gebruik is Flambeer nooit onder de afzuigkap en maak de f...

Страница 6: ...ar in de meterkast op nul Vet en olie zijn bij oververhitting brandbaar Blijf in de buurt tijdens het bereiden van gerechten Iedere aansprakelijkheid voor eventuele schade aan het apparaat of brand veroorzaakt door het niet in acht nemen van de aanwijzingen uit deze handleiding wordt afgewezen Afvoersystemen De afzuigkap kan afhankelijk van het model op twee manieren worden aangesloten 1 Als afzui...

Страница 7: ... D De afzuigkap schakelt in op de corresponderende stand Druk op de uitschakeltoets A De ventilator schakelt uit Verlichting in en uitschakelen Druk op de verlichtingstoets E De verlichting gaat branden Druk nogmaals op de toets E De verlichting gaat uit GEBRUIK A 0 1 2 3 B C D E ...

Страница 8: ...hriften Afzuigkap Maak de afzuigkap schoon met een sopje en een zachte doek Daarna met schoon water nabehandelen Gebruik geen agressieve schoonmaakmiddelen zoals bijvoorbeeld soda Het lakwerk van de afzuigkap blijft mooi als u zo nu en dan de lak met was inwrijft Roestvrijstalen schouwkappen Behandel roestvrijstalen schouwkappen niet met schuursponsjes of andere schuurmiddelen Behandel na met een ...

Страница 9: ...offilters aan het filter Plaats de vetfilters Belangrijk De verzadiging van het filter is afhankelijk van de intensiteit van het gebruik de manier van koken en de regelmaat waarmee de vetfilters worden schoongemaakt Het koolstoffilter moet minimaal iedere vier maanden worden vervangen Koolstoffilters zijn niet uitwasbaar voor hergebruik Verzadigd koolstof is niet milieuvriendelijk vervang het filt...

Страница 10: ...bestaand afvoerkanaal mogen geen andere apparaten op dat kanaal aangesloten zijn zoals een geiser of kachel Neem de plaatselijk geldende voorschriften in acht met betrekking tot de beluchting van gasapparaten Hoe korter de afvoerpijp en hoe minder bochten des te beter de werking van de afzuigkap Controleer voordat u met boren begint of er geen installatieleiding en aanwezig is zijn De aansluitpijp...

Страница 11: ...stallatie De aansluiting op het elektriciteitsnet moet als volgt uitgevoerd worden BRUIN L fase BLAUW N nulleiding Deze afzuigkap is voorzien van een aansluitstekker Installeer de afzuigkap zodanig dat de stekker bereikbaar is Plaats de wandcontactdoos bij voorkeur uit het zicht achter de sierkoker Let op Als u een vaste aansluiting maakt moet u ervoor zorgen dat er een omnipolaire schakelaar met ...

Страница 12: ...ereiding De afvoerpijp kan aan de bovenzijde worden bevestigd Sluit de afvoerpijp aan op de flens D Recirculatie Draai de luchtverdeelhendel C naar de stand recirculatie indien de afzuigkap wordt gebruikt als recirculatiekap ...

Страница 13: ...gaten Duw de bijgeleverde pluggen in de gaten Draai de schroeven in de 2 bevestigingsgaten A Let op draai de schroeven zover in dat ze nog 1 cm uit de muur steken Hang de kap op aan de 2 bevestigingsschroeven Draai de bevestigingsschroeven vast Sluit de afvoerpijp aan op de afvoermond Steek de stekker in de wandcontactdoos BIJLAGE A A ...

Страница 14: ...iste vuilnisbak aangebracht Dit betekent dat het apparaat aan het einde van zijn levensduur niet bij het gewone huisvuil mag worden gevoegd Het toestel moet naar een speciaal centrum voor gescheiden afvalinzameling van de gemeente worden gebracht of naar een verkooppunt dat deze service verschaft Het apart verwerken van een huishoudelijk apparaat voorkomt mogelijk negatieve gevolgen voor het milie...

Страница 15: ...ystème d évacuation 6 Utilisation Commande 7 Entretien Nettoyage 8 Elimination des filtres 9 Remplacement des filtres à charbon 9 Changement d ampoules 9 Installation Généralités 10 Connexion électrique 11 Montage de la hotte cheminée 12 Annexe Mise au rebut de l appareil et de l emballage 14 ...

Страница 16: ...Ce mode d emploi offre une vue d ensemble rapide de toutes les fonctions de l appareil Il contient des informations relatives aux consignes de sécurité et à l entretien de l appareil Conservez ce mode d emploi et le guide d installation Ils peuvent être utiles aux futurs utilisateurs de l appareil HOTTE DE CUISINE A 0 1 2 3 B C D E ...

Страница 17: ...enfants N utilisez jamais la hotte aspirante lorsque le filtre n est pas correctement monté Ne vous appuyez pas sur la hotte aspirante La hotte ne doit jamais être utilisée comme plan pour déposer quelque chose sauf si cela est expressément indiqué Veillez à ce que l aspiration soit suffisante lorsque la hotte aspirante est utilisée en même temps que la plaque de cuisson L évacuation ne peut pas ê...

Страница 18: ...ncteur en position d interruption de courant La graisse et l huile s enflamment en cas de surchauffe Restez vigilant lorsque vous cuisinez La société décline toute responsabilité pour d éventuels inconvénients dégâts ou incendies provoqués par l appareil et dérivés de la non observation des instructions reprises dans ce manuel Système d évacuation En fonction du modèle la hotte aspirante peut être...

Страница 19: ...hotte aspirante est activée en fonction de la position sélectionnée Appuyez sur la touche de désactivation A Le ventilateur est désactivé Marche et arrêt de l éclairage Appuyez sur la touche d éclairage E L éclairage s allume Appuyez encore sur la touche d éclairage E L éclairage s éteint A 0 1 2 3 B C D E ...

Страница 20: ... mentionnées Hotte Vous pouvez nettoyer la hotte à l eau savonneuse et une serviette douce puis rincer à l eau claire Ne pas utiliser de produits d entretien abrasifs Frotter la peinture laquée de votre hotte avec de la cire pour qu elle conserve sa beauté Hottes à cheminée en acier inoxydable Ne pas nettoyer la cheminée avec une éponge à récurer ou avec des produits abrasifs Frotter la cheminée e...

Страница 21: ...es à graisse Fixez les filtres à charbon sur le filtre Remplacez les filtres à graisse Remarque Le charbon actif sature après une utilisation plus ou moins prolongée selon le type de cuisson et la fréquence de nettoyage du filtre à graisse Le filtre à charbon doit toutefois être remplacé au moins tous les 4 mois Les filtres à charbon ne sont pas lavables pour réutilisation Le charbon saturé ne pré...

Страница 22: ...n existant aucun autre appareil électroménager ne doit être raccordé au même conduit exemples chauffe eau poêle Ne pas oublier les règlements locaux en vigueur concernant l aération des appareils à gaz Un conduit d évacuation court et un nombre limité de coudes assurent un meilleur fonctionnement de la hotte Avant de commencer à percer assurez vous qu il ne passe pas de conduites à l endroit chois...

Страница 23: ...onnection avec le réseau électrique doit être éxécutée comme suit BRUN Phase L BLEU Phase N Cette hotte aspirante est équipée d une fiche de raccordement Installez la hotte de manière à ce que la prise soit accessible Placez la prise murale de préférence hors de vue et derrière la gaine décorative Attention Pour le branchement fixe veillez à ce que le câble d alimentation soit muni d un interrupte...

Страница 24: ...aine d évacuation peut être fixée sur le dessus Raccordez la gaine d évacuation à la bride D Mode recyclage d air Pour utiliser la hotte aspirante en mode recyclage d air placez la manette de répartition d air C sur la position recyclage ...

Страница 25: ...xation A Percez les trous Enfoncez les bouchons filetés dans les trous Vissez les vis dans les 2 trous de fixation A Attention vissez les vis de manière à ce qu elles sortent encore d un cm du mur Accrochez la hotte en utilisant les 2 vis de serrage Vissez correctement les vis de fixation Raccordez le tuyau d évacuation à la bouche d évacuation A A ...

Страница 26: ... apposé sur le produit un symbole représentant un conteneur à ordures barré d une croix Cela signifie qu à l issue de sa durée de vie l appareil ne peut être mis au rebut avec les déchets ménagers classiques L appareil doit être déposé dans un centre de collecte sélective de déchets prévu par l administration communale ou dans un point de vente fournissant ce service Le traitement séparé d un appa...

Страница 27: ... Worauf Sie achten müssen 5 Abluftsystem 6 Gebrauch Bedienung 7 Pflege Reinigen 8 Fettfilter entfernen 9 Austausch der Kohlefilter 9 Lampen auswechseln 9 Installation Allgemein 10 Elektroanschluss 11 Montage der Haube 12 Anlagen Entsorgung Gerät und Verpackung 14 ...

Страница 28: ... gibt Ihnen eine schnelle Übersicht aller Möglichkeiten die das Gerät bietet Sie erhalten Informationen zur Sicherheit und zur Wartung des Geräts Bewahren Sie diese Bedienungsanleitung und die Installationsanweisungen sorgfältig auf So stehen sie auch für eine zukünftige Nutzung des Geräts zur Verfügung IHRE DUNSTABZUGSHAUBE A 0 1 2 3 B C D E ...

Страница 29: ...st Lehnen Sie sich nicht gegen die Dunstabzugshaube Die Dunstabzugshaube darf niemals als Abstellfläche verwendet werden sofern dies nicht ausdrücklich angegeben wird Sorgen Sie für ausreichende Belüftung wenn Sie die Dunstabzugshaube zusammen mit einem Gaskochfeld verwenden Die Luftabfuhr darf nicht an einen Abzugskanal angeschlossen werden der auch für andere Geräte verwendet wird Unter der Duns...

Страница 30: ...Fett und Öl können bei Überhitzung Feuer fangen Bleiben Sie während der Zubereitung von Speisen stets in der Nähe Es wird keinerlei Haftung übernommen für Fehler Schäden oder Brände des Gerätes die durch Nichteinhaltung der in diesem Handbuch aufgeführten Anweisungen verschuldet wurden Abluftsysteme Die Dunstabzugshaube kann je nach Modell auf zwei verschiedene Weisen angeschlossen werden 1 Als Du...

Страница 31: ...rd auf die entsprechende Stufe geschaltet Drücken Sie auf die Ausschalttaste A Der Ventilator wird ausgeschaltet Beleuchtung ein und ausschalten Drücken Sie die Taste für die Beleuchtung E Die Beleuchtung ist eingeschaltet Drücken Sie die Taste E für die Beleuchtung erneut Die Beleuchtung ist ausgeschaltet A 0 1 2 3 B C D E ...

Страница 32: ...n zurückzuführen sind Dunstabzugshaube Die Dunstabzugshaube können Sie mit Seifenlauge und einem weichen Tuch reinigen danach mit klarem Wasser nachspülen Gebrauchen Sie keine agressiven Putzmittel wie z B Soda Der Lack der Dunstabzugshaube bleibt gut wenn Sie ihn ab und zu mit Wachs einreiben Rostfreie Hauben Nicht mit einem Scheuerschwamm oder anderen Scheuermitteln behandeln Nachbehandeln mit S...

Страница 33: ...Kohlefilter im Filter an Tauschen Sie die Fettfilter aus Achtung Nach längerem Gebrauch ist die Aktivkohle je nach Art der Kochvorgänge und Häufigkeit der Reinigung des Fettfilters gesättigt Der Kohlefilter muss aber immer spätestens alle vier Monate ausgetauscht werden Kohlefilter sind nicht zur Wiederverwendung auswaschbar Gesättigter Kohlenstoff ist nicht umweltfreundlich Tauschen Sie den Filte...

Страница 34: ...n Abluftkanal angeschlossen wird dürfen auf diesem keine anderen Geräte angeschlossen sein wie Gasdurchlauferhitzer und Gasofen Denken Sie an die örtlichen Vorschriften bezüglich Entlüftung von Gasgeräte Je kürzer das Abluftrohr und je weniger Krümmungen es hat um so besser ist die Wirkung der Dunstabzugshaube Kontrollieren Sie bevor Sie zu bohren beginnen ob in der Mauer keine Installationsleitun...

Страница 35: ...tromnetz ist folgendermassen durchzuführen BRAUN Phase L BLAU Phase N Diese Dunstabzugshaube ist mit einem Stecker versehen Installieren Sie die Dunstabzugshaube so dass der Stecker erreichbar ist Bringen Sie die Steckdose am besten verdeckt also hinter dem Rohr an Achtung Wenn Sie einen festen Anschluß anbringen möchten sorgen Sie bitte dafür daß in der Zuführungsleitung ein omnipolarer Schalter ...

Страница 36: ...bluftrohr kann an der Oberseite befestigt werden Schließen Sie das Abluftrohr an den Flansch D an Rezirkulation Drehen Sie den Luftverteilungshebel C in die Stellung Rezirkulation wenn die Abzugshaube als Rezirkulationshaube verwendet wird ...

Страница 37: ...löcher A Bohren Sie die Löcher Schieben Sie die mitgelieferten Dübel in die Löcher Drehen Sie die Schrauben in die 2 Befestigungslöcher A Achtung Drehen Sie die Schrauben soweit ein dass sie noch 1 cm aus der Wand herausragen Hängen Sie die Haube an den 2 Befestigungsschrauben auf Ziehen Sie die Befestigungsschrauben fest an Schließen Sie das Abluftrohr an den Abluftstutzen an A A ...

Страница 38: ...chen ist gekennzeichnet Dies bedeutet das am Ende seiner Nutzzeit das Produkt nicht zusammen mit dem Siedlungsabfall beseitigt werden darf Es kann zu den eigens von den städtischen Behörden eingerichteten Sammelstellen oder zu den Fachhändlern die einen Rücknahmeservice anbieten gebracht werden Die getrennte Entsorgung eines Haushaltsgerätes vermeidet mögliche negative Auswirkungen auf die Umwelt ...

Страница 39: ...must take 5 Extraction systems 6 Use Controls 7 Maintenance Cleaning 8 Removing the grease filters 9 Replacing the carbon filter 9 Changing the light bulbs 9 Installation General 10 Electrical connection 11 Mounting the canopy hood 12 Appendice Disposal of appliance and packaging 14 ...

Страница 40: ...s user manual gives you a quick overview of all the possibilities offered by the appliance You will find information on safety measures and maintaining the appliance Please retain this user manual and the installation guide They may be of use to future users of the appliance YOUR COOKER HOOD A 0 1 2 3 B C D E ...

Страница 41: ...t lean against the cooker hood The hood must never be used as a support surface unless specifically indicated Make sure there is sufficient circulation when you use the cooker hood on a gas cooker The exhaust exit must never be connected to a smoke duct which is also used for other heating appliances Never flambé under the cooker hood and always clean the filters on time Frying needs to be done un...

Страница 42: ...f the cooker when preparing food We will not accept any responsibility for any faults damage or fires caused to the appliance as a result of the non observance of the instructions included in this manual Extraction systems Depending on the type the cooker hoods can be connected in one of two ways 1 To a duct To a duct the cooking vapours extracted by suction are carried outside once the grease par...

Страница 43: ...r D The extractor hood switches on in the corresponding position Press the off button A The fan will switch off Switching lighting on and off Press the lighting button E The lighting switches on Press the lighting button E again The lighting switches off A 0 1 2 3 B C D E ...

Страница 44: ...r or any fire damage linked to inappropriate maintenance or failure to observe the above safety recommendations Cooker hood Clean the cooker hood with soapy water and a soft cloth Then wipe with clean water to rinse Do not use aggressive cleaning agents such as soda The cooker hood paintwork will stay looking nice if you wax it occasionally Stainless steel canopy hoods Do not use any sort of scour...

Страница 45: ...rs to the filter Replace the grease filters Note Saturation of the activated charcoal will eventually occur after prolonged use depending on the type of cooking and how frequently the grease filter is cleaned The carbon filter needs to be replaced at least every four months The carbon filter cannot be washed for reuse Saturated carbon is not environmentally friendly Change the filter regularly Lig...

Страница 46: ... 55 cm If the cooker hood is to be fitted to an existing duct no other appliances such as a geyser or heater may be connected to that same duct Consider local regulations with respect to the ventilation of gas appliances The shorter the duct and the fewer the bends in it the better the cooker hood will work Before you start drilling check that there are no installation cables present The connectin...

Страница 47: ...nnection to the mains is carried out as follows BROWN phase L BLUE phase N This canopy hood has been provided with a power plug When installing the hood make sure that this plug remains accessible We recommend installing the wall socket out of view behind the chimney cover Attention If you want to make a fixed connection ensure that a multi pole switch with a distance between contacts of 3 mm is i...

Страница 48: ...exhaust air pipe can be mounted to the top of the cooker hood Connect the exhaust air pipe to the flange D Recirculation Turn air distribution lever C to the recirculation position if the cooker hood is used in the recirculation air mode ...

Страница 49: ...g through the hood draw the mounting holes A Drill the holes Push the wall plugs supplied into the holes Insert the screws into the 2 mounting holes A NB screw the screws in until 1 cm is left protruding from the wall Hang the hood on the 2 mounting screws Tighten the mounting screws Connect the flue pipe to the flue ring A A ...

Страница 50: ...d processing of electric household appliances is compulsory this appliance carries the symbol of a crossed out dustbin This means that at the end of its working life you may not dispose of the appliance as household refuse Instead you should hand it in at a special refuse collection centre run by the local authority or at a dealer s providing this service Segregated processing of household applian...

Отзывы: