Peavey MediaMatrix xControl LCD Скачать руководство пользователя страница 21

xControl LCD Hardware Manual   


July 7, 2017 

Version 2.0.0.0 

17 


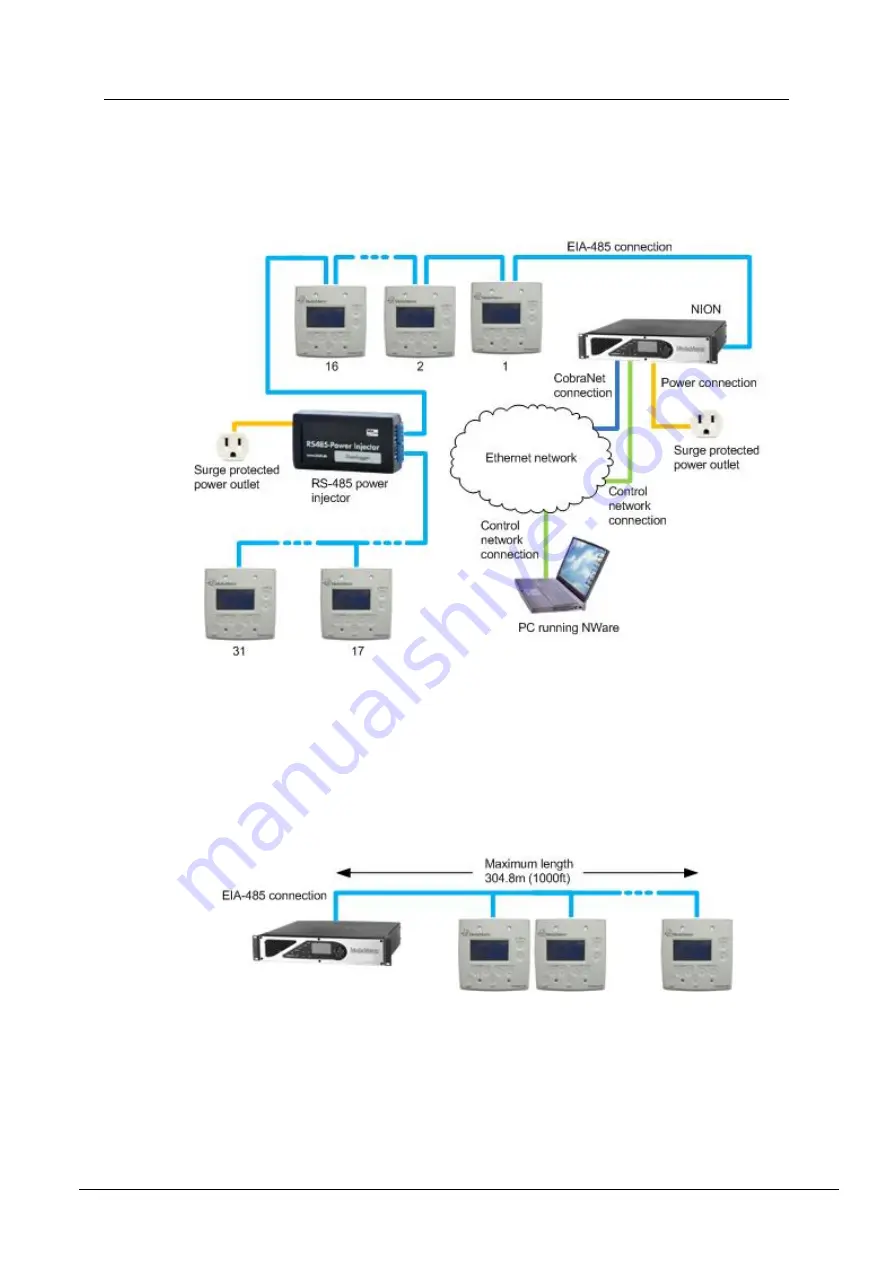
In the example below, an RS-485 power injector is used to boost the available power for the 
devices in the chain. Pins 4 (power) and 5 (ground) of the cable would be used for the power 
connection. Pins 1-3 would be used for the data connection. See 

Preparing the EIA-485 cables


(on page 20) for more information. 


EIA-485 cable length limitations 

Due to its small gauge, the EIA-485 cable has a length limitation of 304.8 meters (1000 feet). 
This is the maximum length that can be used between the NION and the last xControl LCD 
device in the daisy chain. If a longer cable is used, it is likely to cause power drop and stop the 
devices at the end of the daisy chain working. 

Here is an example showing the NION positioned at the end of the daisy chain. 


Содержание MediaMatrix xControl LCD

Страница 1: ...xControl LCD Hardware Manual Version 2 0 0 0 July 7 2017 ...

Страница 2: ...ese systems All creative content in this manual including the layout art design content photography drawings specifications and all other intellectual property is Copyright 2016 Peavey Electronics Corporation All Rights Reserved Features specifications subject to change without notice All other registered trademarks or trademarks are the property of their respective owners Email mmtechsupport peav...

Страница 3: ...ontrol LCD set up 14 Daisy chained xControl LCD set up 16 EIA 485 cable length limitations 17 Chapter 5 Installing the unit 19 Introduction 20 Preparing the EIA 485 cables 20 Installation steps 21 Chapter 6 Setting up the unit using the on screen menus 25 Introduction 26 Displaying the setup menu 26 Setting the unit base code 26 Setting the inactivity timer 26 Setting the logout timer 27 Adding or...

Страница 4: ...iv Version 2 0 0 0 July 7 2017 Warranty statement 31 ...

Страница 5: ...July 7 2017 Version 2 0 0 0 1 In This Chapter Safety warnings 2 Chapter 1 Important safety instructions ...

Страница 6: ...y the manufacturer or sold with the apparatus When a cart is used use caution when moving the cart apparatus combination to avoid injury from tip over 13 Unplug this apparatus during lightning storms or when unused for long periods of time 14 Refer all servicing to qualified service personnel Servicing is required when the apparatus has been damaged in any way such as power supply cord or plug is ...

Страница 7: ...hearing loss but nearly everyone will lose some hearing if exposed to sufficiently intense noise for a sufficient time The U S Government s Occupational Safety and Health Administration OSHA has specified the following permissible noise level exposures Duration Per Day in Hours Sound Level dBA Slow Response 8 90 6 92 4 95 3 97 2 100 1 102 1 105 110 or less 115 According to OSHA any exposure in exc...

Страница 8: ......

Страница 9: ...July 7 2017 Version 2 0 0 0 5 In This Chapter Power outage and surge protection 6 Warranty Registration 6 What you will need 6 What s in the box 6 Thank You 6 Chapter 2 Before you start ...

Страница 10: ...al to our support group It enables us to provide better service and customer support and to keep you informed of new product updates Tip Refer to the warranty statement at the rear of this manual for details of what your warranty includes and what the limitations are What you will need Phillips head screwdriver Small Philips head screwdriver What s in the box xControl LCD is packaged in a single c...

Страница 11: ...July 7 2017 Version 2 0 0 0 7 In This Chapter Description 8 Features 8 Applications 8 Example set up 9 xControl LCD front panel 10 xControl LCD rear 11 Chapter 3 Introduction to xControl LCD ...

Страница 12: ...municates with the unit via an EIA 485 connection Features Capacitive touch buttons LCD display Standard EIA 485 communications Water resistant face Easy connection and installation Supports daisy chaining Up to 31 xControl LCDs can be used with a single NION Can share the EIA 485 network with other XControl devices XControl 4x4 for example Built in data termination switch Configurable controls Bu...

Страница 13: ...e there is also a speaker Users who have access to the xControl LCD devices can control the volume in the local zone and select the input source for the audio either music from the MP3 player or from the tuner Announcements made via the microphone can override the other two sources Tip The design of the NWare project determines which zones each xControl LCD can control ...

Страница 14: ...round Resolution is 128x64 pixels Screen size is 60mm x 32mm 2 36 x 1 26 The screen displays the current zone source and level Capacitive touch buttons Buttons for selecting zone source and level plus enter and mute buttons The enter button is used when the set up screens are displayed and the user wants to confirm a setting ...

Страница 15: ...ot be the last device in the chain or that bi directional control will be used Normally an xControl LCD is used to control devices in an NWare project but the unit also supports bi directional control where the NWare xControl LCD device can be used to control the physical xControl LCD device RJ 45 ports Standard RJ 45 ports that accept shielded CAT5 or CAT6 data cables The ports can supply power a...

Страница 16: ... 0 0 0 July 7 2017 Mode selector switch Rotary switch for selecting PASHA mode resetting the unit and performing tests For more information see Installation steps on page 21 Screw hole There are four screw holes for fixing the xControl LCD to a wall box ...

Страница 17: ...2 0 0 0 13 In This Chapter Introduction 14 NEMA electrical enclosures 14 Single xControl LCD set up 14 Daisy chained xControl LCD set up 16 EIA 485 cable length limitations 17 Chapter 4 Infrastructure design considerations ...

Страница 18: ...te The NION RS 485 port can supply a maximum of 0 5A see RS 422 485 serial port in RS 485 mode in the NION Hardware Manual Therefore up to 16 devices can be daisy chained directly to the port In order to connect additional devices an external power supply is required NEMA electrical enclosures xControl LCD units are designed to mount in standard NEMA electrical enclosures This includes boxes desig...

Страница 19: ...xControl LCD Hardware Manual July 7 2017 Version 2 0 0 0 15 ...

Страница 20: ...xControl LCDs numbered 1 3 is set to OUT The switch at the rear of xControl LCD number 4 is set to IN Daisy chained setup with more than 16 units When you want to connect more than 16 xControl LCDs to a single NION you must consider the power requirements Each xControl LCD requires approximately 30mA of power to operate The NION RS 485 port can supply a maximum of 0 5A see RS 422 485 serial port i...

Страница 21: ... See Preparing the EIA 485 cables on page 20 for more information EIA 485 cable length limitations Due to its small gauge the EIA 485 cable has a length limitation of 304 8 meters 1000 feet This is the maximum length that can be used between the NION and the last xControl LCD device in the daisy chain If a longer cable is used it is likely to cause power drop and stop the devices at the end of the...

Страница 22: ... NION is positioned in the middle of the daisy chain double the length of cable and number of devices can be used Tip If a longer cable length is required larger gauge cable can be used or power can be applied directly to the daisy chain supplementing the power available from the NION ...

Страница 23: ...July 7 2017 Version 2 0 0 0 19 In This Chapter Introduction 20 Preparing the EIA 485 cables 20 Installation steps 21 Chapter 5 Installing the unit ...

Страница 24: ...tions on page 13 for an explanation of the different options Preparing the EIA 485 cables An xControl LCD that will be connected to a NION requires an EIA 485 cable with an RJ 45 plug at one end and a DB 9 plug at the other end When two xControl LCDs are daisy chained together a cable with an RJ 45 connector at each end is required Note The xControl LCD must have both a power ground connection and...

Страница 25: ...white data 1 1 Orange data 2 2 Green white ground 3 5 Blue power 4 4 Blue white power ground 5 5 Installation steps 1 Ensure that the NION supplying power via the EIA 485 cable is switched off 2 Plug the EIA 485 cable into one of the RJ 45 ports at the rear of the xControl LCD 3 If the xControl LCD will be daisy chained to another unit or to a power injector plug the second EIA 485 cable leading t...

Страница 26: ... of chain two cables connected Yes Out No Out 5 Using a small Philips head screwdriver carefully position the rotary Mode selector switch to select the right mode of operation or to test the unit Position Mode 1 PASHA protocol mode This is the default mode When the unit powers up you will be prompted to log on You must enter a valid user passcode before you can change settings using the front pane...

Страница 27: ...ode Allows you to enable or disable user access to the unit using the on screen menus and without removing it from the wall Uses PASHA protocol When the unit powers up you will not be prompted to log on C F Reserved for MediaMatrix Support 6 Attach the xControl LCD to the NEMA wall box using the supplied screws ...

Страница 28: ......

Страница 29: ...t base code 26 Setting the inactivity timer 26 Setting the logout timer 27 Adding or deleting a user passcode 27 Setting the backlight level 28 Displaying the firmware version and copyright information 28 Logging off and returning to the logo screen 28 Chapter 6 Setting up the unit using the on screen menus ...

Страница 30: ...t Setup Passcode screen is displayed You can use the Zone Up and Zone Down buttons to move between the setup screens Setting the unit base code In order for a project to communicate with the xControl LCD it must be assigned a unique base code To set the unit base code 1 Press the Zone Up button or Zone Down button repeatedly until the Set Base Code screen is displayed 2 Press the Level Up and Leve...

Страница 31: ...ct Save and Exit 6 Press Enter Adding or deleting a user passcode You can specify multiple user passcodes that can each be used to gain access to the onscreen controls These are used when mode 1 is selected during installation To add a new user passcode 1 Press the Zone Up button or Zone Down button repeatedly until the Add or Delete User Passcode screen is displayed 2 Press the Source buttons to ...

Страница 32: ...acklight value The valid range is 0 dim to 9 bright 3 Press the Zone Up button or Zone Down button repeatedly until the Save and Exit screen is displayed 4 Select Save and Exit 5 Press Enter Displaying the firmware version and copyright information Press the Zone Up button or Zone Down button repeatedly until the firmware version and copyright information screen is displayed Logging off and return...

Страница 33: ...July 7 2017 Version 2 0 0 0 29 In This Chapter Logging on 30 Using the front panel buttons to change settings 30 Chapter 7 Using the xControl LCD once it has been installed ...

Страница 34: ...en press Level Up or Level Down to change its value 2 Press Enter The Source Zone and Level screen is displayed Using the front panel buttons to change settings The front panel of the xControl LCD is designed to allow you to specify an audio source for each of the zones in your installation and adjust the level for a particular zone To use the front panel buttons 1 Press the Zone buttons to select...

Страница 35: ...atrix Host Processors Servers and Controllers nControl nTouch 180 nTouch 60 xControl LCDs nWall VCAT VCAT HD VGA 2 VSC D4S D1V Remote Control Panels Plates Paging Stations Ambient Sense Devices and other devices installed in user accessible locations 90 Days Loudspeaker Components including speakers baskets drivers diaphragm replacement kits and passive filter networks and all Accessory Products H...

Страница 36: ...ronics Corp 5022 Hartley Peavey Drive Meridian Mississippi 39305 USA Phone 866 662 8750 http www peaveycommercialaudio com products cfm mm Features Specifications subject to change without notice Copyright 2016 All Rights Reserved 80307510 ...

Отзывы: