
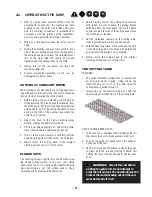


– 20 –
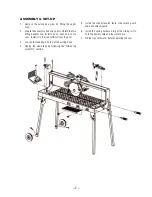
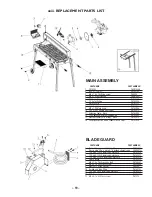
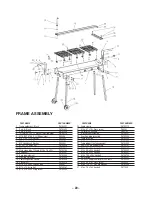
1 Frame weldment - Black PA103891
2 Post A - Black PA103893
3 Post B - Black PA103895
4 (5/16)M8 x 25 x 1.8 Washer (electroplated) PA150119
5 M10 (D41 d10.5 X 3L) Wide washer PA0306
6 M5 x 10 x 1 Flat Washer PA25054
7 M6 Spring Lock Washer PA11090
8 M5 Spring Lock Washer PA25053
9 M 8 x 1.25 Nylon Nut PA100086
10 M6 x 1.0 Nut PA150334
11 Male seven lobe T1 knob M10 x 1.5 x 25L PA102705
12 Bridge/Rail PA103897
13 Rear leg weldment PA103898
14 Front leg weldment PA103899
15 Cable suspension spring PA103924
16 Spring rest PA103810
17 M10 x 1.5 x 60L Cap hex bolt PA4291
18 M10 x 1.5 Nylon Nut PA140267
19 M10 x 1.5 x 20L Wing screw PA103820
20 Cable clamp PA102719
21 M4 x 0.7 x 10L Cross screw PA0353
22 Safety pin with chain PA42148
23 6 inch Wheel assembly PA140381
24 Overflow plug assembly PA140224
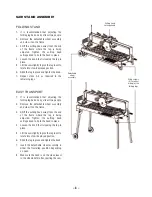
25 Table assembly PA103900
26 Table support screw PA103901
27 Table support feet arrangement PA103902
28 20D x 10L M5 Rubber stop PA102751
29 M6 x 1.0 x 25L Hex bolt PA420319
30 M5 x 0.8 x 25L Hex bolt PA140282
31 M5 x 0.8 x 35L Hex bolt PA160081
32 M8 x 1.25 x 25L Hex bolt PA150145
33 Ruler guide PA103903
34 D4 X 45L Hairpin cotter pin (25D shaft) PA140229
35 M5 x 0.8 x 16L Cross screw PA25058
36 M6 x 18 x 1.8T Very Big Washer PA103904
37 M6 x 1.0 x 16L Hex bolt PA11089
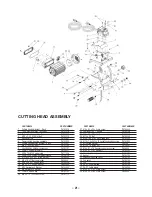
PART NAME PART NUMBER
PART NAME PART NUMBER
FRAME ASSEMBLY


