background image

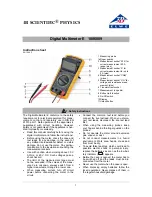
  1.)  4 ½-digit LCD display 
  2.)  USB-connector 
  3.)  Data-Hold function button 
  4.)  Power button 
  5.)  REL function button 
  6.)  Range Hold function buttton 
  7.)  MIN/MAX function button 
  8.)  Backlight button 
  9.)  SET function button 
10.)  Selector knop 
11.)  LED indicator 
12.)  20 A input jack 
13.)  mA input jack 
14.)  COM input jack 
15.)  V/

 input jack 


5.1. Description  


20 A Amperes Input Terminal (12):  

For current measurements (AC or DC) up to 20 A when the rotary selector is in 20 A position. 
 

mA Milliammeters Input Terminal (13):  

This input terminal is used for measuring currents of 2 mA, 20 mA and 200 mA when the rotary selector is in 
2 mA, 20 mA or 200 mA position. 
 

COM Common Terminal (14): 

Return terminal for all measurements. 
 

V/

 Volts or Ohm Input Terminal (15):  

Volts, Ohms, Continuity, Diode and Frequency  
 

Data Hold D-H (3):  

The actual value will be freeze in the LCD-display.  
To release the DATA-Hold Mode, press D-H-button (3) again to return to normal measurement operation.  
 

Relative Measurement (REL) (5)

Example:  
If the stored Relative value is 20.00 V and the present measured value is 22.00 V, the display shows a value 
of 2.00 V. If the value is the same as the stored Relative value, the display shows 0.00 V.  
 
* Press the „REL“ button to activate the REL-mode.  
* Auto range selection will be deactivated and the present range will be stored.  
* Press „REL“ again to show the stored value..  
* Press and hold the „REL“-button for 1 second or turn the rotary switch to remove the stored value and to 

leave the „REL“-mode.  


-20- 

Содержание 3380

Страница 1: ...PeakTech 3380 Bedienungsanleitung Operation Manual Digital Multimeter ...

Страница 2: ...erätes Die angegebenen maximalen Eingangsspannungen dürfen nicht überschritten werden Falls nicht zweifelsfrei ausgeschlossen werden kann dass diese Spannungsspitzen durch den Einfluss von transienten Störungen oder aus anderen Gründen überschritten werden muss die Messspannung entsprechend 10 1 vorgedämpft werden Nehmen Sie das Gerät nie in Betrieb wenn es nicht völlig geschlossen ist Defekte Sic...

Страница 3: ... Technikern durchgeführt werden Gerät nicht mit der Vorderseite auf die Werkbank oder Arbeitsfläche legen um Beschädigung der Bedienelemente zu vermeiden Keine technischen Veränderungen am Gerät vornehmen Messgeräte gehören nicht in Kinderhände Reinigung des Gerätes Gerät nur mit einem feuchten fusselfreien Tuch reinigen Nur handelsübliche Spülmittel verwenden Beim Reinigen unbedingt darauf achten...

Страница 4: ...ine Daten Anzeige 4 stellige LCD Anzeige mit einer maximalen Anzeige von 21999 und automatischer Polaritätsanzeige Betriebstemperaturbereich 0 40 C Betriebstemperaturbereich für garantierte Genauigkeit 23 C 5 C Lagertemperaturbereich 10 50 C Abmessungen B x H x T 92 x 210 x 40 mm Gewicht 410 g einschließlich Batterie 2 2 Elektrische Daten max zulässiger Eingangsstrom 20 A AC DC Messfolge 3 4 x pro...

Страница 5: ... mV 750 V 1 V 0 5 v M 10 St 50 Hz 400 Hz Gleichstrom Bereiche Auflösung Genauigkeit 220 µA 100 nA 0 3 v M 3 St 2200 µA 1 µA 22 mA 10 µA 220 mA 100 µA 20 A 1 mA 1 0 v M 10 St Wechselstrom Bereiche Auflösung Genauigkeit 220 µA 100 nA 0 5 v M 10 St 50 Hz 100 Hz 1 0 v M 10 St 100 Hz 10 kHz 2200 µA 1 µA 22 mA 10 µA 220 mA 100 µA 20 A 1 mA 1 0 v M 15 St Widerstand Bereiche Auflösung Genauigkeit 220 Ω 0 ...

Страница 6: ...ktion unter 30 Ω Kapazitätsbereiche Bereiche Auflösung Genauigkeit 22 nF 1 pF 2 0 v M 10 St 220 nF 10 pF 2 2 µF 100 pF 22 µF 1 nF 3 0 v M 15 St 220 µF 10 nF 2200 µF 100 nF Induktivität Bereiche Auflösung Genauigkeit 220 mH 1 µH 2 0 v M 10 St Frequenzbereiche Bereiche Auflösung Genauigkeit 10 Hz 22 MHz 1 Hz 0 1 v M 5 St Temperatur Bereiche Auflösung Genauigkeit 40 C 200 C 0 1 C 3 0 v M 5 C 200 C 12...

Страница 7: ...n höherer Spannungen besteht Verletzungsgefahr und oder die Gefahr der Beschädigung bzw Zerstörung interner Schaltkreise des Gerätes Der maximale Spannungsunterschied zwischen dem COM Eingang des Gerätes und Masse bzw Erdpotential beträgt 500 V Bei höheren Spannungsunterschieden besteht die Gefahr ernsthafter Verletzungen durch Stromschlag 4 Bedienelemente und Anschlüsse am Gerät 6 1 5 2 3 4 6 7 9...

Страница 8: ...rstands und Frequenzmessungen sowie für die Messfunktionen Diodentest und Durchgangsprüfungen Messwert Haltefunktion D H 3 Die Messwert Haltefunktion ermöglicht das Einfrieren eines Messwertes in der digitalen Sekundäranzeige des Gerätes zur späteren Ablesung oder Auswertung Zur Umschaltung auf die Messwerthaltefunktion Taste 3 D H bis zum Aufleuchten des Funktionssymbols D H drücken Der aktuelle ...

Страница 9: ...ählen und dann ggf auf einen niedrigeren Bereich umschalten 2 SET Taste 9 drücken In der LCD Anzeige erscheint AC 3 Rote Prüfleitung an den V Ω Eingang und schwarze Prüfleitung an den COM Eingang des Gerätes anschließen 4 Prüfleitung über die zu messende Spannungsquelle anlegen und Messwert in der LCD Anzeige des Gerätes ablesen Hinweis Eingangswiderstand in allen Messbereichen 10 MΩ bei 100 pF Fr...

Страница 10: ...sen 5 Nach beendeter Messung Prüfleitungen von der Messschaltung und den Eingängen des Gerätes abziehen Hinweise Der Eigenwiderstand der Prüfleitungen kann bei Messungen von kleinen Widerständen 200 Ω Bereich die Genauigkeit der Messung negativ beinträchtigen Der Eigenwiderstand üblicher Prüfleitungen liegt zwischen 0 2 1 Ω Zur genauen Bestimmung des Eigenwiderstandes Prüfleitungen an die Eingangs...

Страница 11: ...es Gerätes 1 Funktions Bereichswahlschalter 10 in die Stellung FREQ drehen 2 Rote Prüfleitung an den V Ω Eingang schwarze Prüfleitung an den COM Eingang anschließen 3 Prüfleitungen über die zu messende Schaltung bzw das zu messende Bauteil anschließen und Frequenz in der LCD Anzeige ablesen Achtung Bei an eine Steckdose angeschlossenen Prüfleitungen Stellung des Funktions Bereichswahlschalters 10 ...

Страница 12: ...V bei Siliciumdioden Hinweise Bei falsch gepolten Prüfleitungen rote Prüfleitung an Kathodenseite schwarze Prüfleitung an Anodenseite entspricht die Messwertanzeige dem Spannungsabfall in Sperrrichtung der Diode Bei Anzeige des Überbereichssymbols OL ist die Diode entweder offen oder der Spannungsabfall beträgt mehr als 2 V 5 10 Durchgangsprüffunktion Achtung Unter keinen Umständen Durchgangsprüfu...

Страница 13: ...geeignet für Windows 98 2000 NT XP VISTA 7 Zur Installation wie beschrieben verfahren 1 PC einschalten und Windows starten 2 Das Multimeter mittels des mitgelieferten USB Anschlusskabels mit einem USB Port am PC verbinden 3 Das Windowssystem erkennt die neue Hardwarekomponente und die USB Treiberinstallation wird gestartet 4 Legen Sie die Software CD in Ihr CD DVD Laufwerk und installieren Sie die...

Страница 14: ...he Spülmittel verwenden Achtung Modifizierung der internen Schaltkreise oder Änderungen am Aussehen oder der Bestückung des Multimeters haben den automatischen Verlust der Herstellergarantie zur Folge 7 1 Einsetzen bzw Auswechseln der Batterie Zum Betrieb des Gerätes ist eine 9V Block Batterie erforderlich Bei ungenügender Batteriespannung leuchtet das Batteriesymbol auf Bei leuchtendem Batteriesy...

Страница 15: ...hme der Rückwand zum Auswechseln der Sicherung Multimeter ausschalten und alle Prüfleitungen von den Eingängen abziehen Defekte Sicherungen nur mit einer dem Originalwert und Abmessungen entsprechenden Sicherung ersetzen Die Abnahme der Rückwand und das Auswechseln der Sicherung darf nur durch qualifiziertes Fachpersonal erfolgen Zum Auswechseln der Sicherungen wie beschrieben verfahren 1 Multimet...

Страница 16: ...er to the unit under test and discharge all capacitors before taking any resistance measurements Do not conduct current measurements with the leads connected to the V Ω terminals of the equipment Check test leads and probes for faulty insulation or bare wires before connection to the equipment Please use only 4mm safety test leads to ensure immaculate function To avoid electric shock do not operat...

Страница 17: ...requency V Ω COM 250 V AC DC Logic V Ω COM 250 V AC DC 1 2 Safety Symbols The maximum current that you can measure at this terminal is 20 A DC AC This terminal is fuse protected by FF 15 A 250 V fuse When using this range with high current keep the duty cycle to 30 Seconds on load and 15 Minutes off load The maximum current that you can measure with this terminal is 220 mA DC AC This terminal is f...

Страница 18: ...ck hazard 3 Specifications 3 1 General Characteristics display 21999 counts 4 digit with automatic polarity indication Reading times 3 4 x per second Operation temperature 0 40 C Temperature for guaranteed Accuracy 23 C 5 C Storage Temperature 10 C 50 C Operation voltage 9 V battery NEDA 1604 6F22 Dimensions WxHxD 210 x 92 x 40 mm Weight 410 g including battery 3 2 Ranges DC Voltage Range Resoluti...

Страница 19: ...01 Ω 0 15 of rdg 5 dgt 2 2 KΩ 0 1 Ω 22 KΩ 1 Ω 220 KΩ 10 Ω 2 2 MΩ 100 Ω 22 MΩ 1 KΩ 220 MΩ 10 KΩ 0 5 of rdg 3 dgt Dioden Continuity test Diode Measures forward resistance of semiconductor junction in kΩ a test current of approx 1 mA forward voltage max 2 7 V Continuity The buzzer sounds if the measured resistance is less than approx 30 Ω Capacitance Range Resolution Accuracy 22 nF 1 pF 2 0 of rdg 10...

Страница 20: ...ts up to 1000 V High voltage measurements should be done with care and in presence of a person who is educated in first aid Caution The max input voltage for this instrument is 1000 V DC or 750 V AC and to be on the safe side these values mustn t be passed The max voltage difference between COM input and earth is 500 V DC ACeff Higher voltage differences may cause personal injury or damage of the ...

Страница 21: ... Common Terminal 14 Return terminal for all measurements V Ω Volts or Ohm Input Terminal 15 Volts Ohms Continuity Diode and Frequency Data Hold D H 3 The actual value will be freeze in the LCD display To release the DATA Hold Mode press D H button 3 again to return to normal measurement operation Relative Measurement REL 5 Example If the stored Relative value is 20 00 V and the present measured va...

Страница 22: ... greater than 750 Volts AC since it may damage your meter and expose yourself to a severe shock hazard Follow these steps to measure AC voltage 1 Set the rotary selector to the desired position Select the range as required for the voltage level to be measured If you do not know the voltage level start with the rotary selector set to the highest voltage position and reduce the setting as needed to ...

Страница 23: ...ds When measuring resistance be sure that the contact between the test leads and the object is good Dirt oil solder flux or other foreign matters can cause incorrect readings If the measured resistance value exceeds the maximum value OL will be displayed indicating overload and bar graph will be flashing For resistance of approximately 2 MΩ and above the display might take a few seconds to stabili...

Страница 24: ...elect and display appropriate frequencies ranges up to 2 MHz 4 The unit shows the value on the display Warning When the test leads are connected to an AC outlet do not turn the rotary selector to another range It might damage the internal components or cause bodily harm Notes For the most accurate measurements we strongly recommend you to use a BNC cable with ferrite core 6 8 Measuring Temperature...

Страница 25: ...displayed it means the diode is open or above 2 0 V forward voltage However if display shows a value between 0 V and approx 2 0 V it means a forward drop voltage The meter supplies enough forward voltage to light most LED s However if the LED s forward voltage is greater than 2 0 V the meter incorrectly indicates that the device is open 6 10 Checking Continuity Continuity testing verifies that cir...

Страница 26: ...creen to finish the installation Communication Parameters Transmission Rate 4800 baud Character coding Q ASCII 8 Care and Maintenance Your digital multimeter is a precise electronic device Do not tamper with circuit To prevent electric shock hazard turn off the meter and disconnect test leads before removing the back cover Any adjustments maintenance or repair of the instruments except battery and...

Страница 27: ... up batteries are hazardous and must be given in the for this being supposed collective container Statutory Notification about the Battery Regulations The delivery of many devices includes batteries which for example serve to operate the remote control There also could be batteries or accumulators built into the device itself In connection with the sale of these batteries or accumulators we are ob...

Страница 28: ...use in a fuse compartment 6 Replace the cover and secure it with the screw 7 Replace the battery compartment and secure it with the screws Warning Do not operate your meter until the back cover is in place and fully closed All rights also for translation reprinting and copy of this manual or parts are reserved Reproduction of all kinds photocopy microfilm or other only by written permission of the...

Отзывы: