

Your Source for Healthcare and
Wellness Infotainment
™
MODEL NUMBER:
PDI-P15X
Document Number:
PD196-134R6
Support Arm Mounted Television
Page 4 of 6
PDi Communication Systems, Inc. 40 Greenwood Lane Springboro, Ohio 45066 USA PH 1-800-628-9870 FX 937-743-5664
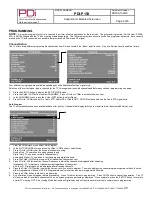
PROGRAMMING
NOTE:
A programming remote control is required to perform all setup operations for the television. The programming remote (Part Number: PD108-
420) is NOT packaged with the TV and must be ordered separately. The following instructions assume you have a programming remote, have correctly
mounted the TV, and connected a coax cable that provides both Power and RF signal.
Channel Setup
The TV offers three different programmable channel banks or Service Levels: Free, Basic, and Premium. Only one Service Level is usable at a time.
Four different tuning types are available depending upon the healthcare facilities’ signal style.
Selection of the correct signal type is required for the TV to recognize all possible channels and before any channel programming can begin.
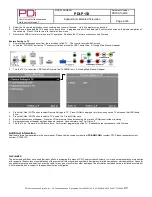
1.
Press the SETUP button to display the SETUP MODE menu.
2.
Press the CH▲ / CH▼ button to select CHANNELS. Press VOL◄ or VOL► to activate the menu item.
3.
In the CHANNELS menu, p
ress the CH▲ / CH▼ button to select Signal.
4.
Press VOL◄ / VOL► to select Air, Cable STD, Cable IRC or Cable HRC. NOTE: Most hospitals use the Cable STD signal style.
Auto Program
The TV automatically scans each available channel for activity. Channels that display activity are memorized into the selected Service Level.
1.
From the CHANNELS menu select Auto Program.
2.
In the AUTO PROGRAM menu, press the
CH▲ / CH▼ button to select Mode.
3.
Press VOL◄ / VOL► to set the scope of channel scanning.
Analog Only: TV searches for analog channels only.
Digital Only: TV searches for digital channels only.
Analog and Digital: TV searches for both analog and digital channels.
4.
Press the
CH▲ / CH▼ button to select the Channel Sequence menu item.
5.
Press
VOL◄ / VOL► to set the Channel Sequence in which the channels are displayed after searching.
Interleave A+D: In the order of channel number regardless of the system.
All A then D: Digital channels are displayed after all analog channels.
6.
Press the
CH▲ / CH▼ button to select the Service Level you wish to program. The menu displays the current programming status of each level as
either Programmed or Blank. NOTE: A Programmed service level can also be re-programmed if desired.
7.
Press the
VOL► button to start auto programming.
8.
A confirmation menu will appear before proceeding. Press CH▲ to start auto programming. Press CH▼ button to cancel the operation. The TV
will now search all available channels with an on-screen progress percentage displayed. Once complete, press the SETUP button to return to
normal TV viewing. NOTE: Any tuning Mode that includes Digital channels will require several minutes to complete auto programming.