background image


94 


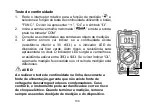
Botão de retroiluminação 

Pressione o botão 

durante mais de 2 segundos para ligar a retroiluminação do 

dispositivo. Pressione novamente durante mais de 2 segundos para desligar a 
retroiluminação. Após 10 segundos, a retroiluminação desliga-se automaticamente. 
 

Lanterna 

Pressione o botão FUNC. durante mais de 2 segundos para ligar/desligar a lanterna. 
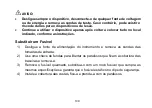
 

Operação de medição 
Conectar as sondas de medição 

Não opere o dispositivo antes das sondas de teste estarem devidamente conectadas. 
Para o garantir, pressione completamente os cabos na direção das tomadas de 
entrada. 

Содержание PCW01A

Страница 1: ...1 User Manual PCW01A Digital Multimeter...

Страница 2: ...2...

Страница 3: ...3 English 4 Deutsch 31 Fran ais 58 Portugu s 85 Italiano 112...

Страница 4: ...ls 10 Product Description 11 Measurement Operation 13 AC DC Voltage 14 AC DC Current Measurement 16 Resistance Measurement 18 Continuity Test 19 Diode Test 20 NCV Test 21 Battery Test 22 General Techn...

Страница 5: ...rformed or without following the procedures the instrument and equipment might get damaged In case that conditions are not fully met or not fully understood do not continue to perform any operation fl...

Страница 6: ...of the manual and that only qualified users operate the device Any change related to the design or construction of the device is not permitted Warranty and any liability in regards to material damage...

Страница 7: ...and pollution level 2 Warning In order to avoid possible electric shock personal injury or any other safety accident please abide by the following instructions Please read this manual carefully befor...

Страница 8: ...t continue using the multimeter Before using the device please check whether it has any crack or plastic damage If so do not use the device Before using the instrument please check whether the probes...

Страница 9: ...ironment When using the probe please put your fingers behind the finger protector of the probe When measuring please connect the zero neutral line ground line first then connect the live wire when mea...

Страница 10: ...rrent AC or DC Warning important safety information Ground Fuse Equipment with double insulation reinforced insulation protection Low Battery Product complies with all relevant European directives Do...

Страница 11: ...III Suitable for testing and measuring circuits connected to the distribution part of low voltage power supply devices in buildings Product Description Instrument Panel Description 1 NCV probe 2 Flas...

Страница 12: ...matically to save power After an automatic shutdown press any button to turn the device on again If you press the FUNC button and turn on the device the automatic shutdown function will be disabled Af...

Страница 13: ...light After 10 seconds the backlight will automatically turn off Flashlight Press FUNC button for more than 2 seconds to turn on the flashlight turn off the flashlight Measurement Operation Connect Me...

Страница 14: ...and insert the black probe in the COM socket 3 When dealing with an unknown voltage range always start with the higher measurement range then switch to a lower range if applicable 4 Connect the probes...

Страница 15: ...measurement sockets This could result in electric shock for the user and damage the device Pay special attention to safety when measuring high voltage to avoid electric shock or personal injury Alway...

Страница 16: ...start with the higher measurement range then switch to a lower range if applicable 3 Insert the red probe in the 10A socket current 600mA or the Socket current 600mA depending on the measurement rang...

Страница 17: ...current 5A continuous measurement should not exceed 10 seconds After that disconnect the device from the measuring circuit and do not use the multimeter for 10 minutes When measuring is finished alwa...

Страница 18: ...result is displayed on the screen 5 When measuring large resistors 1MW it can take a few seconds for the measurement result to be stabilized If the screen shows OL the measurement range has been exce...

Страница 19: ...LED indicator of the device will turn green In addition the resistance will be shown on the screen The LED indicator will turn red if the resistance is between 30W and 50W If the screen shows OL the m...

Страница 20: ...tip with the anode and the black probe s tip with the cathode 4 The measurement result is displayed on the screen 5 If the screen shows OL the measuring diode is either in reverse direction or defecti...

Страница 21: ...r sends out slow paced acoustic signals 4 When the meter senses strong AC signals the indicator lights up red while the buzzer sends out fast paced acoustic signals WARNING Do not measure voltage abov...

Страница 22: ...Insert the red probe in the socket and insert the black probe in the COM socket 3 Connect the red probe s tip with the positive pol and the black probe s tip with the negative pole of the battery 4 T...

Страница 23: ...C MAX Voltage between input sockets and earth ground 600V Fuse protection mA F200mA 250V fuse 10A F10A 250V fuse Sampling rate about 3 times second Display 2000 counts readout Automatically shows the...

Страница 24: ...midity is no more than 70 DC voltage Range Resolution Accuracy 200mV 0 1mV 0 5 reading 3 2V 0 001V 20V 0 01V 200V 0 1V 600V 1V Input impedance 10M Maximum Input voltage 600V Overload protection 600V A...

Страница 25: ...hen measuring large current continuous measurement should be no longer than 10 seconds AC current Range Resolution Accuracy 200mA 0 1mA 1 5 reading 3 10A 0 01A Overload protection A mA F200mA 250V fus...

Страница 26: ...t Function Reverse DC voltage is about 0 5V Overload protection 250V If the resistance is 30 the buzzer will sound and the indicator light will be green When the resistance is 30 and 60 the buzzer doe...

Страница 27: ...the test probes Otherwise there might be the danger of damaging the device or personal injury Ensure that after cleaning the device is dry and that there is no moisture Replacing Battery and Fuse Rep...

Страница 28: ...ting everything back together according to the instructions Replacing Fuse 1 Turn off the power supply of the instrument and remove the probes from the input sockets 2 Use screwdriver to unscrew the s...

Страница 29: ...according to the instructions Information regarding waste disposal You are not permitted to dispose of this device in household garbage This multimeter corresponds to the EU directive concerning the W...

Страница 30: ...lity is taken for any technical or printing errors Importer Distributer Company Name P C Schwick GmbH Address Pohlhauser Stra e 9 42929 Wermelskirchen Germany Email info schwick de Internet www schwic...

Страница 31: ...oduktbeschreibung 38 Messvorg nge 40 Messung der Wechsel und Gleichspannung 41 Messung des Wechsel und Gleichstroms 43 Widerstandsmessung 45 Kontinuit tstest Durchgangstest 46 Diodentest 47 NCV Test K...

Страница 32: ...f hrt werden k nnen das Ger t und die Ausr stung besch digt werden Falls diese Bedingungen nicht vollst ndig erf llt oder nicht vollst ndig verstanden werden d rfen keine der mit dem Vorsicht Symbol g...

Страница 33: ...n dass nur qualifizierte Benutzer das Ger t bedienen Jegliche nderung im Zusammenhang mit dem Design oder der Konstruktion des Ger ts ist nicht zul ssig Jegliche Gew hrleistungs und Haftungsanspr che...

Страница 34: ...en halten Sie sich bitte an die folgenden Anweisungen Bitte lesen Sie dieses Handbuch sorgf ltig durch bevor Sie das Ger t benutzen und achten Sie besonders auf die Sicherheitswarnungen Halten Sie sic...

Страница 35: ...inen Riss oder eine Kunststoffbesch digung aufweist Ist dies der Fall verwenden Sie das Ger t nicht weiter Bitte pr fen Sie vor dem Gebrauch des Ger tes ob die Messleitungen Risse oder Besch digungen...

Страница 36: ...leitungen verwenden legen Sie bitte Ihre Finger hinter den Fingerschutz der Messleitungen Wenn Sie messen schlie en Sie bitte zuerst die Null Neutral Leitung Erdleitung an und schlie en Sie dann die s...

Страница 37: ...Warnung wichtige Sicherheitsinformationen Erdung Sicherung Ausr stung mit doppelter Isolierung verst rktem Isolierschutz Niedriger Batteriestand Produkt entspricht allen relevanten europ ischen Richt...

Страница 38: ...n Verteilungsabschnitt von Niederspannungs Stromversorgungsger ten in Geb uden angeschlossen sind Messungen innerhalb Geb udeinstallation Produktbeschreibung bersicht 1 NCV Sonde 2 Taschenlampe 3 Rot...

Страница 39: ...isierte Uhr am linken oberen Rand der Anzeige Kurz vor dem automatischen Abschalten ert nen einige kurze Signalt ne nach einer weiteren Wartezeit von ca einer Minute schaltet sich das Ger t mit einem...

Страница 40: ...Sekunden schaltet sich die Hintergrundbeleuchtung automatisch aus Taschenlampe Dr cken Sie die FUNC Taste l nger als 2 Sekunden um die Taschenlampe einzuschalten bzw die Taschenlampe auszuschalten Mes...

Страница 41: ...ie die schwarze Messleitung in die COM Buchse ein 3 Wenn es sich um einen unbekannten Spannungsbereich handelt beginnen Sie immer mit dem h heren Messbereich und wechseln Sie dann ggf zu einem niedrig...

Страница 42: ...es k nnte zu einem Stromschlag f r den Benutzer f hren und das Ger t besch digen Achten Sie beim Messen von Hochspannung besonders auf Sicherheit um einen Stromschlag oder Personensch den zu vermeiden...

Страница 43: ...t dem h heren Messbereich und schalten Sie dann ggf auf einen niedrigeren Bereich um 3 Stecken Sie die rote Messleitung in die Buchse 10A Strom 600mA oder in die Buchse Strom 600mA ein je nach dem zuv...

Страница 44: ...liche Messung nicht l nger als 10 Sekunden dauern Danach ist das Ger t vom Messkreis zu trennen und das Multimeter f r 10 Minuten lang nicht zu benutzen Wenn die Messung beendet ist entfernen Sie imme...

Страница 45: ...ildschirm angezeigt 5 Bei der Messung gro er Widerst nde 1MW kann es einige Sekunden dauern bis sich das Messergebnis stabilisiert hat Wenn der Bildschirm OL anzeigt wurde der Messbereich berschritten...

Страница 46: ...nzeige des Ger ts leuchtet gr n Zus tzlich wird der Widerstand auf dem Bildschirm angezeigt Die LED Anzeige leuchtet rot wenn der Widerstand zwischen 30W und 50W liegt Zeigt der Bildschirm OL an wurde...

Страница 47: ...node und die Spitze der schwarzen Messleitung mit der Kathode 4 Das Messergebnis wird auf dem Bildschirm angezeigt 5 Wenn der Bildschirm OL anzeigt ist die zu Diode entweder in umgekehrter Richtung od...

Страница 48: ...er langsame akustische Signale aussendet 4 Wenn das Messger t starke Wechselstromsignale wahrnimmt leuchtet die Anzeige rot auf w hrend der Summer schnelle akustische Signale aussendet WARNUNG Messen...

Страница 49: ...ie rote Messleitung in die Buchse und die schwarze Messleitung in die Buchse COM ein 3 Verbinden Sie die Spitze der roten Sonde mit dem positiven Pol und die Spitze der schwarzen Sonde mit dem negativ...

Страница 50: ...wischen Eingangsbuchsen und Erdung 600V Sicherungsschutz mA F200mA 250V Sicherung 10A F10A 250V Sicherung Abtastrate etwa 3 Mal Sekunde Anzeige Auslesen von 2000 Z hlungen Zeigt automatisch die Einhei...

Страница 51: ...igkeit betr gt nicht mehr als 70 Gleichspannung Mess bereich Aufl sung Genauigkeit 200mV 0 1mV 0 5 Anzeige 3 2V 0 001V 20V 0 01V 200V 0 1V 600V 1V Eingangsimpedanz 10M Max Eingangsspannung 600V berlas...

Страница 52: ...ssung gro er Str me darf die kontinuierliche Messung nicht l nger als 10 Sekunden dauern Wechselstrom Mess bereich Aufl sung Genauigkeit 200mA 0 1mA 1 5 Anzeige 3 10A 0 01A berlastschutz A mA F200mA 2...

Страница 53: ...n Die R ckw rts Gleichspannung betr gt etwa 0 5 V berlastschutz 250V Sofern der Widerstand 30 ist gibt der Buzzer einen Ton ab und das Anzeigelicht wird gr n Sofern der Widerstand zwischen 30 und 60 i...

Страница 54: ...besteht die Gefahr dass es zu Besch digung des Ger tes oder zu Personensch den kommt Achten Sie darauf dass das Ger t nach der Reinigung trocken ist und dass keine Feuchtigkeit eingedrungen ist Wechs...

Страница 55: ...Sie die Stromversorgung des Ger ts aus und entfernen Sie die Messleitungen aus den Eingangsbuchsen 2 Entfernen Sie die Gummiummantelung und l sen Sie mit einem Schraubendreher die Befestigungsschraube...

Страница 56: ...e alles nach den Anweisungen wieder zusammengebaut haben Hinweise zur Entsorgung Es ist Ihnen nicht gestattet dieses Ger t im Hausm ll zu entsorgen Dieses Ger t entspricht der EU Richtlinie ber Elektr...

Страница 57: ...technische Fehler sowie Druckfehler wird keine Haftung bernommen Importeur Distributor Firmenname P C Schwick GmbH Adresse Pohlhauser Stra e 9 42929 Wermelskirchen Deutschland Email info schwick de In...

Страница 58: ...t 64 Description du produit 65 Op ration de mesure 67 Mesure de tension CA CC 68 Mesure de courant CA CC 70 Mesure de r sistance 72 Test de continuit 73 Test de diode 74 Test de NCV 75 Test de batteri...

Страница 59: ...t pas bien appliqu es l instrument et l quipement risquent d tre endommag s Dans le cas o les conditions ne sont pas parfaitement remplies ou comprises il ne faut pas poursuivre l ex cution d une op r...

Страница 60: ...et ce que seuls des utilisateurs qualifi s manipulent l appareil Toute modification li e la conception ou la construction de l appareil n est pas autoris e La garantie ainsi que toute responsabilit e...

Страница 61: ...ment Afin d viter tout risque de choc lectrique de blessure corporelle ou tout autre accident li la s curit veuillez respecter les instructions suivantes Veuillez lire attentivement ce manuel avant d...

Страница 62: ...utiliser l appareil veuillez v rifier si celui ci ne comporte aucune fissure ou dommage plastique Si c est le cas n utilisez pas l appareil Avant d utiliser l instrument veuillez v rifier si les sond...

Страница 63: ...oigts derri re le prot ge doigts de la sonde Lorsque vous effectuez une mesure veuillez d abord brancher la ligne z ro neutre ligne de terre puis brancher ensuite le fil sous tension lorsque la mesure...

Страница 64: ...ou CC Avertissement consignes de s curit importantes Sol Fusible quipements double isolation protection d isolation renforc e Batterie faible Le produit est conforme toutes les directives europ ennes...

Страница 65: ...pour le test et la mesure des circuits branch s la partie distribution des appareils d alimentation lectrique basse tension dans les b timents Description du produit Description du tableau de bord 1 S...

Страница 66: ...r t automatique appuyez sur n importe quel bouton pour rallumer l appareil Si vous appuyez sur le bouton FUNC et que vous allumez l appareil la fonction d arr t automatique sera d sactiv e Apr s la mi...

Страница 67: ...tro clairage Apr s 10 secondes le r tro clairage s teint automatiquement Lampe torche Appuyez sur le bouton FUNC pendant plus de 2 secondes pour allumer teindre la lampe torche Op ration de mesure Pro...

Страница 68: ...ins rez la sonde noire dans la prise COM 3 Lorsque vous traitez une plage de tension inconnue commencez toujours par la plage de mesure sup rieure puis passez la plage inf rieure le cas ch ant 4 Branc...

Страница 69: ...e courant Cela pourrait entra ner un choc lectrique l utilisateur et des dommages l appareil Veillez tout particuli rement la s curit lorsque vous mesurez une tension lev e afin d viter les chocs lect...

Страница 70: ...mmencez toujours par la plage de mesure sup rieure puis passez la plage inf rieure le cas ch ant 3 Ins rez la sonde rouge dans la prise 10A courant 600mA ou la prise courant 600mA en fonction de la pl...

Страница 71: ...v 5A la dur e de la mesure continue ne doit pas d passer 10 secondes Il faut ensuite d brancher l appareil du circuit de mesure et ne pas utiliser le multim tre pendant 10 minutes Lorsque la session d...

Страница 72: ...est affich l cran 5 Lors de la mesure de r sistances lev es 1MW la stabilisation du r sultat de la mesure peut prendre quelques secondes Si l cran affiche OL cela signifie que la plage de mesure a t...

Страница 73: ...ndicateur LED de l appareil devient vert De plus la r sistance sera affich e l cran L indicateur LED devient rouge si la r sistance est comprise entre 30W et 50W Si l cran affiche OL cela signifie que...

Страница 74: ...de la sonde rouge l anode et la pointe de la sonde noire la cathode 4 Le r sultat de la mesure est affich l cran 5 Si l cran affiche OL la diode de mesure est soit dans le sens inverse soit d fectueu...

Страница 75: ...ythme lent 4 Lorsque le multim tre d tecte des signaux CA forts l indicateur s allume en rouge et l cran tandis que l avertisseur sonore met des signaux acoustiques a un rythme rapide AVERTISSEMENT Ne...

Страница 76: ...n de mesure de batterie et choisissez la plage 9V ou 1 5V Ins rez la sonde rouge dans la prise et ins rez la sonde noire dans la prise COM 3 Branchez la pointe de la sonde rouge au p le positif et la...

Страница 77: ...entr e et le sol DC1000V AC750V Protection par fusible mA fusible F200mA 250V 10A fusible F10A 250V Taux d chantillonnage environ 3 fois seconde cran 2000 points d affichage Affiche automatiquement le...

Страница 78: ...rieure 70 Tension CC Plage R solution Pr cision 200mV 0 1mV 0 5 variante 3 2V 0 001V 20V 0 01V 200V 0 1V 600V 1V Imp dance d entr e 10M Tension maximale d entr e 600V Protection contre les surcharges...

Страница 79: ...ors de la mesure d un courant lev la mesure continue ne doit pas d passer 10 secondes Courant CA Plage R solution Pr cision 200mA 0 1mA 1 5 variante 3 10A 0 01A Protection contre les surcharges A mA f...

Страница 80: ...ension CC invers e est d environ 0 5V Protection contre les surcharges 250V Si la r sistance est 30 l avertisseur sonore retentit et le t moin lumineux sera de couleur verte Si la r sistance est 30 et...

Страница 81: ...les sondes de test Sinon vous risquez d endommager l appareil ou de subir des blessures Assurez vous que l appareil est bien sec et qu il n y a aucune trace d humidit apr s le nettoyage Remplacement...

Страница 82: ...onform ment aux instructions Remplacement de fusible 1 Coupez l alimentation lectrique de l instrument et retirez les sondes des prises d entr e 2 Utilisez un tournevis pour d visser les vis de fixati...

Страница 83: ...m ment aux instructions Informations relatives l limination des d chets Vous n tes pas autoris jeter cet appareil dans les ordures m nag res Ce multim tre est conforme la directive europ enne concerna...

Страница 84: ...ute responsabilit en cas d erreurs techniques ou d impression Importateur distributeur Nom de la Soci t P C Schwick GmbH Adresse Pohlhauser Stra e 9 42929 Wermelskirchen Allemagne Email info schwick d...

Страница 85: ...Seguran a 91 Descri o do Produto 92 Opera o de medi o 94 Medi o 95 Medi o de corrente AC DC 97 Medi o de resist ncia 99 Teste de continuidade 100 Teste de d odo 101 Teste NCV Voltagem sem contacto 102...

Страница 86: ...rocedimentos n o sejam seguidos o instrumento e equipamento podem ser danificados Caso as condi es n o sejam completamente respeitadas ou compreendidas n o realize qualquer opera o marcada com o s mbo...

Страница 87: ...te o fornecimento do manual e que apenas utilizadores qualificados operam o dispositivo Qualquer altera o relativa ao design ou constru o do dispositivo proibida A garantia e quaisquer responsabilidad...

Страница 88: ...utro acidente de seguran a por favor siga as seguintes instru es Por favor leia este manual cuidadosamente antes de usar o instrumento e preste especial aten o a informa es de avisos de seguran a Siga...

Страница 89: ...usar o mult metro Antes de usar o dispositivo por favor verifique a existe cia de alguma fenda ou dano no pl stico Se existir alguma n o utilize o dispositivo Antes de usar o instrumento por favor ve...

Страница 90: ...vapor ou num ambiente h mido Ao utilizar a sonda por favor coloque os seus dados atr s do protetor da sonda Durante a medi o por favor conecte o fio zero neutro fio terra primeiro depois conecte o fi...

Страница 91: ...nua AC ou DC Aviso informa o de seguran a importante Terra Fus vel Equipamento com prote o de duplo isolamento isolamento refor ado Bateria Fraca O produto cumpre com todas as diretivas Europeias rel...

Страница 92: ...i es de circuitos conectados parte de distribui o de dispositivos de fornecimento de energia a baixa voltagem em edif cios Descri o do Produto Descri o do painel do instrumento 1 Sonda NCV voltagem se...

Страница 93: ...energia Ap s o desligar autom tico pressione qualquer bot o para voltar a ligar o dispositivo Se pressionar o bot o FUNC e ligar o dispositivo a fun o de desligar automaticamente ser desativada Ap s d...

Страница 94: ...retroilumina o Ap s 10 segundos a retroilumina o desliga se automaticamente Lanterna Pressione o bot o FUNC durante mais de 2 segundos para ligar desligar a lanterna Opera o de medi o Conectar as son...

Страница 95: ...a preta na tomada COM 3 Ao lidar com uma gama de voltagem desconhecida comece sempre com a gama de medi o mais elevada depois passe para uma gama inferior se necess rio 4 Conecte as extremidades das s...

Страница 96: ...edi o est a realizar Isto resultaria num choque el trico para o utilizador e danificaria o dispositivo Preste especial aten o seguran a ao medir voltagens elevadas para evitar choques el tricos ou les...

Страница 97: ...ce sempre com a gama de medi o mais elevada depois passe para uma gama inferior se necess rio 3 Insira a sonda vermelha na tomada 10A corrente 600mA ou na tomada corrente 600mA dependendo da gama de m...

Страница 98: ...ente Ao medir uma corrente elevada 5A a medi o continua n o deve exceder os 10 segundos Ap s este per odo desconecte o dispositivo do circuito de medi o e n o use o mult metro durante 10 minutos Quand...

Страница 99: ...o exibido no visor 5 Ao medir resistores de grande capacidade 1MW pode demorar alguns segundos at que o resultado da medi o estabilize Se o visor apresentar OL a gama de medi o foi excedida ou o circu...

Страница 100: ...W e o indicador LED do dispositivo vai ficar verde Al m disso a resist ncia ser apresentada no visor O indicador LED surgir a vermelho se a resist ncia estiver entre 30W e 50W Se o visor indicar OL a...

Страница 101: ...sonda vermelha ao nodo e a extremidade da sonda preta ao c todo 4 O resultado de medi o ser exibido no visor 5 Se o visor apresentar OL o d odo de medi o est na dire o inversa ou est defeituoso AVISO...

Страница 102: ...e sinais ac sticos com intervalos lentos 4 Quando o medidor sente um sinal AC forte o indicador a presenta uma luz vermelha e o alarme sonoro emite sinais ac sticos com intervalos curtos AVISO N o me...

Страница 103: ...2 Insira a sonda vermelha na tomada e insira a sonda preta na tomada COM 3 Conecte a extremidade da sonda vermelha no polo positivo e a extremidade da sonda preta no polo negativo da bateria 4 O resu...

Страница 104: ...C or 28 C Voltagem MAX entre tomadas de entrada e fio terra 600V Prote o de fus vel mA fus vel F200mA 250V 10A fus vel F10A 250V Visor mostrador de 2000 contagens Apresenta automaticamente o s mbolo...

Страница 105: ...70 Voltagem DC Gama Resolu o Precis o 200mV 0 1mV 0 5 leitura 3 2V 0 001V 20V 0 01V 200V 0 1V 600V 1V Imped ncia de entrada 10M Voltagem de entrada m xima 600V Prote o de sobrecarga 600V Voltagem AC G...

Страница 106: ...a corrente de grande capacidade a medi o cont nua n o deve durar mais de 10 segundos Corrente AC Gama Resolu o Precis o 200mA 0 1mA 1 5 leitura 3 10A 0 01A Prote o de sobrecarga A mA fus vel F200mA 25...

Страница 107: ...de Function A voltagem DC inversa de cerca de 0 5V Prote o de sobrecarga 250V Se a resist ncia for de 30 o alarme sonoro ir emitir um som e a luz do indicador ser verde Quando a resist ncia 30 e 60 o...

Страница 108: ...sondas de teste Caso contr rio pode existir o risco de danos para o dispositivo ou de les o Ap s a limpeza garanta que o dispositivo est seco e que n o cont m humidade Substituir a Bateria e Fus veis...

Страница 109: ...no local indicado conforme as instru es Substituir um Fus vel 1 Desligue a fonte de alimenta o do instrumento e remova as sondas das tomadas de entrada 2 Use uma chave de fendas para libertar os paraf...

Страница 110: ...rte de lixo N o permitido descartar este dispositivo no lixo dom stico Este mult metro corresponde diretiva Europeia relativa aos Res duos de Equipamentos El tricos e Eletr nicos Por favor descarte o...

Страница 111: ...buidor Nome da Empresa P C Schwick GmbH Endere o Pohlhauser Stra e 9 42929 Wermelskirchen Alemanha Email info schwick de Internet www schwick de WEEE No DE 73586423 Tribunal distrital local Remscheid...

Страница 112: ...Descrizione del prodotto 119 Operazione di misurazione 121 Misura della tensione AC DC 122 Misurazione della corrente AC DC 124 Misurazione della resistenza 126 Test di continuit 127 Test diodi 128 T...

Страница 113: ...e le procedure lo strumento e l apparecchiatura potrebbero danneggiarsi Nel caso in cui le condizioni non siano pienamente soddisfatte o non completamente comprese non continuare a eseguire alcuna ope...

Страница 114: ...zzino il dispositivo Non consentito alcun cambiamento relativo alla progettazione o alla costruzione del dispositivo La garanzia e qualsiasi responsabilit in merito a danni materiali o lesioni persona...

Страница 115: ...strumento e prestare particolare attenzione alle informazioni relative agli avvisi di sicurezza Seguire rigorosamente questo manuale quando si utilizza lo strumento Inoltre prestare attenzione a qual...

Страница 116: ...con lo stesso tipo con le stesse specifiche elettriche Lo strumento deve essere utilizzato conformemente alla categoria di misurazione alla tensione o alla corrente specificate Non modificare mai la f...

Страница 117: ...ttere le dita dietro la protezione per le dita della sonda Durante la misurazione collegare prima la linea zero neutra terra quindi collegare il filo sotto tensione al termine della misurazione scolle...

Страница 118: ...o DC Attenzione importanti informazioni sulla sicurezza Terra Fusibile Apparecchiature con doppio isolamento protezione rinforzata Batteria scarica Il prodotto conforme a tutte le direttive europee p...

Страница 119: ...per testare e misurare circuiti collegati alla parte di distribuzione di dispositivi di alimentazione a bassa tensione negli edifici Descrizione del prodotto Descrizione del quadro strumenti 1 Sonda...

Страница 120: ...o spegnimento automatico premere un pulsante qualsiasi per riaccendere il dispositivo Se si preme il tasto FUNC pulsante e accendere il dispositivo la funzione di spegnimento automatico sar disabilita...

Страница 121: ...e Dopo 10 secondi la retroilluminazione si spegne automaticamente Torcia elettrica Premere FUNC per pi di 2 secondi per accendere la torcia spegnere la torcia Operazione di misurazione Collegare le so...

Страница 122: ...presa COM 3 Quando si ha a che fare con un intervallo di tensione sconosciuto iniziare sempre con un intervallo di misurazione superiore quindi passare a un intervallo inferiore se applicabile 4 Coll...

Страница 123: ...razione della corrente Ci potrebbe provocare scosse elettriche per l utente e danneggiare il dispositivo Prestare particolare attenzione alla sicurezza quando si misura l alta tensione per evitare sco...

Страница 124: ...sempre con un intervallo di misurazione superiore quindi passare a un intervallo inferiore se applicabile 3 Inserire la sonda rossa nella presa 10A corrente 600mA o nel Presa corrente 600 mA a seconda...

Страница 125: ...ata 5A la misurazione continua non deve superare i 10 secondi Successivamente scollegare il dispositivo dal circuito di misurazione e non utilizzare il multimetro per 10 minuti Al termine della misura...

Страница 126: ...llo schermo 5 Quando si misurano resistori di grandi dimensioni 1 M W possono essere necessari alcuni secondi per stabilizzare il risultato della misurazione Se lo schermo mostra OL il campo di misura...

Страница 127: ...dispositivo diventer verde Inoltre la resistenza verr visualizzata sullo schermo L indicatore LED diventer rosso se la resistenza compresa tra 30 W e 50 W Se lo schermo mostra OL l intervallo di misur...

Страница 128: ...a punta della sonda nera con il catodo 4 Il risultato della misurazione viene visualizzato sullo schermo 5 Se lo schermo mostra OL il diodo di misurazione in senso inverso o difettoso AVVERTIMENTO Qua...

Страница 129: ...acustici a ritmo lento 4 Quando lo strumento rileva forti segnali CA l indicatore si illumina in rosso mentre il cicalino emette segnali acustici ad alta velocit AVVERTIMENTO Nonmisurare tensioni sup...

Страница 130: ...sonda rossa nel e inserire la sonda nera nella presa COM 3 Collegare la punta della sonda rossa con il polo positivo e la punta della sonda nera con il polo negativo della batteria 4 Il risultato del...

Страница 131: ...so e terra 600V Protezione dei fusibili mA F200mA 250V fusibili 10A F10A 250V fusibili Frequenza di campionamento circa 3 volte secondo Display lettura 2000 conteggi Mostra automaticamente il simbolo...

Страница 132: ...ne continua Gamma Risoluzione Precisione 200mV 0 1mV 0 5 lettura 3 2V 0 001V 20V 0 01V 200V 0 1V 600V 1V Impedenza di ingresso 10M Tensione di ingresso massima 600V Protezione da sovraccarico 600V Ten...

Страница 133: ...i misura una corrente elevata la misurazione continua non deve superare i 10 secondi Corrente alternata Gamma Risoluzione Precisione 200mA 0 1mA 1 5 lettura 3 10A 0 01A Protezione da sovraccarico A mA...

Страница 134: ...est di continuit Funzione La tensione CC inversa di circa 0 5V Protezione da sovraccarico 250 V Se la resistenza 30 il cicalino suoner e la spia luminosa sar verde Quando la resistenza 30 e 60 il cica...

Страница 135: ...rova Altrimenti potrebbe esserci il pericolo di danneggiare il dispositivo o lesioni personali Assicurarsi che dopo la pulizia il dispositivo sia asciutto e che non vi sia umidit Sostituzione della ba...

Страница 136: ...insieme secondo le istruzioni Sostituzione del fusibile 1 Spegnere l alimentazione dello strumento e rimuovere le sonde dalle prese di ingresso 2 Utilizzare un cacciavite per svitare le viti che fiss...

Страница 137: ...fiuti Non consentito smaltire questo dispositivo nei rifiuti domestici Questo multimetro corrisponde alla direttiva UE relativa ai Rifiuti di apparecchiature elettriche ed elettroniche Smaltire il dis...

Страница 138: ...ore Nome della ditta P C Schwick GmbH Indirizzo Pohlhauser Stra e 9 42929 Wermelskirchen Germania Email info schwick de Internet www schwick de WEEE No DE 73586423 Tribunale distrettuale locale Remsch...

Страница 139: ...139...

Отзывы: