background image


13 

to incorrect readings and costly errors.  Therefore, in an effort to prevent the common mistakes associated with 
customer-performed  calibration,  this  document  includes  a  broad  overview  of  the  Back-to-Back  Calibration 
technique.    This  technique  provides  a  quick  and  easy  method  for  determining  the  sensitivity  of  a  test 
accelerometer over a wide frequency range.   


6.1.2  BACK-TO-BACK CALIBRATION THEORY 

Back-to-Back  Calibration  is  perhaps  the  most  common  method  for  determining the sensitivity of piezoelectric 
accelerometers.  This method relies on a simple comparison to a previously calibrated accelerometer, typically 
referred to as a reference standard.   


Figure 1.

 Reference Standard Accelerometer 

 
These high-accuracy devices, which are directly traceable to a recognized standards laboratory, are designed 
for  stability,  as  well  as  configured  to  accept  a  test  accelerometer.    By  mounting  a  test  accelerometer  to  the 
reference standard and then connecting this combination to a suitable vibration source, it is possible to vibrate 
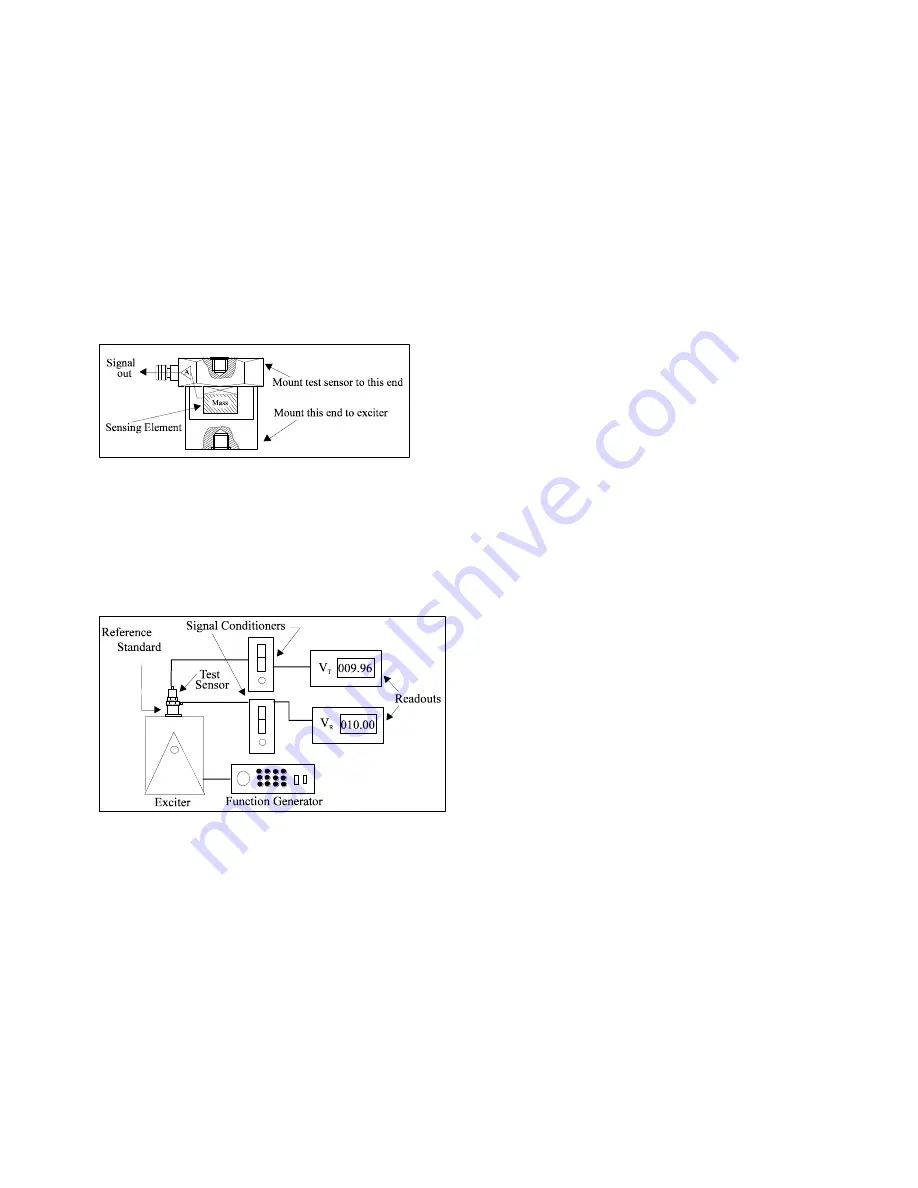
both  devices  and  compare  the  data  as  shown  in  Figure  2.    (Test  set-ups  may  be  automated  and  vary, 
depending on the type and number of accelerometers being calibrated.) 


Figure 2.

 Typical Back-to-Back Calibration System 

 
Because the acceleration is the same on both sensors, the ratio of their outputs (V

T

/V

R

) must also be the ratio 

of their sensitivities.  With the sensitivity of the reference standard (S

R

) known, the exact sensitivity of the test 

sensor (S

T

) is easily calculated by using the following equation: 


S

= S

R

 (V

T

/V

R

 
By  varying  the  frequency  of  the  vibration,  the  sensor  may  be  calibrated  over  its  entire  operating  frequency 
range.  The typical response of an unfiltered accelerometer is shown in Figure 3. 

Содержание EX619A11

Страница 1: ...elerometer Installation and Operating Manual For assistance with the operation of this product contact PCB Piezotronics Inc Toll free 800 828 8840 24 hour SensorLine 716 684 0001 Fax 716 684 0987 E ma...

Страница 2: ...repair User servicing or repair is not recommended and if attempted may void the factory warranty Calibration Routine calibration of sensors and associated instrumentation is recommended as this helps...

Страница 3: ...ry customer service representative Warranty All equipment and repair services provided by PCB Piezotronics Inc are covered by a limited warranty against defective material and workmanship for a period...

Страница 4: ...isclosure Table Pb Hg Cd Cr VI PBB PBDE O O O O O O PCB X O O O O O O O O O O O X O O O O O O O O O O O O O O O O O O O O O O O O O X O O O O O O O O O X O O O O O O O O O O O X O O O O O X O O O O O...

Страница 5: ...e O O X O O O Wires O O O O O O Cables X O O O O O Plastic O O O O O O Solder X O O O O O Copper Alloy Brass X O O O O O This table is prepared in accordance with the provisions of SJ T 11364 O Indica...

Страница 6: ...ODE ACCELEROMETERS SPECIFICATION SHEET INSTALLATION DRAWING AND CALIBRATION INFORMATION ENCLOSED PCB ASSUMES NO RESPONSIBILITY FOR DAMAGE CAUSED TO THIS PRODUCT AS A RESULT OF PROCEDURES THAT ARE INCO...

Страница 7: ...Line Differential Charge Amplifier 4 3 INSTALLATION OVERVIEW 5 3 1 Equipment Inspection 5 3 2 Polarity Test 5 3 3 Sensor Location 5 3 4 Mounting Sensor 5 3 5 Route Mineral Insulated Hardline Cable 6...

Страница 8: ...prior to being analyzed by a readout or recording device The absence of built in electronics permits operation to elevated temperatures of 500 F 260 C for most models or up to 1300 F 700 C for specia...

Страница 9: ...high temperature 500 F charge mode applications use mineral insulated MI hardline Keep cable clean to maintain insulation resistance and good low frequency response 2 4 Hardline Connection Type 2 4 1...

Страница 10: ...goes negative the wiring is reversed contact PCB for technical support FIGURE 1 3 3 Sensor Location Characteristics like location ruggedness amplitude range accessibility temperature and portability...

Страница 11: ...act surface Figure 2 Mounting Surface Preparation STEP 3 Wipe the mounting surface clean prior to installation STEP 4 Place the sensor on the mounting surface and attach with mounting bolts and tighte...

Страница 12: ...um Bending Radius Total d r 1 0 125 3 2 mm 0 60 16 mm 20 0 125 3 2 mm 2 0 50 mm 3 5 3 Clamp Cable To minimize triboelectric motion induced noise from the cable interfering with the sensors high impeda...

Страница 13: ...each element is connected allow a few minutes for the system to thermally stabilize Place the switch on the charge amplifier in the OPERATE position and proceed with the measurement It is often conve...

Страница 14: ...f a typical direct coupled charge amplifier where Rf Feedback resistor ohms Ri Input leakage resistance ohms Eo Steady state output voltage volts ei Offset voltage FET leakage volts Cf Feedback capaci...

Страница 15: ...en the offending sensor or low impedance hardline and the input Figure 5 2 Piezoelectric System Block Diagram Figure 5 2 illustrates a block diagram of the piezo electric system where Ct Shunt capacit...

Страница 16: ...s i o C R 16 f To avoid compromise of the low frequency response established by the charge amplifier parameters and illustrated by Equation 2 the product of RiCs should be several orders of magnitude...

Страница 17: ...rating range may temporarily or permanently affect the sensor This change manifests itself in a variety of ways including a shift of the sensor resonance due to a cracked crystal or a temporary loss o...

Страница 18: ...ognized standards laboratory are designed for stability as well as configured to accept a test accelerometer By mounting a test accelerometer to the reference standard and then connecting this combina...

Страница 19: ...are stress relieved by first routing them to the shaker head securing them with tape or cable ties then routing them to a nearby stationary location This reduces cable motion which is especially impor...

Страница 20: ...tuds Figure 5 Stud Mounting Understand Back to Back Calibration limitations Do not expect the uncertainty of calibration to be any better than 2 In fact the uncertainty may be as high as 3 or 4 for fr...

Страница 21: ...x 41 4 mm x 41 4 mm Weight with cable 19 4 oz 550 gm 1 Electrical Connector 2 Pin MIL C 5015 2 Pin MIL C 5015 Electrical Connection Position Side Side Cable Length 7 ft 2 1 m Cable Type MI Hardline C...

Страница 22: ...EROMETER DECIMALS XX 03 XXX 010 DECIMALS X 0 8 XX 0 25 BB 9 30 15 ECB 9 30 15 JJD 9 30 15 bbehringer 16 19 9 30 2015 59256 PCB Piezotronics Inc claims proprietary rights in the information disclosed h...

Страница 23: ...DWG 62689 REV NR DIN 44641...

Страница 24: ...DWG 62689 REV NR DIN 44641...

Страница 25: ...DWG 62689 REV NR DIN 44641...

Страница 26: ...DWG 62690 REV NR DIN 44641...

Страница 27: ...DWG 62690 REV NR DIN 44641...

Страница 28: ...DWG 62690 REV NR DIN 44641...

Страница 29: ...44641 SCHEDULE DRAWING NO MODIFICATIONS PERMITTED WITHOUT REFERENCE TO THE NOTIFIED BODY Ci AND Li BASED ON CABLE WITH 20 pF ft AND 3 H ft WITH A MAXIMUM CABLE LENGTH OF 100ft Ci AND Li WILL BE DECREA...

Страница 30: ...ER SHALL INSURE THAT THE TRANSDUCER MOUNTING STRUCTURE IS AT THE SAME GROUNDING POTENTIAL AS THE BARRIER GROUND TOTAL EARTH LOOP IMPEDANCE SHALL BE LESS THAN ONE OHM ENTITY PARAMETERS Ui 30 V Ii 130 m...

Страница 31: ...nly Zafar Iqbal Issued by Zafar Iqbal PRODUCTS CLASS 2258 03 PROCESS CONTROL EQUIPMENT Intrinsically Safe and Non Incendive Systems For Hazardous Locations CLASS 2258 83 PROCESS CONTROL EQUIPMENT Intr...

Страница 32: ...ng to Article 501 16 of the NEC CLASS2258 04 PROCESS CONTROL EQUIPMENT Intrinsically Safe Entity For Hazardous Locations CLASS2258 84 PROCESS CONTROL EQUIPMENT Intrinsically Safe Entity For Hazardous...

Страница 33: ...must be bonded to ground according to Section 18 182 of the CEC Part 1 For US Installations sensor case must be bonded to ground according to Article 501 16 of the NEC APPLICABLE REQUIREMENTS CAN CSA...

Страница 34: ...and III Division 1 Hazardous Locations FM Std No 3600 1998 Electrical Equipment for Use in Hazardous Classified Locations General Requirements ANSI ISA 12 12 01 2012 Nonincendive Electrical Equipment...

Страница 35: ...are eligible to be marked in accordance with the referenced Certificate Product Certification History Project Date Description 70028914 Sep 23 2015 New CSA C US certification for model EX619XYY MNNNZ...

Отзывы: