5
ELECTRICAL SHOCK, UNIT DAMAGE HAZARD
Failure to follow this caution may result in personal injury or
furnace component damage.
Label all wires prior to disconnection when servicing controls.
Wiring errors can cause improper and dangerous operation.
CAUTION
!
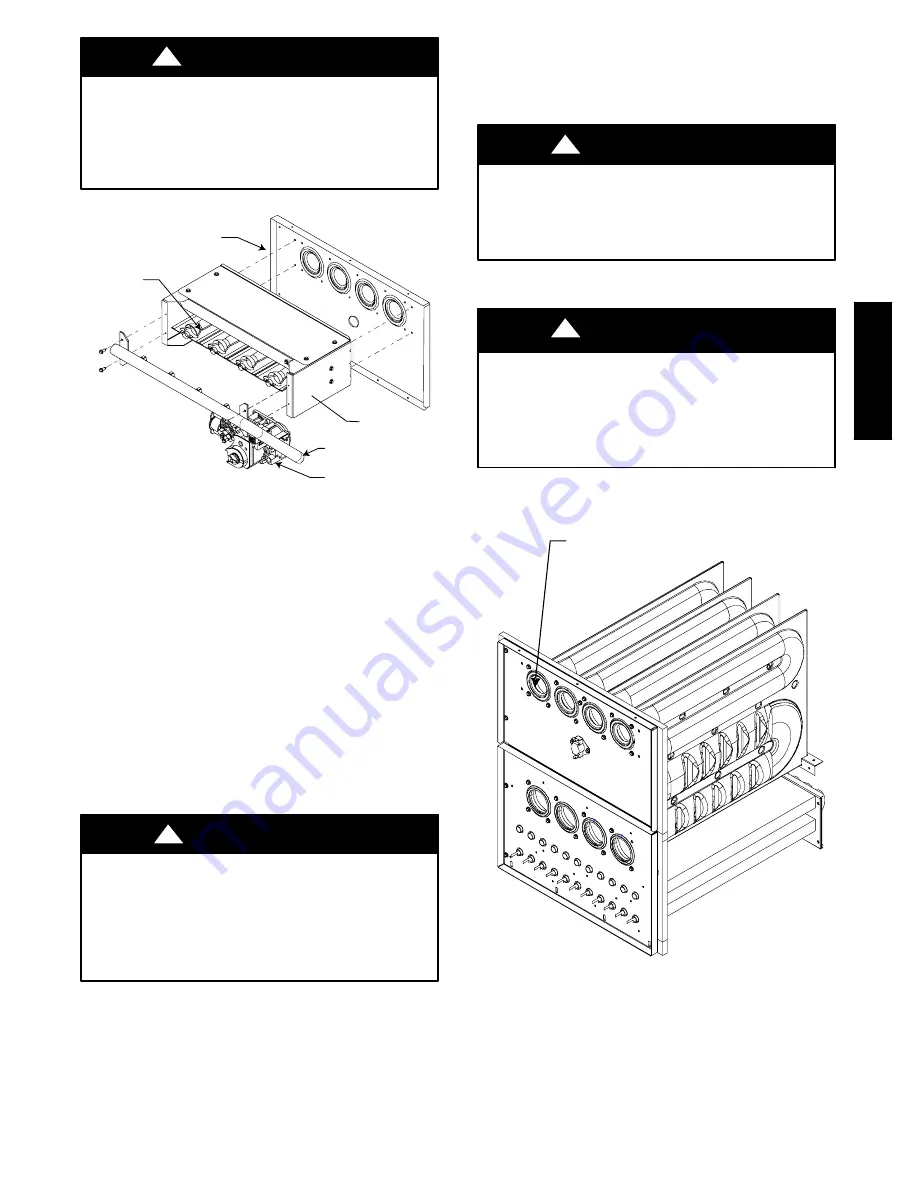
CELL PANEL
BURNERS
BURNER BOX
MANIFOLD
GAS VALVE
A07826
Fig. 4 -- Burner Box Assembly
4. Remove wires from gas valve. Note location for reassembly.
5. Unplug igniter from harness.
6. Remove screws that secure manifold to burner box.
(See Fig. 4.)
NOTE
: Do not remove burner box from cell panel.
7. Remove manifold, orifices, and gas valve as 1 assembly.
8. Remove screws attaching burner assembly in burner box.
NOTE
: Use care when removing and reinstalling burners not to
strike the hot surface igniter.
9. Remove burner assembly from burner box.
NOTE
: All burners are attached to burner bracket and can be
removed as 1 assembly.
10. Clean burners with soft brush and vacuum.
11. Reinstall manifold, orifice, and gas valve assembly in
burner box. Ensure burners fit over orifices.
ELECTRICAL SHOCK HAZARD
Failure to follow this warning could result in personal injury
or death.
Igniter wires must be securely placed in slot in manifold
grommet or else they could become pinched or severed and
electrically shorted.
!
WARNING
12. Reconnect wires to gas valve and igniter. Refer to furnace
wiring diagram for proper wire location.
13. Reinstall gas supply pipe to furnace gas control valve using
backup wrench on gas valve to prevent rotation and
improper orientation.
NOTE
: Use propane gas resistant pipe dope to prevent gas leaks.
DO NOT use Teflon tape.
FIRE, EXPLOSION, UNIT DAMAGE HAZARD
Failure to follow this warning could result in property damage,
personal injury, or death.
Gas valve switch MUST be facing forward or tilted upward.
!
WARNING
14. Turn on gas and electrical supplies to furnace.
FIRE OR EXPLOSION HAZARD
Failure to follow the safety warnings could result in personal
injury, death, or property damage.
Never test for gas leaks with an open flame. Use a
commercially available soap solution made specifically for the
detection of leaks to check all connections.
!
WARNING
15. Check for gas leaks.
16. Replace main furnace door.
PRIMARY HX
INLET OPENINGS
A07827
Fig. 5 -- Cleaning Inlet Openings of Primary Heat Exchangers
PG
9M
TA
V
Содержание PG9MTAV
Страница 6: ...6 A07706 Fig 6 Upload Installations Top Vent PG9MTAV ...
Страница 7: ...7 A07707 A07707 Fig 7 Upload Installations Vent Through Left Side PG9MTAV ...
Страница 8: ...8 A07708 Fig 8 All Models Vent Through Right Side PG9MTAV ...
Страница 9: ...9 A07829 Fig 9 Downflow Left Side Vent and Trap PG9MTAV ...
Страница 10: ...10 A07830 Fig 10 Downflow Right Side Vent and Trap PG9MTAV ...
Страница 11: ...11 A07709 Fig 11 Horizontal Left Through Top PG9MTAV ...
Страница 12: ...12 A07710 Fig 12 Horizontal Left Side Vent PG9MTAV ...
Страница 13: ...13 A07711 Fig 13 Horizontal Right Through Top PG9MTAV ...
Страница 14: ...14 A07712 Fig 14 Horizontal Right Side Vent PG9MTAV ...
Страница 20: ...20 A07822 Fig 20 Wiring Diagram PG9MTAV ...
Страница 21: ...21 A07825 Fig 21 Service Label PG9MTAV ...


