background image

7


Loading Labels for the Optional Peel Mode 

Peel mode (on-demand) must be purchased separately.  In peel mode, the printer 
separates the backing paper from the label.  The next label is not printed until the 
completed one is removed from the printer.  Make sure the printer is configured for 
on-demand mode and the correct supply type is installed.  The minimum feed 
length is 1.5 inches for peel mode.  Hold the leading edge of peeled labels when 
printing labels longer than six inches.  You must use non-perforated supplies for 
peel mode.  Follow the steps for loading supplies from the previous section.  Then, 
follow these steps after you close the printhead. 

1.  

Remove the labels from the first 10 inches of the backing paper. 

2.  

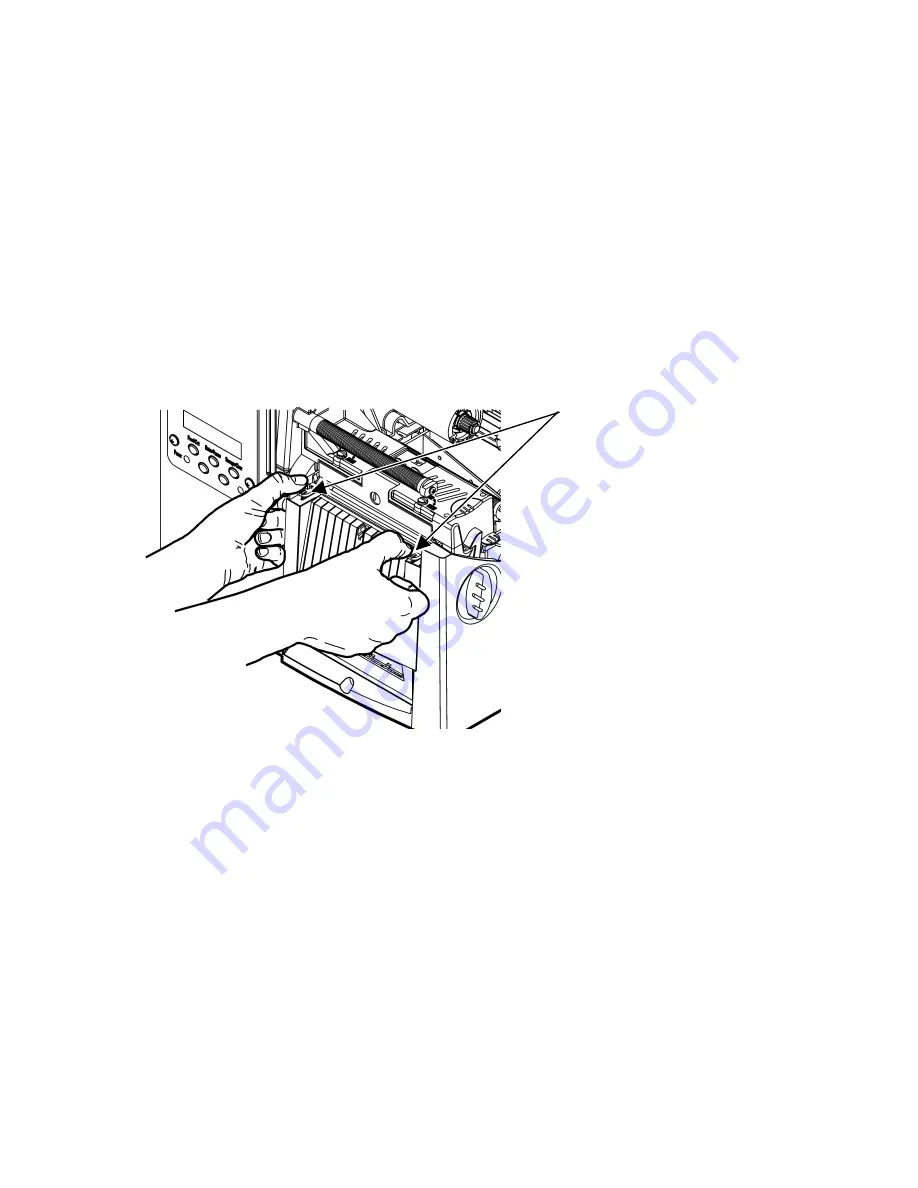
Press down on the exit cover tabs to open the exit cover on the front of the 
printer. 

3.  

Feed the backing paper over the peel bar. 

E x i t  C o ve r   T a b s  

Содержание Monarch 9855 RFID

Страница 1: ...Quick Reference Quick Reference Monarch 9855 RFID Printer TC9855RFIDQR Rev AN 4 08 2007 Paxar Americas Inc a subsidiary of Avery Dennison Corp All rights reserved ...

Страница 2: ...n a residential area is likely to cause harmful interference in which case the user will be required to correct the interference at his own expense CANADIAN D O C WARNING This digital apparatus does not exceed the Class A limits for radio noise emissions from digital apparatus set out in the Radio Interference Regulations of the Canadian Department of Communications Le présent appareil numérique n...

Страница 3: ...lable on the Monarch 9855 printer using die cut or black mark supplies Linerless supplies are not currently supported The RFID printer is also capable of printing standard non RFID supplies For more information about supplies see RFID Supply Specifications The UHF printer supports multi protocol encoding including Class 1 Generation 1 C1Gen1 Class 1 Generation 2 C1Gen2 and EM4122 supplies The HF p...

Страница 4: ... no operator settings required 1 Plug the power cable into the socket Plug the other end of the cable into a grounded electrical outlet 2 Connect the communication cable into the appropriate port Secure the cable with the connecting screws serial or spring clips parallel If you are communicating with the host through the serial port make sure the printer s communication values match those at the h...

Страница 5: ... print job and prints a label with error information that is useful to your System Administrator if an error is displayed When the printer is offline changes the displayed value by one or ten Enter Pause Pauses the current print job or resumes a paused print job Selects the displayed menu item Escape Clear When an error is present clears the error When a job batch is printing cancels the print job...

Страница 6: ... 9855 Operator s Handbook for additional supply loading instructions if using non RFID supplies in your RFID printer 1 Open the cover 2 Unlock the printhead by turning the retaining latch 3 Lift the printhead assembly using the printhead tab until the assembly locks into place 4 Place the roll of supply on the supply holder For labels the supply unrolls from the top or the bottom Do not pick up th...

Страница 7: ...extend past the front of the printer Tuck the supply under the nibs and in between the die cut sensor Do not feed supply between the supply roller and deflector For fan fold supplies lay the label strip over the supply holder and across the supply guide so that a few inches extend past the front of the printer Tuck the supply under the nibs and in between the die cut sensor 8 For tag supplies usin...

Страница 8: ...ck the supply guides into place 10 Hold the printhead assembly by the printhead tab while pressing down on the printhead release 11 Close the printhead by pressing down on the thumb well until you hear it click into place 12 Press Feed Cut several times to feed at least three labels tags to properly position the supply and the ribbon Thumb Well ...

Страница 9: ...is installed The minimum feed length is 1 5 inches for peel mode Hold the leading edge of peeled labels when printing labels longer than six inches You must use non perforated supplies for peel mode Follow the steps for loading supplies from the previous section Then follow these steps after you close the printhead 1 Remove the labels from the first 10 inches of the backing paper 2 Press down on t...

Страница 10: ... narrow knobs according to the width of your supply For supply that is more than two inches adjust the knobs to the wide setting For supply that is two inches or less adjust the knobs to the narrow setting You must adjust both of the knobs to the same position If you experience ribbon smudging in cold dry environments adjust the wide narrow knobs to the wide setting For wide supplies push down and...

Страница 11: ...roll Note Make sure the Monarch This End Out writing is facing out The ribbon roll only fits on the reel one way 8 Carefully feed the ribbon under both ribbon rollers and printhead 9 Align the ribbon and make sure it is straight and centered throughout the path 10 Tape the ribbon to the take up core Do not tape the ribbon to the take up reel 11 Rotate the take up core until the leader is past the ...

Страница 12: ...re the printer is connected and ready to receive data When you turn on the RFID printer Monarch Initializing flashes briefly and then you see Print Mode Ready If an error occurs while the printer is initializing the error message flashes briefly on the display and then you see Print Mode Ready The printer displays Not available when you try to select the RFID menus if the module is inoperative The...

Страница 13: ...ile programming the RFID tag 3 Remove the printed labels If the printer will be unused for extended periods of time we recommend leaving the printhead unlatched Menu Changes Some changes were made to the menu structure for RFID These menus should only be accessed by your System Administrator Refer to the RFIDMP Multi Protocol Application Notes or the HF High Frequency Application Notes available o...

Страница 14: ...vice charge Note You must clean the printhead as described below to maintain printhead life The rate and frequency at which you print determines how often you must clean the printer You may need to clean the printhead sensor and platen roller if there is any adhesive build up in the supply path after printing approximately three rolls of thermal transfer thermal direct supplies or after each ribbo...

Страница 15: ...clean all the way around After cleaning feed several inches of supply through without printing to remove any remaining isopropyl alcohol 5 Rub the cotton swab moistened with isopropyl alcohol across the peel bar and remove any build up 6 Moisten another cotton swab with isopropyl alcohol Rub the cotton swab across the printhead and remove any build up You may need to use a printhead CLEAN STRIP if...

Страница 16: ...cted format and batch packet Does not feed Set wide narrow knobs correctly Partially printed data Clean the printhead Send a corrected format packet Printing shadows or smears Clean the printhead Change supply Check ribbon Light Printing Change supply Adjust the print contrast Check wide narrow knobs Check ribbon Heavy Printing Clean the printhead Change supply Adjust the print contrast Check wide...

Страница 17: ... Data type in the RFID Data Field must be 0 1 2 or 3 See your System Administrator for more information 053 The starting block in the RFID Data Field is invalid 101 Format referenced by batch not in memory 226 Rule Record Line xx Upload device must be H Host for Option 6 228 Memory class identifier is invalid The identifier must be A AFI D DSFID or E EAS for Option 64 For more information refer to...

Страница 18: ...also occurs when there is an error in the Expanded C1Gen2 fields Check with your System Administrator about your format 740 Command hardware inventory or memory allocation error There may be an RFID hardware or memory allocation error 741 RFID tag missing Tag not found in RF Field The RFID tag was not found in the RF Field area inside the printer where RFID tag is programmed Check supply loading I...

Страница 19: ... expected Press Escape Clear and try to continue printing Change supply 752 Printer sensed a mark in the wrong place 753 Printer sensed a mark that is too long 754 Check for a ribbon jam or remove any slack in the ribbon by turning the take up reel clockwise Load a new ribbon 755 Printhead is open Close the printhead 756 Load supplies 757 Load supplies supply length mismatch Press Feed Cut 758 Eit...

Страница 20: ...4 inches 1012 mm wide 203 dpi 8 0 dots per mm Optional 300 dpi 11 8 dots per mm Speed 2 5 4 0 6 0 8 0 and 10 0 ips inches per second 12 0 ips 305 mm printing is an option that must be purchased separately 2 5 is the default for serial bar codes Note The RFID printer pauses while programming the RFID tag Operating Temperatures Direct 40 F to 104 F 4 C to 40 C Transfer 40 F to 95 F 4 C to 35 C Stora...

Страница 21: ...depends on the inlay selected Roll Inside Diameter 4 0 inches 102 mm Roll Outside Diameter 8 0 inches 203 mm maximum Ribbon Width 4 3 inches 110 mm for 4 0 inch 102 mm supply Ribbon Length 23 600 inches 600 meters Additional RFID supplies may be available by request Contact your RFID Representative for more information Tag Cut Dimensions Use these specifications for the 926 Knife with the RFMP pri...

Страница 22: ...uency range in accordance with FCC Rules and Regulations The HF radio operates at 13 56 MHz in accordance with FCC Rules and Regulations Additional frequencies may be available for international locations by request Contact your RFID Representative for more information ...

Страница 23: ......

Страница 24: ......

Отзывы: