background image

5-4

  Care and Maintenance


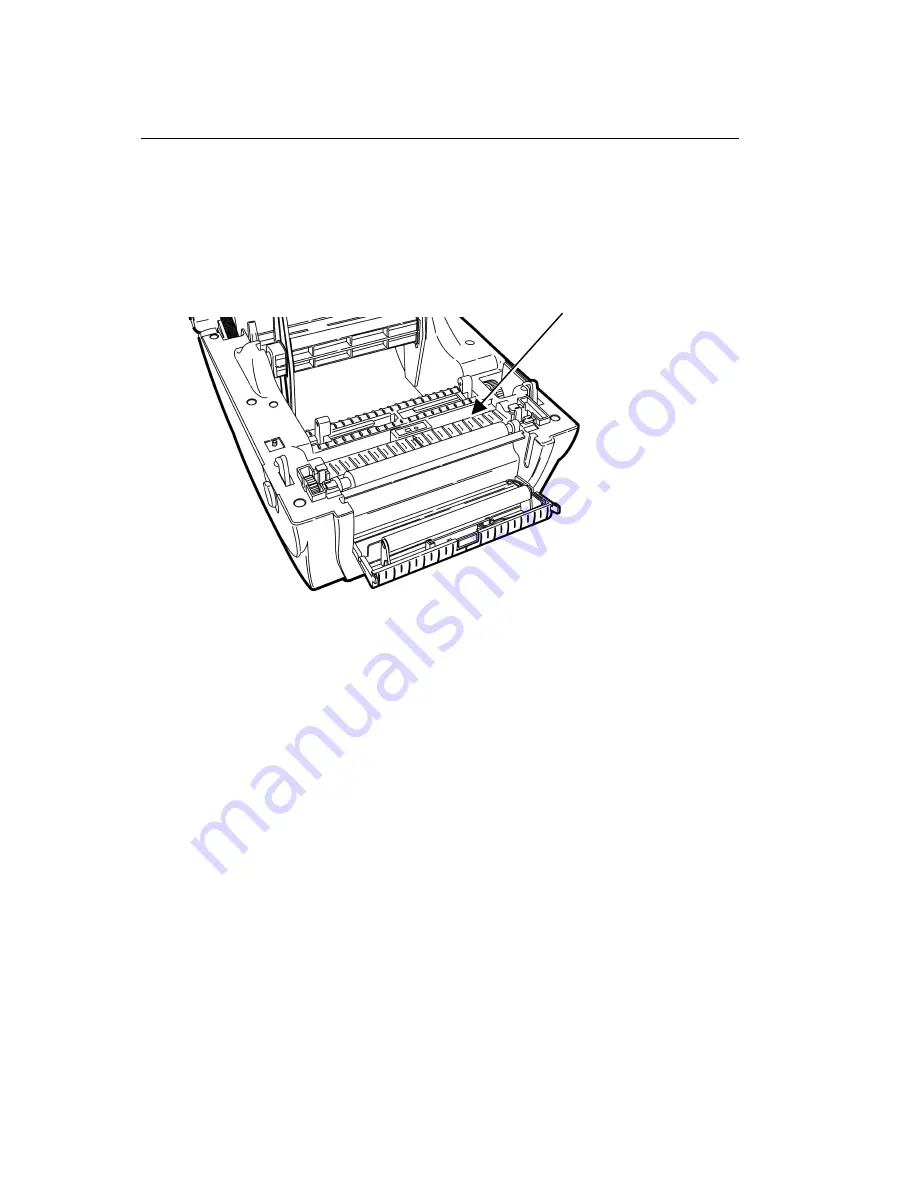
C l e a n i n g   t h e   P l a t e n   R o l l e r   a n d   P r i n t e r  

Moisten a cotton swab with isopropyl alcohol and 

run the cotton swab across the platen roller.  Turn 

the platen roller with your finger and make sure it 

is clean all the way around. 

NOTE: 

Do Not remove the platen roller. 


♦ 

Slightly dampen a cloth with water and wipe the 
exterior surfaces clean. 

♦ 

Use a dry, soft-bristled brush to clean paper dust 
out of the interior. 

Platen Roller

Содержание 9416LX

Страница 1: ...diary of Avery Dennison Corp All rights reserved Equipment Manual Equipment Manual 23456 78901 Fishing Tackle 40 00 23456 78901 Fishing Tackle 40 00 23456 78901 Fishing Tackle 40 00 23456 78901 Fishing Tackle 40 00 Monarch 9416 XL Thermal Transfer Printer ...

Страница 2: ... if not installed and used in accordance with the instruction manual may cause harmful interference to radio communications Operation of this equipment in a residential area is likely to cause harmful interference in which case the user will be required to correct the interference at his own expense CANADIAN D O C WARNING This digital apparatus does not exceed the Class A limits for radio noise em...

Страница 3: ...nication Cable 1 4 USB Port 1 5 Reading the Indicator Light 1 6 Loading A Ribbon 2 1 Replacing a Ribbon 2 6 Loading Supplies 3 1 Loading Supply for Non Peel Mode 3 1 Loading Labels for Peel Mode 3 7 Loading Fan Fold Supplies 3 13 Calibrating the Supply 3 15 Adjusting the Black Mark Die Cut Sensor 3 16 Printing 4 1 Care and Maintenance 5 1 Clearing Supply Jams 5 1 Cleaning the Printhead 5 2 Cleanin...

Страница 4: ...ting 6 1 Printing Problems and Solutions 6 1 Printing Test Labels 6 4 Calibrating the Supply 6 5 Specifications and Accessories A 1 Printer Specifications A 1 Supply Specifications A 2 Ribbon Specifications A 2 Printer Accessories A 2 ...

Страница 5: ...ion cable reading the indicator light Audience This Equipment Manual is for the person who prints and applies labels Ordering the Packet Reference Manual The printer uses Monarch Printer Control Language II MPCL II to create labels for printing The Packet Reference Manual available on our Web site www monarch com describes how to create format and batch packets for printing labels how to configure...

Страница 6: ...ckaging material in case you need to move or return the printer Connecting the Power Supply CAUTION Do Not touch the electrical connectors while setting up the printer Electrostatic discharge can damage or destroy the printhead or electronic components To connect the power supply 1 Place the printer in a location that allows easy access to the front of the printer The printer should never be opera...

Страница 7: ... three pronged outlet in the power supply 5 Plug the round end of the power supply cable labeled printer into the socket at the back of the printer 6 Plug the three pronged end of the AC adapter cable into a grounded electrical outlet WARNING The printer and power supply should never be operated in a location where either one can get wet Personal injury could result ...

Страница 8: ...ter and the host set the communication values on the printer to match those at the host only required if you are using the serial port For parallel communication 1 Turn off the printer before connecting the cable 2 Connect a parallel printer cable from the host to the parallel port at the back of the printer 3 Secure the cable with the spring clips Parallel Port ...

Страница 9: ...ure the cable with the connecting screws The factory defaults are 9600 Baud no parity 8 bit data frame 1 stop bit and DTR flow control 96 N 8 1 DTR To set communication values refer to the Packet Reference Manual USB Port The printer has a USB Universal Serial Bus Version 1 1 communication port Drivers are available on our Web site for a variety of operating systems USB Port 9 pin Serial Port ...

Страница 10: ... Printer is paused Press the FEED button to resume printing FLASHING RED Printer error condition See Chapter 6 Troubleshooting for error conditions and solutions ORANGE The system is detecting the supply and ribbon status No light Printer is off Make sure the power supply is connected properly See Connecting the Power Supply earlier in this chapter Feed Button Indicator Light ...

Страница 11: ... for Supplies printing Thermal Transfer require a ribbon for printing Supplies If you are using thermal direct supplies do not load a ribbon See Chapter 3 Loading Supplies for more information The printer automatically detects if a ribbon is installed when you turn on the printer and switches to thermal transfer printing mode Make sure the ribbon window and the supply door are closed when you turn...

Страница 12: ... 1 Push down on the ribbon window to unlock it and raise the window 2 The ribbon take up core should already be on the take up reel Attach the take up core to the front hub as shown Ribbon Window Take up Core Take up Reel Back Hub Front Hub ...

Страница 13: ...A Ribbon 2 3 3 Open a package of new ribbon taking care not to wrinkle or crush the ribbon 4 Slide the ribbon onto the ribbon reel as far as it will go Ribbon on Ribbon Reel Ribbon Leader Back Hub Take up Core ...

Страница 14: ... the supply door 8 Lift open the supply door The supply door support at the right hand rear of the printer holds the supply door open 9 Feed the end of the ribbon under the printhead and around the take up core 10 Stick the leading edge of the ribbon onto the take up core 11 Rotate the take up core until the ribbon leader is firmly wrapped around the take up core and the black portion of the ribbo...

Страница 15: ...lling the bottom of the supply door support forward towards the front of the printer Close the supply door slowly and make sure it latches securely If you do not latch the supply door completely poor print quality may result 13 Press the ribbon window down firmly until it locks into place ...

Страница 16: ...e and discard the used ribbon and take up core Save the ribbon reel located inside the take up core before discarding 3 Remove the ribbon reel with core from the back hub and place it on the front hub 4 Follow the steps from the previous section to finishing loading the ribbon Ribbon Window Take up Core Take up Reel Back Hub Front Hub ...

Страница 17: ...es in the printer to print in non peel continuous mode Make sure the black mark die cut sensor is set correctly for your supply type See Adjusting the Black Mark Die Cut Sensor for more information If you run out of supply while printing do not turn off the printer when reloading the supply You may lose your data The printer resumes printing when reloaded 1 Remove and discard the tape from a new r...

Страница 18: ... levers located on both sides of the printer towards the front of the printer to release the supply door 3 Lift open the supply door The supply door support at the right hand rear of the printer holds the supply door open Supply Door Support ...

Страница 19: ... supply onto the supply holder If the core diameter on your roll of supply is 1 inch in diameter remove the 1 5 inch supply core adapters from the supply guide holders 6 Slide the supply holder guide back onto the end of the supply holder If you are using the supply core adapters for 1 5 inch core supply make sure to push the supply core adapters into the ends of the supply Supply Holder Guides Su...

Страница 20: ... mount IMPORTANT INFORMATION Make sure the plastic line attaching the supply holder to the printer is tucked down out of the way of the supply holder and supply holder guides Otherwise the plastic line may wrap around the supply holder or get caught on the supply holder guides Supply Roll Mount ...

Страница 21: ...pplies 3 5 8 Slide the supply guides to their widest position 9 Feed the supply printing side up under the white roller under the supply guides and over the platen roller Supply Guides White Roller Platen Roller ...

Страница 22: ...ply door slightly and pulling the bottom of the supply door support forward towards the front of the printer Close the supply door slowly and make sure it latches securely If you do not latch the supply door completely poor print quality may result 13 Press the FEED button The indicator light should be GREEN 14 Calibrate the supply if necessary See Calibrating the Supply for more information ...

Страница 23: ...bels when printing on supply longer than six inches 1 Remove and discard the tape from a new roll of supply Unwrap and discard supply with any glue residue 2 Press the release levers located on both sides of the printer towards the front of the printer to release the supply door 3 Lift open the supply door The supply door support at the right hand rear of the printer holds the supply door open Sup...

Страница 24: ...and the peel bar 5 Remove the supply holder guide from one end of the supply holder The supply holder is normally attached with a line to the inside of the printer not free standing as shown below Do not cut the line Peel Door Peel Bar Peel Roller Supply Holder Guides Supply Holder 1 5 inch Supply Core Adapter ...

Страница 25: ...ing the supply core adapters for 1 5 inch core supply make sure to push the supply core adapters into the ends of the supply 8 Insert the ends of the supply holder into the slots in the supply roll mount IMPORTANT INFORMATION Make sure the plastic line attaching the supply holder to the printer is tucked down out of the way of the supply holder and supply holder guides Otherwise the plastic line m...

Страница 26: ...o labels from the backing paper 11 Feed the labels printing side up under the white roller under the supply guides and over the platen roller 12 Press the labels under the supply guides 13 Slide the supply guides so that they barely touch the edges of the backing paper White Roller Platen Roller ...

Страница 27: ... completely closed the supply door does not close properly 16 Close the supply door by lifting the supply door slightly and pulling the bottom of the supply door support forward towards the front of the printer Close the supply door slowly and make sure it latches securely If you do not latch the supply door completely poor print quality may result Peel Roller Peel Door ...

Страница 28: ... separates from the backing paper Remove the peeled label and another one prints NOTE Hold the leading edge of peeled labels when printing on supply longer than six inches 18 Calibrate the supply if necessary See Calibrating the Supply for more information ...

Страница 29: ...pply guides so that they barely touch the edges of the supply 4 Feed the fan fold supplies printing side up into the external supply slot on the back of the printer and through the external supply guides 5 Press the release levers located on each side of the printer towards the front of the printer to release the supply door 6 Lift open the supply door The supply door support at the right hand rea...

Страница 30: ...fold labels under the supply guides 11 Slide the internal supply guides so that they barely touch the edges of the supply 12 Close the supply door by lifting the supply door slightly and pulling the bottom of the supply door support forward towards the front of the printer Close the supply door slowly and make sure it latches securely If you do not latch the supply door completely poor print quali...

Страница 31: ...e turning on the printer 3 To calibrate the supply release the FEED button after the indicator light starts flashing ORANGE The printer calibrates the black mark or die cut sensor measures the label length and prints the test labels To calibrate the ribbon release the FEED button after the printer starts flashing RED The printer calibrates the ribbon sensor 4 To resume normal printing turn off the...

Страница 32: ...pply does not have any black marks For die cut supplies make sure the sensor is in the detented position and the middle of the square lens lines up with the arrow inside the printer For black mark supplies if necessary move the sensor to the left or right depending on where the black marks are on the supplies The black marks on the supply should cover the square lens inside the sensor Sensor set f...

Страница 33: ...ter must match those at the host The printer s default communication values are 9600 Baud no parity 8 bit data frame 1 stop bit and DTR flow control 96 N 8 1 DTR 1 Turn on the printer 2 Download a format and a batch Refer to the Packet Reference Manual for information on downloading print jobs 3 The printer prints the labels either in peel mode or non peel mode 4 Remove the printed labels 4 ...

Страница 34: ...4 2 Printing ...

Страница 35: ...FF position O You should turn off the printer s power before you clear a supply jam If you need to clear a supply jam during a print job you may lose your data when you turn off the printer 2 Press the release levers towards the front of the printer to release the supply door 3 Lift open the supply door The supply door support at the right hand rear of the printer holds the supply door open 4 If n...

Страница 36: ... not latch the supply door completely poor print quality may result 9 Press the FEED button to clear the error The indicator light should be GREEN Cleaning the Printhead Clean the printhead whenever you notice a decline in print quality or after using three rolls of supply You must turn off the printer s power before you clean the printhead If you need to clean the printhead during a print job you...

Страница 37: ... at the right hand rear of the printer holds the supply door open 4 Moisten a cotton swab with isopropyl alcohol 5 Rub the cotton swab across the printhead to remove any build up 6 Allow the printhead to dry for one minute before you close the supply door and resume printing ...

Страница 38: ...the cotton swab across the platen roller Turn the platen roller with your finger and make sure it is clean all the way around NOTE Do Not remove the platen roller Slightly dampen a cloth with water and wipe the exterior surfaces clean Use a dry soft bristled brush to clean paper dust out of the interior Platen Roller ...

Страница 39: ...he printer and the AC outlet See Connecting the Power Supply in Chapter 1 for more information Check the cable connections from the host to the printer Connecting the Communication Cable in Chapter 1 for more information Make sure the ribbon and supply are loaded correctly See Chapter 2 Loading A Ribbon and Chapter 3 Loading Supplies for more information Clean the printhead See Cleaning the Printh...

Страница 40: ...prints the test labels and calibrates the ribbon sensor 5 To resume normal printing turn off the printer wait two seconds then turn it back on Problem with the supply Load different supply See Chapter 3 Loading Supplies for more information Make sure the ribbon is not empty Make sure the black mark die cut sensor is set correctly for your supply type See Adjusting the Black Mark Die Sensor for mor...

Страница 41: ...e print speed darkness contrast Refer to the Packet Reference Manual for more information Supply might be caught in the printer See Clearing Supply Jams in Chapter 5 for more information Make sure the supplies and ribbon are loaded correctly See Chapter 2 Loading Ribbon and Chapter 3 Loading Supplies for more information Supply exits partially out of the printer or skips For thermal transfer print...

Страница 42: ...E The test labels print The first label shows the printer s configuration by packet A F Refer to the Packet Reference Manual available on our Web site for more information The second label shows the model number software version communication settings speed contrast gap sensor setting label length and total number of inches printed 4 To resume normal printing turn off the printer wait two seconds ...

Страница 43: ... after the indicator light starts flashing ORANGE The printer calibrates the black mark or die cut sensor measures the label length and prints the test labels To calibrate the ribbon release the FEED button after the printer starts flashing RED The printer calibrates the ribbon sensor 4 To resume normal printing turn off the printer wait two seconds then turn it back on again ...

Страница 44: ...6 6 Troubleshooting ...

Страница 45: ...eight 7 4 188 mm Width 8 4 213 mm Depth 12 4 315 mm Weight 6 3 lbs 2 9 kg without power supply Shipping Weight 12 lbs 5 4 kg Power AC Input 100 240 V 50 60Hz DC Output 18 24 V Operating Limits Operation 40 to 105 F 4 to 40 C Storage 40 to 140 F 4 to 60 C Relative Humidity 5 90 non condensing Printhead 4 09 104 mm 203 dpi 8 0 dots per mm 300 dpi 11 82 dots per mm Printing Method Thermal Direct and ...

Страница 46: ...ed labels when printing on supply longer than six inches Ribbon Specifications Types Standard Core Diameter Inside 1 0 25 4 mm Outside 1 5 38 mm Width 1 6 41 mm minimum 4 3 109 mm maximum Length 300 meters Printer Accessories Use these part numbers when ordering parts Description Part Number Centronics Cable IEEE 1284 B to 25 pin male 118363 Serial Cable 6 DB 9 pin male to DB 9 pin female 300017 0...

Страница 47: ......

Страница 48: ...Visit for sales service supplies information and telephone numbers for our locations throughout the world TOLL FREE 1 800 543 6650 In the U S A 1 800 363 7525 In Canada www monarch com ...

Отзывы: